As a rule, when it comes to the presentation of baits, and even more precisely, about the leashes that we make for bottom fishing for carp, many anglers (regardless of their professional level) have the same problem on their minds. That is, at some “wonderful” moment we unexpectedly (for ourselves) understand that, after all, we are not getting one hundred percent results from tying our carp rigs.
And then we justify our failures - either because of the illiterate choice of place for fishing, or because of “uncatchy” weather, or because of fishing pressure, or other “excuses.” In general, by hook or by crook, we try to deny our helplessness in creating such equipment that is guaranteed to catch carp! And all this happens against the backdrop of what already exists in the world - simply a huge assortment of products for carp fishing and the widest selection of all kinds of “tricks” and “new products” for fishing.
Naturally, having carefully read many books and articles (from famous carp anglers), in search of the best equipment for carp fishing, we find “something”! After which, we assure ourselves that this particular equipment is the best (specifically for our situation on the lake). But then – with our own brains we completely refute this information, after the very first carp session!
So, starting from scratch or returning to the simplest installations is the best way to competently master the intricacies of creating leashes (for carp fishing). Only after thoroughly studying and successfully using the simplest leashes a hundred times in practice, you will be able to understand for what situations on a pond you need to tie more complex carp rigs (or use more complex leashes), and how to do it correctly! In this case, there is no need to even try to jump “above the navel.”
Personally, I think that modern carp anglers are overly spoiled with too wide a range of carp equipment. And even more precisely - a huge selection of all kinds of “small things” presented in the windows of fishing stores. For example, today you can easily find hooks of virtually any size and shape, or you can purchase leader materials of any structure and degree of rigidity. Moreover, there are a lot of swivels on the shelves - with enlarged rings, models for quickly changing the leash, etc. In general, today we can purchase almost everything that is necessary to create carp equipment for any situation on a pond!
However, with such a wide choice, it is very easy to make a mistake, for example, using completely incompatible things at the same time. As a rule, after we cannot resist the temptation to “shove” somewhere a new product that we bought recently, after its gorgeous advertising in many magazines. I am completely sure that if all beginning carp fishermen, during the first 2 months of fishing, did not “be smart”, but bought a couple of hooks (of the same variety), and also purchased only one type of leader material, then they would catch a lot more carp. And also normally (and much faster) mastered all the necessary basics of carp fishing!
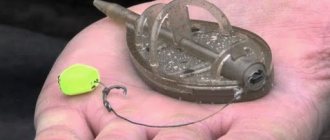
The most simple knotless “design” of a hairline installation contains almost all the mechanical principles of operation and the “sensing ability” of equipment that every carp angler needs to know!
Hair rig
What is the most important meaning of hair rigging? It is precisely in attaching the bait to the hook in such a “cunning” way that the latter’s tip does not close, and the bait itself is able to move naturally and freely. When carp suck up our bait, by the way, just like any other type of food, then, as soon as they feel the “resistance” of the sinker, they try to get rid of the potentially dangerous food, i.e. in fact, they immediately spit it out. And, just at this moment, the sting of the hook is “notched” in the lower lip of the fish. That is, in essence, the carp “self-hooks” - both under the weight of our sinker, and under the weight of the bait located below the hook, as well as due to the “spitting force”.
If the hook was bad, it may mean that the “hair” was too short and the carp was not able to “suck” the bait deep enough before spitting it out sharply (and powerfully). Continuous observations of the place/position of the hook in the lip of the carp will help you analyze the situation normally and choose the most optimal length of the “hair”. The ideal place/position of the hook in the mouth of a carp is considered to be the central part of the lower lip (approximately half an inch deep). Depending on the nature of the reservoir, the characteristics of the bottom topography, the specifics of the food supply, as well as some nuances of the carp’s feeding behavior (on a particular lake), the length of your “hair” should be selected. That is, taking into account all these important factors.
Carp hooks
Also, it is definitely worth noting that each equipment has its own hooks. Most modern carp hooks are special models, usually designed for strictly specific situations or for any specific carp equipment. The design of making hooks for carp fishing can differ in many characteristics, the main of which are the so-called “total length of the forend” (the distance from the eye to the lower point of the hook); “the width of the hook” (i.e. the lower “bend” of the hook) and the thickness of the material (from which the hook is made). Of course, thinner hooks are designed for catching “regular” fish in the simplest bodies of water, and thick (and super/strong) hooks are designed for fighting trophy fish in more complex ponds and lakes (i.e. with snags, algae, etc. underwater obstacles).
What is the main task of a carp hook? Essentially, it consists in ensuring that precisely at the moment the fish spits out (our bait), it instantly turns with its sting down and immediately bites into the lower lip. Judging by personal practice, hooks that have a short shank and more rounded shapes (the so-called “curved style” of manufacture) unfold perfectly and are reliably hooked into the lip of a carp. Personally, I would advise beginners to start their journey in carp fishing with these types of hooks. The best option is the relatively new “SSBP Armapoint” series from the purely “carp” company FOX.
How to attach boilies to tackle?
After the first three stages, namely choosing a reservoir, preparing boilies and tackle, it remains to understand exactly how to tie boilies onto the tackle. Using a thin needle, make a hole in the dough bait, and then attach it to the leader that you previously attached to the main fishing line.
Important! Do not attach the boilie to the hook, this will scare away the carp!
Carp is a very cunning fish that will immediately understand what is happening. The subtlety of preparing boilies is that the leash should descend approximately from the center of the hook shank. To do this, pass it through a cambric pre-installed on the hook. This will double the reliability of hooking fish. The length of the leash should be twice as long as the length of the boilie itself.
A beginner in fishing can easily figure out how to knit boilies and then apply this technology in practice. It is important to remember that for fish of the carp family, first of all, it is not the color or smell of the proposed bait, but its nutritional value. The carp will immediately understand that this food will not satisfy it and therefore simply will not touch it. The ingredients for the boilie should be saturated with fats, proteins and carbohydrates.
However, if your goal is short-term success, flavorings are also suitable. Over time, the fish will get used to your new baits and in the future you will always leave the pond satisfied after using tackle with boilies.
Having familiarized yourself with the technique of knitting boilies, feel free to take on practical classes to consolidate the skills you have acquired. Boilies for carp fishing are versatile and valuable equipment for both experienced fisherman and beginners.
The hook is selected in proportion to the boilie, single, made of thick and reinforced wire, well sharpened, with a shortened fore-end.
Boilies are sold in special stores of different types, sizes, tastes and colors. There are also many different companies, the quality of the product itself and the price category. But some fishermen prefer to make them themselves at home.
Binding components can be chicken or quail eggs, honey, gelatin, wheat gluten, corn syrup, beet molasses, etc. Some of them have a good smell.
[THERE IS AN ANSWER] How to catch carp with boilies in a pond
Natural products can also act as odor enhancers, for example, fish oil, vanillin, essential oil extracts and a variety of aromatic spices. For plasticity, glycerin, fruit syrups, and honey are used.
The main components in the preparation of boilies are flour, eggs, crushed cereal, food coloring and flavor enhancers.
Cooking steps:
- The eggs and liquid ingredients are mixed well, separate from the dry ingredients.
- Everything is combined and mixed into the dough. Eggs can be added until the dough becomes elastic. dense and it should not stick to your hands.
- We form sausages from the dough, which we cut into small pieces of the required boilie diameter.
- Heat treatment, cooking, microwave or freezing is everyone's choice. but you also need to take into account some nuances, such as cooked boilies become loose, become limp faster and hold their shape less, and can also float.
The hard bait is attached to the shank of the hook. This equipment is universal.
Drive materials
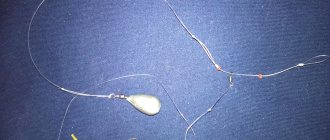
And finally, the last important element for creating catchy carp equipment is a leader, for the manufacture of which you can use leader materials produced in 3 main varieties: soft braided (without a shell), soft braided (with a shell / braided) and hard (nylon or fluorocarbon). Naturally, without taking into account the “sophisticated” combined manufacturing options (for more sophisticated carp anglers).
Sufficiently hard nylon can work just as well as soft braid, while actually using the same carp rigs. Using soft braided materials (sheathed/braided), you can always “remove” the abrasive/resistant coating, and as a result get a soft section that ensures normal mobility of the nozzle against the background of the remaining (harder) part of the entire leash. I assure you that in some situations this must be done! Since carp can feel both the resistance of a hard leash and the “weight” of the sinker, without having yet fully “sucked in” the bait.
Some anglers pay too little attention to the length of the leader. And this is in vain! Since it is this “characteristic” that greatly influences the “detecting ability” of the entire equipment as a whole.
Too long leads lead to insufficient resistance of the “classic” sinker (weighing 3 ounces), thereby providing the opportunity for the fish to easily get rid of the hook. As soon as they feel the prick of the hook, the carp begin to turn their heads violently, and this leads to the fact that the puncture site of the lip increases significantly, which is why the hook falls out. In turn, a short leader is able to provide direct contact between the hook and the sinker (with virtually instantaneous resistance from its 3-ounce weight). In itself, lengthening the leash will be a rational solution only in cases where carp take the bait very carefully, “checking” its natural mobility in advance. Thus, if your “weak” bites do not transform into confident “locomotives” for a very long time, then you should seriously think about the length of the leash. Be sure to change it and compare the new result with the previous one.
In-depth study and thorough understanding of the BASICS of creating leashes and carp equipment (in general) ultimately lead to the fact that the carp angler begins to BELIEVE in his equipment. And this is one of the main aspects of carp fishing! Personally, in 95% of cases I am quite satisfied with the use of only 3 carp rigs: with a single bottom boilie, with a single Pop-Up and, of course, a “snowman”. All these 3 rigs are knitted from identical materials and work successfully - in fact, according to the same principle.
Practical part (step by step instructions)
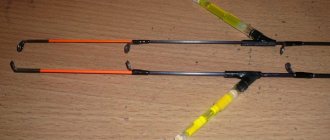
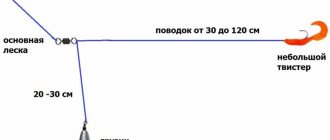
1) This photo shows everything that is needed to make leashes of 3 varieties.
2) Remove 5 inches of braid (i.e. approximately 13 cm) from the leader material to rig with a 15-16 mm bottom boilie. For the “snowman” rig, we remove the braids a little more. At the far end of the piece of “bare” material, we tie an ordinary knot.
3) Using a special boilie needle (personally, I use a needle from FOX), carefully place our 15 mm boilie on the “hair”.
4) Next, we attach a stopper so that the boilie stays securely on the “hair”.
5) At a distance of 1 inch (approximately 2.5 cm) from the boilie, tie a micro ring (“Rig Rings Micro”).
6) After which, through this ring we thread a hook (number 8). Personally, I believe that the use of micro-rings provides the bait with much greater “freedom of action”, thereby significantly improving the “sensing ability” of the entire equipment.
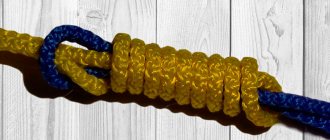
7) Directly through the eye of the hook - we thread the “free” end of the leader so that we can then tie a “Knotless Knot” (i.e. without a knot).
First, we make 6 turns around the shank of the hook, and then again we pull the end of the leash through its eye.
9) And, in the end, we securely tighten our knot.
10) Using scissors (or other tools), cut a piece of heat/shrink tubing (1 inch or 2.5 cm long)
11) Then, we put this segment on the leash and pull it onto the resulting knot. Thanks to a piece of heat/shrink tube, the hook (in the carp’s mouth) will unfold.
12) At the other end of the leash - we also knit a knot and tighten it securely, only this time using a special device (for example, from the FOX company).
13) A few inches from the hook (on the leash) we make 3-4 turns from the “core” of the leader.
14) We cover these turns (from the “inner part” of the leader) with soft lead (or fishing tungsten putty).
15) This will normally press the leader to the bottom.
16) Taking precautions, carefully place our piece of heat/shrink tube under the hot steam to give it the required angle.
17) As a rule, there are several nuances in Pop-Up montages. One of which is the distance of 2-3 mm from the ring on the hook to the boilie.
18) The next nuance is to increase the length of the heat/shrink tube section by 2 times and attach an additional “weight” (in order to provide some kind of “counterweight”).
19) This photo shows 3 fully finished leashes.
By actively using the leashes described above (of 3 varieties), I managed to catch literally hundreds of carp! With continuous self/training, I achieved better results until I gained confidence in my rigs. As of today, I very rarely think about leashes, because... mine work perfectly. They catch fish perfectly not because of their “design”, but because of their simplicity, reliability and durability!
... almost a "ten" ... a confident "twenty" and, finally, a "thirty"!!
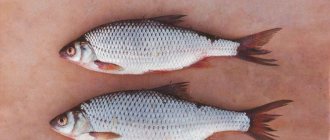
The photo shows 3 different carp that I caught in 3 different bodies of water. What do these photographs have in common? All 3 fish were taken on the snowman rig! Of course, sometimes situations arise when it is necessary to use more complex leashes (and equipment). However, 90% of the time (in all my fishing sessions), the very first thing I do is take out the ready-made leader. And, just the same, one of the 3 that I told you about a little higher in this article. I sincerely hope that I will publish a new article about montages very soon. In the meantime, smile more often, enjoy life and enjoy carp fishing!
Publication author
offline 7 months
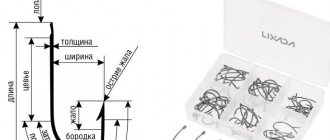
Main characteristics of leashes
When making a leash, the main parameters should be taken into account:
- Strength , which directly determines whether the leash will withstand the fish caught on the hook.
- Elasticity . It is necessary to take into account when using light baits for the greatest efficiency in performing their assigned functions.
- Color . The most acceptable leash is green, but can be silver or brown.
- Thickness _ The choice should be average. With a thick leash, the load on breaking the line will increase. If it is too thin, the wiring of the bait will not be of high quality.
- Resistance to abrasion and stretching . Such influences should not affect the leash.