The topic of the page is devoted to washing bloodworms yourself with a device specially made with your own hands for this purpose, which I personally have faithfully performed its functions for many years.
True, the scoop for washing bloodworms is currently in the possession of a friend, or perhaps one of his acquaintances. Therefore, in the text of one of the articles I included a graphic image of it that is more legible for illuminating this topic.
I hope that a detailed description of the technical process of making a scoop with your own hands and the rather difficult process itself associated with washing bloodworms with your own hands will bring at least some benefit to some of the fishermen.
How to wash bloodworms yourself
The question “How to wash bloodworms for yourself?” may be of idle and purely educational interest to many fishermen.
But the problem of how to catch bloodworms from one mine all winter, so that there is enough for fishing for yourself and a couple of friends, may currently be of more concern to rural children.
True, during the years of “decaying socialism”, we, the indigenous inhabitants of the urban khrushchebs, often had to wash the bloodworms ourselves. There were never enough mosquito larvae in stores selling fishing supplies for everyone who wanted to purchase this tasty product for fish (especially in the spring). And there were reasons for this.
Fishing tackle and bait, like gasoline, then cost mere pennies. Those who wanted to work had normally paid jobs, and the state seriously fought against poachers.
As a result: the fish have not yet been predatorily scooped out of the reservoirs. Therefore, there were incomparably more people who liked to freeze their noses during winter fishing, as well as when washing bloodworms on their own.
In addition, bloodworms washed somewhere in a neighboring republic or region arrived in our stores by plane, to put it mildly, not of very good quality.
Therefore, at the end of March, they always washed the bloodworms themselves, using one mine, prepared with their own hands from scratch, to the fullest, choosing from it when washing the bloodworms cleanly for a decent number of fishermen.
The length of time spent on washing the bloodworms yourself depends on the infestation of the reservoir with larvae and on the convenience of washing. Therefore, in order to wash 3-4 dozen matchboxes of bloodworms in reservoirs that are not very rich in these larvae, it can take almost the entire daylight hours in winter.
You can read below about how to wash bloodworms yourself using our method. For fishermen from rural areas, I can offer an idea on how you can catch bloodworms all winter from one ice hole, without working your ass off each time cutting down a new hole.
The best places to find bloodworms
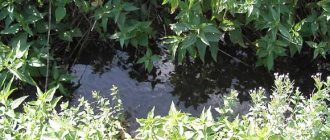
It is advisable to stake out (find) the best place for washing bloodworms on your own before the freeze-up from the boat or on the first, but strong ice.
A test soil sampling can be done with a tin can nailed to a light pole. Then the bloodworms are washed in a small area with curved sides at the fence site. A small lane can be broken through with an ice pick.
The best places for washing bloodworms with your own hands in winter are considered to be silted closed reservoirs, large bays and backwaters of rivers and streams.
In this case, the lake or dam should not be heavily stocked with fish, otherwise the bloodworms will be significantly eaten away by fish by spring. In addition, the place where you can wash the bloodworms should not be too deep. The best depths in terms of convenience and prospects for washing bloodworms from one place all winter will be about two meters.
Everyone understands the wishes regarding the abundance of bloodworms and the cleanliness of the bottom of the reservoir. But I’ll explain why the depth to the bottom under the lane for the convenience of washing bloodworms should not be too small and not too large.
The fact is that with greater depth in the place where the bloodworms wash themselves, we will have to manage a very long pole, and even a heavy (filled with silt) scoop on its butt.
(Only Kolya Valuev can operate such an “excavator”. But, to our great regret, lately this powerful man has been very busy on television in the roles of an advertising clown. So we are unlikely to get help from him in the matter of washing bloodworms any time soon .)
If we periodically wash bloodworms on our own from one place in a body of water that is too shallow, then from a shallower depth we will only be able to scoop up silt near the lane. We simply won’t be able to get the bucket far under the ice, especially under thick ice at the end of winter.
In the case of a well-chosen place with a relatively long pole, you can independently lift 40 silt from the bottom of the scoops, although for one or two fishing trips it will be enough to scoop up the dirt only a couple of times. We leave the remaining sections of the bottom of the reservoir with unwashed bloodworms for subsequent fishing trips in the coming long winter.
Then, by renewing the mine once a week, you can wash bloodworms from it throughout the winter in the required quantity. And the place chosen for washing the larvae should be marked along the edge of the ice hole with poles, which will not interfere at all so that someone here does not go under water.
Agree, washing bloodworms with your own hands all winter from one place, covered with thin ice, still does not mean chiseling a meter thick layer of ice every time in the middle of winter before each washing of the larvae.
It is better to look for an area suitable for washing bloodworms in the summer. This place should be either stagnant or weakly flowing and well silted, with a flat bottom without a large slope.
Visually find a place where you can quickly wash up bloodworms, orient yourself along the coastline. If the shore of a reservoir is sandy, then it is unlikely that such a reservoir will have a layer of silt sufficient for a large accumulation of larvae. In such a place we won’t get anything other than golden sand. But we didn’t come to the pond for despicable metal.
Next, interested fishermen can get acquainted with the method of washing bloodworms with their own hands throughout the winter.
How to prepare bloodworms
In winter, the use of high-tech modern gear is very difficult, and that is why fishermen prefer to use bait in the form of various live baits. These are, as a rule, mosquito larvae and other small things that can attract the attention of redfin fish with a rather moderate appetite at this time of year due to the lack of desire to leave the relatively warm regions of reservoirs near the bottom.
Beginning ice fishing enthusiasts have questions about how to prepare bloodworms in the evening. The answer to this is simple: first of all, you will need a container made of foam material for storing various types of materials, visually reminiscent of foam plastic.
This container needs to be treated with iodine. You can take a simple iodized pencil, which costs mere pennies in almost any pharmacy, and draw a grid on the inside surface of the box. Next, lay out the larvae exactly in the quantity that you will need the next day.
The point is that the jig will already be attractive to the eyes of the river striped robber, but overnight it will infuse and become saturated with iodized smell, which will make its “popularity” among the perch increase several times!
Before baiting the hook, we take the bait out of the cocoon. Externally, the caddisfly is similar to a large maggot, but a little larger and with a more pronounced head. You can bait the larva near the head, but, in my opinion, it is better in the middle of the body.
In the vast majority of winter, anglers fish with jigs and know that the catch is influenced not only by the technique of the game, the selection of bait, but also by the choice of the right bait.
In addition, bait can only successfully catch one specific fish. Let's say, sometimes there are days when the chebak or dace do not favor bloodworms, so give them maggots. But perch and ruffe are practically not taken on plant baits, and thus they can be quite easily weeded out when catching other fish.
Even from these most obvious facts we can conclude that a competent choice of bait largely determines the success of fishing.
Bloodworm
Before you lower the bait bloodworm into the hole, you need to cool it a little so that it is not too mobile, then it will not burrow into the bottom soil so quickly. Some people suppress it in their palms, but I seriously doubt that this is a more effective method than cold.
The bloodworm must be hooked by inserting the sting of the hook into the body of the larva towards the darker head than the tail, or, if the bite is very weak, in a ring, piercing both the head and the tail. It is important not to crush, but to pierce through so that the body remains intact. You can put two or three bloodworms on the hook at once. For bream, you can make a larger bunch: 3-5 bloodworms.
Maggot
The name of this larva comes from the word “dough” - this is a dough that, after standing in a warm place, increases in volume. So the larva increases in weight by more than two hundred times in a week.
Maggot is a good and strong bait. If you can catch the same with bloodworms and maggots, then it is more practical to fish with the latter - you need to change the bait 2-3 times less often, and sometimes the fishing speed is a decisive factor.
After bloodworms, I consider maggots to be the second most important bait for jig fishing. A universal bait for catching any fish. In recent years, maggots have appeared in a variety of colors and smells. It’s a matter of each fisherman’s taste as to which maggot to choose for fishing, but it’s better to take several colors at once, in case the fish likes one more.
In Europe, maggot is the most common bait for catching almost all types of fish. All maggots offered for sale in Europe are grown from fly larvae imported from Kenya. Food coloring of red, green, yellow or brown is added to feed consisting of chicken broiler processing waste to obtain marketable larvae of the appropriate color.
It is better to store maggots in a box somewhere in the inner pocket of your jacket. But this does not mean that the bait is afraid of the cold; it all depends on what kind of maggot you have. If this is a special technologically diluted maggot, then it will come to life both overheated and supercooled, while an ordinary one can withstand freezing only once, the first and the last.
Tips for fisherman: How to properly fish with a balance beam in winter - How to best use
An ordinary maggot in a warm place will soon pupate, but a frozen one will, of course, defrost, but it will also die very quickly after that, and you won’t be able to use it a second time. Maggots that have turned into brown barrel pupae are called casters. The fish bite on them worse, but they can be added to a “sandwich” (white maggot and red-brown caster) or used for bait.
The maggot is baited by the head so that its tail moves actively. You can put 2-3 maggots on the hook at once. It is good in a “sandwich” of maggots. There is also a nuance that is worth paying attention to: often the fish begins to perceive the bait for size, and then you need to look for the smallest and fastest maggots and put them on the hook one at a time. It would seem like a trifle, but more than once it was a decisive factor.
Worm
I have noticed that our Siberian chebak often bites on a worm with greater pleasure in the middle of winter than on bloodworms or maggots. Knowing this fact often comes in handy when you need to catch live bait and, of course, chebak.
What's bad about a worm for winter is that it doesn't like the cold. Therefore, it must always be kept warm. In addition, if you have a home-grown worm, before fishing you still need to prepare it, that is, get rid of the smell of rot and earth. The easiest way is to leave the worms overnight in a container with dried tea (tea leaves). If you stock up on sand in the summer, you can clean the worms by keeping them there.
We usually put a piece of worm (tail or head) on a standard jig. It may not look any more appetizing than a bloodworm, but the worm bleeds more and emits stronger odors that attract fish. It’s impossible to list all the nuances, and you get many answers to questions directly while fishing.
Chernobyl and burdock
These larvae live in the stems and fruits of plants, and this is not only burdock and Chernobyl, but also burdock and other large plants. The larvae live inside these plants all winter, and they can be collected immediately before fishing. Some fishermen prepare stems with larvae in the fall and store this bait in their closet.
When fishing, you need to store the larvae especially carefully so that the leftovers will be useful on your next fishing trip. And if you do happen to freeze the larvae, then you still need to put the box in which you stored them while fishing in a cool place—they will withstand one more defrosting.
In appearance, the burdock is not so different from the maggot, but who, the fish, knows why it often makes a choice between two seemingly identical larvae in favor of one. There are many examples of this - again, let’s remember how often when fishing a fish takes a dung worm, but ignores an earthworm.
As is the case with all larvae, when baiting a burdock moth on a hook, it is better to catch it on the skin near the black dot on the head.
Caddisfly
Both in winter and summer you can find this bait on the shelves of our Siberian fishing stores. Caddis flies are the larvae of various butterflies. But we call them all caddisfly, since their general structure is the same - it is a larva living in water inside a cocoon. It can be made from a variety of natural materials: sand, plants, twigs and foliage. And the colors of a caddisfly cocoon can be completely different.
The caddisfly is an attachment that does not always produce results everywhere. You just need to have it with you so that sometimes it works one hundred percent. It happened more than once that when fishing with caddis flies, much larger perches were caught than were previously caught with bloodworms or jigs.
Before baiting the hook, we take the bait out of the cocoon. Externally, the caddisfly is similar to a large maggot, but a little larger and with a more pronounced head. You can bait the larva near the head, but, in my opinion, it is better in the middle of the body.
Mormysh
Mormysh and jig are twin brothers, at least outwardly. But, for the most part, we use jigs only for feeding fish. Attempts to catch only with jigs brought results, but significantly worse than with bloodworms and other baits. I think that a lot depends on the region and even a certain body of water in Siberia, because this aquatic amphipod does not live everywhere and not in the same quantities.
Having poured a bunch of jig onto the bottom of the reservoir, under the hole you can watch how it begins to swarm and crawl to the sides, which attracts fish to your fishing spot. Even if the fish does not want to bite off the jig, it will still hang around in this place and sooner or later it will grab one of the offered baits. But as a bait, mormysh has no competition and in combination with other baits gives good results.
Victor Kovantsev, Tomsk.
Did you like the article? Subscribe to the channel to stay up to date with the most interesting materials
When was the last time you caught dozens of HUGE pike/carp/bream?
Scoop for washing bloodworms
Before you try to wash bloodworms in your favorite pond, you should use something to lift it from the bottom. For these purposes, we tried different shapes of scoops in the form of a ladle. And they left only two scoop designs: square and the one shown in the drawing below in the text.
First, a few words about the square-shaped scoop for washing bloodworms. The ladle has the largest grip; with this scoop you can wash bloodworms faster if there is a thin layer of silt at the bottom.
But moving a washing unit with a square base shape in a thick layer of liquid mud is a rather labor-intensive task.
In addition, for a square scoop, it is more time-consuming to manufacture a washing mesh - the main component of the device for washing bloodworms.
You have to cut out 4 small identical squares in a piece of rectangular mesh at the corners, then bend the scoop mesh in the form of a square box again, and then sew the corners of the scoop with thin wire.
Then, according to the size and shape of the resulting mesh bath, in which the bloodworms will be washed, a supporting square hoop is bent from a thick (5-6 mm) wire and the curved mesh of the scoop for washing the bloodworms is screwed to it with a thin wire.
The technical process for making a scoop, which can be used to scoop up sludge and wash bloodworms, is described more fully below. But since fishermen have to use a round-shaped scoop to wash bloodworms, it is this that will be disassembled here.
I'll repeat it again. If there is enough silt at the bottom of the reservoir, then washing bloodworms in winter will be more convenient and faster using a scoop with a round wire ladle.
Design of a scoop for washing bloodworms
The supporting structure of the scoop, which serves to collect sludge from the bottom and then wash bloodworms, is bent from thick (5-6 mm) wire. Let it be a round rim with a diameter of 30-40 cm for winter.
The size of the scoop depends on our physical strength, as well as on how quickly we need to wash the required amount of bloodworms.
But I don’t recommend making the base of the washing device too large in diameter. Washing bloodworms in winter using a heavy ladle is very hard work.
Not only is it more difficult to scoop up the silt at the bottom of a reservoir with a bulky scoop, but using a large device is inconvenient and difficult to wash out bloodworms from the silt in the lane.
Scoop bucket for washing bloodworms
To make a bucket that serves not only for washing bloodworms, we take a strong mesh made of any metal with a cell size of 4 to 6 mm (we use buckets with steel meshes) and bend it into the shape of a sphere. You can shape the mesh into a soup ladle.
Just keep in mind: the deeper the ladle, the more soup you can pour into your plate at one go, but the harder it will be to carry the brew to the table.
Next, a curved sphere of a mesh bucket is placed on a supporting base bent from thick wire, in which the bloodworms will subsequently be washed. Then we cut the mesh around the perimeter of the wire rim in such a way that there is a side along its entire circumference, sufficient to bend the mesh around the round base.
The remaining allowance of the ladle mesh is wrapped around a ring of thick wire. And so that we don’t worry that the bottom of the bucket might fall off when washing bloodworms, we also attach the mesh to the perimeter of the wire base with a thin, strong wire. But for this you will have to work hard, since the fastening wire will need to be pulled through the mesh cells.
The pole of the device for washing bloodworms
We cut down the pole of the device for each bloodworm in the winter on the shore of the reservoir. But the guys from rural areas have the opportunity to keep the pole at home. Then the pole will dry out, losing a lot of weight before the next wash of bloodworms.
The recommended length of the pole depends on our physical capabilities, the thickness of the ice, the dimensions of the lane and the depth of the reservoir in the place where the bloodworms are washed.
For example: with a reservoir depth of 1.5 meters and ice half a meter thick, we don’t need a too long pole, which we still won’t be able to get far under the ice even in a relatively large ice hole.
It is advisable to cut the pole out of a dry pine pole. And the best solution would be if you don’t have to disassemble the device for washing bloodworms at all.
Winter bloodworm prey
Extraction of bloodworms with a string
String mining involves the use of a device in the form of a frame attached to a pole. The size of the frame will depend on the size of the hole. The frame is wrapped with fishing line at least 1 millimeter thick with the distance between the strings no more than 2 centimeters. The extraction of bloodworms occurs in the following way: the frame is lowered to the very bottom and moved along it, thus the bloodworm located in the silt is caught on the fishing line.
Using a bucket when collecting bloodworms
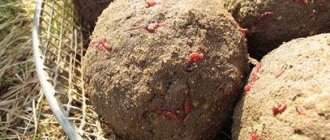
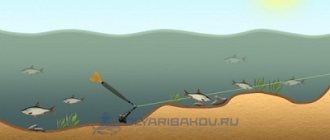
This method is one of the simplest with a minimum of equipment. All you need is a bucket and a lighted fire. The principle of this method is as follows: a bucket is lowered into the water, silt is scooped up from the bottom, and then the bucket with silt is placed on a fire made in advance. When the water heats up, the bloodworm larvae will begin to rise to the surface, from where they can be easily collected.
For meat or fish
This method is the slowest in obtaining bloodworms. A piece of meat or fish is wrapped in gauze to form a bag that resembles a bag. This bag is tied to a rope or cord and thrown into the water. The next day he takes it out and unfolds it. In this bag, in addition to a piece of meat or fish, bloodworms should be found. This method is not common among fishermen, but in ancient times bloodworms were caught in this way.
A depth gauge is needed to determine depth, search for holes, and study the bottom topography. A weight or a feeder on a cord can handle its function. For convenience, tie knots every meter.
Firstly, ice is a potentially dangerous place. Do not go out on the ice if its thickness is less than 6 cm (ideally more than 10 cm). When planning winter fishing, keep in mind that in calm weather, 2.5 mm of ice freezes for every degree below zero per day. For example, at -8 degrees, 2.5 x 8 = 20 mm = 2 cm of ice will freeze per day. Bring a partner with you, you may need help.
Secondly, the risk of hypothermia. Frost is the main limiter for novice subglaciers. But we knew that it wasn’t summer outside, we could handle it!
What are the advantages and disadvantages of winter fishing?
Winter fishing is an exciting, exciting and dynamic process.
You can walk on the ice to any place, to any depth of the reservoir, and fish in the most inaccessible fishing spots.
There are types of fish that can only be caught in winter, for example, whitefish, smelt, burbot.
There is no need to throw gear far. The fisherman is in complete control of the process.
Fishing without bait - a reelless method - is possible only in winter. This is an interesting and complex, even masterly method; it is not easy to learn. But you probably won’t return home without a catch.
Minus Celsius will naturally lead to freezing of the hole and freezing of ice on the fishing line. With experience in fishing comes the skill of conquering the cold: your hands will get used to deftly moving the tackle, you will learn how to protect the hole from freezing.
Additional equipment is required: tackle and attachments, an ice auger, a fishing box, a tent with a stove and much more. But once you buy everything you need, you can easily devote time to your favorite activity.
Many fish hibernate in winter, so species diversity is somewhat less than in summer. And in the dead of winter, some fish completely lose interest in bait. There are ways to stir up lazy fish, and this only increases the excitement
Tips for fisherman: How to properly fish with a reelless reel in winter - Choosing the best
Thoughtful preparation will help you choose the optimal equipment, equipment, accessories, and take into account important details.
Clothes are multi-layered. The bottom layer is natural underwear or thermal underwear. The next layer is a fleece or wool set, a woolen sweater with a high neck. The top layer should be windproof and waterproof, but at the same time wick away moisture and not restrict movement. A jacket made of membrane fabric is preferable: it will protect from wind and snow and allow sweat to evaporate. Choose a mid-thigh model, always with a deep hood.
Prefer pants with straps - overalls - this will allow you to squat and bend over and over again without freezing your lower back.
Shoes - boots made of waterproof material, for example PVC, with an inner woolen boot, with high non-slip soles, or special boots. Wool felt boots with high rubber galoshes are not bad.
A cap. Some experienced fishermen prefer earflaps coated with waterproof fabric - they cover the ears and neck. Sports woolen hats with a tight knit are also comfortable. You can put a hood on top.
Comfortable gloves with three cut fingers. You can wear mittens on top. Bring spare gloves in case you get wet.
The knife is multifunctional and scissors should always be in the drawer.
A flashlight is needed for night fishing. The LED headlamp is convenient - it “looks” in the same direction as you, and your hands are free. Take a spare set of batteries; they discharge faster in cold weather.
A depth gauge is needed to determine depth, search for holes, and study the bottom topography. A weight or a feeder on a cord can handle its function. For convenience, tie knots every meter.
A dry cloth or towel to wipe wet objects and hands and prevent them from becoming icy. Put it behind your boot, it will always be at hand.
Mothworm for live bait. It could be a foam box, a birch bark box, or even a matchbox. In the inside pocket of your jacket, your worm and maggot will be warm and will remain active and attractive to the fish.
Metal mesh with handles - for catching. A plastic bag will not work due to its fragility at sub-zero temperatures.
Metal feeder in the shape of a cube or cone.
Yawner and extractor for opening the fish's mouth and removing the hook when swallowing it deeply.
Container for live bait. There is a large selection of special containers (cannes). For the initial stage, a 6-12 liter plastic bottle with a handle is also suitable.
Interesting little things that will make fishing more comfortable: salt heating pad, heated insoles, knee pads (useful during active fishing when you have to stand near the hole).
Recipe for a special ointment. You will often have to take off your gloves and be without them for a long time. There are special winter creams that are sold in pharmacies. Many winter residents like a homemade remedy: 70% goose or pork fat and 30% petroleum jelly. The composition has a water-repellent and warming effect.
So, we have theoretically familiarized ourselves with the features of ice fishing, the bottom topography and the species composition of the fauna of the reservoir, we have chosen a place and time, it’s time to start practicing.
If you don't bite, look at your neighbors! If other fishermen are scurrying back and forth and drilling new holes, then the bite is bad for them too. If the neighbors are concentrating on jigs, it means they have found the key to the bite, and you should look for it.
If it doesn’t bite in this hole, drill a few more nearby. Work actively with one, leave the other jigs on duty with different attachments and return to them if there is no bite every 20-30 minutes.
And in order not to freeze while searching for a bite, there are excellent tents with a stove that maintain room temperature, even at -50 degrees.
Experiment with baits and bait.
- The jig involves active fishing - a game.
- A reelless jig is a jig without natural bait.
- Float. This method is more of a wait-and-see approach: we lower hooks with bait into several holes and wait for a bite. Just keep in mind that we overload the float so that it does not freeze into the ice. If the wait is too long, we’ll feed you. More on this later.
- Zherlitsa - catching a predator with live bait.
- Winter lure - with a spoon, balancer and other artificial baits.
Choosing gear and life hacks for catching fish
Each fish has its own “character” and preferences.
Perch is a predator, active all year round. When ice freezes, the fish remain in the coastal zone, among sparse vegetation. Perch prefers water rich in oxygen. Therefore, in the dead of winter, flocks go to the depths, and by spring they approach thawed patches near the shore. To catch perch, we use a wide arsenal of gear: a jig, a float, a spoon, a balance beam and others. The bait is mostly natural. Hunting for perch in different periods of winter differs significantly, but is always interesting and productive.
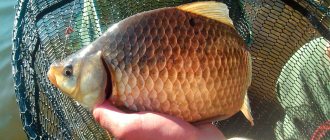
Crucian carp feed sluggishly in winter, but around the clock, love warmth, and often burrow into the mud. We are looking for crucian carp in frosts down to -10 degrees not far from the shore, near the reeds. We fish with a fishing rod using a float or jig.
Roach is caught with a jig (dim and small), with a bait or a reelless bait, or with a float rig; there have been cases of catching with small spoons. Feeds around the clock, prefers shallow places. Needs bait.
Pike can be caught around the clock. Loves the borders of thickets, hunting small things from ambush. It can be found in the narrow channel in front of the bay, on migration routes. We make a chain of holes 130-150 mm in diameter at a distance of 4-5 meters from each other, and catch them with a spoon.
Burbot actively feeds at night (18-23 hours), a predator. It is caught before spawning (late December - January) and in March. We look for burbot sites and trails, for example, near shallow water areas, and catch there. We use jigs and glitter.
We look for whitefish at the edges of holes; they also love surface waters. A schooling fish, its discovery is a matter of chance. We use small spoons, act silently, whitefish are shy.
An ice drill will help us. For ice thickness up to 30 cm, a regular ice auger is ideal. Place it, press it, spin it.
At the moment when water appears in the hole, the ice auger usually comes out below the ice, although the hole has not yet been drilled. You need to lift the drill and turn it to make the hole even in width.
Drill a new hole in a new location because the ice is denser in the old, frozen hole.
The sprat must be of good quality
A fairly catchable bait in winter is a light chicken bait. It holds perfectly on the hook, attracting fish with its aroma. A cow's udder works similarly. and attracts fish with its smell and taste. The pieces need to be cut according to the type of fish you plan to catch.
Pike perch are crazy about sprat. Burbot also respond well to it. Even pike are often tempted by sprat. This small fish should be of a “could-eat-it-yourself” quality. Otherwise, it will not hold well on the hook and fall apart. The sprat needs to be placed with its tail on the hook, and with its head towards the fished object.
The sprat must be of good quality
Brief contents of the review:
Attaching the device for washing bloodworms
An example of attaching the pole of the device to a bucket intended for washing bloodworms in winter is shown in the drawing.
In principle, if you are not going to wash the bloodworms often, then we attach the pole to the device using two staples, on top of which we wind a couple of dozen turns of thin, strong wire.
Therefore, when making a device for washing bloodworms, do not forget to leave two pieces of wire 15-18 cm long in the crotch of the supporting wire ring.
Their ends, approximately 1 cm in size, should be bent towards each other in the form of staples and, when assembling the device, driven into the thick end of the pole.
Although, instead of wire, you can use some kind of coupling to attach the scoop to the pole. In this case, your design will be quickly disassembled.
In principle, a device in which you can lift silt from the bottom of a reservoir with subsequent washing of bloodworms is ready for use.
Scoop for collecting washed bloodworms
I depicted the approximate shape of a scoop for collecting washed up and floating bloodworms in the drawing. The second purpose of the scoop will be to transfer the larvae into containers.
But for the same purposes, you can simply bend a fine-mesh mesh in the form of a one-time small scoop.
If you decide to make a “branded” scoop, then the device can be bent from the side surface of an instant coffee can. In this case, in the lower plane of the scoop, with a thin nail or awl, you should pierce more holes (not like in my picture) to drain the water while collecting bloodworms from the surface of the mynah.
And, as an addition to the scoop, we get hold of a small container (bucket, jar) for storing bloodworms during the period of washing the larvae. The scoop should fit freely into the neck of the container.
Review of ready-made baits for winter
To all baits, no matter ready-made or homemade, you should always add a nozzle and bait with which you are currently catching, for example, a handful of bloodworms.
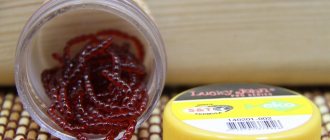
Usually four types of branded Dunaev winter mixtures DUNAEV-READY are used. Here you can immediately mention “ Universal ”. It is usually used on all types of winter fish. The bait is dark brown in color. This mixture resists frost well, that is, it does not freeze as quickly as other mixtures. It also does not spoil for a long time. And this is what is called “rancid” bait, which will not attract fish, but will rather scare them away.
Tips for fisherman: Which balancers are better for perch in winter - What is the difference, pros and cons
The “Motylnaya” bait attracts winter fish very well, but it should be taken into account that along with peaceful fish, predators can also approach the hole. This bright red bait contains about 10% natural bloodworms.
The bait mixture "Bream" has an excellent ability to lure bream to the hole, but there is one unpleasant moment. This ability of this bait may not manifest itself in all reservoirs. This must be verified experimentally.
The bait "Roach" is also universal. It attracts almost all fish, but it contains components with a dusting effect. Therefore, small things can also fit into the hole.
Fishermen are often concerned about how to properly store bloodworms so that the fish will enjoy them for as long as possible. Storing bloodworms at home is quite difficult. It crushes easily, but there are several ways to keep the bloodworm alive. These methods are somewhat similar.
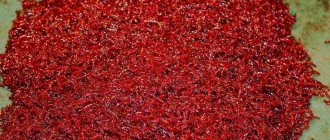
Photo 1. Extraction of bloodworms.
This method is not the only one. Catching bloodworms can be done in a gauze cloth with large holes or in a thin-woven bag. The trick is that you need to put a piece of fish, meat and a weight in the bag that allows you to lower it to the very bottom. After several hours, the bag is removed from the water, and the accumulated larvae are collected by hand.
Experienced fishermen advise how to catch bloodworms on a device such as a string. A fishing line or wire is pulled tightly onto the frame and used to comb the bottom of the reservoir. The strings touch the larvae, and they wrap themselves in rings around them. Then the rings are washed off into a tank or bucket of water. Unfortunately, this method damages many larvae.
When sorting, the bait should be placed in a fine-mesh sieve. Then the sieve should be immersed in a container that is first filled with water. After a short period of time, small larvae will crawl through the cells into the container, but large ones will remain.
At the selected location, a hole is cut approximately 1.00 - 1.50 x 1.00 - 1.50 meters. The hole can be cut with a sharp hatchet. During the cutting process, the resulting crumbs are immediately removed from the future ice hole. Until the edges are cleaned, water should not be allowed to enter the hole. If the water rises, further cleaning of the ice hole becomes an unpleasant task. For such circumstances, it is necessary to provide a tool like an ice pick.
Preparing a place for washing bloodworms
Preparing a place for washing bloodworms in winter includes clearing the snow in the place where the lane is cut down and the area where the scoop pole is used. But from the beginning we decide on the location of the ice hole.
For one-time washing of bloodworms, it is better if the water depth to the bottom of the reservoir does not exceed one and a half to two meters. In this case, the length of the pole of the device for washing bloodworms can be limited to 3-3.5 meters.
Next you need to think about the size of the lane. The fact is that the thickness of the ice in the place where the bloodworms are washed may turn out to be decent, and all the cut ice from the ice hole will have to be removed. Otherwise we simply won’t be able to scoop up the silt with a ladle.
In this case, we are not talking about pulling the cut ice out onto the virgin soil next to the ice hole - this is simply physically impossible to do. The ice floe will have to be sunk and driven as far as possible beyond the edge of the lane under the ice field. It will be very difficult to do this alone.
Cutting out a myna to wash bloodworms
The mine in which you can wash bloodworms can also be prepared in different ways. One of them is to cut it out with a pick, push a piece of ice under the ice, remove crumbs of ice from the surface of the water with a ladle and start washing the bloodworms. A very labor-intensive and time-consuming method.
We do things differently. In the corners of a rectangle with sides approximately 1 meter by 70-80 centimeters, drill 4 holes with an ice drill. Then, using a hacksaw with a long blade, we cut out the ice, connecting the drilled holes with through cuts.
In this case, the operation to prepare a mine suitable for washing bloodworms in winter takes much less time. During operation, the plane of the hacksaw blade must be deviated from the vertical so that the lower edges of the lane are larger than the upper ones. Otherwise, the cut ice simply will not fit into the hole when it is melted.
If it is difficult to handle a whole piece of ice, you can cut it into small pieces. To do this, a through hole is drilled in the middle of a sawn block of ice with a drill and from it a monolith of sawn ice is cut into pieces with a hacksaw.