The float rod remains the favorite of most anglers, regardless of the spread of more advanced gear. And fishing with this type of gear is very popular at any time of the year. But in addition to the fishing rod itself, it is necessary to select the right equipment for it, which will guarantee the fisherman good catch.
The difference in winter and summer fishing gear is simply huge and has several distinctive characteristics. For example, pay attention to the most important part of a float fishing rod - the float.
Such small gear also differs depending on the season of its use and in winter a special type will be required.
Winter floats, as can be seen in numerous photos on the Internet, have differences among themselves. These are the features of catching this or that fish, and the size of the float itself.
It is for these reasons that you need to carefully select a float for winter fishing. We will talk about how to make the right choice and equip a fishing rod in this material.
Float winter fishing rod: equipment
A winter fishing rod with a float for fishing must be specially equipped. Since fishing conditions are more severe than in warm weather, it is necessary to prepare for the process more thoroughly.
There are several equipment options:When fishing in a body of water with a current, you will need an ordinary lead sinker and one or two hooks. The sinker sinks to the bottom of the reservoir. In order for fishing to be effective, the distance from the sinker to the hook must be at least 5-6 centimeters.
Read here Fishing with float rods - a step-by-step description and video master class on fishing with a fishing rod with a float (85 photos)
Another rig option is to use a jig. If such equipment is chosen, then it is necessary to fasten the equipment depending on the presence of current.
When the water is still, the line is threaded through the entire jig, and only then the hook is attached. And in river fishing conditions, it is necessary to attach the tackle only to the top ring to avoid tangling of the fishing line. Another option is suitable - a winter float with petals.
You can also use a hard leash for the hook when fishing. It will make the tackle less noticeable to fish, since there will be no twisting of the line.
Manufacturing
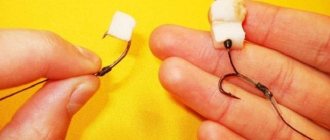
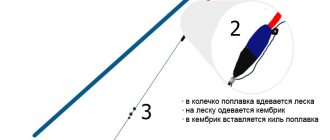
The design is simple - a body made of foam or wood with a hole in the middle or a loop (pin) for fastening through the cambric. The simplest option is a do-it-yourself winter float made of polystyrene foam. Polystyrene foam is easy to process, there is a lot of it around now, so it makes no sense to complicate your work by using wood.
Making it yourself (click to enlarge)
Simple single float
You can make a winter float with your own hands in any shape - spherical, droplet, barrel, tablet. It is much more important to then grind it to the required load capacity. The fastening is made permanent, through a hole in the body with a pin, or removable - with a cambric on a leg. To work you will need the simplest tools and materials:
- Foam plastic is hard, low porosity.
- Material for the pin – plastic sticks, toothpicks, etc.
- Cambrics, thin steel (copper) wire for loops - in the manufacture of hinged fastenings.
- Waterproof adhesive that does not corrode foam
- Acrylic paints, nail polish for coloring
- Knife, scissors, needle files, sandpaper, thin drill, thick needle.
A blank is cut out of polystyrene foam with a knife, depending on the desired size of the future product. The minimum is 6-8 mm thick and up to 1 cm long. Next, the workpiece is ground to a rounded shape. Using a heated needle or drill, a hole of the required diameter is drilled in the workpiece. Mounting options:
- Lower antenna for cambric
- Through hole for permanent fastening through bodies.
- Loop and pin with a tube for hinged fastening.
The lower antenna or wire is firmly fixed in the body using a moment or superglue. Winter signaling devices do not need reliable fastening, as in summer - there are no long casts. If you make a longitudinal cut in the cambric, you get a completely removable fastening option.
Hollow glued plastic
From the available tubes, handles and other similar materials you can glue together a hollow plastic float. However, this design has a significant drawback - the lack of the possibility of grinding to fit a specific jig.
Composite
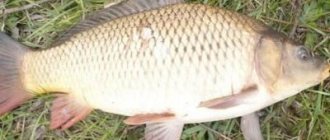
The components are designed for sensitive adjustment of gear when fishing for bream, roach, and crucian carp at sufficient depths. Their overall carrying capacity is greater, and when there is a bite on the rise, only the upper signal part floats up first. The large body remains under water and continues to compensate for the weight of the bait. The compound is assembled from foam bodies of various shapes, from bottom to top, from large to small. The blanks are cut out of polystyrene foam and fastened loop to loop with wire hinges and glue. Instead of polystyrene foam, you can use rigid polyurethane foam. Such a composite float for winter fishing with your own hands is no worse than a store-bought one.
Flowers and petals
If you get confused, you can make a more complex and beautiful drop-down float for winter fishing with your own hands. A variety of roses, tulips, and daisies work on the same principle as a sequential compound. In this case, upon ascent, several elements rise from the water at once and are laid out on the surface. Read more about homemade winter floats with petals.
Setting the load capacity
The most important part of the manufacturing process is adjusting the load capacity. To do this, the workpiece is attached to a piece of fishing line, and the jig for which the float is made is tied. Experiments can be carried out in a three-liter jar or bucket of water. Initially, such installation must have positive buoyancy. Next, the foam plastic is ground with a file or sandpaper until the workpiece begins to slowly sink under this load. This type of float setting for a winter fishing rod is an advantage over ready-made store-bought options. The result is a tuned connection.
Coloring
This part of the work is optional, but desirable. With the proper approach, the result will be a float for winter fishing, no different from store-bought products, but already selected and configured for the specific weight of the equipment. For painting, you can use acrylic paints and varnishes that do not corrode the foam. It is better to prime porous materials before painting so that the paint does not soak into the pores.
Painted homemade floats for winter fishing are more durable and look more beautiful. The main purpose of painting is not artistic, but purely functional. A bright striped indicator is simply easier to see in a dark hole, especially when fishing at night. For even better visibility, the foam can be painted with luminous phosphorus varnish.
Subscribe to the channel:
My YouTube channel RYBAFAN on fishing:
We're OK
Photo of a winter float
Note!
Fishing with a spring - rigs, baits, baits, gear and methods of fishing with a spring (80 photos)How to tie a fishing line to a reel - methods, tips on how to tie correctly and an overview of the most reliable knots (85 photos and videos)
Cuts for wobblers and spinners - how to make a simple homemade cut. 110 photos and videos of practical tips
Help the project, share on social networks
0
Options for making a sensitive float with your own hands
Despite the abundance of floats in fishing stores, amateur fishing masters continue to make homemade models. They differ in appearance, material and load capacity. Making a sensitive float with your own hands is not difficult. It is enough to decide on the type of product, select suitable materials and consistently perform all operations.
A DIY float can be used in different fishing conditions. Depending on the scope of use, appropriate materials should be selected.
- You can fish in the coastal zone with the lightest models weighing 0.2-0.8 g. Thanks to the low weight, it is possible to hunt for such types of fish as roach, rudd and crucian carp.
- For fishing in the current, a medium-weight float (0.8-2.5 g) is required. Equipment with such a signaling device can easily be cast to 20-30 m, where large fish such as bream, ide, and chub live.
- A heavy float weighing from 3 to 10 g allows you to perform ultra-long casting. Such models have a voluminous body, and flight characteristics reach 50 m. The antenna will be clearly visible from afar due to its large size. Large representatives of the ichthyofauna such as carp and silver carp will be interested in the bait.
If earlier fishermen were limited in materials, today the choice is quite large. Some of the materials are suitable for making a body, while others are better used as an antenna.
- You can create a floating body using:
- polystyrene foam;
- wine or cognac corks;
- medical syringe;
- balsa;
- wood.
- The following may be suitable for the role of an antenna:
- waterfowl feather (from geese or ducks);
- cane;
- plastic tube.
To create a bite alarm, you may need various household materials:
- waterproof glue will help hold the individual elements together;
- wire 0.5-1.0 mm thick is needed for making rings and loops;
- acrylic paints will give the float individuality and good visibility;
- toothpicks will help process the body of the float.
For comfortable and fast work, you should have some tools on hand.
- The easiest way to make precise and even holes is with an electric drill and a drill set. In some cases it is more convenient to work with an awl.
- A chisel and a sharp knife will allow you to remove excess pieces of material when creating a fishing masterpiece.
- Using a file or sandpaper, you can give the float precise shapes and perfect smoothness.
- The easiest way to hold the material or tool being processed is in a vice.
- A ruler or caliper will help control the accuracy of production.
Technology for making a float from wine cork or polystyrene foam
To make a float with increased load capacity, it is necessary to form the body. It can be shaped like a ball, an olive, or a drop.
Minimal modification is needed when making a wine cork float. It has a cylindrical body, which remains to be slightly modified and polished.
- But when using popular polystyrene foam, you need to cut a suitable shape from a square or rectangular blank. At the initial stage, it is better to use a sharp utility knife to give the future float a body as close to the ideal shape as possible. The length of the workpiece can be 50-70 mm long and 10-20 mm thick.
Photo 1. Foam body, antenna and pen rod.
Photo 2. Glue the antenna and rod into the body.
- A carabiner with a swivel or a wire loop is attached to the bottom of the antenna. All that remains is to decorate the body and antenna with paint or nail polish.
Photo 3. Cut off the rod tube. it turned out to be a sliding float.
Photo 4. Color the product.
Every fishing enthusiast has several goose floats in his box. They often help out when fish bites are cautious and unnoticeable. Before making a float from a goose feather, you should properly prepare the material.
- To collect feathers, it is better to go to a pond that is favored by geese or ducks. You can take 5-10 feathers with you, different in color and length. You should not start any processing on the shore. It's better to do everything at home.
- Using a stationery knife, cut off the fluff on both sides.
- The remaining fluff can be removed using fire. To do this, it’s easier to use a lighter and walk the flame along the body several times. Fire will also help straighten a crooked feather.
- Next, you need to coat the attachment points of the fibers with colorless varnish to seal microscopic holes and cracks.
- The upper part of the feather is painted red or orange.
- Knowing how to make a feather float, it is important to securely attach it to the fishing line. To do this, two cambrics from a tube from a dropper are placed on the feather. Alternatively, a thin wire loop can be made at the bottom end of the float.
- Increasing the weight and carrying capacity of a goose float is quite simple. It is necessary to make a body from foam, balsa or cork. Then measure the thickness of the feather with a caliper and make a through hole using a drill. Its diameter should be 0.1-1.0 mm thinner than the thickness of the pen. The antenna is inserted inside and fixed with glue.
For ultra-long casting of equipment, you can create a float with a weight.
- You can make an antenna from two plastic tubes. A tube 1.5 mm thick should be installed on top; a plastic product with a diameter of 3 mm is suitable for the lower part. Alternatively, bamboo or reed can be used.
- The body is made of polystyrene foam. Body height is 40-70 mm, diameter at the top is 15 mm, at the bottom it narrows to 10 mm.
- A hole 4-6 mm deep and 2.5 mm thick is made in the lower part of the body. A lead load is mounted in the hole, which is fixed with glue. It can be cast to the appropriate thickness by first installing a wire loop.
- A wire ring for fishing line is attached to the upper part of the body.
- The antenna is assembled with the body using waterproof glue. The final step will be to paint the float.
A fan of float fishing should have a rich set of bite alarms. Some floats are convenient to use when fishing short in calm weather. Other models will help deliver bait over long distances, allowing you to catch trophy fish.
Winter Fishing with a Float: Installation of Equipment and Correct Loading of the Float
It is advisable to adjust winter float gear at home by immersing the end of the fishing line with a hook or jig in water poured into some fairly high vessel. Why is it better to do this at home than in the cold: yes, because adjusting the weight of the jig or the carrying capacity of the float is much more convenient at home than on the ice. Better yet, prepare several already adjusted tackles with jigs of different weights and float carrying capacity.
Winter Fishing with a Float is also interesting because by the behavior of the float itself in the hole, an experienced fisherman can determine which fish is disturbing the bait, and in accordance with this, choose the moment of hooking, for example:
- The perch , having grabbed the bait, pulls the float to the bottom, although not as decisively as in the summer; — The bream , having taken the nozzle, on the contrary, lifts it from the bottom, causing the float to lie on its side from a vertical position; — The roach , spinning around the nozzle, barely noticeably moves it.
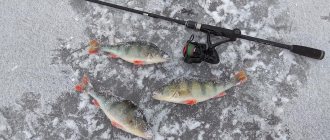
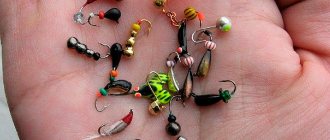
Of the huge number of different types of winter floats, the most popular is the small cone-shaped white float with a black spot on top. Floats of this shape and color are easier to observe. True, their carrying capacity is too great.
Such floats are most suitable for fishing with medium and heavy jigs. Narrow-bodied and cigar-shaped winter floats, excellent for light loads or light jigs. In this case, only the thin tip of the float protrudes from the water, which gives it even greater sensitivity.
Basically, for catching fish in winter with a float rod, the following baits are used:
Construction of tackle
Now let's start describing how to make a winter float fishing rod and from what elements. In order to begin assembling the gear, you need to prepare the following:
Now let's look at each element of the gear in more detail.
Fishing rod
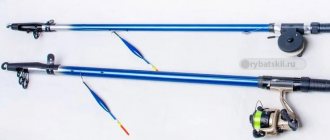
As can be seen from the picture above, the equipment of a winter float fishing rod is based on three types of winter fishing rod designs. These are such popular fishing rods as:
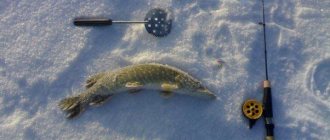
- Filly. This is the name of a winter fishing rod, which has a specially shaped foam body, like the legs of a mare, which combines a handle, a reel and legs for installation on the ice.
- Balalaika. If a regular jig balalaika is equipped with legs for placing on ice, it is also perfect for float gear.
- A fishing rod with an open reel , legs and handle is most often used for mounting float gear. Thanks to the trigger stop, it easily releases the line, the legs allow you to conveniently position it above the hole, and the warm foam or neoprene handle will help you make a precise hook.
All presented winter fishing rods are equipped with elastic whips, on which pass-through elements for fishing line are placed: rings or a set of cambrics. The same tulip is often glued to the tip as on summer fishing rods.
fishing line
To equip a winter float fishing rod, a monofilament fishing line with a thickness of 0.12 to 0.18 millimeters is used. Thin diameters are used when fishing without a leash at shallow depths, and for greater depths, gear with a thicker line and leash is better suited.
The diameter of the leash is chosen depending on the intended trophy, but as thin as possible. For example, for catching roach, sometimes 0.10 millimeters will be enough, while for catching large bream, the optimal thickness is 0.14 millimeters.
Float
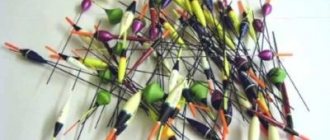
Floats for winter fishing are a subject for a separate discussion. There are as many designs for winter as there are for summer. Mostly fishermen make them with their own hands, although there are also good models in stores.
All floats designed to equip a winter fishing rod can be divided into several groups according to several factors:
- According to the method of fastening, the winter float can be permanent, put on the fishing line through a through channel, or easily replaceable with fastening at the bottom point or with a side slot.
- Depending on the number of bodies, there are single and composite models.
- According to the animation method, the float can be simple and drop-down, or petal-shaped.
Photo 1. The simplest float: body and antenna.
Winter fishing has its own characteristics, which force us to make floats with a complex device. The fact is that when you look into the hole from above, the vertical displacement of a simple single body in it is very difficult to track, especially with a careful bite. This is where some tricks come to the rescue.
Photo 2. Installation of the float on the fishing line.
With a composite, double or triple float, when bitten, the upper part falls on its side, which is clearly perceived by the eye, if, of course, the upper and side surfaces are painted in different colors.
Step-by-step instructions for creating a float rod for summer fishing
- So, we need to assemble a simple float fishing rod. First we take the fishing rod . If the rod is telescopic, pull it out and fix all the parts, but do it in such a way that the rod can be easily disassembled.
- Choosing a fishing line . For summer fishing, a fishing line 0.2 millimeters thick will be sufficient, which can easily withstand a load of two kilograms. We wind the fishing line onto a reel or reel.
- Attach a float to the fishing line.
- Attach a hook to the end of the fishing line . For summer fishing from the shore, No. 4 is perfect.
- The final stage of assembling the float rod is loading. This stage is carried out on a reservoir: during experiments with different pellets, the optimal position of the float is achieved. The float should be half hidden in the water, without sinking or lying on the water.
Catching pike perch at night. What are the features of this fishing, read here.
And here you will learn about ultralight fishing.