Manufacturing and tooling
Homemade products for winter fishing are a kind of interesting hobby in itself.
And the highest reward of the craftsman is the catchability of the manufactured element of the tackle. Making winter floats with petals with your own hands is also in this category. The basic manufacturing principle is hinged coupling of the petals, which are reduced to one attachment point (or to a large body). Factory flowers, for example, have a wire ring around the circumference of the main body, onto which movable petals are attached through holes. At home, it’s easier to make separate wire loops for each. There are a lot of different designs, their creation is a creative experiment. The main difficulty is fine processing of foam parts and adjusting the length of the hinges. It is necessary to ensure that the foam petals open simultaneously (if there are a large number of them. To do this, they must be identical in shape, volume and weight, and also have a uniform geometry of attachment to one point, the identity of the hinges themselves. The more identical and geometrically identical they turn out details - the more beautiful they will be laid out on the water.The hinges are made of wire rings or thick fishing line.
To work you will need:
- Solid foam;
- Tools (pliers, round nose pliers, wire cutters, etc.);
- Sharp knife;
- Needle file;
- Glue;
- Waterproof paints and varnishes that do not corrode foam;
- Cambrics.
The photographs and video below discuss the principle of manufacturing the simplest designs of drop-down floats. Based on them and using your imagination, as well as your hands, you can create a real masterpiece and surprise your fishing friends.
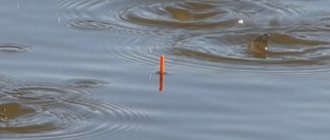
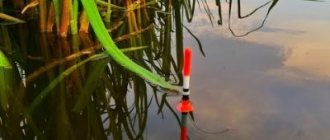
- an element of equipment for a winter float fishing rod that serves as a bite alarm instead of a guard or a nod. The float is designed to visualize the bite and hold the equipment with a jig or hook in the desired position at the bottom.
Floats for winter fishing can be classified according to their design and the method of attaching the float to the fishing line.
By mounting method:
According to the method of fastening, winter floats are divided into removable and non-removable. The latter are now very rarely used; the line of a winter fishing rod passes through the body of the float. Such a float can only be replaced together with all the equipment.
Removable floats are fixed to the fishing line at one point using a cambric or PVC tube. The removable float is fixed using a plastic or metal pin (clamp) made of wire located in the lower base of the float. The latch itself is attached to the float not rigidly, but loosely, in a loop-to-loop manner.
By design:
- Classic cylindrical or round float;
- A cylindrical float beveled at the top;
- Double float;
- Winter float “Tablet”;
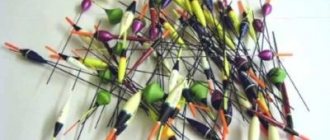
- Drop-down petal float;
- Flower float.
The last two types of floats are rarely used in winter fishing and can be classified as exotic.
Float petal and flower
As we have already said, a winter float with petals is a complicated design of a regular float. The purpose of this complication is to better visualize the moment of the bite.
The petal float consists of two halves of a regular cylindrical float, each of which has a loop for connection to the float retainer. After making such a float, it is necessary to adjust the correct opening of the float after surfacing.
A flower float is an impressive, but more complex design, which, if desired, can also be made with your own hands. We have not seen such floats in the assortment of fishing stores.
Varieties
Floats for winter fishing with petals are made according to the principle of composite structures. The petals are hingedly attached to the main body; when floating up, they spread out to the sides on the surface of the water in the hole, which gives such an interesting visual effect.
Petal
The float petal has the right to life from the point of view of practicality. This is an ordinary composite float, the upper part of which is made in a shape that allows it to beautifully unfold on the surface, from the center of the axis to the side. It has only one petal, which does not particularly interfere with the fishing process when removing the fishing line from the ice back into the hole. There is also a practical benefit to this design. The overall length of the float is longer than that of a regular float. This means that the amplitude at which the weight of the bait in the fish’s mouth decreases (taken by the pop-up float) is greater. You can read more about this in the article on winter rigging fishing rods for bream. When catching this fish, it is important that it does not feel the weight of the jig in its mouth when biting.
Trousers
This design presupposes the presence of two parts, spreading to the sides when lifted. Because of its unique appearance, the float is popularly called “pants”. The two floating petals are even more noticeable in the hole. But the overall design is more complicated, and you need to handle such a fishing rod more carefully, preventing the petals from freezing to the ice.
Flower
A true masterpiece of ice float fishing. The flower float for winter fishing is beautiful, complex and difficult to use, especially when fishing in the cold. You should not allow it to get on wet ice - the petals will instantly freeze, and when you try to separate them from the ice, they will probably come off or break. A fishing rod with a flower is comfortable to use during a thaw or in a tent with a bottom. The flower adds effective visualization of the bite and difficulty when working with the tackle. The expediency of its use is based not on practicality, but on the fisherman’s emotional craving for beauty.
Source: Podlednik.ru
Which float is best for winter fishing
Box for winter fishing: types and making it yourself
In stores and on the Internet, you can find a large number of floats for winter fishing, the range is similar to summer gear, and you need to choose them by studying the intricacies. For winter, gear should be selected more carefully, and the fishing rod should be set up correctly.
When choosing, the secondary factors are shape, color and size. This is due to the fact that the float does not need to be cast far, so it may not be multi-colored. All actions take place in the hole, in the immediate vicinity of the fisherman. It is much more important to determine the load capacity and features of the products. The main task of the element is to unload the mass of bait and equipment. The greater the sensitivity of the gear, the easier it is to detect a bite.
Important! The calmer the water, the thicker the float is needed.
Forms
All floats for fishing in winter are often small in size and made of foam or balsa. They vary in shape; during fishing during this period, there are no summer factors, including winds or distance from the main location of the fisherman. The float needs to be immersed only 2–5 cm.
Among the main types according to shape are:
- Round or cylindrical.
- Models are cylindrical with a beveled top.
- Double.
- Winter model "tablet".
- Petals opening.
- Flowers, roses.
Often 1–2 types are used, as well as ovoid models. The last pair of models are rarely used, and the product itself is considered exotic.
If you set up the fishing rod correctly, there won’t be a big difference in the floats, and the choice depends on the price and personal preferences. For example, a “tablet” is better visible during ascent; at night, a drop of paint or varnish with the addition of phosphorus can be applied to the equipment. When fishing, it is not the shape that is more important, but the type of fastener to the fishing line.
Did you know? The longest fight with fish reached 32 hours. A black marlin weighing more than 600 kg pulled the boat for 80 km weighing 12 tons, after which the fishing line broke.
Attachment to fishing line
According to the type of fastening, all options are divided into removable and non-removable models. The latter option is rarely used, since you need to pass the line through the entire float to attach it. Replacement is carried out exclusively together with the equipment. The removable version is attached to the fishing line at a certain point through a cambric or a special tube. It is fixed by a metal or plastic pin at the bottom of the float.
Considering all possible fastening options, we can highlight:
- Through - performed in the center through a hole (non-removable type).
- Cambric or through a tube - a universal version of removable equipment, makes it possible to install other signal elements without dressings. Only the cambric is attached to the fishing line.
- With a side slot on the float - the fishing line is inserted into a special slot and clamped with a pin. The part can be replaced, excluding bandaging.
- Through a crooked hole in the float - a rare type of fastening. Winter fishing rods should be simple and reliable; this type of fixation has difficulties, which include the passage of fishing line.
Long casts in winter are irrelevant, so not the strongest, but reliable mount will do. Even if the float comes off, it will remain on the water in the hole.
Important! The most sensitive floats
—with a relatively thin and elongated main part.
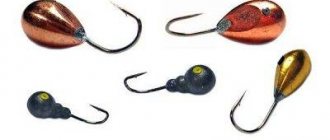
Manufacturing
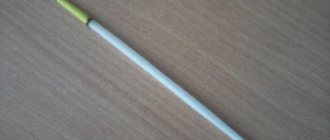
The design is simple - a body made of foam or wood with a hole in the middle or a loop (pin) for fastening through the cambric. The simplest option is a do-it-yourself winter float made of polystyrene foam. Polystyrene foam is easy to process, there is a lot of it around now, so it makes no sense to complicate your work by using wood.
Simple single float
You can make a winter float with your own hands in any shape - spherical, droplet, barrel, tablet. It is much more important to then grind it to the required load capacity. The fastening is made permanent, through a hole in the body with a pin, or removable - with a cambric on a leg. To work you will need the simplest tools and materials:
A blank is cut out of polystyrene foam with a knife, depending on the desired size of the future product. The minimum is 6-8 mm thick and up to 1 cm long. Next, the workpiece is ground to a rounded shape. Using a heated needle or drill, a hole of the required diameter is drilled in the workpiece. Mounting options:
The lower antenna or wire is firmly fixed in the body using a moment or superglue. Winter signaling devices do not need reliable fastening, as in summer - there are no long casts. If you make a longitudinal cut in the cambric, you get a completely removable fastening option.
Hollow glued plastic
From the available tubes, handles and other similar materials you can glue together a hollow plastic float. However, this design has a significant drawback - the lack of the possibility of grinding to fit a specific jig.
Composite
The components are designed for sensitive adjustment of gear when fishing for bream, roach, and crucian carp at sufficient depths. Their overall carrying capacity is greater, and when there is a bite on the rise, only the upper signal part floats up first. The large body remains under water and continues to compensate for the weight of the bait. The compound is assembled from foam bodies of various shapes, from bottom to top, from large to small. The blanks are cut out of polystyrene foam and fastened loop to loop with wire hinges and glue. Instead of polystyrene foam, you can use rigid polyurethane foam. Such a composite float for winter fishing with your own hands is no worse than a store-bought one.
Flowers and petals
If you get confused, you can make a more complex and beautiful drop-down float for winter fishing with your own hands. A variety of roses, tulips, and daisies work on the same principle as a sequential compound. In this case, upon ascent, several elements rise from the water at once and are laid out on the surface. Read more about homemade winter floats with petals.
Setting the load capacity
The most important part of the manufacturing process is adjusting the load capacity. To do this, the workpiece is attached to a piece of fishing line, and the jig for which the float is made is tied. Experiments can be carried out in a three-liter jar or bucket of water. Initially, such installation must have positive buoyancy. Next, the foam plastic is ground with a file or sandpaper until the workpiece begins to slowly sink under this load. This type of float setting for a winter fishing rod is an advantage over ready-made store-bought options. The result is a tuned connection.
Coloring
This part of the work is optional, but desirable. With the proper approach, the result will be a float for winter fishing, no different from store-bought products, but already selected and configured for the specific weight of the equipment. For painting, you can use acrylic paints and varnishes that do not corrode the foam. It is better to prime porous materials before painting so that the paint does not soak into the pores.
Painted homemade floats for winter fishing are more durable and look more beautiful. The main purpose of painting is not artistic, but purely functional. A bright striped indicator is simply easier to see in a dark hole, especially when fishing at night. For even better visibility, the foam can be painted with luminous phosphorus varnish.
Source
Equipment of a float rod for crucian carp
DIY underwater camera for winter fishing
To catch crucian carp with a float, light, rigid-action fly rods with a adjusted (adjusted) tackle weight are used.
The length of the fishing rod and the load of the tackle depend on the casting distance of the float and the characteristics of the reservoir: the depth and degree of cluttering of the pond (lake) with foreign inclusions.
During periods of decreased fish activity, you can add one or two more equipment with floats configured for different horizons for catching crucian carp.
When fishing for crucian carp in summer in windy weather, you have to make the tackle heavier and, accordingly, install a float with a larger carrying capacity.
And if you clear the sector and side “pockets” in the algae, then you can catch crucian carp using floats throughout the entire summer daylight hours on a section of the bottom darkened by algae. Moreover, even in relative shallows the crucian carp will not see the fisherman.
The scheme for catching crucian carp with float rods in an area of the pond cleared of algae is shown under the title of the article.
The slackness of the fishing line can also be adjusted due to the drift of the float by the wind. Therefore, it is better to adjust the float rod from a deliberately small descent under the fishing line float. That is, first the float should be submerged. And then, in several steps, raise the float device higher.
Due to the settings proposed above, the sinker on the fishing rod will fully correspond to its purpose.
Paternoster for the float track
Ice fishing pressure
The following equipment (Fig. 5) is considered more suitable for fishing on lakes from a boat, but it has also been successfully tested when fishing from the shore with long-distance casting. The equipment is made as follows. A stop knot is tied on the main line, then a transparent ball (not filled with water) is passed along the line through one eye, then a swivel is tied. We tie a fishing line to its second eye, taking into account the fishing conditions, length and thickness, equal to the main fishing line or a little thinner. A sinker is attached to the end of this line. We tie several leashes on the sides - a regular paternoster.
There are two possible options here.
In the first case, the load is heavy and it sinks the float, which, due to its buoyancy, maintains the equipment in a relatively vertical position. Floaters usually value this type of equipment while rowing, slowly moving around the water area, looking for fish sites. This method is very good for searching for perch, which has a decisive grip and which often hooks itself. On the hooks of leashes you can put not only natural bait, but also artificial things, for example, small, well-playing twisters, Christmas tree rain, strips of inflatable balls and other homemade and branded baits. This method of perch fishing can be successful not only from a boat, but also from the shore: we cast, slowly pull up, the transparent ball acts as an assistant, because it tends to help the equipment take a vertical position, which benefits our paternoster, especially if there are a lot of leashes .
The second version of this equipment implies that the transparent ball remains afloat, which means that we select a light weight, weighing less than the carrying capacity of a ball not filled with water. In this case, the working descent can be varied both by the length of the fishing line to which the leashes are attached, and by the location of the ball on the main fishing line, because the locking unit can be moved up and down.
The best baits and lures
Among the best natural baits are:
- bloodworm;
- maggot;
- light larvae;
- bark beetle
The most popular among fishermen is a bunch of bloodworms. However, when it is pierced with a hook, the color becomes pale and the contents flow out. To exclude this, bundles of 4–7 pieces are prepared in advance. bloodworms. They are tied with nylon thread, and the finished baits are stored in match boxes for easy storage and use while fishing. Threading is done by prying the thread, but so that the hook remains invisible. To solve this problem, 1 bloodworm is put on it.
For a big catch, it is important to use the right bait. Therefore, immediately after drilling holes, you need to pour fish food into the cone container.
It is good to do this procedure 1–2 days before the start of fishing. Suitable pea or semolina porridge, which are crushed and mixed. The use of seeds, crackers, and pearl barley is also allowed. You can use porridge only before fishing.
Did you know? Carp
—It is a smart and cunning fish, so it can only be caught through complementary feeding, which begins in the fall. A light jig is used for fishing.
Equipment for a float rod with a float
How to equip a fishing line with a float, sinker and hook to start fishing?
Today, you can rig a float rod for winter fishing in various ways. We will consider the most effective and practical of them.
First equipment option
This method is appropriate for equipping a float rod in winter, when fishing is supposed to be at the very bottom of the reservoir. After all, this is where fish mainly live in cold weather. When starting to search for fish, you need to submerge the float somewhat below the surface of the water. This is possible when its carrying capacity is 0.1-0.2 grams less than the weight of the sinker.
You need to check the float at home. This is done using a bathtub or any other container. Lower the hook to the bottom. He can either lie down or just touch him. Winter equipment should not have buoyancy.
The distance between the jig, sinker and hook should be at least 7 cm. During a very light bite, if desired, you can increase this distance to 30 cm. To attract a catch, it is recommended to smoothly and naturally raise and lower the hook at regular intervals.
Second equipment option
This method is perfect for fishing in a body of water with a large current. You can, of course, use it in a standing reservoir, exclusively for those fish that live slightly above the bottom surface. Thanks to the additional equipment of the fishing rod with a lead sinker, the float will slowly sink. A sinker is lowered to the bottom, and a little higher, already on the main fishing line, a leash 5-35 cm long is attached, moving freely and smoothly. It is also recommended to use a small pellet, but it must weigh less than the float mechanism itself. They start catching fish from the bottom, and only if the bite does not appear, you can gradually raise the leash higher to the surface of the water.
Sinker and hook
Before you start choosing a sinker, you should decide on its required weight and dimensions. Since in the future it is these parameters that will actively influence fishing conditions.
So, if you plan to fish in a still body of water using an ice fishing rod, then choose light and small sinkers. They are attached to the fishing line at a distance of no more than 6-8 cm from the hook. If you fish in a strong current, then you need a larger sinker.
Experienced fishermen always take into account the size of the sinker, and not just its weight. It is necessary to select a load so that it submerges the float in the pond by 2-3 cm, but at the same time does not pull the piece of fishing line that is located in the space between the fishing rod and the float into a tense straight line.
One of the most important characteristics of a hook is its elasticity. Therefore, pressing hard on it should not cause a break. The hook should just bend a little
Plus, pay attention to its end, which should be sharp enough
Depending on what kind of bait you prefer, you should choose a hook.
- using a special fishing rod for winter fishing for bloodworms, select a small hook with a short shank, size No. 2-3;
- when using a worm, bread crumb and pieces of meat, you need to choose larger hooks, size No. 5-7;
- then for fry you need to take hooks of size No. 8.5-10 with a long shank.
Video recommendations for rigging a winter float rod for bream:
https://youtube.com/watch?v=yMkf8dOpA5A
Mormyshka
Most experienced fishermen recommend fishing with a jig in the winter. After all, this is a very practical and convenient option, combining a hook and sinker for the purpose of catching fish with a stationary natural bait.
The jig hook should be equipped with maggots, bloodworms, worms or dough, slowly lowering the bait to the bottom of the reservoir or to the place where the fish are concentrated. Next, you should put the fishing rod on the surface of the bottom and watch carefully so as not to miss a bite. After all, it can be light and almost invisible. The positive side of this fishing technique is its simplicity, and the negative side is the roughness of the equipment itself, which can frighten and alarm a possible catch.
But still, if the bite is normal, the bait is bright and catchy, and the fish is caught in a body of water with a strong current, then these tackles are more than effective. A good result can be achieved in the process of fishing with a fixed jig for large-sized perch in those waters where competition among fishermen is enormous and their large accumulation is obvious.
Pay attention to the reelless jig Cat's Eye, which performs well when catching perch and roach
Equipment options for a winter float fishing rod
Option 1. Using a regular lead sinker and hook.
Figure 1 shows fishing without current.
Figure 2. Fishing in the current, the sinker must be lowered to the bottom. The distance in both cases from the hook to the sinker closest to the hook is 4-7 cm.
Option 2. Using a jig and a hook.
Figure 3 shows the gear in still water. The line is passed through the jig, the latter is attached, then the hook is attached to the leash.
Figure 4 shows the flow situation. In this case, you should attach the leash with the hook by passing the fishing line through the top ring of the jig, and not through the entire cavity. This way the jig will easily reach the bottom, and the leash and hook will not get tangled.
Option 3. With a hard leash.
Figure 5 shows the use of a small leader made of stiff line and a light hook. Thanks to this tackle, the hook will go a little to the side and will be more noticeable.
The same option in the current is shown in Figure 6. Another leash with a non-sinking plastic jig has also been added.
Homemade transparent balls - floats
You can easily make a ball-float yourself. The manufacturing technology is known to experienced fishermen - homemade fishermen. You can recall one of the simple and accessible methods. You will need thin plexiglass (2 squares approximately 10x10 cm) and a metal ball with a diameter equal to the planned diameter of the float. When heated, the plexiglass becomes plastic, and using a metal ball we squeeze out two hemispheres. After cooling, the excess plexiglass is cut off with a jigsaw and the two hemispheres are glued together. Instead of ears, you can simply weld two wire loops into the ball, to which we will attach the main fishing line and leash. Two holes with a diameter of about 3 mm are drilled into the ball, which will help fill the float with water and drain it after fishing. We fit suitable dense plugs under the holes - you're done.
You can also make very small transparent balls with a diameter of 1-1.5 cm, which are very difficult to find on sale, but which are excellent for fishing with a short fly rod on top, for example, bleak or roach.
Almost ready-made floats - balls can be found among all sorts of market junk - costume jewelry, you just have to look at it carefully with an inquisitive fisherman's eye.
I recommend to read:
Option 14: Flat foam flow float
A float of an unusual shape that holds well in the current. The body of the float is cut out of hard foam using a template. It is flat and of an unusual shape. Then the top layer of foam is removed; it is especially hard and interferes with further processing.
On the thin side, mark where the holes for the line holder and antenna will be located. Next, holes are drilled according to the diameter of the future tubes. You can take Chupa Chups straws. The tubes are glued in with superglue and cut to size.
An awl is used to make a hole for the keel. It must be made of stainless wire. Next, the body of the float is given a streamlined shape using sandpaper.
Homemade float for fishing in the current
Features of floats with petals
Petal floats are not often found on sale. Their cost, as a rule, exceeds the price of ordinary winter floats by tens of times. They have, as already mentioned, an aesthetic function rather than a practical one. Such devices have only one advantage - they are more noticeable when biting. Against this background, there are two important disadvantages:
- The design is complex, which entails a high risk of breakage if handled carelessly.
- During active biting in cold weather, when taking the fishing line out onto the ice, such a complex float freezes and clings to uneven surfaces with its petals, which leads to additional difficulties in handling the tackle.
Equipment for a winter fishing rod with a float
The equipment of a winter float fishing rod is the float itself, a jig or a hook with sinkers located on the fishing line of a winter fishing rod. The equipment is built based on the fishing conditions - depth and current. There are the following options for winter float equipment:
- Winter rig with hook;
- Equipment with jig;
- Combined equipment with a hook and jig, with two jigs or hooks.
The main hook or jig is tied to the main fishing line without any leashes. An additional hook is tied above the main hook or jig using a leash. An additional jig is tied above the main one, usually without a leash - directly to the main fishing line (garland or locomotive). The jig can act as a sinker located above the hook.
Arranging a winter fishing rod is a creative endeavor. Based on the basic options, you can create your own.
Winter float fishing line
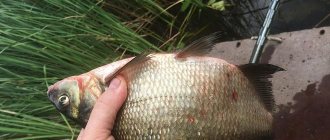
Many sources advise using a monofilament line with a diameter no thinner than 0.14 mm, in case a large fish like a large bream or crucian bites. A strange recommendation is to sacrifice the number of bites and fish caught for the opportunity to bring out a random “big fish”.
If we are purposefully catching bream or other large fish, it makes sense to use a fishing line with a diameter of 0.13 - 0.15 mm, and if we are catching, for example, small roach or silver bream, a fishing line of 0.1 - 0.12 mm is suitable. A fishing line thicker than 0.14 mm is used if you are catching really very large fish.
You can always have several winter fishing rods with fishing lines of different diameters in stock. Considering that anglers usually fish with two or more rods in holes drilled side by side, it is possible to conduct “A” “B” testing of the catchability of different equipment.
Loading the winter float
Unlike the summer float, the winter float does not have an antenna, since it does not need it, because in winter fishing, the bite is visualized from above, and not from the side.
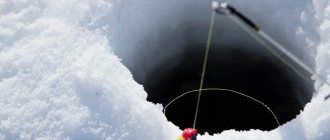
In addition, the winter float is completely immersed in water to prevent it from freezing and freezing into the film of ice that quickly forms in the hole.
The winter float is immersed in water to a depth of 1–2 cm from the surface. The total weight of the weights and jigs should provide just such a load on the float. Fine-tuning the loading of the winter float is done by selecting the weight of an additional mini-weight.
Winter Fishing with a Float: Features
Winter fishing with a float has both advantages and disadvantages compared to fishing with a fishing rod with a nod and a jig. The main difference between winter float fishing is that you need to know exactly where the fish are standing and moving. Basically, this is achieved by feeding the holes, thereby collecting all the fish in one place.
This fishing method completely eliminates the possibility of “playing” with the bait, which when fishing with a jig increases the number of bites. Therefore, such fishing is considered less active.
237 kg of Large Fish - for 1 Fishing!
Detained poachers told the secret of a good bite. Fish inspectors were surprised by the lack of Prohibited Equipment...
More details
Advantages of Winter Fishing with a Float:
1. A float more noticeably signals weak fish bites than a nod; 2
The fisherman's attention is much less tired: it is easier for him to monitor the position of the light float, which stands out in contrast against the dark background of the water; 3. There is no need to constantly hold the fishing rod in your hand; usually it stands on a stand or simply lies on the snow near the hole; 4
If you drill another hole nearby, you can successfully fish with two fishing rods at the same time; 5. If you put up a tent, you can fish even in severe frost. In a tent, with the necessary equipment, you can even lie down, sleep, cook, etc.
The most important thing: you need to make sure that the ice crust that forms in the hole on a frosty day does not interfere with the movement of the float, otherwise you may miss the bite. And so that our float does not freeze into the ice, it is usually immersed in water by 2.5 - 3 cm.
If a jig with a nozzle is used as a hook, then its weight should be enough to hold the float under water. And this may mean that the carrying capacity of winter floats must be selected individually, for each type and weight of jigs. To make the eyes less tired and to make it easier to observe weak bites, the upper part of the float is most often painted red.
The process of fishing with a winter float rod
Fishing with a winter float differs in many ways from fishing with a float rod in the summer.
Drill a hole and clear the surface of the water from small pieces of ice so that nothing interferes with the float.
The float must be loaded with at least two pellets; a small pellet should be placed 5-7 cm from the hook with the nozzle. This will allow the bait to sink slowly, which has a positive effect on the fish’s attention to the bait.
A bite - surfacing, the float moving to the side, or diving under water - at this moment you need to decisively hook. After hooking, when you feel that the fish is on the hook, take the fishing line in your left hand and place the fishing rod in a specially cleared place on the ice. Carefully, without making any sudden movements, pull the line out of the hole with both hands, the main thing is not to let the line slack or sag, even if the fish is securely sitting on the hook, at this moment it can simply make a sudden movement and break your delicate tackle.
After catching a fish and placing a new bait on the hook, if the old one is missing, lower the tackle into the water again. The line may become slightly frozen with ice when immersing the line - pass it through the clenched fingers of your glove to remove the ice.
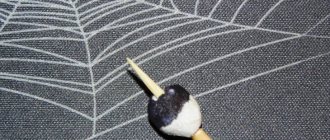
Making a homemade winter float
A homemade float may be no different from a purchased one, and in some cases even surpass the latter, because you can make a winter float really sensitive, which floats from store shelves cannot always boast of.
- To make a float with our own hands, we will need hard (dense) foam plastic; from it we need to cut blanks for the future float (of course, with angular edges for now). The larger the size of the float, the higher its carrying capacity. After receiving the first workpiece, you can try testing it in a jar of water to see how much weight the workpiece can withstand in order to determine the size of future floats.
- The blanks have been received, now you need to shape the float using a knife, removing all excess.
- To give a smooth surface to our almost finished float, it can be sanded with fine sandpaper or a file.
- We need to make fastenings at the bottom of the float. First, we melt a hole with a hot needle or pin, then we make a fastening from a wire, for example from a telephone wire or from anything, here you just need to use your imagination.
- After inserting the fastener, if you are not sure of the strength of the connection with the workpiece, apply a drop of glue to the joint.
Making a winter float is a creative activity; now, if you want, you can prime the float with a primer, and then, when it dries, paint the top or, conversely, the bottom of the float in the colors you want. It is necessary to prime the float so that it does not absorb water and paint.
Winter float daisy
Types of floats and their characteristics
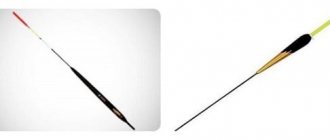
Based on the shape of the body, all floats can be divided into two large groups: elongated and full-bodied. The first type is popular among cautious fishermen. The secret to the effectiveness of such a float is quite simple: the smaller the volume of the surface part of the hull, the less effort the fish spends diving it. Bream and large roach swallow the bait more confidently, without feeling unnatural resistance from a bunch of bloodworms or maggots. Full-bodied floats are more stable on the surface of the water and are used where it is more difficult to identify a bite due to the presence of a current or great depth. Our catalog also includes two-, three- and four-piece models for more accurate recording of fish movements.
Depending on the method of attachment to the fishing line, all floats are divided into 3 categories:
1. Models with free fastening in the lower part of the body.
2. Models with a channel for fishing line near the rod.
3. Models with a channel for fishing line near the rod and a side slot.
Separately, it is also worth remembering the floats with removable antennas. Such models allow you to quickly adapt the tackle to fishing conditions without retying the equipment. As for materials, our catalog contains mainly floats made of impact-resistant foam, balsa and plastic.
Sliding equipment
This is also a very catchy installation (Fig. 3.). We pass the main line through one eye of the ball. Then we pull a round rubber stopper onto the fishing line, the role of which can also be performed by a suitable piece of plastic insulation from various wires. Now we tie the main line to one eye of the swivel, and tie a leash to the second eye. A soft stopper in the rig is very desirable, because it prevents the massive float from hitting the swivel when casting, which can threaten to break the eye of the float and seriously load the line assembly that holds the swivel. This equipment is good because the fish does not feel the resistance of the float when biting, because the fishing line slides freely through the eye of the ball. However, for the same reason, the fish will not be able to hook itself and hooking is required. The same free passage of the fishing line through the float will help you not to miss a bite. The bite itself is clearly visible, or it is “heard” by the finger holding the line near the reel.
You can fish with such equipment not only on the surface, but also in the middle horizons, and in shallow waters even at the bottom. To do this, you just need to load the leash with one or more lead pellets. Thus, fishing is good in shallow, fast-flowing waters with an “irregular” current and often “jumping” depth. That is, in those fishing conditions, where no matter how you choose the shape of a traditional float, no matter how you load it, you still won’t be able to clearly distinguish a bite.