Tips and tricks
When creating equipment for a girder, you need to take into account the attack of the pike, which consists of two stages:
- First, the predator grabs the bait fish from across and drags it several meters forward.
- Then he stops, releases the fish and swallows it lengthwise.
Here it should be borne in mind that the bite can end at the first stage if:
- The pike will notice the resistance created by the fishing line wound around the tackle. To avoid this, you need to leave a sufficient supply of thread and select the right weight.
- The predator will prick itself with a hook that is embedded in the back of the bait.
It is recommended to carry out the installation as follows: push back the gills, pass the leash through the mouth and secure the hook. This way the tip will point towards the tail, which will not scare off the prey at an important moment.
Having figured out what the vent looks like and is made, you should take into account some additional nuances:
- If there are several types of bait, then it would be useful to use several leashes placed at different depths. This increases the chance of a bite, since several water horizons are fished at the same time.
- If the bite is bad, you should use the thinnest possible line and tackle that includes one hook.
- On bodies of water with strong currents, it is necessary to use a heavy weight.
- A perch installed at night in winter requires camouflage. It is enough to sprinkle the frozen hole with snow or simply cover it with something.
The information presented in the article allows you to understand the existing varieties of vents, used both in summer and winter. Most of them can be made independently at home without any problems. When fishing this way, you must adhere to certain recommendations so as not to scare away the prey.
Pike baits
Many types of industrial and homemade girders are installed on ice in winter. Each design has its adherents, but the methods of pike fishing are the same. The main thing is to choose the right place and collect the gear.
Fishing device and methods
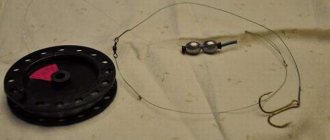
Regardless of the type, each vent is equipped in the same way. The cross-section of the main scaffold is 0.3–0.6 mm. The outlet leash is attached to it using a swivel. A self-made guitar string leash will be reliable. The industry produces leashes made of Kevlar, steel, and tungsten. When catching small pike, you can use monofilament line.
A tee is attached to the leash using a carabiner. Size No. 6–12, depending on the size of the pike found in the pond. At the top, immediately behind the leash, there is a weight attached; it serves as a limiter for the main movable weight. Weight 25 g. The length of the main conductor depends on the depth of the reservoir, the minimum size is 8 m.
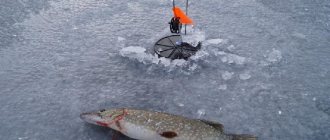
Depending on the design, the line is wound on a flyer or reel, circle or bottle. For winter types of girders, a wooden reel or a simple reel is used. A mast with a flag and a lock are installed on the base. When the line bites, the flag is released from the hook, and it becomes vertical. The fisherman just has to reach the tackle, hook and fish out the pike.
Summer girders operate on a similar principle. They can be floating or coastal, but the operating principle is the same. Industrial and homemade ones successfully cope with their task, regardless of the type of their execution.
Types of girders
Zherlitsy are divided into winter and summer.
Winter ones are installed on ice. They can be placed for the day. These are the girders:
- with a flat base;
- vertically located gear.
When leaving the girders for a long time, use the under-ice type of installation, closing the hole and placing the tackle under the ice.
With flat base
The most common and convenient type of winter gear for pike fishing. A simple fishing reel, a flag and a clamp are secured to a flat base using a bracket. The design and gear can be easily re-equipped and repaired. When folded, the girders are compact and lightweight, so you can fit a sufficient amount into your backpack.
The base is made of lightweight materials (plastic, plywood) of a round shape. Thus, the girder completely covers the hole and prevents the water from freezing. Pike is a cautious fish. Therefore, she perceives any object on the ice as a danger. Having closed the hole, you can install the vent at a shallow depth. But such gear must be fixed. It is easily blown away by the wind. Therefore, it is sprinkled with snow or ice crumbs.
Industrial products are expensive, so fishermen make them themselves.
Vertical tackle
Such a girder is located on a vertical stand, which is fixed with snow.
It is more stable and does not blow away in the wind. The height of the flag can be adjusted. The low price makes it popular with many fishermen. But such gear cannot block the access of light to the hole and prevent the water from freezing. The principle of operation is similar with all types of vents. The pike hits the bait, and the line, stretching out from the reel, releases the flag pole, it straightens, informing the fisherman that the pike is biting.
Design features and equipment elements
These include the basic requirements:
- Fishing line. It must correspond to the size of the fish and fishing conditions. The thickness is 0.3 mm, this is the thinnest fishing line for catching small squints. To catch large pike you will need to use a thread with a cross section of 0.6 mm.
- A reel or other line winding device. There is only one requirement here - the braid must be wound smoothly without overlaps, and the size of the forest receiving device must correspond to the footage of the fishing line.
- Hooks. To hunt for predators using perches, it is preferable to install tees of sufficient size.
Weights. To fix the main sinker, a small pellet is used; the weight for the tackle can be 10–25 g. This depends on the speed of the current, the size of the live bait and the fishing location.
You can make leashes yourself or buy ready-made ones.
It is important that they withstand pike teeth, which is why they are usually made of steel. The length of the leash is up to a meter (depending on the desire and experience of the fisherman).
It is important to choose the right bait. To do this, you should find out the types of peaceful fish that live in the reservoir.
Pike's favorite food will be popular among fishermen. Crucian carp, bleak, and perch are the most durable and attractive baits for pike.
Features of catching pike on girders in summer
Fishing with homemade summer girders, unlike other pike gear, has its own characteristic features. These include:
- Passivity of fishing - installed girders do not require the presence and participation of the fisherman in attracting pike.
- Ease of manufacture and use - the installation of a girder in summer does not require special skills and tools; the design during fishing ensures self-hooking and reliable retention of hooked fish.
- Lack of a visually observable moment of biting - in most cases, the angler does not see the moment the pike grabs the bait.
- Possibility of staying in one place for a long time - a “charged” and securely fastened vent can be left in a promising place for a long time. Strongly attaching it to a pole, tree or other stable object on the shore, as well as using a thick fishing line, allows you to not fear that the tackle will be torn off or pulled under the water by a hooked pike.
Do-it-yourself summer bait for pike
Those who are familiar with the design of a winter girder can, of course, easily convert it into a summer version. Although there are different designs and many fishermen do not know how to attach them to a pond or large rivers with moderate currents.
Among the classic options for girders, you can make simple designs with your own hands from scrap materials: a flyer, a tube, a flag or an ordinary plastic bottle.
A fishing line is attached to these materials at one end. It is wound so that it can easily come off the base if necessary. A sliding sinker is connected to the other end, as well as a tee and a leash.
To securely hold large fish, the frame of the structure is securely attached to a stick or wrapped around a nearby tree.
When installing a girder, it is advisable to hide it, install it directly under tree branches hanging over the water.
When using the slingshot design, you need to stick the sharpened end directly into the thicket of reeds or sedge. In such places, the use of spinning rods is out of the question, but ordinary scraps from sewer pipes are just what you will need.
Moreover, it is reasonable to make several vents of different designs at once, and place them close to each other at night. When the fish starts to bite, the line will easily unwind from the stag; there will simply be no obstacles for the fish to swallow the hook.
Self-hooking will occur in full when the fishing line leaves the base of the girder.
In this article we covered the question of how to make fishing chairs with your own hands.
After the spring flood in the summer, the water level in rivers and lakes begins to decline. At the same time, the growth of grass in the pond begins to gain strength. All this, along with the presence of snags, makes fishing difficult for the spinning angler. A hand-made summer vent can come to the rescue.
Those who fish in winter can easily adapt their gear for summer fishing in open water. However, not every fan of exclusively summer fishing is familiar with the design of the girders. The girder is made from simple available materials.
In addition to installing the gear, the fisherman also needs to decide on the method of attaching the girder to the reservoir, especially if it is a large river with a moderate current.
Getting to know the device
The zherlitsa is a classic live bait tackle designed for catching predatory fish. With the help of this device, pike, pike perch, catfish, burbot and perch are quite successfully caught. Depending on the time of year, there are winter and summer zherlitsy. Today, various modifications are presented to anglers.
They all have a similar design, in which there is a bite alarm, a base and a stand on which the reel is attached. The fishing rods use a general principle: a predator, having swallowed the bait, pulls on the line, causing the alarm to go off. Knowing the principle of operation, it will be interesting for the home craftsman to start making a summer girder for pike with his own hands.
When making a summer lure for pike with their own hands, many fishermen wrap the reel with wood so that it unwinds easily from the slightest tug. Often the line is installed in a wooden groove or piece cut from plywood. You can also use an inertia-free reel, which will easily unwind with a little effort.
We suggest you read: Choosing a feeder rod for beginners
How to properly make a summer bait for pike?
Fishermen have developed many variants of such devices. Judging by the reviews, handicraft girders are not inferior to branded ones. The following is one of the simplest ways to make a summer girder for pike with your own hands. To make a fishing device, you need to perform the following steps:
- Wrap a line around a wooden flyer, the length of which should be at least 20 m. You can also use a plastic pipe or durable plywood.
- Insert the line into a special slot in the reel. This must be done so that a sufficiently long piece of fishing line ends up in the water. In this case, the depth of the reservoir itself should be taken into account. Experienced fishermen recommend checking it first before starting to operate the device.
- Next, the fishing line on the girders is equipped with a corresponding sinker using a sliding method. Its weight should not exceed 15 g. The sinker is attached to a swivel, which is then connected to the leash. For this purpose you will need a winding ring. Live bait is attached to the latter on a double or triple fishing hook.
After performing these steps, the girder is connected with a rope to some static object located on the shore of the reservoir.
What are girders?
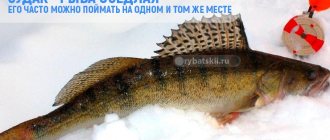
Pike is a desirable catch for any fisherman. In summer it can be caught using any tackle ; in winter it is best to catch pike with a girder. In fact, only it allows you to achieve maximum results.
A zherlitsa is a piece of equipment that allows you to catch pike with live bait. There are a lot of varieties of this equipment. There are options for both the cold season and summer girders.
This tackle is sold in any store. Experienced fishermen prefer to make a pike girder with their own hands. They rightly believe that they know better how to fish more efficiently.
The classic winter vent has a simple design . It consists of the following elements:
- fishing line - must be strong enough to withstand the jerks of a large fish. Experienced fishermen recommend not to waste time on trifles and use a fishing line with a thickness of at least 0.3 mm. It will hold the predator and give you the opportunity to play with the bait. The fishing line must be elastic and frost-resistant;
- hook - it should be sufficient in size and quality;
- sinkers – for the girder, oval sinkers weighing 10-15 g are used. When fishing is carried out at great depths, you can use sinkers weighing up to 20 g;
- leash - pike are much more willing to take live bait on a leash from a fishing line. Leashes are made of metal, but pike ignore them in winter;
- reels - the optimal internal diameter is 15 cm. This will prevent the line from sagging in the cold and the fisherman will easily see the bite. The height of the sides of the reel should not be less than 1.5 cm. Otherwise, there is a chance that the line will overlap the drum.
When buying ready-made tackle in a store, you need to pay attention to the following points:
- the coil must be plastic;
- its movement should be slightly difficult - it will avoid tangling of the fishing line;
- the bite alarm must be metal and have a bright flag;
- the length of the alarm should not exceed 50 cm;
- it must be flexible and durable enough not to react to the movements of live bait.
Pike baits
Pike on a girder in winter There are two types of winter girders for pike:
- Classic over-ice girder for pike;
- Subglacial vent or postavusha.
Each type of vent has a huge number of design variations.
A classic over-ice pole for pike for winter fishing, consists of a pole rig and its holder along with a bite alarm in the form of a flag. That is why, when I catch pike on girders in winter, it is sometimes called fishing on flags. It is this type of girders that we will talk more about.
An under-ice vent (supply), as the name suggests, is installed under the ice. Most often, this type of vents is used for covert installation to avoid detection by strangers. Fishing with such girders follows the principle: set it up at night and check it the next day. An exclusively passive fishing method, more often used for catching burbot than pike.
The fish are biting like crazy! You can even put bait on it. The poacher spilled the beans.
35 kg of fish per pheromone bait. Fishing report!
Gear equipment
Regardless of the design, the equipment of the pike girder is mounted in the same way.
- Main line with a diameter of 0.3 – 0.4 mm;
- Sliding sinker "olive";
- A leader made of leader material, fluorocarbon or thicker line, or a flexible metal leader;
- Sharp treble, double or single hook.
For catching pike, a double hook (double) is most often used.
The length of the pike leash (the distance from the weight to the hook) depends on the depth and ranges from 0.5 to 1 meter (the deeper, the longer). The length can be adjusted by moving the load along the line.
The sinker must be capable of holding the baitfish at the desired horizon (weight depends on the size of the baitfish, depth and current). In shallow water (up to 1 meter) you can do without a load at all.
IT IS IMPORTANT TO KNOW! Fishermen caught 25 kg of fish using the Fish XXL bite activator! Read more…
Installation of girder equipment for pike:
The device of the over-ice vent
The operating principle of the winter girder is based on the activation of a flag when a pike bites. In addition, the trap must provide the pike with free movement after the bait is grabbed, since it does not swallow it immediately.
A winter pike rig installed on ice consists of the following elements:
- Equipment;
- Gear stand;
- Reel (line holder) with a supply of fishing line;
- Bite alarm (flag).
The most primitive fishing rod can be considered a rig on a wooden fly, a flexible twig with a slot for fishing line and a red flag at its tip. When biting, the fishing line is pulled off the twig and it flies up, leaving a supply of fishing line on the ice for the pike to select. The blade is securely attached to the ice.
However, there are more advanced, convenient and at the same time simple designs.
Poachers who caught 317 kg of fish were not punished
A group of fishermen revealed the name of the secret bait during interrogation.
Category: regional news.
MORE →
The pole stand, the reel or line holder and the flag are the basis of the pole, which is one device that serves to interact with the pole equipment. The base of the girder is installed on the ice and can be designed as:
- Platform-cover for the hole;
- Tripod;
- Stand for installation in ice;
- Changeling or “cross”.
Vent on the platform-cover
The vent on the lid covers the hole, thereby slowing down the process of formation of an ice film. This is the most common type of girders. The device is a structure that includes the following elements:
- A flat platform-cover, most often in the form of a circle, with a slot for the fishing line;
- Vertical removable stand with a reel for equipment attached to it;
- A flag on a spring plate fixed in the platform.
After installing the girder, the flag is loaded into the coil by the stop. When there is a bite and the reel rotates, it is released and triggered - it straightens, signaling that the pike has taken a bite (it shoots).
Zherlitsy with a flag
Winter girders, which are familiar to ice fishing enthusiasts, can also be used in summer. It is only necessary to make some modifications to the gear.
- Models with a high leg are best suited. A flag and an inertial coil are attached to it.
- A monofilament thread with a diameter of 0.4-0.5 m and a length of up to 20 m is wound onto a reel. The sinker must be sliding, and when hunting pike you cannot do without a metal leash.
- The most problematic aspect of fishing with such a girder will be its installation. The most favorable option is a long stake securely driven into the shallow coastal waters. You can tie the pole stand to it using wire, rope or tape.
- The advantage of such gear will be a clearly defined bite from the predator. When the flag flies up, you should not rush to the fishing rod. You need to give the fish a few minutes to swallow the bait. You can determine the hooking moment by the rotation of the coil. It is better to decorate it in alternating red and white sectors. Then you can see the rotation of the coil from afar.
Fishing with live bait for pike
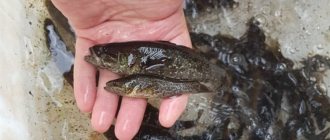
There are several ways to catch live bait for pike. The simplest of them, which allows you to catch small crucian carp, minnows, and redfish, is fishing with a small fish. To do this, you need to take a fine mesh and throw a small load into it and install it at a shallow depth. Then the small fish are fed with bread or other bait. When a sufficient number of fry have gathered above the net, they raise it sharply and thus get a large amount of live bait at one time.
Live bait for larger fish is caught using a simple float tackle. You can use bread, maggots, dough, etc. as a nozzle.
How to properly mount live bait
Variation of threading a hook on live bait
Several methods of baiting with live bait are used to catch pike. All of them are primarily aimed at ensuring that the bait remains mobile for as long as possible. This is an extremely important point, because the tackle used for pike is in the water for a long time.
In reservoirs with stagnant water or fairly weak currents, live bait is usually placed behind the back. To do this, the bait is pinned onto a hook or “tee” approximately in the middle of the back, where the fin is located
Moreover, this must be done with great care, trying not to damage the dorsal muscles of the fish. Otherwise, this may lead to loss of mobility of live bait
After this, the fish is thrown into the water.
This nozzle method is not suitable for rivers with strong currents. Therefore, in the case of fast water, it is correct to place the bait on the upper lip. To do this, you can use either an ordinary hook or a tee. If you need the live bait to remain energetic for as long as possible. A baiting method is often used, in which the lead of the tackle passes through the gills of the baitfish, after which the sting is hidden behind the dorsal fin in the body of the fish.
How to save live bait
Live bait, as a rule, does not live very long if you do not think about its safety in advance. The most optimal and tenacious is the crucian carp, which can be forgotten for literally half a year and the loss in quantity will be only about 20%. For others, the preservation method is something like this:
- For fry 5-10 cm, in an amount of about 20-35 pieces, a container with a volume of 15 liters is required (for a larger number of live bait, a larger volume of container accordingly)
- Change the water at least once a month (or use a sponge for filtration and take it out for cleaning at the same frequency)
- If possible, avoid highly chlorinated water (from household water supplies)
- Clean the container along with changing the water.
- Provide a minimum oxygen supply (do not cover the neck of the container or other container)
Such simple moments will help live bait live as long as possible.
Watch catching pike with live bait using a float rod:
Equipment for vents
Sinkers, fishing line and hooks
When equipping rigs, I recommend using an olive sinker of such a size that the sinker fits freely into the groove of the reel and not by tension. This will make it easier for you to unwind the beginning of the tackle when installing it. The required weight is obtained by the number of olives.
I use two 3/8 oz olives.
The sinkers are fixed with two stoppers cut from the cargo inner tube.
The line is threaded through the stopper using a thin saddlery awl. The loop knot is covered with a cambric, this protects the line from getting caught behind the knot and getting tangled. A 20-30 cm piece of cord (0.4 mm in diameter or more) is attached to the loop of the fishing line with a noose loop - the cord protects the fishing line from rubbing against the edge of the hole when placing the head of a trophy fish into the hole. Often it is Trophies who lead long round dances, the tension under the hole and the fishing line are in the risk zone... The other end of the cord is also attached to the swivel of the leash with a noose loop. This installation makes it possible to quickly replace the leash in case of chronic wear.
For fishing with girders, I only use doubles.
This is due to the method of attaching live bait, which I successfully practice, and, again, to promptly removing the hook from the leash. The main line is attached to the reel using a self-tightening loop.
Winding fishing line - video
Since winding the fishing line on this model of girder is done somewhat non-standardly, I decided not to talk about it, but to show it.
In words:
- Thread the fishing line from top to bottom into the “Anti-Beard” hole
- Tie the fishing line to the reel with a self-tightening loop, or any other knot that you prefer.
- Wind the fishing line (move the reel clockwise, respectively, the fishing line counterclockwise)
- Equip the vent.
- The concept of the Anti-Beard is to make one turn of the line counterclockwise around the reel and lower the sinkers and live bait into the hole.
Live bait and its bait on the hook
Dear Friends, use a fixed net for catching live bait only as a last resort, when there is no other alternative. After the net, live bait is no longer live bait, but dead fish and is most suitable for fishing in Pike traps. In fact, they sometimes hang frozen food on traps.
There are countless ways to attach live bait to a hook (single, double, treble), from simple and practical to almost sexually perverted. The method described below involves the use of a double, and was shown to me by old Fishermen in the Tomsk region.
Having removed the double from the leash, the loop of the leash is carefully passed under the gills of the live bait and the leash is pulled out through the mouth
The double is threaded through the loop of the leash and the leash is carefully pulled up. The double depicts a mustache on the muzzle of a live bait fish
What is good about this method of attaching live bait? I will answer in detail point by point:
- Live bait is not injured and remains mobile for a long time.
- When you see a fresh job, you don’t need to run like crazy, your eyes bulging, to the line and hook! It is well known that Pike always grabs live bait across the body, swims with it for some distance and there begins to swallow it from the head. From the head, that’s right, from the Head!.., and there is a double – “with its stings back”..., so the Fish, without being pierced, calmly swallows the bait. With this method of attaching live bait, I have never had any problems. (Ugh, ugh, ugh!!) Of the hundreds of different-sized Shchukans, only a few had a hook in the jaw, a dozen had a hook in the gills, and all the rest had a hook in the beginning of the esophagus.
- Based on the above, when you see a fresh piece of work, do not run to it, but take out a flask with Cognac. Take a sip for a Happy Day in Nature! Take a deep breath of the frosty air... And then, slowly, take a replacement eland with live bait and a hook, go to work, I wish you that there would be a lot of them...
I would like to emphasize to you: Take your time! Let the Pike swallow it... And enjoy your Rest and Fishing!
Tackle
Depending on the season, even when fishing with a spinning rod, different baits are used, not to mention the methods and designs of equipment.
Types of gear used for pike fishing
To catch pike, our fishermen use 3 main types of gear:
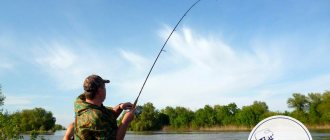
- the most common and catchy way of fishing for pike is using spinning tackle with various baits and equipment;
- bottom types of fishing rods for catching predators;
- and of course, live bait gear, all kinds of mugs, and zherlitsy.
The choice of type of pike fishing is influenced not only by the fisherman’s preferences, but also by the fishing season and weather conditions.
The principle of choosing gear depending on the conditions
Depending on the season, it is necessary to use gear that is most suitable for the taste preferences of the predator. In open water, the main type of gear is spinning. But many fishermen prefer to combine active types of fishing with pike fishing using live bait or bottom rigs.
Much depends on the experience of the fisherman. It’s easier to throw several dozen girders in the predator’s hunting areas and check the gear several times a day. Or take a spinning rod and explore places on the reservoir using sea fishing skills or trolling.You will need to select different types of wiring and types of bait depending on the time of year. For vertical lures, winter lures, rattlins and balancers are used, which do not work in open water. Rattlins for winter are different from summer ones. They do not have a rattle, the noise effect attracts predators in the summer, but only scares them away in winter.
In autumn, the water cools down, and the pike does not react to jerking baits. At this time, do not use spinners, which work great in the summer. This is the time of wobblers and jigs. Pike feed actively, gaining fat reserves before winter. This is one of the most favorite periods for predator hunting lovers.
We will examine this issue in more detail in the next section.
Types of girders for summer fishing
As can be seen in the photo of summer vents, according to their design features they are divided into:
- Postavushi.
- Hanging.
- Moored.
Each type differs not only in equipment, but also in the installation method.
Read here Kayak for fishing: tips for choosing, features of use for fishing and types of kayak (135 photos)«>
Manufacturing process
Do-it-yourself summer girder is not such a tricky thing, if, of course, you have at least some skills for such work. Even a schoolchild who hasn’t shied away from technology lessons can make such a trap correctly.
The oldest, described in manuals of the 19th century, is considered to be the manufacture of a summer pier from a slingshot. The slingshot in this case is a very real branched branch of a tree or bush. In summer, such traps can be made directly on a pond, using the tree and shrub vegetation that is most often found there: alder, willow, and sometimes bird cherry.
A wooden slingshot is also convenient because it can be easily processed with a regular knife, without the use of additional tools. A slot is made at the base of the slingshot, which is necessary to make it more convenient to tie a piece of rope to it, which is necessary for mounting the trap on a stuck pole or natural base, for example, to a branch hanging over the water. The manufacturing process is simple.
- The fishing line is wound in loose layers in the form of a figure eight from one “horn” to another.
- The tackle is mounted on the free end of the fishing line.
- On one of the “horns” it is necessary to make a vertical slot into which the equipped tackle is loaded.
- To make a trap, you need to select a branch so that the length of the horns and the base are approximately 10-15 centimeters.
A fishing slingshot can also be made at home from a board; it can also be assembled from pre-prepared bars of the desired shape and size. The operating principle of such a wooden girder is no different from the one described above.
It is important to process the edges, round them so that the fishing line can be easily retracted
The simplest modern homemade option is a trap made from a plastic bottle. It is better to use a 1 - 1.5 liter bottle
A smaller container can easily get lost, while a larger one will attract too much attention and, in certain conditions, may even scare away a cautious predator.
- The fishing line is tied to the neck of the bottle, under the thread for the cap.
- Next, you need to wrap it in even rows without overlaps on the bottle.
- Using tape, you can attach a signaling device made from another plastic bottle to the bottom side.
In order to charge such a girder, the equipment can be glued with tape so that after hooking a fish it will jump out and release the alarm, and then the fishing line will unwind itself from the rotating bottle.
A completely lowered line will cause the bottle to stand upside down in the water, this will release the alarm and the triggered trap will be clearly visible
It is important that water is not filled into the bottle; for this reason, damaged containers are strictly not recommended for use.
Using a coil, you can make an analogue of a winter girder installed above the hole. In the summer version, it differs only in that it is attached to a pole or branch, which must be stuck into the bottom or coastal slope, at a certain angle to the water. Thus, it is possible to make all-season traps that will be mounted to different bases depending on the conditions.
The equipment of all types of vents is approximately the same. The weight of the sinker must be made so that the predator does not immediately feel it. The purpose of the sinker is to keep the bait close to the bottom, somewhat limiting its movement. The hook - single, double or tee - is connected to the fishing line using a leash. If the prey is supposed to be small, for example perch, you can do without it. But still, a leash made of metal or other modern materials will somewhat protect the tackle when fishing, when breaks on snags or as a result of catch resistance are possible.
Take action!
When fishing for pike with a girder on a small (10-15 meters wide) river with a small current, an abundance of backwaters and creeks, thickets of aquatic vegetation and an average depth of about 2.5-3 meters:
It is best to prepare live bait in advance, with preference given to juveniles of “local” fish species
Prepare and equip all the fishing rods at home - the gear should be set up as quickly as possible on the reservoir.
Since it is most likely to catch pikes ranging in size from 1-1.5 to 2-3 kg, use a transparent monofilament line with a cross-section of 0.3-0.35 mm, an olive sinker weighing 6-8 g, and a metal leash 15-20 cm long. with triple or double hook No. 3-4. For such a small river, wind no more than 10 meters of fishing line on each girder - such a supply is quite enough so that the pike, having taken the bait, is detected and cannot get the equipment too tangled in the grass.
It is best to take 5-6 girders with you - install 4-5 of them, leave 1 in reserve;
Having arrived at the reservoir, initially carefully, without creating unnecessary noise, walk along the river bank and select several places in which there is a high probability of pike presence - backwaters and small backwaters, snags, fallen trees and lying in the water, reed thickets, water lilies
From alder, hazel or young aspen growing on the shore, cut the required number of poles from 2 to 3 meters long, remove small branches from them, carefully sharpen the butt part of each of them;
Do not remove bark from poles to camouflage installed gear;
Using a fishing rod with a sinker, measure the depth in the places where the girders are placed; based on the results of measurements, reel in and fix with a splitting line such a length of fishing line so that the live bait is 5-10 cm above the bottom;
It is best to prepare live bait in advance - in this case, give preference to juveniles of “local” fish species: small roach, perch. In this case, the pike is more likely to take live bait without being wary;
Place the live bait behind the back, being careful not to damage the fry’s spine;
Tie each of the poles securely to the top of the pole and carefully, without creating unnecessary noise, lower the rig with live bait into the chosen place and firmly stick the pole with its pointed end into the shore;
After all the gear is installed, move some distance away from it and fish with a float rod - the absence of a person on the shore near the gear, clearly visible to a sharp-eyed predator, will allow him to safely come out of his hiding place and attack the baitfish on the hook;
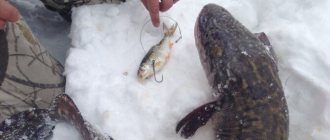
Check the vents every 3-4 hours. It is very difficult not to notice the triggered tackle - the fishing line is stretched with a string, the tip of the pole often bends under the jerks of the pike. Having noticed a triggered girder, do not hook or hesitate - just quickly pull the fish ashore, allowing it to tangle the fishing line in the grass or branches of the nearest snag;
Having pulled the pike ashore, using a yawner or, in extreme cases, a twig, remove the hook with live bait from its mouth, not forgetting that your fingers should not end up in the pike’s mouth;
To ensure that the fish does not spoil and remains alive for a long time, place it on one of the carabiners of the kukan, tied to a reliable stake driven into the shore, and lower it into the water;
After catching a pike, re-bait the tackle with fresh live bait and throw it into the same place.
https://rybak.guru/izgotavlivaem-zherlicu-na-shhuku-svoimi-rukami-bystro-i-prosto/https://zen.yandex.com/media/velesovik/kak-sdelat-samodelnye-jerlicy-4- samyh-prostyh-sposoba-5caabd35dc9f5800afde6cf6?feed_exp=ordinary_feed&from=channel&rid=3996194029.330.1554864029734.84125&integration=publishers_platform_yandex https://ohotnik.org/posts/zherlicy-svoimi- rukami/https://trofey.ru/articles/osnastka-zimnikh-zherlits /https://turboklev.com/lovlya/pike/zherlicy-na-shhuku-letom.html
What types of summer vents are there and how to make them yourself
During the development of its design, many different types of summer girders for pike fishing appeared.
Depending on the characteristics of the equipment and design, the following types of summer girders are distinguished:
- Postavushi.
- Hanging girders.
- Moored girders.
Summer girders of these types have differences not only in equipment, but also in installation methods. Let's take a closer look at each type with its varieties, installation and installation on a pond.
Postavushi
These girders are designed for fishing in bodies of water with current. Depending on the design and method of attachment to the shore, the following types of postavush are distinguished:
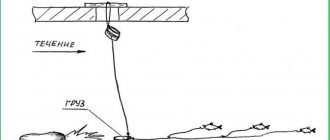
Simple - the equipment of such a rig consists of 5-6 meters of fishing line with a cross-section of 0.5-0.6 mm, at the end of which a sinker weighing 30-50 grams is attached. Above the sinker, two loops for leashes are made on the fishing line in increments of 0.5 meters. The length of the leashes is on average 40-45 cm, they are made from the same fishing line as the main equipment. The leashes are tied to the main line using the “loop-to-loop” method - for this, strong double loops are made at the ends of the leashes. Leashes are equipped with double or triple hooks. The resulting equipment is wound onto a reel or plastic reel from under the fishing line. When installing on hooks, bait small fish, unwind the required amount of fishing line, and lower the baited equipment into the water. The reel or bobbin is attached to a branch or bush hanging over the water using the remnants of the fishing line.
With a coil - it is structurally the same winter vent. To make it, a spring with a flag made of bright red or light green fabric is screwed to the top of a long stick using self-tapping screws, and a bracket with a coil is attached just below. The end of the stick is sharpened. The equipment used is the same as in the previous design, with the difference that the amount of main fishing line can be increased to 10-15 meters. They fish with this tackle in the following way: bait the fry on the hooks, throw the equipment into the water from the hand, using the donkey principle; the vent is stuck with its sharp end into the soil of the bank; The reel is used to tension the fishing line. The spring with the flag is inserted into the groove of the coil. When a bite occurs, the reel rotates and the spring, when released, straightens, signaling to the angler that a predator has captured it.
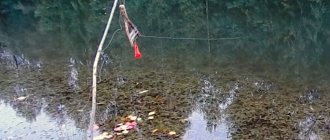
Floating - assembled from a large foam or cork float to a ring, in the body of which the main equipment with a sinker and two leashes, as well as a cord for casting the tackle, is attached. They throw the baited bait with a cord from the shore or bring it in by boat. The cord is tied to a tree or a peg driven into the bank.
Video: pike on rigs or summer baits
Hanging
These are classic Sabaneev zherlitsy. Depending on the design there are:
- Simple - a figure of eight 12-15 meters of monofilament fishing line with a cross-section of 0.3-0.4 mm is wound on a cut-out wooden slingshot, a sliding “olive” sinker weighing from 5 to 15 grams is put on, and fixed on both sides with silicone stoppers. A metal tungsten leash up to 30 cm long with a double or triple hook at the end is tied to the end of the main fishing line. The girder obtained in this way is attached to a tree or thick bush, or a stake driven into the bank, using a nylon cord. A fry is baited onto the hook and, after releasing the required amount of fishing line, it is fixed in a split at the end of one of the branches of the slingshot.
- With a shock absorber - the equipment of such a summer pike rig is assembled in the same way as the previous one. The difference lies in the presence of a rubber shock absorber attached parallel to the line in a ratio of 4:1 (line: shock absorber), and the absence of a reel - all equipment is attached to the top of the pole. When biting, the shock absorber very well softens the jerks of the fish and contributes to better and more reliable self-hooking.
Video: installing a summer girder from the shore
Moored
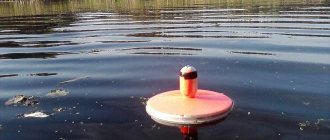
This zherlitsa is a circle with equipment from the postavushi. They make a similar tackle (jet) for pike with their own hands as follows:
- From the selected floating material, a circle with a diameter of 12-13 cm and a thickness of 2.5-3 cm is cut out with a jigsaw.
- A hole is made in the center of the circle and a stick with a cutout in the upper part is inserted into it.
- A groove is cut out along the rim of the circle.
- The equipment is wound into the groove.
- The upper part of the circle is covered with red waterproof paint, and the lower part with white.
- Slots are made along the rim of the circle on two opposite sides for attaching fishing line.
When installing such a girder, the required amount of fishing line, slightly larger than the depth at the fishing site, is unwound, it is alternately attached in the slots on the rim of the circle, in the slot in the end of the antenna tip.
When biting, the pike pulls the rig and the circle turns over under the force of the antenna lever, notifying the fisherman about the bite.
Video: do-it-yourself summer bait for pike
Fishing accessories and gear for fishing with summer girders
What the girder actually consists of, let’s look at each type in detail:
Zherlitsa-flyer
To make it you will need:
- a wooden branch in the shape of a slingshot with a total length of 15-20cm (of which 10-15cm is on the slingshot and 5cm on the base) and the thickness of the knots is 1.5-2cm;
- strong fishing line or thin nylon cord, the length of which is determined based on the depth of the reservoir plus 5 meters, usually no more than 10 meters;
- a load weighing 10-12 grams, depending on the liveliness of the live bait and its size;
- carabiner with clasp;
- a metal leash, preferably made of nichrome wire with a diameter of 0.3 mm;
- hook.
Floating vent
To make it you will need:
- a disk with a hole for a wooden pin in the center and a groove along the edge, as a rule, an easy-to-process and buoyant material such as polystyrene foam, wood or polypropylene is used (you can also use a plastic bottle, a tin can, or a “chmak” type structure instead of a disk);
- nylon cord 2mm thick, the length is determined based on the depth of the reservoir plus a reserve of at least 6 meters;
- undergrowth made of monofilament 0.4-0.5 mm thick and 1-2 meters long;
- “olive” weight weighing 10-15 grams;
- swivel;
- carabiner with clasp;
- metal leash;
- hook.
Zherlitsa with a flag
To make it you will need:
- stick 30-40cm long;
- homemade flag;
- inertial coil;
- monofilament with a thickness of 0.4-0.5 mm and a length of up to 20 meters;
- cargo;
- carabiner with clasp;
- metal leash;
- hook.