Preparing fishing elastic for fishing involves installing removable leashes on swivels and attaching baits to hooks. If the safety line is not spread out, then it should be spread out to avoid snagging on the hooks of the elastic band.
On the previous page of the topic, a description is given of preparing a fisherman’s workplace for comfortable fishing with a fishing rubber band, without getting up from a folding chair.
To do this, we must already have the fishing shock absorber equipment cast from the shore or brought in from the boat, a peg installed for attaching the supporting fishing line of the tackle, and a fish tank attached in the water for storing the caught fish. More details in the topic: Equipment for fishing with a rubber band.
Here we will prepare the rubber band fishing equipment for fishing. At the same time, we will do without excessive stretching of the rubber cord when installing fishing elastic leashes, equipping hooks with attachments and when removing caught fish from the hook.
At the end of the topic, I will tell beginners how to spread the safety line of a rubber shock absorber from a place equipped for rubber band fishing.
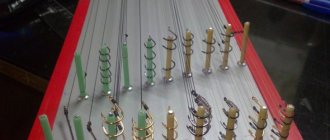
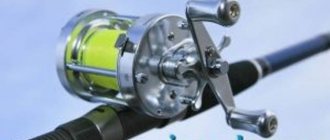
Installation of a leash on an elastic band swivel
I will describe my actions when installing leashes on swivels when preparing the elastic band for fishing, without leaving the folding chair.
The previous page describes the method of equipping a place convenient for fishing with a fishing elastic rig thrown into the water without leashes.
Here we will install each leash on its own homemade swivel (picture on the left). For this:
The main (bearing) fishing line, up to the first homemade swivel that appears from the water, is pulled out of the water and dropped behind a peg with a fish bite alarm on an elastic band.
The working section of the fishing line with the swivels of the equipment, on which ten leashes removed from the reel at home will be installed, is also completely pulled out of the water and laid out along the edge of the shore like a snake.
I place the last swivel from the shore behind the slot in the peg. In this position, it acts as a stopper, preventing the fishing elastic from shrinking, and the fishing line, during installation of the leashes on the gear, will not allow it to return back into the water (see drawing below in the text).
In order to eliminate accidents and avoid injuring your hands with the stings of hooks while fishing, I install the leashes in the process of preparing the elastic band for fishing one by one, starting with the last swivel from the shore.
First, I prepare the leashes needed for fishing, and thread the little finger of my left hand into the loops of three or four of them. Next, without getting up from the chair, I install leashes with hooks on the nearest swivels one by one.
I release a section of fishing line with leashes into the water. I install the rest of the fishing elastic leashes in exactly the same way when preparing the elastic for fishing from the shore, lake, river or pond.
The numbers 1,2,3 in the picture show the sequence of mounting the leash with a hook on the swivel of a fishing elastic band. The leash is removed at home or directly while fishing in the reverse order.
Below I will describe in more detail how sections of the fishing line are laid out before installing the leashes in the swivels of the fishing elastic in the process of preparing the gear for fishing. The installation of the leashes is carried out after installing a peg on the shore at a certain angle of inclination, which serves as a support for the entire casting bottom equipment.
Next, I will draw a picture showing the locking of the swivels in the process of preparing the elastic rig for fishing, without leaving the folding chair.
Drawing of an elastic band before installing the leashes
To install leashes in the process of preparing the elastic band for fishing, we remove the supporting fishing line of the tackle from the slot in the rod and drop a weight next to the peg - a fish bite alarm (black).
We pull it to the shore and throw the entire descent of the fishing line behind us up to the first swivel. Naturally, the line release did not fit in the drawing and was located outside the drawing.
Then we pull out the working section of the fishing line with swivels (red) from the reservoir and lay it out in front of us in the form of a snake - you can lay it out right next to the shore in the water.
We insert the fishing line behind the last swivel into the slot of the rod or rail. As a result, we got a securely locked tackle and both hands were untied for installing leashes on the swivels of the fishing elastic.
Therefore, we calmly proceed to installing the leashes in the swivels fixed to the main fishing line of the elastic band. Then we release all the gear into the pond and adjust the tension of the main line.
Next, step by step, we attach fresh baits to all the hooks of the rubber rig or replace baits worn out by fish during the fishing process.
Replacing the nozzle on the elastic hook
Replacing baits on elastic hooks, as well as eating caught fish, requires certain skills, unless we have an additional relatively high stake prepared behind us, 10 meters from the shore, which I never use.
In this case, all manipulations with replacing the nozzle have to be done while sitting on a chair, with a taut fishing elastic cord, which constantly tends to break out of your hands.
But this is only if I replace the nozzle on one hook of a fishing rubber band after an empty bite or picking up a caught fish.
If we need to attach or replace all the attachments on the elastic hooks, then we will use a more civilized method.
First, I will describe my actions when replacing or initially attaching baits of animal or plant origin to elastic hooks.
To change the nozzles, I tighten the main line, throwing it over the peg to my right.
I lay out a section of fishing line with leashes in front of me like a snake next to the water’s edge (this is always less than 5 meters).
I insert the main line of the fishing elastic into the slot of the peg in front of the second or third swivel from the thrown load. I equip or replace attachments on the hooks of nearby leashes.
Then the main line of the rubber band is removed from the slot of the peg, the rubber cord pulls the hooks loaded with the nozzle towards the abandoned load, and I perform exactly the same operations with the next 3-4 swivels, leashes and nozzles on the hooks.
After the nozzles on all fishing hooks are replaced or initially installed, the tackle is lowered into the place where the fish are caught with a fishing elastic band.
How to choose the right hook?
So, the angler has the following types of hooks at his disposal:
- jig heads;
- offset;
- single;
- doubles.
Before planting a silicone bait, you should always mark the expected location where the tip will exit the body. Inexperienced anglers can use a marker for this.
It is very important to understand that not every hook size will fit every type and length of rubber. When it is introduced into the body, the integrity of the fish is violated. Silicone is constrained along its axis by a foreign body.
Therefore, free dynamics and play in the water space are reduced:
- in order not to deprive the vibrotail of the freedom of vibration and the attractiveness of the game, the length of the hook is chosen to be approximately ½ of the body of the fish;
- for twisters, the length of the forend is chosen approximately equal to the belly of the fish. You can leave a few millimeters before the beginning of the curled tail;
- for worms it is better to choose a length half the size of the bait.
Each assembly option has its own uniqueness and advantage over the other method. But there is one common point - hooking. It is worth dwelling on this point in more detail.
Offset hook mount
The sting penetrates the head part (mouth). The point comes out of the fish's neck.
The body of the bait rotates 180 degrees around its axis. There is no need to insert through the entire abdomen. After the puncture, the rubber moves towards the step of the offset press with the head part.
The tip pierces the back or middle part of the silicone and exits outward. Sometimes the released sting can be slightly driven into the body of the bait. Thereby camouflaging and hiding from vegetation and obstacles.
A “Cheburashka” is attached to the eye of the hook.
Jig head mount
The sting penetrates the head part of the bait (mouth).
The silicone body is threaded along the forearm to the intended point where the tip exits the dorsal part.
The head part is fixed on a noticeable technological protrusion of the sinker.
Double mount
The double expands by several millimeters (taking into account the thickness of the bait).
One needle pierces the center of the abdomen. The nozzle is pulled to the eye between two hooks.
The eyelet is carefully inserted into the inner part and pulled along with an exit at the head part.
The hook is attached to the Cheburashka directly or through a winding ring.
Single hook mount
A model with an enlarged eyelet is selected for free play on a hinged connection with the Cheburashka.
The sting is threaded through the head of the silicone.
The rubber body is threaded along the shank to the eye of the hook.
At the intended point, the tip is removed from the abdomen.
General conclusion regarding installation selection
The variety of rubber baits, the features of the bottom topography and fishing conditions have not without reason necessitated the invention of various rigging methods.
So, for twisters and worms, the most successful will be execution using North American technologies. In lures made from vibrotails, articulated and classic mounting deservedly come first.
orybalke.com
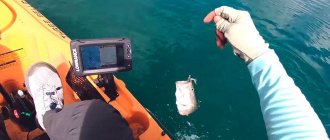
How to remove a fish caught with an elastic band
It would not be at all difficult to remove a fish caught on a fishing elastic hook if you did not have a stretched rubber cord in your hands.
In order not to return to this again, I will explain how I remove the caught fish from the hook myself, without leaving the chair in a place equipped for fishing with an elastic band.
And you can remove a caught specimen of the catch without resorting to any devices in the form of a stake stuck into the shore as follows.
After a successful hook-up, I bring the fish to the shore, throwing the main line of the fishing rubber band selected from the water behind the peg to my right.
To the hook from which the caught fish is to be removed, I distribute fishing line with leads along the shore directly near the water (or even in the water).
Above the leash with the caught fish, I wrap the main line of the fishing rubber band around the middle finger of my left hand with a couple of turns.
With my right hand I lift the fish, with my left hand, which holds back the tension of the equipment, the hook is removed from the carcass of the caught fish, and the catch is sent to the fish tank. Moreover, I remove large specimens of fish from the hook without lifting them on a leash. In this case, the risk of disappearance will tend to zero, and the fish dropped into the cage will still be washed off there.
Then, one by one, I check or replace the nozzles on the hooks, after which I release the fishing elastic back to the fishing area, for example, crucian carp, and wait for the next bite.
Double hook
Application
Having mastered how to attach a rubber bait to an offset hook, most spinning anglers switch to gear with a double hook . They explain this by saying that in this case the probability of successful strikes will double. But do not forget that when fishing in places with large underwater obstacles, the likelihood of snags and equipment breaks will increase.
The main advantages of double hooks:
- The angle of attack of the predator decreases;
- The probability of successful hooking increases;
- “Rubber” slips less, since the stings are distributed throughout the body of the silicone fish;
- Compared to tees, fewer hooks;
- With the correct size of hook and vibrating tail, the imitation of the movement of a live fish is preserved.
Disadvantages of double hooks:
- Compared to offset and single hooks, there is a high probability of snagging;
- Difficulty in installing gear without instructions. Most inexperienced spinning anglers spread the double hook and put the vibrating tail on one of its branches. In this case, the second hook is located outside and scares away the fish;
- The vibrotail is more susceptible to damage, which reduces the service life of the gear.
Double hooks can be found in any fishing store, but to equip the tackle you need to use a double hook with a long shank. Their sizes range from “14” to “3/0” , with “14” being the smallest hook and “3/0” being the largest. Full list of sizes: “14”, “12”, “10”, “8”, “6”, “4”, “2”, “1”, “1/0”, “2/0”, “3” /0". Different manufacturers may have slight variations in size markings.
Mounting the bait
When installing a bait with a double hook, just as in the case of an offset hook, you need to decide whether the size of the hook will suit the silicone bait. To do this, you need to attach the hook to the silicone fish, and the bend of the double should be located in the middle or slightly closer to the head.
How to equip a hook with silicone? The bait is installed as follows:
- The double hook must first be opened for ease of installation.
- Use a sting to pierce the vibrotail or silicone bait on one side.
- Pull the needle of the hook out from the other side and pull the shank of the double through the body of the fish so that its eye is in the center of the vibrotail.
- Then, with the eye forward, pass the fore-end through the entire body of the fish so that the eye comes out of the fish’s head. The shank of the hook should form a spine in the rubber fish.
Stretch for mounting elastic leashes
Preparing a fishing line for stretch fishing is used for installing leashes and attaching baits to hooks on the shore of a reservoir and requires quite a lot of free space.
In order to place the tackle on a stretch 5-6 meters from the peg with a fishing rubber band inserted into the reservoir, a meter-high wooden stake with a slot in the upper end is stuck, which during any manipulations by the fisherman - installing leashes and when attaching baits to hooks - will serve as a support for the stretch .
Next, we pull out the elastic rig from the fishing spot and insert the fishing line behind the last swivel into the slot of the peg.
Next, see for yourself. You can stick another stake even further from the shore and stretch a fishing line with swivels between two posts.
Then, on the main line of the fishing elastic, we install the leashes in the swivels. Then we place nozzles or baits on the hooks of the leashes one by one and put the tackle into the water. Until the next time we hook a fish or check baits, we won’t need to stretch the fishing elastic.
After biting and hooking the fish, we pull out all the fishing elastic equipment and insert it into the slots on the pegs. After which a specimen of the catch ends up on the stretch of the carrying line of the tackle between two pegs.
Inconveniences when stretching fishing elastic
During our endless travels along the stretch, we will have to run along a rubber band carrying line pulled out of the water, for which the tackle will certainly punish us more than once (it will drop the hunted and exhausted). But there’s nothing you can do about it... Such is the vile nature of a fishing line tangled in its legs.
If you act in exactly the same way when catching every fish caught on a tackle with an elastic band (at least it pecks at all of us more often), then an irrational loss of 70-80% of the time is guaranteed.
But what about those fishermen who, having equipped a fishing spot with a fishing band under a steep river bank, do not have the opportunity to prepare gear for fishing with streamers?!
They will probably have to use the method of adjusting the fishing elastic in a limited space, described above in the text.
For these reasons, when preparing a fishing rubber rig for fishing, it is not advisable to use special long rubber cord stretchers on the shore.
All actions related to setting up the tackle, replacing baits and removing fish from the hook can be perfectly done without leaving the chair, where a short peg will perfectly cope with the functions of supporting the tripwire.
Installation of offset hook
Incorrect installation of the offset machine will only lead to disappointing fishing due to the lack of bite and catch.
How to choose an offset hook for the size of the bait
It is important to choose a hook that will suit not only the future catch, but also the bait.
When choosing, you should follow the rules:
- the length of the blanket should not interfere with the play of the silicone figurine; if you take a very long hook, you can ruin the bait - it will stretch out and its playing qualities will be impaired;
- you should choose a hook with a hook height slightly less than the body height of the silicone bait;
- If you decide to fish in sea water, you should choose an offset hook of a special design that has protection. Sea water will negatively affect conventional equipment that is designed for use in river water.
Important: if the bait is selected and mounted correctly, its body will fit tightly to the sting. This will help you avoid getting caught on underwater obstacles while fishing. It is important that the tip does not sink too much into the silicone. This can lead to the fish leaving when attacked.
Silicone bait attachment
The nozzle process will vary significantly depending on its type. Here it is important to take into account not only the location of the puncture point, but also the rigidity of the material from which it is made. if it is too soft, there is a risk of the bait slipping off the hook.
Then you should pull it up a little to avoid loss during fishing.
Installation of a vibrating tail on an offset hook
Vibrotail is a special type of silicone bait that is loved by many anglers. At the bottom of the figure there is a tail resembling a shovel. It is this long tail that actively animates when it gets into the water. The main installation mistake is installing the bait on the hook in such a way that the metal interferes with the play of the tail. Such equipment will be useless, since it will not be able to force the predator to attack.
How to mount:
- pierce the end part of the vibrotail. The tip of the sting must be brought out so that it ends up at the bottom of the vibrotail. Moreover, only a small area of sharp equipment should be visible;
- mark the puncture site and measure the angle of the sting;
- make a final puncture of the bait’s body and remove the sting through the marked point;
- check the density of the bait;
- if the material is too soft and the vibrating tail dangles, tighten it more tightly.
How to attach a twister
Twister is an artificial bait that does not look like a fish. It consists of a cylindrical body (which is often covered with ribs) and a sickle-shaped tail. It is the tail that is responsible for imitating the movements of a living creature and should provoke the predator to attack.
Installing a twister on an offset press is slightly different from installing a vibrating tail. The installation technology is simpler, since the twister has clearer shapes. It is important here to follow the steps correctly:
- pierce the head of the bait with the sting of the hook;
- rotate 90 degrees and bring out the tip on the side;
- rotate the tip and mark the exit point;
- pierce the body of the bait right through;
- tighten the body, achieving a tight fit.
Important: when installed correctly, the tail of the sickle points down.
Worms on an offset hook
Some silicone tips imitate organisms that are found in nature. for example, silicone earthworms. The installation of a worm on an offset hook follows its own rules.
Installation rules:
- take an offset hook in one hand and a worm-shaped attachment in the other;
- pierce the worm at a point closer to one of the ends and run along the hook to the eye;
- bring the bait to the base of the hook, gradually turning;
- in the area of the sting, thread the body of the worm and deepen it. Thus, the worm is attached not at one, but at two points at once.
Slugs
bait
Slugs fall into the category of passive baits. The silicone figurine does not have any playing elements. Slugs are used by fishermen who prefer quiet hunting for river predators. If weak wiring is used, the action of the body of the bait will be barely noticeable and is unlikely to provide the opportunity to get a big catch. An experienced fisherman is able to animate the tackle correctly.
How to properly attach a slug to a hook:
- the head part is chosen as the attachment point so that the tail (narrower) part can flutter freely in the water column;
- For installation, large hooks are chosen, since the body of the slug is larger than the earthworm. For high-quality serifing, it is necessary that the offset maker exceeds the body of the slug in size. At least a third of the length.
The slugs have a special slot that allows you to hide the offset press tip. Such equipment does not need additional load. But if necessary, it is possible to supplement the equipment with a Cheburashka load.
Cancers, nymphs
Silicone edible baits, which in appearance resemble river crustaceans and larvae, are the most catchy at the moment. even with a weak current, the animation with tentacles, tails and antennae looks so impressive that the predator attacks the bait in most cases. In addition to its appearance, manufacturers impregnate the bait with attractants of larvae, crustaceans, and worms.
The rule for installing a silicone crustacean on an offset hook is with the pliers backwards. This installation creates the impression that the crayfish is moving backwards in the water column. If the fisherman has a silicone nozzle with a long neck, it is worth mounting it with the claws forward.
Please note that there are no special rules for installing creatures.
Installation of an offset hook on a Cheburashka
Cheburashka is a collapsible tackle consisting of a sinker and offset. The name came about because the sinker has two ears, which make it look like a long-eared creature from a cartoon. The hinged mounting method allows the bait to move freely. This allows you to throw it a greater distance.
Step-by-step installation:
- fix the Cheburashka on the fishing line;
- attach the offset press to the second eye;
- place the silicone bait on the sting.
Advice: first of all, it is worth making preparations and turning one of the ears perpendicular to the other. This will help prevent the line and hook from tangling.
Installation of offset hook with spring
On the shelves of fishing stores you can find specialized types of offset machines. For example, with a spring. It has a loose fit and is located next to the ear. In this installation option, the spring acts as an additional retainer and is screwed into the silicone nozzle. Most often, this offset version is used for catching very active and large fish. Reliable fixation allows the bait to remain on the hook and withstand numerous bites.
Spreading the line of the fishing rubber band
So far, all the material has been devoted to preparing for the installation of leashes on fishing elastic swivels, attaching baits and removing caught fish, but not a word has been said about the separation of the bottom fishing line.
And often the comfort of fishing in real summer fishing conditions depends on how far the safety line is spaced from the working area of the fishing elastic rig.
If the load is thrown perpendicular to the edge of the shore and the current in the reservoir is weak, then it does not matter in which direction from the main vein the safety line of the fishing rubber band is spread. If only there was a guarantee that after the bite the fish did not pull the leashes onto the safety line when jerking.
Sometimes, in a limited fishing space, the belay is forced to hook onto the coastal bushes as high as possible with virtually no spread, so it may not be at the bottom of the reservoir. This is also a good guarantee against the adhesion of fishing rubber lines to each other.
After casting the tackle with an elastic band diagonally to the shoreline, when spreading the fishing line, it makes sense to head along the shore towards the abandoned load.
When fishing in a noticeable current, the safety line has to be carried higher (against the current) from the main line, because it is unknown how much the current will bend the section of gear with a fishing elastic band, located between the abandoned load and the stop peg on the shore. With different elastic tensions, the bend of the tackle will also be different.
At the end of fishing with a rubber band, for example, before leaving home, the spool with the safety line spaced apart is transferred back to the main vein and only after this the load is gradually pulled up. Otherwise, all snags and debris found in the fork between the fishing lines will be ours.
The term “stage by stage” means that several meters of safety line and a supporting line with fishing elastic equipment should be reeled onto your reel.
For lovers of night fishing with fishing bands, the technology for making an electronic light bite indicator.
CONTINUATION OF THE TOPIC:
Baiting the fishing spot with a fishing band
***