Experiment "Polymer worms"
ELENA REZNIK
Experiment “Polymer worms”
The world around us is wide and varied, a child is a curious and the more he learns now, the easier it will be for him in the future. Parents can answer their child’s questions themselves, but it’s best if the child tries everything with his own hands. In kindergartens, the issue of all-round development of children is raised very well. By first grade, children know all the letters of the alphabet, can read, count, and solve simple examples and problems. Conducting laboratory experiments for children 5-6 years old in kindergarten makes it possible to explain many physical phenomena in a form that is accessible and understandable to the child.
It is impossible not to note the positive impact of experiments on the emotional sphere of the child, on the development of creative abilities, on the formation of work skills and the promotion of health by increasing the general level of motor activity. In childhood, the leading activity is not only play, as is commonly believed, but mostly experimentation.
Therefore, one of the most interesting experiences for children was making colored polymer worms .
Before starting the experiment, we carefully studied the safety precautions.
Then we moved on to the instructions. It's printed right on the box.
And, armed with knowledge, we began.
Stirring with a spoon turned out to be not very convenient, so we replaced it with a fork and things became more fun.
Now we add dyes.
Let's start preparing the Worm . We prepared it from the entire volume at once. The activator granules dissolved quickly and without residue.
And finally, the most interesting thing! We fill a syringe with a special solution and squeeze it into a glass with the Activator.
We got such .
Experience of an allergy garden To surprise with your health and overcome allergies, you need to know all the rules and, of course, follow them. Will live without worries, Friendly Sadovian people.
Summary of a lesson in the senior group on familiarization with nature, including an elementary experiment on the topic “Experiment with water” Summary of a lesson in the senior group on familiarization with nature, including an elementary experiment on the topic: “Experiment with water.” Teacher Efremov.
Work experience in the State Communist Party Early age is the most important period of a person’s life, when the most important and fundamental abilities that determine.
Experience in testoplasty Modeling is the most tangible form of artistic creativity. In modeling, the scale of crafts is not determined by the sheet format as in drawing and applique or.
Work experience of teacher Svetlana Viktorovna Biryukova, preschool educational institution 76, Ryazan You don’t know what to do with your child in his free time: it’s simple, accessible and easy! Educator. Experience of creating a “3-D” theater Hello dear colleagues. I would like to bring to your attention a 3-D theater that I made with my own hands. I really love creating different things.
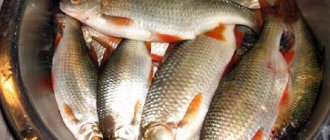
How to breed crawling worms
In nature, these worms live in the soil, where there are remains of plant organic matter, which serves as their food. By digesting the soil, they convert it into nutritious humus. Due to the underground passages they make while moving, air exchange in the ground is activated. Experienced gardeners have long discovered improved plant growth in earthworm habitats.
Related article:
Dates for autumn planting of green manure
So, if you intend to create a worm hutch for breeding crawlers, you need to choose a warm, sunny day for this. First you will have to dig a trench and fill it with garden soil mixed with rotten leaves and humus. Within 3-4 days you will find several worms in it.
Create a wormhole
Important! When you build a worm hutch, make sure that no ashes or coals fall on the ground, otherwise the crawlies will not actively develop.
During the cold season, you can grow worms in a barn, in a basement, or on a balcony. The main thing is that the room temperature is at least +15°C. The construction diagram of the worm house is as follows:
- Take a box no more than 20 cm deep. It is advisable that it be made of wood and have gaps on the sides.
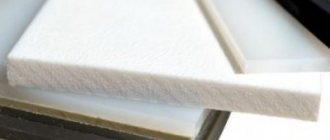
- Place material with breathable properties on its bottom. Burlap or lutrasil are ideal.
- Make a mixture of soil, chopped hay and leftover leaves. Pour it into a container.
- Moisten the substrate and place 2-3 dozen individuals on its surface.
Related article:
Gardening tools: how to choose?
You will definitely have to control the soil moisture and from time to time add plant debris and other food that the individuals eat into the “house”.
Advice. Try to mix the soil in the box from time to time. Such an event will contribute to the uniform distribution of moisture and feed. Moreover, the worms will be deprived of the opportunity to bunch into balls, which is why they die.
Experience in creating long POLYMER WORMS! Instructions in which you need to figure it out yourself..
Hi all!)
Yesterday I wrote a review of Lori’s “Metal Magic” Children’s Art Set Tin Sponge from Fixed Price. Now I want to tell you about another set for children’s experiments)
WHERE DID YOU BOUGHT. PRICE
We bought a set at Pyaterochka for 129.99 rubles.
BOX
The set was packed in a cardboard box.
I noticed this QR code when we had already done the experiment.
On the box you can see what other sets there are in this series.
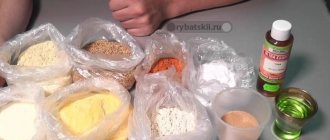
INCLUDED
Our kit included instructions, pimpled oilcloth, two wooden stirring sticks, two large cups, one small cup, one measuring cup, a syringe, gloves and three labeled bags of powders.
INSTRUCTIONS
DESCRIPTION OF EXPERIENCE
We wanted to strictly follow the instructions, but it immediately became clear that the instructions were written for the purpose of unsubscribing, and not for the purpose of helping children complete this experience. In general, the set itself was assembled anyhow.
Let's go in order. First, you had to pour boiling water into a small glass and pour sodium alginate into it. Nowhere in the instructions does it say exactly how much water should be poured. We put the measuring cup just like that; we didn’t use it. We had to pour the powder into boiling water, in exactly that order, as it was written. We had to pour water at random; we poured a little more than half a glass. Sodium alginate was packaged in the largest bag, that is, it contained the most powder. And at the same time, to dilute it with water, we were told to take a small glass. If they couldn’t put in the right container, at least they wouldn’t confuse us and tell us to take larger containers, or even better, indicate the volume.
This is what this stage looked like.
We had to stir it every 2 minutes for 15-20 minutes. It was almost impossible to stir there, the mixture was too thick, much more water was needed.
You just need to pour water at room temperature into the remaining glass.
Then we are told to take a syringe and draw a colored solution of sodium alginate into it. But they didn’t tell us how to do it. After the experience, I watched a video using the QR code, the video was clearly from the creators of this set. They didn’t say anything about how to make solutions; they only showed in 50 seconds how to make worms from ready-made solutions.
To figure out what exactly we need to do next, I found a video on YouTube with similar worms. I saw that a colored solution was being poured into a transparent solution from a syringe. The color was thick, like liquid soap. That is, we had to make a liquid colored solution from our porridge in the first glass. We took another dish, transferred the contents of the first glass there, and added boiling water several times, since we did not know exactly how much it was needed. All this was mixed until smooth, although it still turned out not very homogeneous. Then we added the contents of the third remaining bag there; it was clear that there was red powder. The second color was not in the set. The result was a red solution, like a paste.
Composition and origin of marmalade
Before you start preparing the treat, you should find out what these cute gummies include. Modern gummy worms contain: sugar, starch, gelatin, synthetic dyes and flavors. However, previously this sweetness was prepared exclusively from natural products. So, for example, in France, where chewing marmalade first appeared in the 18th century, it was made from quince and apples. According to some versions, the “ancestor” of marmalade is the oriental sweet Turkish delight, which for thousands of years was prepared from rose water, fruit, starch, honey and other natural ingredients.
In Europe, people learned about chewing marmalade only in the 14th century. Local chefs tried different ways of preparing this sweetness and thus came to the conclusion that quinces, apples and apricots should be used as the basis for marmalade. Only thanks to these fruits did the mixture acquire the desired consistency, as it turned out later, due to the substance they contained - pectin.
To watch online, click on the video ⤵
The secret of making polymer worms Read more
Everything about growing worms at home. How to keep and what to feed a worm Part 1 Read more
Let's make polymer worms! Chemical experiments at home. More details
Breeding worms at home | VERMIFARM Read more