Content
- Making a blank
- Shaping
- Putting it all together
- We impregnate and paint
I started making wobblers more than 15 years ago. Before this, I successfully caught pike using spinner spoons. Pike perch - only for small fry. In the magazine “fishing and fish farming” I saw pictures of the first rapala wobblers, and the idea came up to carve a similar one from wood. At that time there was no trace of them in our city.
The first wobbler copied the original floater. I painted it as best I could, giving it a perch color. And what a surprise I was - I caught a good pike perch on my first fishing trip. Since then I became interested in wobbler making. Over time, he came up with new forms. I remade many wobblers, but this first one could not be surpassed - it consistently caught pike perch. The pike ignored him, but the pike perch simply adored him. For several years I caught pike perch with this particular wobbler, even periodically repainting it.
Well, now let’s move on to the main thing - how to make a wobbler with your own hands. There is nothing complicated here. A minimum of tools and available materials. I will describe the whole process briefly - otherwise the article will be very long.
Video on the topic: Blade and deepening of the wobbler
Making a blade for a wobbler
.
By and large, all the work can be completed here, just glue in the blade and slightly balance it. But further, in addition to gluing the shoulder blade, we will also stroke and cherish it “until complete satisfaction.” Let's start with the shoulder blade.
Firstly, if you make a wobbler a day, then it will be difficult for everyone to fool around with the blades. This matter must be put on stream. Let's start with the fact that you need to make at least two identical blades. In the first section, when making a wooden wobbler, we already encountered this. Identical ones are needed so that by changing the first one and bringing it to better wobbler performance, we will take a copy from the second one for reproduction.
So, we make two identical blades in any way, adjust the blades to the wobbler, namely: make the distance from the wobbler to the hole a little longer, then you can always grind off the excess. Notice that the end of the spatula is sharpened on both sides. The lower turning is needed so that the shoulder blade fits onto the front loop more easily and easily, and the upper one, as you understand, so that the shoulder blade fits more tightly and fits inside. Make the hole in the shoulder blade larger than the eyelet, then the whole thing will be filled with putty, and it will be easier to put it on.
We make a wedge-shaped spacer from the same foam board or wood, expand the blade, hang hooks and put it into the water. Note!
The blade should be perfectly level in relation to the wobbler. Any distortion and the wobbler will behave completely unpredictably, up to the complete cessation of play.
Let's chase him. The ideal result would be when the wobbler started working with the slightest pull and did not lose its play during fast retrieval. A few tips when setting up a wobbler.
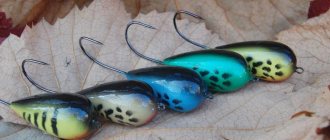
If the wobbler lies flat in the water and does not fall on its side, this is good. The front part can be recessed due to the weight of the shoulder blade, although this is not necessary. Like here:
1. When retrieving, the wobbler begins to lean heavily to the side, rotate and jump out of the water. This means that either the front loop is too bent to the side, or the blade is not glued horizontally. If the blade is glued in crookedly, then this is the worst thing to deal with, but while the blade is not glued in, you can try to fix something else.
2. The wobbler moves steadily to the left or to the right of its straight-line movement. You need to bend the front loop on the wobbler with pliers in the opposite direction.
Read also DIY PVC fence
3. The wobbler yaws from side to side. That's not fatal. You will have to experiment with the bend of the shoulder blade (only up and down, but not left and right) and the length of the shoulder blade itself; you may have to shorten it a little. When you have achieved the game. then you can, without removing the wedge, fill, or rather putty, the blade in the wobbler, and at the same time the shells. But more on that later.
Foamed PVC is a common and technologically advanced material used in various fields of human activity. For example, advertising blocks, frames, windows are made from this material...
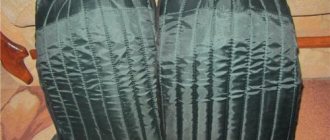
The material is produced in sheets, the thickness of which ranges from 1-10 mm or more. PVC density is 0.45-0.8 g/cm3. This indicator depends on the manufacturer and brand, and its value is similar to that of linden and alder. At the same time, the material does not absorb moisture at all, has sufficient strength, and is easy to process. The considered characteristics of PVC indicate that you can make a wobbler from this material with your own hands.
Making a blank
To begin with, we select the necessary timber - anything will do except heavy and resinous ones - pine and birch, we immediately sweep away.
We mark the size and saw off the blanks.
Next, we make a longitudinal cut in the blanks for the loop and a front cut for the blade.
Longitudinal - to a depth of no more than 7 mm, under the shoulder blade too, and strictly perpendicular to the longitudinal one. The angle of inclination depends on the depth required.
Next, we need stainless wire and material for the blade - it can be plexiglass or, as in this case, fiberglass.
From fiberglass we saw off a blank for the blade - a small rectangle.
It is more convenient to do this on a machine with a round cutter, but you can also use a hacksaw for metal.
Step-by-step guide on how to make a wobbler with your own hands
Every angler will be able to make wobblers for casting pike. The working horizon is from one to one and a half meters, the optimal length is about seven centimeters. So how to make a wobbler with your own hands? So let's get started:
- The profile of the future catchable bait is drawn on paper.
The template is cut out. The shape of the bait can be adopted from the Khamsin bait from the manufacturer ZipBaits or Kosadaka. Pike are great on such wobblers. They have a fairly simple shape, which will make your work easier.- On the Internet, the picture of the bait is copied and changed to the required size and printed on a printer. An alternative is to trace the picture on a transparent piece of paper directly on the monitor with a gel pen. In this case, the template will be more accurate.
- The outline is transferred to plastic. At this stage, you already need to know the thickness of the body of the future bait. This is necessary in order to understand how many plates will have to be glued together, and where in the bait the equipment and fittings will be located. Khamsin can hardly be called a fat man; his body width is slightly more than a centimeter. In our case, we will need three plates. The thickness of one of them is six millimeters, and the remaining two are four millimeters each.
- PVC is cut. This is done with an ordinary stationery knife and on a hard surface. The more careful you are at this stage, the less you will have to trim the workpieces with the same knife or file. Two plates with a smaller thickness are set aside, and work continues with the central, thicker one, intended for hinges and loading.
Three loops are twisted. The loop can be called correct if it holds well and sits firmly in the body of the bait. Ideally, it should sit straight and straight. In our case, a special loop is twisted, which has a twist along its main length, and at the end there is a small wire hook, and near the ring there is an untwisted section, which is intended for even mounting it into the body of the wobbler. The finished loops are set aside.- The plates are connected using glue and processed to the planned shape.
- A stationery knife is used to cut off the bulk of the excess plastic, and the remainder is removed with a file or needle file and sandpaper.
Loading is being done. There are different ways to calculate the amount of lead required. The simplest and fastest involves the use of precise electronic scales and a container of water. You can’t do without a Cheburashka weight with a wide eye, through the eye of which a piece of thin fishing line is passed and tied to one of the loops of the wobbler. This is followed by hanging rings and tees on the workpiece, which is necessary for a more accurate calculation of the load. Then, using tape, the end of the fishing line is glued to the electronic scales. The Cheburashka is thrown into a suitable container (a plastic bottle will do) and water is poured in. In order to measure the amount of lead required to immerse the bait, the scales are turned upside down and the wobbler is drowned in the container. The scales will show the exact load, only with a minus prefix.- After determining the required quantity, the halves are separated and you can begin loading. To more accurately hit the thickness of the plastic, lead buckshot can be riveted a little. You will need 3 g of lead. Buckshot of 8.5 mm diameter weighs the same. Buckshot is shaped into a flattened barrel using a small hammer. In this form, it fits perfectly into a 6 mm PVC plate.
- The future bait is leveled, primed and painted. You can refuse to paint the wobbler, and limit yourself to applying stripes and fins with waterproof markers.
Read also Crassula Bonsai photo
How to achieve big catches?
Over many years of practice in catching various types of fish, the most effective methods have been found:
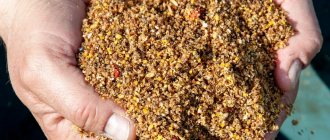
- Use of special activators . This pheromone-based activator attracts fish the most at any time of the year. Reviews and discussions of this bait are here .
- Use sensitive gear . Read these methods in the appropriate section.
- Albumin-based baits . You can read it here .
Useful Tricks
Despite all the advantages of PVC, when catching large pikes, our wobbler will suffer from the teeth of a predator and will soon fail. To extend the life of the bait, you can apply a couple of layers of epoxy resin and sand it. Be aware that you won’t get a perfectly flat surface, since when the epoxy hardens, bumps and sagging will form. A homemade wobbler becomes not only more durable, but also very aesthetic.
Epoxy resin can be refined with some kind of varnish for exterior use, for example, a composition of the Odilak brand. The coating does not become harder immediately, but over time it becomes stronger - this is a very good feature of the so-called yacht varnishes. At the same time, the varnish does not react with paints or other varnishes.
If you cover the bait with several layers of epoxy resin, and after sanding, apply a couple of layers of yacht varnish, the bait will receive both the necessary protection from the teeth of a predator and an attractive appearance.
Shaping
The main preparations are done. Next, let's get creative. We plan out the shape of the wobbler you like from the blank - this process must be done very carefully - using a sharp knife we gradually give it the shape.
Next comes the final finishing with abrasive. I use porous stone and skins of different grains.
Putting it all together
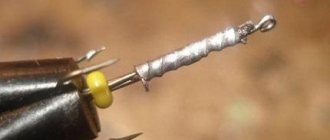
After the workpiece is sanded, we make a loop. To do this you need pliers, round nose pliers and a skein of thread. Well, and, accordingly, the wire.
The loop is made as in the photo according to the size of the bait. After this, the ends are wrapped with thread - this is necessary so that the loop fits tightly into the longitudinal cut.
And insert the loop inside, making sure that the loops protrude evenly.
Next, we take the blade blank and use a thin file to make a small cut in the middle, otherwise the loop will not allow it to go in.
And insert the spatula.
Then secure the blade and loop with a few drops of superglue. After the glue has set, we give the spatula the desired shape. This is best done on sandpaper.
Next, the longitudinal slot is filled with any filler. I use acrylic liquid nails, pressing into the gap with a gun. Once cured, it becomes plastic and can be processed with a file.
We impregnate and paint
The workpiece is ready. Next comes the process of impregnation and painting. In this case, this wobbler will be covered with foil.
There is no point in describing the paint jobs - here everyone is doing the best they can. The main thing is that the process of making a blank for painting is simple and understandable.
And the most important thing is that a wobbler made with love catches better than famous brand names.
Maybe someone will find my technology for making wobblers useful. There is nothing complicated here.
And now the wobbler that I made in the article is ready for use. It was no coincidence that the blade was made from fiberglass - I fish mainly on rocks, and sometimes the blades break - then the pike starts kicking so hard while you pull it onto the stones that the blades fly off, then you miss in the dark and instead of water, hit the edge of the stones with all your might. Plastic is not iron - it breaks off with a strong impact. Blades made of fiberglass do not have this drawback - you can shovel them on the stones any way you like, but they won’t break.
Wobbler blade material
Now a few words about the material and method of fastening the blade. As we already know, Lauri Rapala made his first blade for a wobbler from tin. However, later it turned out that the opaque “additive” gives the bait an unnatural appearance and clearly alarms the fish.
Read also When the pedunculate oak blooms
That’s why an almost invisible plexiglass blade appeared in the water. And now almost all wobblers made of wood or polystyrene foam are equipped with a transparent blade that is glued into a special groove. Metal blades remain only on the most powerful “magnums”, where the entire bait must withstand extreme loads, and on some single models.
However, the plexiglass blade is not very strong and sometimes pops out or breaks if handled carelessly. In this case, you have to glue it back or look for a replacement. It’s easier with a metal blade: as a rule, it is attached not only with glue, but also with self-tapping screws.
With the advent of plastic wobblers, the problem resolved itself. The blade of the required strength is molded integrally with the plastic body, then the body is painted, and the blade is left transparent. Such a blade can only be broken on purpose.