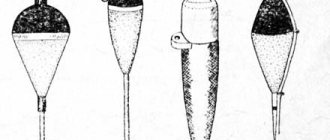
Methods for attaching a leash
Perhaps this is the very first and most important question that needs to be asked, since if the leash is attached incorrectly in feeder fishing, there will most likely be a tangle, it can break off at the last moment when fishing for a trophy, the hook with bait will look unnatural and will scare away the fish. There are several methods of fastening: continuous, when the leash cannot be replaced during fishing, and removable, when the leash can be removed and another one installed. Removable leashes are most widespread, so these are the methods that are being considered.
The most common fastening method is the loop-to-loop method. It consists in making a loop on the fishing line at the place where the leash is attached. A loop is also made. It is inserted into a loop on the fishing line, after which a hook with a leash is threaded through it. The result is a very strong connection like an Archimedean knot. There are almost never breaks at the junction, since the line is double thick there, and if there is a chance of a break, it will happen lower.
How to attach a leash
The leash is attached as follows:
- the fisherman needs to measure the fishing line 5–7 cm longer than the recommended length of the leash;
- then you should tie it at the end with a special knot (“figure eight” or surgical). If you have no experience in tying, it is recommended to use looper;
- the second end of the segment is attached to the hook, for example, with a palomar knot.
By the way, every experienced fisherman has his own favorite method of fastening.
Did you know? The largest bream are up to 70 cm long and weigh
—
up to 10 kg. The older the fish, the darker its scales.
Leash attachment methods
Some anglers prefer to attach the leash not loop to loop, but through a swivel. This type of fastening is simpler and prevents twisting. It is more convenient to remove the leash from the swivel than from the loop from the fishing line. And the clasp at the end of the swivel makes this process very simple. However, the fastening is still done using the loop method; the role of the loop on the fishing line in this case is played by the ring of the swivel or fastener. Fastening using the Archimedean knot method is the most reliable, and other methods that involve the mobility of the leash relative to the fastener ring are not in demand in feeder fishing.
When using various rigs, it is very important that no impacts occur when casting against the loop assembly. Otherwise, even a correctly tied knot can become loose. Therefore, when making a loop on a fishing line and installing an inline type, place a silicone bead or a piece of cambric in front of it above the knot. The feeder will not break the knot when cast. The same bead should be placed above the feeder so that when unwinding it you do not accidentally damage the tulip of the top.
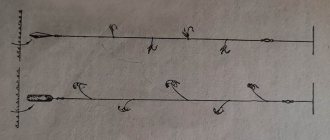
We tie two hooks to the fishing line
Both the upper and lower hook are tied to the same fishing line. This is, as a rule, the main line of a float summer or winter fishing rod.
The “Podolsk fork” tie is made on the basis of a regular loop made with a simple triple knot, to which two hooks are tied.
How to tie 2 hooks - sequence of actions:
- We make a loop on the fishing line using a simple triple knot, leaving a reserve at the free end - this will be the side leash;
- We cut off one of the ends of the loop near the knot - this will be the leash for the lower hook;
- We tie the upper and lower hooks sequentially. How to tie a hook.
! Remember to wet the knots as you tighten the line.
How to tie 2 hooks so they don’t get tangled - video
To demonstrate the sequence of actions in the video, so that it is better visible, we take large hooks and instead of fishing line, a rather thick thread of a bright color.
Leash length
This parameter can determine the success of the entire fishing trip. How to determine the optimal length for a leash? With a very short leash, the bait and hook are located directly next to the feeder. The fish sees the bait, smells it, and then it can bite on a hook that is easier for it to find. However, if the leader is very short, the so-called “presentation” of the bait is lost.
The fact is that almost all the food that falls to the bottom slowly falls onto it. The feeder quickly sinks down, dragging the leash with it. The fish becomes wary of the bait, which quickly falls down. In addition, many fish, for example roach or silver bream, can look for food halfway through the water and ignore what lies at the bottom. Especially in summer, when a thermocline forms in the water. A slow-dropping bait on a long leader has a better chance of triggering a bite.
But you shouldn’t make leashes that are too long for several reasons:
- They get confused when casting, especially with a short rod.
- They fall very far from the bait, especially in the current.
- If its upper part is in the water column, it can create a game when fishing in the current. This may scare the fish away in some cases.
- When fishing for a large fish, it has a greater chance of breaking.
- It wears off faster against objects at the bottom.
- Hooking is not as effective, since it has more spring than the main thick fishing line or cord.
- It can be inconvenient to change the bait, fill the feeder and remove the catch from the hook, especially at night.
In the end, for catching each type of fish and reservoir, you should select the length of the leash individually. For beginner feeders, we should recommend a length of about half a meter - this is a universal length for catching small fish from the bottom in a weak current.
Choosing the right fishing line
When choosing a material for tying leashes, you should pay attention to the properties and characteristics of the fishing line used for this. Different feeder fishing conditions require different element parameters. This is precisely what determines the variations in changes in fishing criteria, which can differ significantly from each other, thereby providing the opportunity to obtain positive fishing results in different situations. Leading materials are characterized by the following properties: rigidity, colors and shades of the material, the magnitude of the breaking load and the diameters of the thread used for the element.
By diameter and breaking load
The diameter and breaking load of the driving element are selected based on the trophy planned for catches, and more precisely, its mass. The leash on the feeder must ensure the reliability of landing the caught fish. The angler will be able to find out the diameter and magnitude of the breaking load when purchasing the leader material, where these parameters are indicated by the manufacturer on the packaging. It is natural that the larger the diameter of the thread, the higher the breaking loads. When selecting the diameter and breaking load of the material, the excess forces that arise when fighting caught fish are taken into account. The weight of the trophy alone does not guarantee the correct selection.
Important! The weight expected in the catch is increased by at least 25% to eliminate breakage from the resistance forces of the fish, and even in the best case they double the weight and, based on these data, select the diameter and breaking load of the fishing line.
The rest of the overload is distributed between the correctly configured clutch of the tackle, the rod blank and sometimes used to absorb the jerks of the trophy, feeders and shock leaders.
Rigidity
The rigidity of the material affects the sensitivity of the equipment and the spatial location of the bait in the water column or at the bottom of the reservoir. Rigid fishing lines are more difficult to tie into a piece of equipment, and it greatly affects the thinness of the equipment, making the installation rougher. But at the same time, this quality helps to achieve the delivery of the bait and its subsequent retention in the water horizon in a more stable state than a soft thread. Lines with low rigidity, on the contrary, make the rigs sensitive, which is suitable for catching more cautious fish, but such rigs are more likely to get tangled and, at longer lengths, are more difficult to control when casting and reeling in.
Color
The color design of the cord is used to disguise the equipment. The camouflage shade of the thread is selected based on the color of the water and the color of the soil. Transparent fishing lines do not always satisfy fishing conditions, because they become clearly visible against the dark background of the bottom or in water blooming with algae, creating glare and reflecting light. Therefore, light green, yellow and green threads are used for green water, black is most suitable for muddy soils, red and brown fishing lines are invisible on clay and sandy bases, and in clear and clean water blue and colorless leader materials camouflage the equipment well.
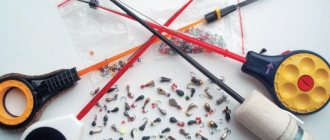
Material for leashes
We often see how leashes for feeder fishing are made from completely unsuitable materials. This could be winter fishing line, or fishing line that has served its purpose on a float fishing rod, and much more. It is absolutely worth saying that for leashes on the feeder, you need to purchase fishing line separately, do not take old winter fishing line and so on.
For leashes, regular monofilament fishing line is used, not fluorocarbon, although it must be of high quality. There are several basic criteria that leash material must meet:
- Medium hardness. A fishing line that is too soft is inconvenient when tying a hook and loop and gets very tangled on the bottom tackle. Too hard will be felt by the fish.
- Consistent thickness and quality along the entire length. For the leash, the monofilament must be of good quality, since if on the main line the unstable strength is compensated by the thickness, then on the leash, an increase in thickness will lead to a lack of bite.
- Diameter corresponds to the nominal value. Not everyone will like it if the manufacturer deceives them by writing one diameter on the reel, but in reality it turns out to be another, although this often happens. This is seen less often on expensive fishing lines.
- Sufficient unwinding length. You should not buy a small unwinding of monofilament leader. This is a consumable item, and it is not recommended to use leashes for more than one fishing trip. A hundred-meter reel will last more than a year. A twenty-meter unwinding can be used up in two fishing trips.
- Diameter is the most important quality of a leash. It should be selected to the minimum necessary. The most popular leader line diameters are 0.1 and 0.12 mm. Thicker leashes are used when fishing for trophies and when fishing in the grass, when when pulling out you often have to pull out the hook. Sometimes thinner leashes are used, especially when catching cautious fish.
- Color. It is recommended to use a fishing line of dark colors for the leash so that it does not stand out against the background of the bottom. If there is no dark fishing line, you can use a transparent one, but it will only be good at great depths, where the fish can no longer see it well. When fishing on grass, green line is unrivaled. Since painting often reduces the strength and durability of the leader, it is advisable to have at least a couple of different colors of fishing line available for the leader.
- Strength at knots. Some cheap lines have low strength where the hook or loop is attached. In this case, breakage will more often occur at the place where the hook is tied, and not at the loop. Beginners who do not yet have the habit of crocheting correctly should approach their choice especially carefully.
How to choose a leash for a dog
So, when buying a leash, you must follow simple rules:
- When choosing a leash, it is important to decide on the final goal. Having precisely defined the purpose, you can significantly narrow the search. You should not try to combine several goals at once, otherwise the chosen leash will ultimately turn out to be useless.
- The size of the dog also needs to be taken into account. Some leashes are simply not suitable for large or small dogs. In any case, for a strong animal you need a durable one, albeit one with quite a lot of weight.
- Consider the dog's character. Hyperactive and aggressive dogs will require more durable material. Almost any will suit a calm pet. You need to understand that a hyperactive pet will always spoil the leash faster.
- Before purchasing, make sure of the strength and quality of the carabiner. Sometimes it is poorly secured. There may also be a problem with the shutter.
- Separately decide on the length of the leash. The length also depends on the purpose. If leather is the chosen material (even if it is only partially used), take care into account. When purchasing, choose a leash whose edges will be processed, otherwise the leather will quickly get wet. Dry the skin so that it does not rot.
- When keeping your pet outside, use two leashes, which are changed if necessary (one is torn or dirty, for example).
Choosing the leash size
How do you know which leash is the right weight for your dog so that your dog will break it?
As a rule, leashes correspond to the weight categories of dogs:
How long should the leash be?
It all depends on the purpose for which you choose ammunition. For exhibitions they use short ones (about 1 meter). Walking leashes are usually 2-5 meters long.
Long ones are often used for training (the length is at least 5 meters). When choosing the length, also consider how convenient it will be for the owner to use the leash (for example, not everyone can handle a 10-meter canvas leash).
Every dog needs a leash, regardless of size, activity level or personality. It is better to purchase dog equipment for every occasion, so that you can always feel comfortable while walking with your pet.
Leash holder
To ensure that fishing leashes are always at hand, do not get tangled, and can be easily changed, you need to use a leash holder. Often such an accessory can be seen on the fishing trips of famous athletes - a massive leash holder in which leashes are laid out along lengths measured with high precision. With the help of some of them you can not only store, but also knit leashes. In it they are stored in their natural form, elongated in length, without kinks. You can even store one and a half meter leashes! In cases where it is not possible to purchase and use one, use smaller ones. They have no less functionality, but in them the leashes are stored bent two or three times. To make the behavior of the leash more natural, after it has been removed from the leash and secured, it must be pulled a little to straighten the bends.
There are often recommendations to make a leader from a piece of pipe insulation. It is a foam pipe into which pins are stuck. In this case, the leash clings in a loop to a pin, and then wraps around the insulation, at the end a hook is stuck into it. This leash has a trick. It is compact and inexpensive. However, when the leash is stored on it for a long time, especially in the heat, in the trunk of a car or near the engine, it takes on an extremely unsightly appearance.
The fishing line begins to deform, and due to the porous structure of the material, this happens very unevenly. Different deformations occur in different parts of the fishing line; moreover, when winding, it puts very uneven pressure on the porous material. According to the author, it is better not to use a leash at all than to use this device.
The option without a leash at all also exists. The author of the article fishes with a feeder and ties leashes directly while fishing. You just need to take a looper and hooks, and you can measure the exact length using the divisions marked on the first bend of the feeder. The hook is inserted into the hookkeeper, then the leading line is pulled along the scale, and a loop is knitted at the required distance. Everything is very simple and convenient. Although, of course, this will take more time than installing a ready-made leash from a leash, but the leash line is less damaged.
Victoria Leshchenko
I've been working hard in the fishing tackle department for the past six years. I can help you assemble almost any gear.
Ask a Question
A good quality leash is the key to successful fishing! At the same time, however, you need another accessory - a hook holder, in which the hooks are inserted according to type, are clearly visible, and are convenient to take. When choosing leader length, yours truly starts with a longer leader, then gradually cuts the hook and reties until you get a good execution and number of bites.
I would like to say a few words about the environment. All cuttings of fishing line, including the leader line, must be placed in a garbage bag. Any feeder should have it on hand to put bait bags and other garbage there. Be respectful of nature and do not throw garbage on the shore.
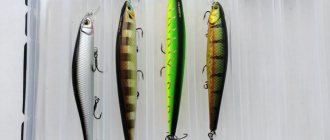
Hook selection
There are many ways to tie a feeder and leash to a feeder. Each fisherman chooses a knot that is most convenient for him to create. The main thing is that it is reliable. In these places the equipment is most vulnerable. Therefore, the selected unit must be strong and reliable.
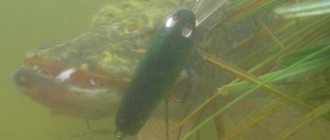
Feeder hooks are not large in size. Most often, equipment No. 10-16 is used for these purposes. It is important to pay attention to the quality of the hook. It should not bend, have defects or traces of rust. You will need to purchase several different hooks. This will allow you to select the best type of equipment for the feeder in the field.
Hooks must be well sharpened. High-quality varieties are made from hardened steel
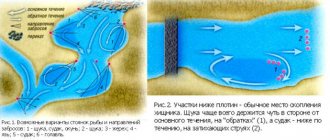
For current and still water
As mentioned earlier, the leash for current should be shorter than for still water. This is due to the fact that when it falls, it will stretch along the current, and not fall down after the feeder, and a long leash will place the bait far from the bait. You should also use a thinner leader line. The fact is that in still water the fish takes the bait much more carefully, because it does not have to waste energy on keeping the body in the current, and the bait will not go anywhere, there is time to figure it out. For example, if you can actually fish in a current with leaders of 0.12 mm for any conditions, then for weak currents and standing water 0.1 and even 0.08 mm are used. Thin fishing line gives especially good results on pressed-in reservoirs, urban and suburban ponds and pay zones.
Description of feeder leads
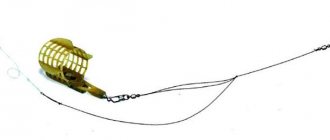
The following feeder equipment exists:
- Gardner Paternoster – this leash is excellent for fishing on muddy ground. The feeder may get somewhat into the silt, but this will not become an obstacle to the equipment being able to sensitively transmit a bite. A 15 cm long twist extends from the main line, to which the feeder is attached. This allows the leash to not overlap with it. This equipment does not belong to the category of self-cutting equipment;
- Inline - this type of leash is very simple, but at the same time very effective when catching carp and other types of white fish. Equipped with a removable sliding sinker, which can be replaced with a lightweight feeder. The device is well suited for fishing in still water;
- Method - such a leash for the feeder is used together with a feeder of the same name, which looks like a pacifier. The food itself needs to be pressed into a one-sided feeder, then, when it reaches the bottom, it slowly erodes. If the soaked pellets are made more viscous, then hooks can be placed in the feeder along with bait, which is perfect for carp fishing. In addition to pellets, you can use hominy, dough, mastyrka or pea porridge as a filler;
- A symmetrical loop is the simplest configuration of a loop system; it perfectly conveys the bite of those fish that move in different directions from the feeder. Most often used in standing water, and not in strong currents;
- Asymmetrical loop - this self-cutting equipment does not allow the line to twist, so it is often used when fishing in strong currents. This is a more advanced modification of the symmetrical loop and is used much more often;
- Helicopter and 2 knots - a leash for a feeder, used for fishing in the distant reaches. As you know, carp most often stays in the middle of the reservoir, and does not really like coastlines. The helicopter is also well suited for muddy bottoms. It is similar in design to Gardner's Paternoster;
- Combine - in this case, the feeder is not attached to the tube, but to a 10-centimeter long loop that is attached to it. This option is also suitable for fishing on muddy bottoms;
- Equipment for the feeder with a special anti-twist tube. A curved tube is used for it, with a feeder attached at the bend. But thanks to this, the tackle itself twists less, but this type of equipment is not used very often, since it is massive, and it is extremely difficult to make it with your own hands without special tools.
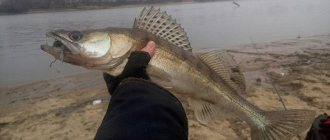
Leash for bream
Bream is the most coveted trophy for feeder fishermen in the middle zone. The leash for it should have the minimum required length, since the bream takes the bait very carefully, lifting it from the bottom and pulling it up by lifting the body. Therefore, the length of the leash should be no less than one and a half the length of the intended prey - usually about seventy centimeters. Depending on the fishing conditions, you can use a longer leash. If you put a short one, the fish will feel the feeder and spit out the bait.
Storing leashes in a leash holder
A leash holder is a special box for storing already made leashes. They are made in advance at home, knowing what water the fishing will be in and precisely adjusting the length. The standard length of an inexpensive ready-made box is: 25, 35, 50 cm. It is inconvenient in that it cannot be used with a line length of more than 50 cm. More expensive models have a reel inside, on which the material is wound and is perfectly preserved inside.
With the right fishing equipment, it is unlikely that you will leave fishing without a catch. A fish as large and tasty as bream is worth taking the time to prepare your gear and have a great time by the river.
Two hooks on the rig
The fewer different nodes, connections and elements on the equipment, the less the equipment gets confused. Therefore, experienced anglers try to minimize equipment and use only one hook and one leader.
More hooks equals more fish?
Sports anglers always use only one hook, but not only because of the rules. They know exactly how much the fishing efficiency is reduced if there is a second hook. Amateurs are still confident that the more hooks on the tackle, the more catchy it is.
However, there are situations when the presence of a second hook on the rig is justified from the point of view of biting fish.
Two hooks sometimes help
A clear example is the rigging of a winter fishing rod with two jigs or a jig and a hook on a leash. Two miniature baits are more attractive to fish than one larger one. This is especially noticeable in the behavior of perch.
Catching perch with two jigs
Perch is a predatory fish and very curious. Its behavior and reaction to baits are a bit like cats. The presence of two jigs on the line provokes perch more.
In addition, a hook with a bloodworm attached above the jig often helps out at the moment of a capricious bite when catching roach.
How to tie a hook above a jig
The hook above the jig is tied in exactly the same way as in a tie with two hooks, only a jig is used instead of one hook.
Two hooks on a summer float fishing rod
If you think that two hooks on a rig are better, then you already know how to tie them so that they do not get tangled. It remains to decide how to knit them: on the main fishing line or on a thinner one.
Leashes with hooks are always knitted from a thinner line than the main one. This prevents you from losing all the equipment in the event of a snag, and allows you to use a line that is “less noticeable” to the fish.
If we tie a “Podolsk fork” directly on the main line, there is a risk that if it gets hooked or if a very large fish bites, the line will break not at the knot, since it is quite strong.
Therefore, it makes sense to use a thinner fishing line for these two hooks, at the end of which another small loop is knitted to connect to the main fishing line. The hooks are tied to the main line using the loop-to-loop method. See the video (in a similar way):
If you still have any questions about installing two hooks on the rig, ask in the comments.