Feeder installation Gardner loop is the equipment that most feeder operators start with due to its ease of knitting and efficiency. Some fishermen confuse this installation with the classic paternoster. This is partly true; the Gardner paternoster is a variety of a number of similar rigs.
The main problem for beginners is the leader twisting around the main line or getting caught during casting. However, with proper installation such problems do not arise. In this article, we will consider in detail the features of installing the Gardner paternoster and the nuances of its use in feeder fishing.
Feeder equipment
A Gardner loop for a feeder can be knitted on a pond in just a couple of minutes. To do this, you do not need special knots or additional fishing accessories - the main fishing line and the fisherman’s hands. That is why this installation is popular among fishermen. However, the Gardner paternoster is not universal - it is just one of several effective types of feeder equipment.
In various fishing conditions, the Gardner rig works better, in others, an asymmetrical loop, and thirdly, the installation of a running feeder (inline). The angler's job while fishing is to figure out what works best under those particular conditions. Therefore, you need to master all the basic feeder equipment. Article about feeder installations:
General principles of knitting
Gear for bottom fishing can, of course, be tied at the end of the main fishing line, but it is still better to prepare them at home in a quiet environment and bring them to fishing in special purchased or homemade cases and leashes. This applies to installations such as: paternosters, Gardner loops, symmetrical and asymmetrical loops.
The point here is not only about saving time on fishing, but also about the fact that these loops should be knitted from a rigid fishing line. Most often they use monofilament with a diameter of 0.22-0.28 millimeters or fluorocarbon with a diameter of 0.35-0.4, which is also less noticeable in the water.
Increased rigidity of the rigs is required to reduce the likelihood of them overlapping with the main working line of the feeder or leash, the length of which in some cases, when fishing for saberfish, for example, can exceed one meter.
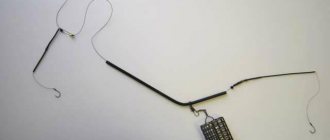
Gardner's loop is a type of paternoster
- The feeder equipment is a Gardner loop in terms of the mechanics of its operation - the same as a paternoster, or in our opinion - a blind feeder at the end of the fishing line and a retractable leash. It’s just that, unlike the bottom outlets we are used to, this equipment is more effective. A hook is made to the leash from a thick fishing line, the same one that is used as the main one.
- The length of the branch exceeds the length of the fishing line to the feeder and ends with a loop into which the leash is attached. In general, the leash together with the outlet turns out to be much longer than the distance from the point of its attachment to the base to the feeder. But, thanks to the thick, rigid and long lead, it does not get tangled when casting or reeling in the feeder.
- The Gardner paternoster for the feeder differs from the classic one only in that the outlet to the feeder is made on a loop. In the classic form, this shoulder is made from a weaker and thinner fishing line - specifically so that when hooked, the feeder comes off, and not the leash with the fish.
- According to legend, the famous fisherman Steve Gardner from England came up with this rig when he watched his wife while fishing for a long time could not tie a regular installation on a tap. In England, this editing is simply called “Loop”, which means “loop”. And already in our country this type of paternoster is called the Gardner loop.
Gardner's paternoster
Which is better, a Gardner's loop or a classic paternoster? In terms of operation, these are absolutely identical installations. The Gardner rig is easier to knit - one knot to form a loop. At the remaining end there is a loop for a leash. We don't need the function of tearing off the feeders. On the contrary, it’s better to let the fish come off when hooked than to tear off an expensive feeder. It’s just that the classic paternoster comes from England, from a time when feeders were not yet used, and losing a cheap sinker instead of a fish was considered normal there. Read more about paternoster feeder equipment.
Regular paternoster
Tips for using equipment
- It is better to thread the swivel or clasp into the loop before tying the knot. This will make it possible to change feeders when weather conditions change.
- It is better to attach the leash loop to loop, this will help avoid twisting.
- For beginners, it is best to use braided fishing line. It practically does not twist, compared to monofilament.
- When going fishing, it is best to take several leashes of different lengths with you.
- The length of the branch that connects to the leash should be slightly greater than the entire length of the feeder and loop.
- Do not forget to moisten the knots before tightening, this will prevent tearing and damage to the line.
So, now you know about the method of rigging a Gardner loop for a feeder: how to knit, where to use it, its advantages and disadvantages. Most fishermen initially did not really trust it, as they believed that such a simple design could not bring a big catch . But after the first fishing, they immediately changed their minds.
Source: 34fish.ru
Application on a pond
As already mentioned, the Gardner loop paternoster is an effective and simple equipment, but not a panacea. The main advantage is sensitivity. However, due to the peculiarities of the installation, this sensitivity is preserved only in comfortable or moderately difficult fishing conditions - there is no strong current, kinks of the main line over the edge, etc.
For the sensitivity of the Gardner equipment and, in general, any paternoster, it is important that there is direct contact between the quivertype and, in fact, the installation. Then all the smallest touches of the fish on the bait are transferred to the tip of the feeder. If the line is blown into an arc by the current, or it bends at the bottom on the upper part of the edge, the bites are no longer transmitted so clearly. In difficult fishing conditions, it is better to use an asymmetrical loop or inline.
Fishing with a Gardner loop is effective when the fish tries the bait and takes it completely in place, then swims away. This equipment will not work well when the fish does not take the bait properly, and large hooks are used - for example, it slightly grabs the bait with its lips and tries to swim away without swallowing it.
In this case, when hooking (or when the fish picks up the slack from the hook to the feeder), the effect is “kicked in the teeth.” This often happens when fishing for roach. Treatment is to install small hooks and a longer leash. If, on the contrary, the bite is good, if the hook is too deep in the fish’s mouth and it is difficult to remove it, you need to shorten the leash and the outlet to the feeder, and hook a little earlier.
Testing during fishing
Therefore, theoretically, apart from the reservoir, it is impossible to say which is better, an asymmetrical loop on the feeder or a Gardner loop (or inline). Under different conditions, one or another installation works better. Each rigging method has its own advantages and disadvantages, which are learned with experience.
The further you cast, the larger the loop you need to make. But as this element increases, the risk of entanglement increases; the lead to the leash will also have to be made longer. For ultra-long casts, it is better to use inline or asymmetrical equipment. However, at close and medium distances the paternoster is very sensitive, and it is also easy to knit.
In a strong current with a long line to the feed and a short leash, the hook with bait may not touch the bottom at all, but hover above it. This can be used, for example, when fish are attracted to the bait not on the bottom, but dangling in the stream. For roach this is rather a favorable option, but not for bottom bream or crucian carp. But when fishing there are always exceptions - sometimes even bream or crucian carp prefer a rig dangling with the current (or slowly sinking, on a longer leash).
With the Gardner rig you need to work short - literally, with the butt of the feeder in your hands or on your knee. Self-notching rarely occurs. If you don’t have time to hook, the fish will spit out the bait. Therefore, this installation is for lovers of tempo active fishing with tackle in hand. If the feeder is placed on a stand, and the angler sits a little further from the gear, it is better to use self-cutting rigs (asymmetrical, inline with a stopper on the rod side).
How to knit a spare rig?
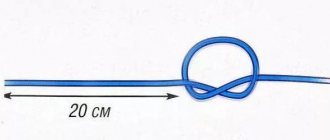
To do this, fold a piece of fishing line from 60 to 90 cm in half, but taking into account that one end will be 20 cm longer. Then make a large loop with five passes through the ring. The fishing line will have ends of different lengths, each of which will have a loop with a triple knot. Attach a feeder to the middle loop, a leash to the long end, attach the short end with a loop to the main fishing line. You can make as many spare equipment as you like. The supply will make the fishing process more comfortable, because even a minor break or damage to the main equipment will not prevent you from continuing, because replacement will be carried out easily and quickly.
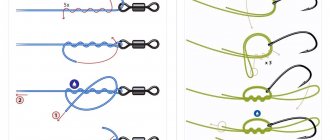
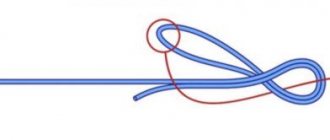
How to knit a Gardner loop correctly
The whole idea of installing a gardner, which distinguishes it from a regular bottom short lead, is a long lead that allows the rig to not get tangled or twist on the main line when reeling in or casting. The lead to the leash is always made longer than the arm with the feeder - this is a key feature during installation.
Requirements for a correct Gardner loop:
- A lead on a leash longer than a shoulder with a feeder.
- Installation should be made of rigid monofilament or fluorocarbon. If you do it with braid or soft fishing line, there is a high probability of tangling.
- It is necessary to avoid protruding elements on the feeder clasp and knots. For example, when forming a loop on a leash, the excess tip is cut off to the root. All these protrusions increase the likelihood of entrapment.
When these requirements are met, no tangles or overlaps will occur. You can often find similar diagrams on the Internet:
Gardner rig on braid
However, the braid is soft, and tangling in such equipment cannot be avoided. There will be less tangling with soft, careful casts at short distances. Gardner's braided rig is a backup emergency option when you need to re-connect the installation on a pond, and a piece of 0.3 mm rigid monofilament is simply not available.
You can tie the feeder to the Gardner loop on the feeder simply with a loop in the eye. However, this is also an emergency option if there is no swivel - when reeling in with a spinning reel, such equipment will twist the line. Therefore, it is better to use a swivel with a carbine. In addition, the feeder fishing technique involves selecting the weight of the load during the fishing process. The fastener makes it quicker and easier to change cords. We tie a loop to the swivel as usual. However, there is no need to tighten it - again, for a possible quick change. It is better to leave the base of the loop on the body of the swivel.
Easy installation
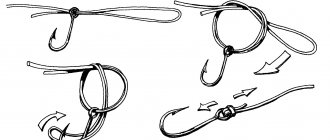
Let's look at how to knit a Gardner paternoster for a feeder. The process is incredibly simple.
- We fold the fishing line in half, retreat the required length (depending on the required distance from the leash knot to the feeder, usually from 7 to 20 cm), tie a figure eight knot. You can use a surgical knot (simple double or triple). It turns out to be a loop and two ends. One is the main fishing line, or a branch for attaching to the cord (when using braid as the main one). The second one is on a leash.
- We attach the feeder.
- We measure the length of this bend.
- We tie a loop for the leash, so that in the finished version the lead to the leash is longer than the arm with the feeder.
- We attach a leash with a hook to the outlet loop.
The Gardner loop is knitted on the knee without using any twists or beads or stoppers. In principle, a Gardner loop can be knitted on wood and braid. But on a cord, as already mentioned, the bend will not have the necessary rigidity characteristics, which leads to overlapping and tangling.
Twisted equipment
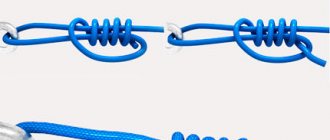
If there is no rigid monofilament, or you have to install it on a braided line, the elbow can be tied in the form of a twist to prevent tangling. This will somewhat reduce the likelihood of tangling, and when using hard material, it will almost be reduced to zero. This installation of a Gardner loop is more complicated - you still need to somehow tie the feeder twist to the braid or main line.
If you start knitting with a twist, you will get two bends after it. One is for the main line, the other is for the feeder. However, this will no longer be a Gardner loop rig, but a regular paternoster. The feeder is made not on a double line, but on a single line. In principle, this does not matter - the main thing is not to get confused. This version of the Gardner loop for a feeder with twisting is a solution for constant entanglements (in fact, a regular paternoster with twisting).
Fidergam
Another option for a Gardner loop for a feeder is with a piece of feeder rubber. If everything is fine, the equipment is made of rigid monofilament and does not get tangled, the feeder is added simply as an insert between the leash and the outlet on it. All this is located below the feeder, and therefore does not overlap. However, if you don’t want or can’t knit a Gardner loop correctly (for example, you don’t have rigid monofilament), you can make it directly on the braid.
Diagram of insertion in paternoster
We make a standard loop, attach the feeder to it, and cut off the end of the leash completely. We tie a piece of feedergam onto the braided line just above the outlet of the feeder using a regular triple knot. Then at this place we tie a regular knot of the main cord - so that the rubber does not slide along the base. We make the outlet entirely from elastic according to all the canons - longer than the arm of the feeder.
We tie a loop on the leash at the other end of the elastic band. This option is good only for short branches to the feeder - 7-10 cm. Otherwise, the piece of feedergam will need to be made too long - it will stretch very much. Elastic rubber in this installation lowers the leash below the feeder, such equipment does not get tangled when casting.
Gardner's sliding loop
Some sources indicate sliding installation schemes with a feeder on the outlet, calling it a “sliding paternoster”. However, this is essentially a Running Feeder Rig with a tap. And this outlet should be made not from a loop - but in the form of a fluorocarbon twist. Therefore, if you want to tie a Gardner loop to a feeder in a sliding version, see the article about online feeder equipment.
Elements included in the paternoster (Gardner loops)
The Gardner loop consists of the following elements:
- Line for feeder equipment.
- Fishing line for the base.
- Feeder.
- Swivel with clasp.
For this, you may also need an anti-twist, stoppers and, of course, a carabiner.
- The main line wound on the reel of a fishing rod. For the base, monofilament or braid is usually used, and the second option is considered more preferable, since such a cord does not twist, and the tackle itself becomes more sensitive when used.
- Leash with hook. The leash with a hook for this equipment is made in length from 0.3 m to 1.1 m. Most often, fluorocarbon fishing lines are used for this.
- Loop for attaching the feeder. A loop for attaching the feeder is made on the main fishing line at a distance of 10-15 cm from its end, on which another knotted loop is made for attaching the leash. The size of the loop for attaching the feeder should be such that the latter passes through it.
- Hinge attachment point. The loop attachment knot can be made in only a few ways, but most often a double loop or a so-called surgical loop is tied. The second type of loop is more suitable for a slippery cord. The main difference between a “surgical” loop is that the cord in the place where it is planned to knit the future knot is first bent and twisted a couple of turns (2-4), then a double knot is knitted from the resulting twist.
- Swivel for attaching the feeder. For this type of equipment, only one swivel with a clasp is required, with which the feeder is attached.
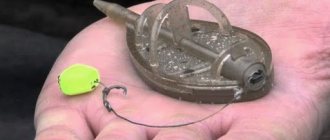
- Feeder. When fishing with a feeder, various feeders are used. I use a Gardner loop rig; it is recommended to give preference to lighter samples that are attached to a special loop.
- Paternoster leash. To prevent the paternoster leash from twisting around the base, feeder fishing experts advise increasing its rigidity by twisting it in the upper part.
- A “loop-to-loop” connection for tying a leash to the main fishing line. A leash with a hook is connected to the main fishing line using the “loop-to-loop” method. To do this, you need to tie regular double knots at their ends, thereby making loops.
Separate installation or on the main cord
Such manufacturing options are not based on the wishes of the angler, but on the obvious issue of functionality - the absence of tangling and twisting. You can knit a tackle with a Gardner feeder loop directly on the main monofilament or shock leader, if they have the required stiffness characteristics. That is, it is a rigid feeder line or fluorocarbon. Then no entanglements occur. All other options are a search for working options against such entanglements.
If soft fishing line or braid is used as a base or shok leader, we knit a Gardner fishing loop as a separate installation, from the same fluorocarbon or hard monofilament. Then we attach all the equipment to the base. As an option, the entire section to the feeder is made of wattle, and the outlet is made of feeder rubber.
We use a whole braided bundle only out of desperation - when there are no hard materials. And only with a soft casting technique and not over long distances - otherwise overlapping and twisting cannot be avoided.