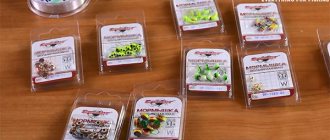
Filling the jig crown with solder
In the photo above of the made crowns of my homemade jigs, a soldering iron tip with a drop of solder is drawn.
If the cavities of the jig blanks are properly tinned, then there should be no problems with filling the crowns with solder. For ease of pouring, make a device - a wooden block.
On the block, place the crowns of homemade jigs coated inside with flux. For better stability of the workpieces, cut or punch holes in the wood with your punches.
Before filling with solder, insert CORRECTLY punched holes in the crowns of the jigs with needles (pins) LUBRICATED with MACHINE OIL, then stick them into a wooden block with slight friction in the hole of the crown of the jig.
Adjust to the desired length and fix the tinned, flux-lubricated fish hooks in a wooden block in the correct position. Fill each jig crown you make along with the shank of your hook with solder.
Note the text in all caps fonts and the manufactured jig, filled with solder without lubrication, shown in the photo in the upper right corner.
If the technology for filling the crown with solder is broken, the pin cannot be removed from the workpiece - the cup. Therefore, an almost completely manufactured jig along with the pin has to be thrown away.
If the hole in the crown, which serves to pass the line through, is not punched correctly, then the manufactured jig will not occupy the angle of inclination in space that we would like to achieve.
Before filling the hooks and crowns of jigs with solder, the needles can also be coated with another lubricant that can prevent the process of soldering them into the solder. After the crowns are correctly filled, the needles from the finished jigs are unscrewed using pliers.
Using the same technique, jigs are formed from solder without crowns.
Making the jig itself
First of all, the question arises: where can I get tungsten wire with a diameter of 3–4 mm? The easiest way is to turn to any welder who works with argon welding for help. During his work, he always ends up with small pieces of electrodes that are quite suitable for making jigs. Now you can start cutting. You will need a grinder and abrasive wheels. It is better to fix the grinder, then it will be more convenient to work with both hands.
A simple jig can be made using a drill and file. To do this, the electrode is inserted into the drill chuck and the workpiece is processed with a file.
Hook groove
Sometimes grooves for a hook and holes for a fishing line are made in the workpiece, but it should be understood that any groove or hole reduces the specific gravity of the jig, so they should be minimal.
Now that the body of the jig is ready, you need to take care to solder the hook to it. Alas, ordinary soldering will not work in this case. In order for the tin to adhere to the tungsten, the body of the jig must be coated with brass or copper. To do this, you can use an acetylene torch, or assemble a simple device for electroplating. You will need: a constant voltage source, for example, a phone charger, a resistor, copper sulfate, copper wire.
The copper wire should be twisted into a spiral, placed in a glass with a saturated solution of vitriol (with sediment) and connected to the positive pole. The jig is connected to the negative through a resistor and lowered into the glass using a crocodile holder.
Electroplating tool
The resistor resistance is derived from the formula R=U/I. U is the voltage that the power supply produces, I is the required current strength, equal to 0.04 A. Thus, for 8-volt “charging” you need a 200 Ohm resistor, for 12-volt – 300 Ohms, etc. The copper plating process lasts about half an hour.
After copper plating, the body of the jig needs to be tinned with solder, after which you can solder the hook, which is first bent to the shape of the body of the jig. The finished jig can be painted with nitro paint in several layers.
Sometimes, instead of soldering, the hook to the body is fixed with epoxy resin. The reliability of such a connection will depend on the quality of the glue.
Using copper wire
If making tungsten jigs at home using the method described above seems complicated to you, then you can resort to some tricks. For example, secure the hook with thin copper wire. The hook is bent at the desired angle, joined to the body with a small amount of glue, and then tightly wrapped with copper wire.
Clean with a soldering iron and file
This method is applicable for large jigs. When making small ones, the weight loss is significant.
Perhaps the easiest way to make a tungsten jig at home is to attach it to a piece of tungsten electrode using a cambric. After heating over a flame, the insulation shrinks, securely fixing the workpiece and hook.
Solder for making jigs
In principle, any brand of solder is suitable for making a jig. But here it should be remembered that the lower the grade of tin-lead solder, the heavier the alloy.
POS-18 solder is noticeably heavier than POS-90, but its melting point is higher. The numbers at the end of the mark indicate the percentage of tin in the solder alloy. The specific gravity of tin is 7.3 g/cubic. cm; lead - 11.3 g/cubic. cm.
A jig with a crown filled with heavier solder holds the river flow better and reacts more clearly to vibrations of the nod spring at great depths. But a home-made bait, filled with light solder, has better gliding properties in shallows.
When making a jig, I use soldering acid as a flux, which I do not advise you to do, since problems may arise when unscrewing the needle from the solder in the finished jig. If possible, it is better to use an alcohol solution of rosin as a flux.
I use the same solders and fluxes when tinning and soldering hook shanks.
Next, we get acquainted with an alternative way to correctly solder a hook into the crown of a jig, for which I draw another explanatory picture.
Repair of tungsten jigs
- VK
Due to the design features of tungsten jigs, it is almost impossible to damage the metal body itself, with the exception of galvanic coating or paint, without special zeal. Simply because the hardness of tungsten is comparable to the hardness of hardened steel.
Let's talk about the main element of any fishing bait - the hook. It is its durability that directly determines the durability of the bait if the angler cannot change the hook without changing the performance characteristics of the bait.
Unlike jigs made of fusible metals, in which replacing the hook without special tricks is almost impossible, tungsten makes it easy to change the hook without changing the shape or even the weight of the jig. True, this is “easy” only possible with well-selected and adjusted tools, which allow an operation that is quite problematic for many to be completed in a minute or two. Otherwise, soldering and re-soldering the hook is a very serious problem unless one has strong fine soldering skills.
Specifics of hook soldering
The design of different tungsten jigs can differ very significantly.
- Drilled jigs made of solderless tungsten and its alloys, on the body of which a galvanic coating is applied to allow the hook to be soldered (photo 1). This is perhaps the most capricious and demanding option.
- A noticeably easier case is the exact same baits, which have a hole drilled for the fishing line in exactly the same way, but the material used is a lighter tungsten alloy, which is already more or less soldered with standard tin-lead solder.
- The next option is a jig made of solderless tungsten or an alloy with a groove, which I first coat with a galvanic layer of metal, and then a hook is soldered into the groove.
- The fourth option is the most reliable and trouble-free option from the point of view of soldering - a groove in tungsten, which is first sealed with a copper alloy, and then a cut is made there for the hook.
The design features of each type significantly affect the technology and ease of soldering. What do we need for resoldering? In the simplest and most primitive case, a wooden block, a needle, a solder-free wire of a diameter suitable for the hole for the fishing line, POS-60 solder, liquid (this is more convenient to use) flux and a soldering iron with a power of 10 to 40 W, depending on the size of the jigs, may be sufficient. . If you are using hooks with a non-solder or poorly soldered anti-corrosion coating, you will need a good fine-grained needle file.
Difficulties
You should be aware of the difficulties that sometimes arise in the process of sealing or resoldering a hook in a jig of one design or another. They can not only change the features of performing various actions, but also make it difficult or almost impossible. Electroplated coatings, due to the physical properties of the metals they contain and differences from those of tungsten, can be very capricious in relation to excessive or prolonged heating. Overheating often leads to the peeling off of that thin film of metal from the tungsten, which ensures that the hook is firmly held in the bait. A hook or a fragment of a hook falls out, and a new one stubbornly cannot be soldered, since the solder flatly refuses to flow into the hole for the fore-end, no matter how much flux and solder is applied. These are signs of peeling of the galvanic coating.
This defect cannot be corrected using “standard” soldering. More refractory solders with a noticeable content of silver and copper, intended for soldering tungsten and similar metals, flux selected for them and more serious soldering equipment can save you. I’ll be honest: I have never tried to solve this problem in this way, because... I make do with the existing equipment for making jigs - and simply apply the galvanization again. This option involves two difficulties: it is necessary to clear the area for applying a new layer of galvanic coating from contaminants and oxides - and only after that apply a fresh layer of soldered metal to the entire body of the jig. There are two ways to clean the tungsten surface: either re-drill with a drill, risking breaking it when passing through the old hole, or make a short groove with a diamond disc. After this operation, the jig is sent to the “plating shop” - and, upon returning from there, it is completely ready for soldering the hook.
Another common complication is the large amount of solder that often occurs during soldering on the front of the jig. Its formation can be explained very simply, but for several reasons. This may be a soldering iron tip that is unsuitable in shape and size, which inevitably results in a large contact spot with the body of the jig, where an influx of solder then remains. To avoid this, you need to get a soldering iron that has a very thin needle-shaped or at least a sharp-conical tip - the contact point will be minimal. At the same time, such a soldering iron will significantly protect against the second possible cause of a large influx - excess solder at the tip of the soldering iron. Ideally, on the soldering iron we need to have a portion of spread solder that is only 2 - 3 times greater than the minimum amount for one jig. Visually, such a tip will be only slightly thicker than a clean one - and the soldering area will take exactly as much solder as it needs.
The third and very insidious reason for the appearance of “bloopers” and sagging is excess flux. Some people advise applying liquid flux almost separately and with a reserve into the soldering hole, on the shank of the hook, etc. In this case, after heating, the flux spreads very strongly over the surface of the jig - and pulls with it excess solder from the soldering iron. After something like this, you either have to struggle with a soldering iron to take the excess back, risking overheating or staining the jig even more. Or try to remove the excess mechanically, but here you can easily tear off the galvanic coating from the tip of the bait. The latter can be quite dangerous, because... Damage to the integrity of the surface metal affects strength and durability. Therefore, it is much easier to show moderation in soldering than to regret later about a “killed” jig.
Often acids and mixtures of them with some salts are used as flux - for example, hydrochloric and orthophosphoric. Such reagents have a drawback - after soldering, it is necessary to carefully remove excess, otherwise corrosion of the hook at the very base is very likely. It is even more dangerous if before soldering we diligently processed the fore-end with a file - after tinning there could be areas not covered with solder.
Soldering
Sealing and resoldering a hook are not very different, although they have their own nuances. I’ll start with a description of the initial soldering, since when resoldering we simply add a couple of not very complex operations. There is no fundamental difference between slotted and drilled jigs, but these same slotted jigs are a little more troublesome to fix, because a wire in an empty groove, as well as in one filled with liquid solder, can move quite strongly in one plane, changing the angle of the hole for the fishing line relative to the axis of the jig body. This problem is dealt with by sticking a wire into a flat wooden surface at the desired angle so that the bottom of the jig rests on a solid support. If desired, I think you can make stationary devices by pouring the wire into plaster or fireproof plastic. A drilled jig does not have this problem, since the needle or tapered wire perfectly holds the bait, coinciding along the axis with the hole for the fishing line.
By the way, when soldering, some “craftsmen” hold the body of the jig suspended on a wire with their hand. The second hand works with a soldering iron. This is possible, but the hand inevitably shakes, moves, and with it the body of the jig moves relative to the soldering iron and hook. The second option for “keeping both hands busy” is to fix the body of the bait on some kind of device, and the hand free from the soldering iron holds the hook with fingers or tweezers. The disadvantages here are exactly the same. In both cases, the accuracy and alignment of the installation of the hook and body relative to each other suffers, which requires additional time and effort for adjustments during reheating, since both hands are already occupied at the time of soldering.
The specifics of hook solderingThis is why I use primitive, but very convenient devices that allow me to fix both the hook and the body of the jig. An ordinary steel needle with a diameter exceeding the diameter of the hole for the fishing line is quite suitable for this, so that the jig is clearly fixed to the tip. The needle is inserted into a wide eraser or something similar in a vertical position.
The result is a complete and effective “hand substitute” that does not tremble, is not afraid of getting burned, etc. The hook is attached to tweezers, fixed in a pattern or miniature bench vice at the same level as the jig located at the tip of the needle.
We unscrew the vice a little so that the jaws of the tweezers unclench, and insert the bend of the hook between them, after which we again clamp the tweezers with the handle of the vice. We do this so that the shank of the hook is located in space exactly along the axis of the hole of the jig into which it needs to be soldered. The surface of the forend must be completely prepared for soldering. Now it’s just a matter of putting a tiny drop of flux on the fore-end so that after combining, part or all of the drop is located at the very nose of the jig. This is where you need to touch the soldering iron with moistened solder.
The forend will begin to quickly heat up, the flux will begin to spread - and will crawl into the hole itself, and solder will also flow through it, if the soldering iron is not too far from the tip of the jig body and it has enough power to warm up the body in this way. You can carefully move the tip of the tip so that it heats the tungsten directly, but in this case you need to be very careful and prevent overheating at the point of contact. You should not chase the power of a soldering iron for the sake of imaginary speed - the chance of “burning” a thin galvanic film is too great. For soldering jigs up to 5 mm inclusive, a power of 20 W is sufficient. At the same time, for small jigs it is necessary to further extend the tip so that it does not overheat excessively, and for large jigs, on the contrary, it is necessary to retract it inside the body in order to improve the heating of the large metal blank. But you don’t have to worry about such manipulations by acquiring a soldering station that allows you to make adjustments using the handle on the power supply.
While working with a soldering iron, the free hand performs auxiliary functions as needed: moves the jig towards the hook, holds the fixture in place, turns if necessary, etc. And after soldering is completed, it is necessary for several seconds to clearly record the immobility of the hook and the body of the jig relative to each other, because The solder remains liquid for some time after the soldering iron is removed - and this is longer, the larger the bait.
Resoldering
Based on what was described above, the difference between primary soldering and hook re-soldering is clear. To install a new hook, you must first remove the old one, and then heat up the solder in the hole for the hook. That is, we first need to install the jig on a needle (if we are talking about a drilled one) or on a device similar to the one I described above (if we are talking about a bait with a groove). And, holding the old hook or a fragment of it with the same tweezers installed in a vice, gently heat it, as during primary sealing, until the solder melts. Then we immediately move the needle and jig away until the solder hardens again. After this, you need to let the jig cool. This is a very important point that is worth remembering when soldering a jig with galvanization: it is better, instead of one long heating, to make two shorter ones with complete cooling between them. This way we will avoid the risk of the previously described detachment. The same should be done if the amount of flux or solder turned out to be insufficient and the soldering area was soldered poorly. First you need to cool the bait and only then add flux or solder during another heating.
With this in mind, we pause after removing the old hook. Then everything is done exactly as described above for the initial sealing - with the only difference that at first the hook only rests against the filled hole, and after heating and melting the solder, the left hand moves the device with the body of the jig so that the fore-end fits into the hole. If everything went well, the bait is left alone until it hardens, and then removed to remove residual flux, install a cambric or tie it to a fishing line.
By the way, if there is an urgent need to change the hook in a lead jig, this can be done using a drill with a cutting disc, a weak soldering iron and tin. First, use a disk to make a short groove exactly through the fore-end remaining in the body of the bait. And then, using a soldering iron, we carefully heat the fore-end near the jig according to the scheme described above. The only difference is that in this case we solder with pure tin. It has a noticeably lower melting point than lead, which means that with proper skill it is quite possible to solder the hook before the bait itself melts.
I would also like to warn those who use various dyes and varnishes for jigs. When resoldering hooks, you need to be very careful with them. It may be tempting to peel off heat-warped plastic. This risks the fact that along with the paint and varnish, we will peel off the galvanic coating with all the corresponding consequences. Therefore, it is still better to wash off dyes thoroughly with a solvent to avoid unwanted side effects.
Correction of hook defects
You often read or hear how fishermen try to make handicraft “modifications” of the hook in a jig. Some try to bend the tip at a certain angle relative to the body of the jig, citing the interests of grip. With such manipulation, they usually try to change the bend by bending the sting upward. It seems to me that this is not the best solution. Firstly, such a very rough deformation of heat-treated steel creates additional stresses and microdefects in it due to metal stretching on one side and compression on the other. This inevitably reduces reliability and durability. Likewise, the damage to the protective anti-corrosion coating that occurs during such manipulations also leads to damage, which tears, warps and ceases to protect against the effects of water. At the same time, the same effect of changing the position of the tip can be easily achieved at the stage of selecting the hook model and actually sealing it. If, however, it is necessary to bend the tip somewhat, then it will not be a sharp deformation of the bend that will be more gentle, but a more or less smooth bend of the straight forend - due to the smaller angular deformation, the described negative effects will not be so strong.
Pointing the hook
I’ll immediately make a reservation that sharpening the hook point is rather a forced and emergency measure, since in the vast majority of cases the result will be inferior to the factory one. Including due to the defenselessness of the tip, which has been simultaneously cleaned of anti-corrosion coatings. But sometimes there is no choice - either he is somehow sharpened, or completely stupid. Again, as when preparing the forend for tinning, it is better not to use a coarse diamond file - too quickly and roughly it can peel off a fair layer of metal. The same can be said for various sharpening stones and files. For such an operation it is worth using more gentle materials and technologies. The best choice is very fine-grained sandpaper, which, for convenience, can be applied to a spatula or any plate of suitable thickness - just so as not to wear off the beard. You can also use a drill with a sheet metal disc coated with fine grinding paste (like GOI paste). The main thing is that the disk is flat and does not “beat” when rotating. But still, it is better to consider the option of sharpening the hook as a temporary measure - and at the first opportunity, resolder it or change the bait for a new one.
A. Dyachenko
Related articles:
Methods for making BALDA tackle
Homemade popper
How to insert a cambric into a jig
Good reel care
Soldering a hook into the crown of a jig
The process of correctly soldering a hook into the crown of a jig was discussed in general terms in the previous article. There, a hook with a tinned shank is soldered into the jig when filling the homemade crown cavity with solder.
Here we will do things a little differently: first we will fill the cavity of the jig crown with molten solder, then we will start soldering the hook.
To solder a hook into a jig in a more universal way, we fix the position of the crown of the future jig on the edge of a wooden block and fill it with solder (without a hook yet).
We place the hook under the hook between the halves of the bent piece of cardboard, heat the solder in the crown of the jig, and solder the shank of the hook at the desired angle of inclination into the body of the bait.
The method is more convenient when soldering the hook not only into the crown of the jig, but also into the solder poured onto the petals of homemade spinners.
Next, I draw a picture showing the correct position of the hook in the manufactured jig.
The correct position of the hook when soldering a jig
The grip of the hook depends on the correct position in the jig. Both positions of the figure (“a” and “b”) show the correct position of the needles before soldering the hooks into the cavity of the crown when making a drop-shaped jig.
In this case, the angle of inclination in space of each “droplet” after soldering the hook will be 10-15 degrees, which is the optimal angle of inclination of the jig with a horizontal orientation in space.
But in position “b” the shank of the hook will definitely protrude from under the layer of solder during finishing processing of the manufactured jig, which can be accidentally cut off.
Therefore, to secure the nasal end of the crown, before filling the jig with solder, we make a shallow cut with a needle file.
After correctly soldering a batch of hook jigs into the crowns, we check the balancing of the baits and adjust the jigs to the correct angle of inclination in space.
How to make a tungsten jig with your own hands
You can easily make tungsten jigs with your own hands using the following technology:
- Cut off a fragment corresponding to the shank of the hook from the tungsten electrode.
- Cut the heat shrink tubing slightly longer than the insert.
- The rod and shank of the fishing hook are inserted into the heat-shrinkable plastic tube.
- In the flame of a candle or lighter, heat-shrink and compress the assembled structure.
- Apply a layer of superglue along the edges of the tube.
As a result of production, a tungsten jig is obtained, which is quite durable, which can be used in both the reel and non-reel version.
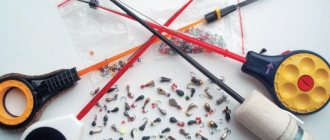
Materials and tools
Making tungsten jigs with your own hands requires equipment with the appropriate materials and tools:
- tungsten electrode;
- fishing hook;
- plastic heat-shrinkable tube SSD;
- lighter;
- a grinding machine with a cutting disc for cutting the electrode;
- Super glue;
- protective glasses;
- bench vice;
- thin disk with diamond coating;
- set of files.
Where can I get tungsten for equipment?
Tungsten is a widely used material. The refractory metal is used in incandescent light bulbs and is sold in the form of wire. In addition, tungsten for jigs can be found in workshops engaged in argon welding. Refractory welding electrodes are suitable for the manufacture of tungsten jigs.
The simplest technology for soldering a tungsten jig
To begin with, you need to cut the material to the desired size on a cutting or grinding wheel. In this case, you should protect your eyes with glasses. Then hold it in a vice and drill a hole in the tungsten blank with a drill with a diameter of 0.7-1.5 mm. Drill at 500 rpm using emulsion. Any oil is suitable as an emulsion - from vegetable to machine oil. Some even use milk.
Soldering tungsten is a serious problem because it cannot be soldered with tin-lead solder. There are many videos on the Internet showing the intricacies of the technology, how to solder tungsten bait. They describe two soldering methods:
- copper plating by electrolytic method followed by soldering the hook with tin-lead solder;
- dipping a red-hot workpiece into hard solder of the PSR type, using a specialized flux, followed by soldering with hard or tin-lead solder.
Before soldering tungsten jigs at home, cut the groove for the hook with a thin diamond-coated disk. Insert nichrome, or better yet, tungsten wire into the drilled hole to prevent soldering.
What to consider when making
It is necessary to take into account many nuances of the technological process. The main problem is the frequent breakage of the fishing line due to the sharp edges of the hole in the tackle.
How to make a tungsten jig and avoid loss.
To avoid unnecessary losses, they use a method such as inserting a plastic cambric into the hole of a tungsten jig.
In addition, it is necessary to avoid overheating when soldering the copper-plated layer of a tungsten bar to prevent peeling.
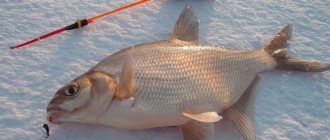
The correct angle of inclination of the soldered jig
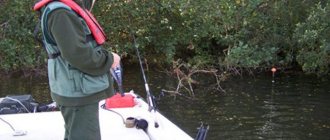
My soldered homemade jigs called “droplets” at the correct angle of inclination in fishing conditions after soldering are shown in the photo.
The speed of filling our fishing boxes with fish catch largely depends on the correct angle of inclination of the jig.
The values of the correct angle of inclination relative to the horizon plane for different jigs can vary from 0 to 90 degrees.
Typically, soldered inclined jigs, designed for catching fish using smooth oscillations of the nod spring, are set to a small angle of inclination (15-20 degrees).
For reelless jigs, depending on their structure, the correct angle of inclination ranges from 20-90 degrees.
Some fishermen, when soldering special jigs intended, for example, for catching bream, set the baits to a small positive angle of inclination. As a result, the tip of the hook on the bait suspended from the fishing line may be higher than the body of the jig.
How to make a “Devil” jig with your own hands
Jigs are very popular among anglers, especially in winter fishing for many types of fish. Fishermen are especially fond of the jig called “Devil”, which shows a high level of catchability. Many fishermen do not buy such a jig, but quite successfully make it themselves at home, and homemade products sometimes turn out much better than store-bought options.
Features of making jig "Devil"
To make your own “Devil” jig at home, you can use several different methods, among which are the following:
- — the process of manufacturing “Devil” without soldering or casting;
- — “Devil” using soldering;
- - production by casting method.
At the same time, the first method is the simplest and easiest, but it still allows you to get a very effective homemade “Devil” jig as a result; the other methods are somewhat more complicated.
Manufacturing without soldering or casting
In this case, you just need to mount a weight on the tee, finally secure it and paint it. Before doing this, you need to prepare the following set:
- — “Drop” sinkers made of silicone;
- - tee number 20 or slightly smaller, it should have a long fore-end and thin hooks;
- - beads or seed beads;
- — pliers and superglue;
- - file;
- — black waterproof varnish;
- - a drill or screwdriver with a thin drill bit, although this tool may not be needed.
We take the necessary sinker, remove it from the tube, while the ring of the tee must be carefully squeezed using pliers so that it can be inserted into the hole of the weight. You can also slightly widen the hole in the weight using a drill bit on a drill or screwdriver.
You should also put a bead or beads on the tee, a weight on top, then you should crimp the lead and fix it at the bottom with superglue. Then we process the workpiece with a file, paint it, and additionally hang beads or any other decorations. Cover with varnish.
Making “Devil” using soldering
The basis is a tee, and in order to make smaller versions of the jig, it is quite difficult to find small hooks for the tee, so you have to solder them yourself. At the same time, the preparation of such a tee is the basis for subsequent versions of the “Devil” manufacturing. In the future, you can use lead pouring or solder on top.
For soldering you will need the hooks themselves, some copper wire, a soldering iron and solder, you will also need either a plug or a drill to hold the hooks; if you need to hang a bead, you should prepare that too.
You should bite off the rings from a pair of hooks, while leaving the ring on the third one. The hooks should be tinned and then secured in the desired position - in the head of a drill or in a piece of cork, having made cuts in advance. Next, the workpiece is wrapped using pre-tinned wire and thoroughly soldered, then processed with a file.
The correct angle of inclination of vertical jigs
Please do not confuse horizontal jigs with reelless jigs such as devils. These jigs have a vertical action, the correct angle of inclination is equal to or close to 90 degrees.
Special mention should be made about the vertical jig called the bulldozer. The closer the angle of inclination of this bait is to 90 degrees, the better. Otherwise, at the end of the retrieve, our homemade bait will begin to fall on its side with catastrophic consequences for the vibrations of its hooks.
The angle of inclination of my homemade jigs called goats is in the range of 40-60 degrees.
If, after soldering the jig, it turns out that the bait suspended on the fishing line is not in the correct position in space, then in order to not noticeably deteriorate the fishing results, the angle of the jig should be changed.
But usually large, heavy lead jigs suffer from this drawback after soldering.
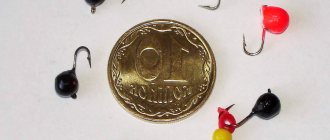
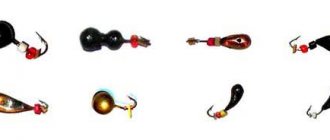
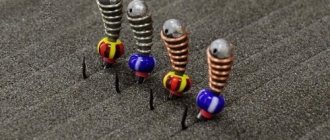
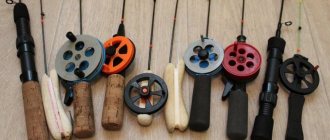
What to make your own jigs from?
To make bait at home you will need a minimum number of tools and widely available materials. At home, jigs are usually made of lead (soldered or forged).
The materials can be thin-rolled scraps of ferrous and non-ferrous metals, as well as their alloys. This can be bronze, tungsten (for this you need machines and special tools), tin of coffee cans, cupronickel, stainless steel, coins (royal or made in the 20s).
Gear can be made from any available materials: cans, various types of metal packaging containers (they sell piece and bulk materials). The baits are coated with anti-corrosion material.
Fishermen also use other materials: copper wire, plastic, epoxy resin, stainless steel electrodes. Homemade baits can be
but can be used for all types of fishing (summer, winter).
Changing the angle of the jig
The incorrect angle of inclination of a manufactured jig can be changed either by changing the shape of the bait or by changing the point of suspension to the fishing line.
For a jig with a crown, I know of two ways to change the angle of the bait.
In the picture drawn to explain the material in position “c” after soldering, the finished jig will acquire an incorrect angle of inclination with the back part lowered and the hook pulled up, which will increase the number of fish landings.
The angle of inclination of this jig can be changed and brought to zero or even negative by moving the point of suspension of the jig to the fishing line.
To do this, drill a new hole for passing the fishing line along the dotted line. Here, changing the angle of the jig will cost us little, but the shape of the jig will not change. Typically, large angles of inclination in space are assigned to reelless jigs.
The closer to the rear end of the jig the hole is pierced, the greater the positive angle of inclination relative to the point of suspension to the fishing line the jig receives.
In position “g” after soldering the jig, nothing will have to be changed, since the position of the puncture point in the crown of the jig is chosen correctly, the angle of inclination of the jig is set to negative. From an aesthetic point of view, before filling the crown with solder, it is better to stick the needle along the dotted line.
The angle of inclination of any jig can be slightly changed by removing some of the solder from the nose or rear end of the bait. Then her weight will decrease. But solder can be added in the right place to change the angle of inclination of a homemade jig.
If you increase the layer of solder at the head end of a homemade jig, the angle of inclination of the bait will increase. When the thickness of the fill in the rear of the jig changes upward, the angle of inclination decreases.
Using the same principle, you can change the angle of inclination of the lead jig.
Is it difficult to make a tungsten jig yourself?
Often, experienced fishermen make jigs on their own, because they believe that mass-produced such products do not suit them. And if you also decide to start creating a tungsten jig, then you cannot do without a soldering iron, tweezers, flux, solder and soldering acid. It’s also good to get an electric sharpener, pliers, and diamond files.
Having acquired all the necessary tools and materials, you will then need to go through the following stages of work, described below.
- From a tungsten electrode about 4 millimeters thick, using an electric sharpener, grind out a part in shape and size corresponding to some type of jig, that is, similar, for example, to a drop, a ball or an ant. It is recommended to treat the surface of the resulting product with a needle file to eliminate sharp protrusions or other imperfections.
- Before soldering, the tungsten workpiece must be tinned. To do this, it is heated red-hot and dipped into solder. After cooling, the part is additionally cleaned with a needle file to remove solder deposits.
- The hook also needs to be tinned and, applied to the tungsten workpiece, carefully soldered to it. After which the resulting product must be cleaned of all contaminants.
- You can paint the manufactured tungsten jig using regular nail polish.
When making jigs with your own hands, you can experiment, for example, making them very small or, conversely, very large, with or without beads and any other additions. Using just a bare hook as a basis, you can hang one bead or several, put on pieces of multi-colored PVC pipes. You can also experiment with the length of the hook shank, the length of the pendant, and make hanging hooks on the jig. Jigs with hanging hooks that easily fly into the fish’s mouth have proven themselves well, and all that remains is to hook the prey.
Below is another simple way to create jigs shown in the figure:
Creating them is very simple:
- Take a hook with a long shank.
- A cambric in the form of a piece of heat-shrinkable tubing is put on a piece of tungsten electrode, slightly shorter in length than the hook, and the hook is inserted into it.
- The casing is heated over a candle flame or using the hot air of a hair dryer so that it securely compresses the hook and a piece of tungsten.
- Additionally, for reliability, the connection at the edges is fixed using superglue.
The resulting simple and reliable products can be used both as a reel jig and as a reelless jig.