Zakidushka is the colloquial name for the most popular type of fishing tackle. An affordable price combined with the possibility of self-production allows you to use a large number of similar fishing rods on reservoirs. And this is an important factor that makes it possible to get a hefty catch in a short period of time.
Thanks to the presence of simple gear, you can catch large bottom fish both in shallow waters and at medium distances from the shore line. Maximum efficiency can be achieved when fishing on a hard and sandy bottom surface with a minimum amount of snags.
What is a snack? This is a thick fishing line (about 0.7-0.9 mm in diameter) with a sinker at the end and several hooks attached to the main fishing line with leashes made from small pieces of fishing line. The opposite tip can be located either on the reel or on a special wooden part.
The main advantages of simple gear include:
- the ability to easily make long casts;
- carrying out fishing in deep areas of the reservoir;
- effective fishing both in areas with strong currents and in calm waters;
- simultaneous hunting and feeding;
- different design variations.
Types of snacks:
- a simple version of a hook with fishing line;
- donka with elastic band;
- tackle resembling the appearance of a ring.
Fishing with bait is not simple and is done in different ways, depending mainly on the fishing location and the type of desired prey.
The main objects of hunting for simple tackle are:
- zander;
- pike;
- carp;
- perch;
- roach;
- bream;
- catfish;
- crucian carp and tench.
Using a homemade fishing rod, you can go fishing throughout the year, but the most effective time for catch fishing is spring.
What is a zakidushka and features of its use?
One of the fishing methods is to use bottom gear. In fishing circles it is classified as passive. But despite this characteristic, the simplest, unpretentious method, without frills in material resources and painful choices among rods and reels, from time immemorial, the “old-fashioned” method has invariably been considered a throwaway method.
From his entire arsenal, the fisherman had a piece of fishing line, several leashes with hooks, a sinker cast from lead, or a piece of stone or crushed stone of a suitable size, which was found on the shore of a reservoir.
On the shore, the tackle was collected, thrown into the place where the expected prey was caught, and the fisherman could only see the long-awaited bite. The tackle was selected, the fish was removed from the hook and the process was repeated.
The process was simple and gave the fisherman true pleasure - the pleasure of being alone with nature. Blue water, blue sky, green shore, yellow sand underfoot, and not going home empty-handed.
But this is for those who have some practice. But for others, this pleasure begins with the preparatory work.
Devices for bottom fishing (hooks, elastic bands)
The name itself is “donka”
combines several types of fishing gear that have their own names -
the simplest donka (classic), the zakidushka, the “carousel”, the underpass, the ring, the “elastic”, the “automatic”, the seine and others.
These fishing homemade products are, on the one hand, the simplicity and versatility of using gear for different types of fish, and on the other hand, fishing from the bottom.
After all, as you know, the largest fish are caught at great depths.
If you double the length of the fishing line on a float rod, move the float to the very tip of the rod and make the load heavier, the resulting tackle will become the prototype of a simple donkey. This, by the way, is what many floaters do when, after a flood or rain, they have to fish in cloudy water or in a very strong current. However, the simplest donka does not require such a long rod: it is not involved in casting, hooking, or fishing for prey. All these operations are performed exclusively by the hands of the fisherman. And a float hanging above the water is not the best “watchman” for bites.
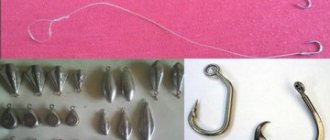
The simplest fishing rod consists of a short (up to 1 m) fishing rod equipped with a reel or reel, a supply of fishing line of 35-50 m, a sinker and leashes with hooks.
The fishing rod is usually made from thin wood (usually juniper) whip. Its butt end is sharpened to make it easier to stick into the ground, and at the tip there is a loop for attaching the fishing line in working condition. This loop is made exactly the same way as on a float fishing rod. In principle, any bottom tackle can rightfully be considered homemade, since experienced fishermen most often assemble it, as they say, from “a” to “z” themselves. We will not dwell in detail on each stage of assembly, but will consider only a few of them. Sometimes fishing enthusiasts store the fishing line on a reel made of plywood or foam plastic, and make a fishing rod on the shore from a branch of a willow bush that grows locally. It is hardly worth encouraging such amateur activity: after all, the bush will be damaged in vain - after fishing, the cut twig, as a rule, turns out to be thrown away as unnecessary. It is more correct to do otherwise - in advance, at home, make a fishing rod for the donkey from some auxiliary material. Such a fishing rod can last more than one season. Choosing a fishing line for rigging a simple donkey is not difficult. But when choosing the shape, weight of the load and the method of attaching it to the fishing line
one must be guided by considerations of expediency.
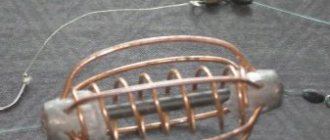
For example, if the coastal section of the bottom is flat, it is hardly worth using a light load: you won’t be able to cast it far, and there are no fish close. On the contrary, on a lake, pond or river with a weak current, a very heavy load is not needed. If the bottom of the reservoir is muddy or rocky, a “pellet” is more practical - a round-shaped weight. In a strong current with a sandy bottom, it will be better to “lie” a flat load. The main material for the manufacture of bottom sinkers is lead or its compounds - everyone knows this. But you can build a sinker for a donkey from... clay, cake, steel spiral springs and even cans. It is the choice of sinker that has a serious impact on the catchability of this tackle. And a simple piece of lead in this case is not always the best solution. It is more effective to build a sinker-feeder
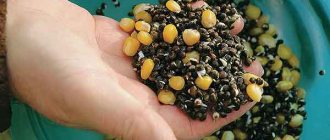
. And the easiest way is to make it from ordinary cans. To do this, you will need two tin cans of different sizes so that they can be inserted into one another, like a student's pencil case. After this, you need to make holes in the walls of the cans and attach a small loop to one of them, through which your feeder sinker will be attached to the fishing line. Before casting such a sinker, you need to add complementary food, such as porridge. From a sinker thrown into the water, the current washes away crumbs, which attract fish.
YOU SHOULD KNOW If the bottom is silted, and this is exactly what happens in ponds and lakes, the hooks sink in it and the fish sometimes do not see the bait. To keep it in the water column, a ball of granular foam can be placed on the fishing line of the donkey leashes, not far from the hooks (the kind used to make packaging for radio equipment). Balls can be selected of any size depending on the size and weight of the hook with the nozzle. To put the ball on, just cut it halfway with a sharp blade. White foam beads on leashes also serve as additional bait for fish.
In principle, such a homemade sinker for bottom tackle can be made from a small plastic bottle, a film cassette, a plastic medicine bottle, etc. containers. You can also use a lump of clay as a sinker. To do this, you need to mold a ball the size of a tennis ball from viscous clay. Sprinkle Hercules cereal on plastic wrap and roll the ball over it until it is completely covered with cereal flakes. Then make two shallow cuts on the sides of the ball and stick a leash into them. You need to seal it so that only very short pieces of leashes with hooks stick out from the ball. The sinker is ready. Now, like an ordinary stone, you can throw it into the right place. Attracted by the food, the fish will approach the tackle, plucking the petals of the “Hercules”, and along with them will grab the bait. But a very easy-to-make sinker-feeder made from... curlers. Take regular plastic curlers. Attach the lead plate (Fig.).
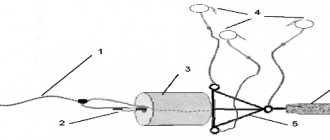
The curlers can be shortened, and the cells in them can be made larger by cutting through the partitions. It is easy to select the weight for each specific case, simply by varying the size of the lead weighting plate. If necessary, you can change the diameter of the feeder by cutting the curlers lengthwise and tying the seam with thread or wire. Just as in a float fishing rod the float is of great importance, which is a bite indicator, so in a bottom fishing rod the guard plays the role of an indicator. The bell is most often used as a guardhouse. A sensitive guard, like its main component - the bell, can be made independently. In this case, the guard will be like a continuation of the fishing rod.
Take a piece of thin board, cut a reel on the side, sharpen the lower end, and use a thin drill to make a deep (5-7 cm) hole in the top - a nest for the guard. The guard itself is made of elastic steel wire (you can use a bicycle spoke). A bell is attached to its upper end, and a bend is made in the middle to clamp the fishing line. This type of tackle is light and convenient: the pointed end of the fishing rod is securely held in the ground, and the bell is sensitive to the slightest touch of the fish to the nozzle (Fig.).
You can try another gatehouse design - on a clothespin (Fig.).
So that the bell does not become an obstacle when winding the fishing line, it can be tied to a separate leash 40-50 cm long. The second end of this leash must be threaded into a hole made in one of the halves of a wooden clothespin and tied with a knot. The clothespin should be secured to the tip of the fishing rod, and the bell on the leash should be thrown over the working part of the main fishing line. This device allows the fishing line to move freely through the guide ring, and during hooking, the bell can be dropped so that it does not interfere.
Fishing bells of different sizes are sold in fishing stores, but your own rings better. And you can do it like this. A 16-gauge brass shotgun casing requires sawing off two-thirds of the body. The tongue of your bell can be a large pellet, a piece of lead, or an ordinary nut. The tongue is attached to a thin wire passed through the hole for the capsule. On the outside of this wire you should curl a ring to hang the bell on the fishing line. If you prefer such tackle as an elastic band, then you can use your talents as a DIY craftsman when constructing the tackle itself - from making a buoy to attaching a safety cord. By the way, the “elastic band” can only partially be called bottom tackle, since it can successfully serve as a fly fishing rod. The simplest rubber band buoy is an empty plastic bottle or a piece of foam on a safety cord. The cord should be long, greater than the depth to which the sinker lies. The disadvantage of such a buoy is that you can only pick up the sinker after finishing fishing by swimming or using a boat (Fig.).
In order to pick up the sinker after finishing fishing with a rubber band directly from the shore, as they say, without getting your feet wet, you can use a device that was once proposed by A.G. Karbivnichy (fig.).
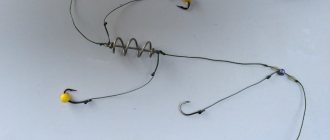
He suggested not keeping the safety line separate from the rubber thread, but connecting them. To do this, several small elastic sleeves, for example made from electrical wire insulation, must be placed along the entire length of the elastic band at the same distance from each other. On each of them, in the center, make two loops from fishing line: one to tightly clasp the muff, and the second (on top) to connect the muff to the safety line, which runs freely parallel to the elastic band. The amount of slack in the safety cord should be such that, when straightened, it allows the elastic to stretch, but does not allow it to break. After connecting to the elastic band, a sinker is tied to the lower end of the safety cord, and a working line is attached to the upper end, to which leashes with hooks are attached. There is no difference from the usual “rubber band” equipment either in casting the tackle or in the fishing process. But after finishing fishing, you need to remove the load from the water in the following sequence: wind the main fishing line with hooks on the reel (the elastic will stretch); put the reel down and pull out the safety cord along with the elastic band; when the sinker is on the shore, bring the tackle into the stowed position. Fish are caught using bottom tackle not only in summer, but also in winter. As a rule, in reservoirs where there is a current, pike perch, pike and large perch are caught using winter donkeys. You can assemble the winter donka, just like the summer one, yourself. You will need two sinkers: one light, weighing no more than 5-8 g, designed for spreading the tackle downstream, the other heavier, weighing up to 25-30 g, for laying the tackle on the bottom of the reservoir (Fig.).
Both sinkers are sliding and move freely along the fishing line until they reach the limiters, which can be either lead pellets or carabiners with clasps. Tie three leashes: one at the end of the bottom, below the light sinker, the other two - 30-40 and 60-70 cm above the limiter of the light sinker. The technique for “throwing” such a donkey is as follows. Having attached bait (worm, whitebait, cut fish) to the hooks, you should gradually lower the tackle into the hole, holding a heavy sinker and releasing the line from the reel. The current will carry the light sinker along with the leads away from the hole. When 5-6 m of fishing line comes off the fishing rod, you can lower a heavy sinker into the hole along the fishing line. You can cast out much more line, and then, lowering the heavy sinker, slowly pull up the tackle, fishing a significant area downstream. The fishing rod is placed on the ice on spacers; the simplest are wire flyers. They attach themselves to the rod of the fishing rod and prevent large fish from dragging it into the hole. That's all for today, to be continued...
This post may contain affiliate links. This means I earn a small commission from links used at no additional cost to you. See my privacy policy for more information.
unique, content, article, fishing, homemade, fishing, water, free
Step-by-step process of making a do-it-yourself snack
The main condition for installation is ease of transportation and storage. For classic tackle (main line, leashes with hooks, purchased sinker), an assembled rig with a reel made of dense foam or cut from plywood and covered with foam rubber, or with a glued piece of foam/cork for attaching hooks, is suitable.
If the use of replaceable leashes is intended, then it is performed on separate reels.
Figure eight knot when connecting hooks to fishing line
What should you pay attention to?
Particular attention should be paid to the loading of the bag. The load should be quite heavy, since you will have to throw it by hand over a long distance. It should also stay at the bottom when the rubber shock absorber is pulled, and not be pulled behind it. Therefore, it is best to use a weight that weighs about 300 grams or a little more.
The rubber shock absorber should be 10-20 meters long. To prevent the elastic knot from coming undone, it is recommended to first attach a meter-long piece of thick fishing line to the load, and then attach the shock absorber itself to it using a swivel.
After the elastic band, a thinner fishing line with a diameter of 0.2-0.3 mm is attached. This will be the main line. Leashes with hooks are attached to this fishing line. The number of hooks may vary, but in order to avoid snagging and tangling of leashes, it is not recommended to put too many. Typically 5 to 7 hooks are installed. When fishing for crucian carp and some other carp fish, it sometimes makes sense to attach feeder feeders between the leashes, which are filled with bait.
Difficult tricks
The evolution of development does not stand still: the fish is becoming more and more careful, and the fisherman is becoming more and more cunning. To achieve the desired result, the fisherman adds to his arsenal all kinds of equipment and the experience of experienced brothers in arms.
Every fisherman knows the proverb “it was biting here yesterday, but today it was on the opposite shore.”
To attract fish to the fishing site, the tackle is equipped with a feeder. The feeder is made of a mesh with a middle cell, where complementary food and a sinker are placed. , feeder feeders became widespread . Small spring feeders designed for catching specific fish (crucian carp, crucian carp) have also found use. They can be installed not only on the main line between the leashes, but also directly on the leashes themselves.
When placing bait in the feeder, you should take into account the nature of the reservoir:
The advantages of this gear are obvious over others: simplicity of design with minimal costs.
Among the disadvantages : only one - with each bite the tackle requires re-casting.
This drawback is devoid of another tackle - an elastic band.
Common types of feeders
Among the most popular equipment options it is worth noting:
- Spring feeders are twisted products made of brass or copper wire. The inner part contains a plastic or metal tube through which the main line is passed. Often, such models are installed when it is necessary to use crumbly bait.
- Top feeders - the design looks like a flat sinker, where bait in the form of sunflower cake is tied. Leashes with hooks are hidden in the top of the head or installed close to the feeder.
- Nipple feeders are made from a copper, lead or brass plate that is bent into the shape of a spoon. The tackle is supplemented with bent pieces of wire or springs, which serve to hold the bait. The hooks are hidden in the concave part of the feeder. By sucking up particles of bait, the bottom fish gradually swallows the bait.
Casting will be effective only if the feeder with bait is selected for specific fishing conditions. In this case, even the simplest gear is guaranteed to bring a catch.
Zakidushka with rubber shock absorber
This tackle belongs to the type of bait, but it occupies a separate level in the bottom class, as it has some features both in design and in the technique of its use.
Donka with rubber shock absorber (elastic band)
History is silent about its origin. From the stories of the oldest fishermen it is not clear: either it came from the north, or from the Far East, or from local fishermen.
In the Central regions of Russia, the “elastic band” (the name of the tackle in common people) received its main significance when fishing for saberfish, and in the Southern regions - when fishing for roach. A true connoisseur of nature will remember the seething stream of silver water, but for someone of the opposite nature, you won’t be able to see the span of his arms with your gaze.
Based on this, the zakidushka has undergone some elements of design differences.
Device and basic techniques
The very name of this snack speaks about the main element of the design - the elastic band.
In Soviet times, including the era of “shortages in stores and no shortage among the population,” prefabricated models for the creative development of the school-age category were especially popular among fishermen. This category was saved by the growing progressive development of the automobile industry and the production of consumer goods (bicycles). Rubber bands were cut from tire inner tubes with a sharply sharpened object (similar to a stationery knife).
The requirements for the elastic band were stricter than those of the “Quality Mark”:
Currently, there is no limit to the abundance of hooks, lines, and elastic bands.
The elastic is installed between the main line and the sinker. The length of the elastic is determined by calculating the casting distance of the tackle, taking into account the strength of the current and its extensibility.
Requirement for the sinker . The sinker must have a mass (weight) that prevents the force of moving from its place, equal in total to the tensile force of the elastic band and the force of the current.
Presumably, calculating the length of the rubber and the main line comes down to determining the distance when casting by hand equal to 40 m.
Approximate parameters of the cast (without taking into account the current):
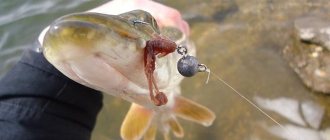
Leashes - 0.16...0.25 mm, shortened 15-25 cm. Attachment point to the main fishing line. The leashes are installed between beads of different contrasting colors (red, blue, green, yellow, white). The distance between the beads is 40-60 mm. The beads are secured with a locking knot.
In addition to equipping the tackle, the fisherman’s arsenal is supplemented by two fishing lines:
On the shore, instead of the main fishing line, a backup line is laid out. An elastic band is attached to the doubler using a swivel with a carabiner and a sinker behind it. An additional fishing line is attached to the sinker, the opposite end of which is fixed on the shore at a distance from the shaft, which ensures normal operation with the main fishing line without interference.
This apparent complexity is typical for ensuring the safety of the main gear when casting and pulling out the sinker to ensure the integrity of the elastic. The tackle is thrown to the fishing point. The backup line is reeled onto a spare reel. The main fishing line is attached to the elastic band, which is subsequently fixed to the peg.
After all the preparatory work, the equipped tackle is smoothly released into the water.
After enjoying the day, the main line is first selected and unfastened, then the additional sinker and elastic are selected.
Additional features
The fish swims along the bottom (as people say), but at times it breaks away from the bottom and rises to the upper layers of the water . This is preceded by various factors:
Types of snacks you can make with your own hands
There are several options for snacks that you can create with your own hands from scrap materials. This is a throw with a fishing line, an elastic donk and a tackle in the form of a ring.
Necessary materials for the dumpster
To make such a homemade product you will need the following materials and tools:
- a small piece of board or plywood;
- monofilament thread 0.5 mm thick;
- thread for creating a leash, preferably 0.3 mm thick;
- Rusilo;
- hooks;
- rubber or foam rubber;
- saw;
- drill;
- sandpaper;
- glue.
Stages of creating the simplest snack
- Initially, it is recommended to select a piece of plywood or board to further create cuts in it. This can be done by using a saw on both sides of the workpiece.
- To secure the hooks, a piece of rubber or foam rubber is glued to one side of the workpiece.
- To secure the monofilament thread, a hole is created in the reel.
- A weight weighing about fifty grams is fixed at the tip of the thread.
- Having retreated twenty centimeters from the last one, hooks are fixed alternately at the same distance.
- At the final stage, the monofilament thread is fixed by creating a hole, and the hooks are stuck into the foam rubber. Ready!
Do-it-yourself bundt with an elastic band
This is a very common and popular equipment, which is presented in the form of an elastic shock absorber securely fixed to the main monofilament thread (via a carabiner or using the “loop-to-loop” method).
During the process of removing the rig, the sinker is held in place and is subsequently attached directly to the rubber part. Whereas the leashes are already attached to the monofilament thread.
The elastic band is selected in such a way that during the process of stretching it allows it to reach the hooks on the surface of the reservoir. And at the moment of compression, it again delivered them to their original position.
Moreover, the position of the sinker in this case can be adjusted using a cord with a float attached to it.
DIY chuck with a feeder
You can create such equipment in different ways. A distinctive feature of each method is the use of a specially assembled feeder.
"Spring"
Such equipment is presented in the form of a plastic rod into which a monofilament thread is inserted, and a barrel-shaped wire-spring enveloping it around it. It is necessary to ensure that the feeder slides freely along the monofilament, while locking node connections in certain places will act as limiters. This homemade product is most often filled with clay-containing feed, which is particularly viscous. This will allow the bait to attract the attention of fish much longer.
"Makukha" or "makushatnik"
This is a homemade product in the form of a flat weight with leashes attached to it. The hooks are hidden in the sunflower cake using rubber bands. Over time, the cake will begin to dissipate in the water column, and the fish, trying to feast on it, will be hooked without realizing it.
"Pacifier"
This homemade product looks like a spoon made from soft metals. To ensure better and reliable fastening of the feed, a special spiral is located inside. The structure is carefully filled with bait, hiding the hooks in it. And the fish, trying to taste the delicacy, gets hooked on its own.
Catching fish with a hook
Before you start casting our equipment, you should lay out the monofilament thread on the ground in a snake or rings. Moreover, this area must be previously cleared of various debris and vegetation. The tip with the sinker attached to it is carefully taken into the hand a little higher than the location of the leashes themselves. While actively rocking to avoid shaving the nozzle, cast the structure further away.
The donka is cast using the same method by unwinding the sinker or by ejecting. For example, you take a stick that has a small depression at its end, and a sinker is placed there. Do not throw the equipment like a standard stone.
Because at this moment the sinker is located directly in the hand, and the hooks are somewhat further away on the surface of the earth. This can be very dangerous: one awkward movement and the hooks are already digging into your palm.
But there is a way out of this situation - work in pairs, when your friend carefully pulls the monofilament thread and places the leashes parallel to the coast.
A cast is considered perfect when the bait falls into the thickness of the reservoir at a distance of more than 40 centimeters. When the load reaches the bottom surface and the monofilament weakens somewhat, it is still recommended to create a low tension. This is achieved by attaching a guard to the tip of the fishing rod.
When the donka is not equipped with a reel, fishermen advise securing the free end of the monofilament thread securely on the shore. Because a large specimen can pull all the equipment with it into the water column. You can see the bite by the vibration of the guard. And you should start hooking fish by holding the monofilament with your hand.
Advantages
- the main advantage of such equipment is its low cost;
- plus, you can significantly increase the water expanses of fishing;
- in the process of tightening the monofilament thread in different directions, it is possible to fix it in the selected position;
- the presence of a leash allows you to observe the bite;
- if the fishing location is unknown to you, the donka can act as a depth gauge;
- By changing the length of the descent, you can control the bait above the surface of the bottom of the reservoir. This will be a very good opportunity when you decide to fish in an overgrown or littered pond.
Fishing technique with a hook
Upon arrival for fishing, first of all you should choose the most suitable place, and only then start casting bait.
The most common and popular casting method is considered to be manual. It involves unwinding a monofilament thread with an attached sinker and throwing it to the desired location. It's very simple and effective.
You should carefully monitor the hooks that are located on the main monofilament so as not to get hurt or get caught in your hands. For this purpose, an elastic band is used to return the tackle to its original position after casting.
When you hear the alarm ringing, the fish has already bitten, all that remains is to hook it correctly.
“Rubber”: a cushion with a rubber shock absorber. Two ways of fishing
Today we decided to talk about fishing with an elastic band. This may not be the most sporting way of catching fish, but it is quite legal. You just have to follow the fishing rules and tie no more than 5 hooks on the tackle.
In late autumn, when the water gets colder, you can effectively catch burbot and night pike perch using live bait using a passive method. The undoubted advantage of this method is that the live bait is fed smoothly and delicately, which keeps it alive for a long time. The fish are not afraid of casts, and you can fish a large area of water, which is very important for finding burbot and its trails.
With a passive rubber band, or a bottom with a rubber shock absorber, you can catch a variety of fish. For fry - a predator, especially night pike perch and burbot; for worms, maggots - bream, ide, carp. When fishing for carp, it is recommended to make longer leashes and load them so that the bait is located at the very bottom. Many people neglect this, so they cannot boast of a big catch. Also, between the elastic band and the main fishing line (sometimes on the fishing line itself between the hooks), you can install small, lightweight spring feeders, which will allow you to precisely deliver the bait to the fishing spot.
Making a snack
So, let's look at the step-by-step assembly of a donkey with an elastic band:
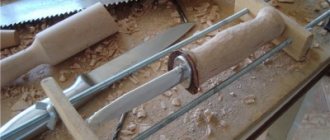
- We make a reel from a plank
. The slots should be such that the fishing line with an elastic band fits completely and does not extend beyond the height of the horn. - Glue a piece of foam rubber
onto one side of the board. You can do without it, but thanks to the foam rubber it is easier to fix the hooks without dulling them. - Drill a small hole
for attaching fishing line. - We tie the line
and wind a 52 m long line on the reel. It may be necessary to wind more or less. Here it is necessary to take into account the distance to which the cast will be made. 50 meters is enough to cast a distance of 60 meters. Those two meters out of 52 are a reserve. The missing 10 m will be replaced by an elastic band for the donkey. These 10 m are also supplemented with another 1-1.5 m for better shock absorption of the donut and to prevent its rupture. We will consider the diameter of the main line later.