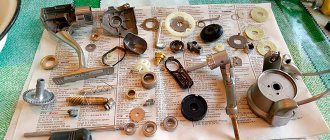
How to set up a reel - important spinning reel settings
In this article we will talk about setting up spinning coils.
To correctly set up such a reel, or rather its drag, you first need to install it on the fishing rod, then correctly wind the fishing line on it, and only after that set up the friction brake. For experienced fishermen this all seems quite simple, but for beginners this information will be very valuable. So, let's start by installing the spinning reel.
If you want to understand the topic of spinning reels in more detail, we recommend our article - spinning reels.
Why do you need a friction brake on a reel?
Friction brakes make it possible to adjust the fishing line under load. Before you start fishing, they need to be adjusted to the type of gear. Now they are installed on all spinning reels.
Using a friction brake has the following advantages:
- the fishing line does not break;
- the hook is not deformed;
- catch increases;
- You can use light bait.
Varieties
Reels are now available in different designs and models. There are only 2 types of friction brake for all models: front and rear.
How to install a reel on a fishing rod
Installing the coil is extremely simple, and even absolute beginners should not have problems with this procedure. First you need to unscrew the mount, then the reel is inserted into a special holder located on the handle of the rod.
The ring is then tightened tightly and the base of the coil is subsequently clamped. The coil should not dangle, but it is important not to overdo it when tightening, so as not to strip the thread.
It happens that during fishing the reel holder gets unscrewed a little, so tighten it from time to time.
How to wind fishing line on a spinning reel
We stretch the end of the fishing line through all the rings of the rod, starting with the smallest one at the tip of the spinning rod;
We fold back the line ring and tie the line to the spool using a reliable self-tightening knot;
Next, the actual process of winding the fishing line begins. For this procedure, it is necessary to provide a slight tension on the line, which a partner can help with, or you can put the skein in your pocket and pass the line through the fingers of the hand that holds the rod (with the other hand you rotate the reel handle).
Too much tension is also undesirable, as it can lead to the formation of knots or simply uneven winding.
Stop the process of winding the fishing line when there is approximately 2-3 mm of free space left to the edges of the spool. You should not reel in more fishing line, otherwise the same knots, tangles, or slipping of the fishing line during casting may form in the future.
At the end of fishing, it is recommended to always make a “idle” cast, and then, with the rod positioned perpendicular to the ground, slowly wind the fishing line so that it dries a little and lays flat on the spool.
Setting the feeder coil clutch
Hello, dear readers of the “School of Fishing”! Today Valery Fedorov will tell you about setting the clutch of the feeder reel. A necessary thing, one might say paramount.
Next time you will find an equally important article for a novice fisherman about laying line on a reel, so don’t miss its output. We look forward to your questions and feedback in the comments and don’t forget that all comments will be entered into a competition with prizes.
Since the leash obviously has a lower breaking load than the main line, the clutch must be adjusted according to the breaking load of the leash. You just need to find out what this load is equal to.
For example, Dmitry Baturin tells an almost anecdotal story about how he tried to register a European record in 2011. Using 8 lb line (1 lb = 0.45 kg), he caught a cod weighing 16.5 kg.
To officially register the record, they sent a properly completed application to the EFSA (European Federation of Sea Anglers) headquarters. However, registration of the record was refused on the grounds that tests of the cord showed that its actual breaking load was about 14 lb.
Incredibly surprised by the fabulous characteristics of the cord, Dmitry turned to the IGFA (International Trophy Fishing Association) with a request to test the cord. Testing carried out by this organization showed a breaking load of approximately 5.5 lbs. Amazing!
In both cases, testing was carried out on special high-precision calibrated equipment, and the results differ by almost three times. This is clear evidence of the mess that takes place both in the production and in testing of monofilament and braided fishing lines.
From this we must draw a conclusion for ourselves - not everything that is written on the fence, that is, on the package with the reel, is true. For reinsurance, we need to make an amendment. At least 10 percent. Next. It is known that the strength of the fishing line at the knots decreases. Having rummaged through the net, we will find that, for example, one of the most common knots among fishermen, the “palomar” knot, reduces strength in some sources by 2%, in others by 20%, in still others somewhere in between the first two. That is, no one knows how much actually. The picture is the same as with the registration of the record.
And finally, the fishing line loses strength when it becomes saturated with water. Again, how much? Nobody knows either. It all depends on the quality of the forest. The most pessimistic estimates are up to 30%. One thing is certain: fluorocarbon forests almost do not absorb water. But no one knows how much “almost” this is. The most cautious authors say “no more than 5%.” And thanks for that.
Thus, even if the truth is written on the reel with fishing line, the total decrease in the strength of the leash, according to the most conservative estimates, will be up to 20%. And most likely more. In these conditions, the friction brake must be adjusted “by eye”, and how much exactly, everyone decides for themselves depending on their “eye”.
For example, without further ado, I consider the loss of leash strength to be 40%. (This includes loss of strength in water and on knots, as well as, to put it mildly, inaccurate information on the packaging). Let’s assume that the declared breaking load of the driving line is 5 kg, then I set the friction brake to a load of 3 kg.
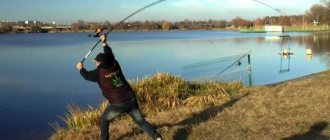
Since when playing fish, part of the load goes to the bending of the feeder rod and friction on the rings, the adjustment should be done only on the assembled rod. Place the reel on the rod and pull the line through the rings. We tie an electronic canter to the cord (see photo), secure the rod or ask someone (for example, a neighbor) to hold it.
Then, we pull the line with a canter perpendicular to the rod because it has the best shock-absorbing qualities when the angle between the line and the rod is close to straight. We adjust the friction brake so that it is activated when the canter shows 3 kg. In this case, part of the load falls on the shock absorption of the rod (position “B”, blue sector in the figure), and part – on friction on the rings (yellow sector). Point “f” in the figure is the clutch actuation point.
If there is no neighbor or canter, then you can tie a plastic bottle filled with water of the required weight to the forest (let me remind you that a liter of water is 1 kg). We hold the rod horizontally and, raising it, adjust the friction so that it is activated when the bottle comes off the floor.
We mark the position of the clutch with some kind of mark, for example, a narrow strip of adhesive tape. Since different rods have different shock-absorbing properties, the clutch on them will work differently. Therefore, if we use different rods with this reel, we adjust the drag for each one. And we mark the marks with different colors, for example, with a colored ballpoint pen.
We do the same if we use leashes with different breaking loads. When fishing, before casting, we tighten the clutch so as not to cut your finger with the cord, and after casting, we align it with the mark.
But we must keep in mind that the most precise adjustment of the friction brake of the reel for the feeder will not help if the trophy for which, in fact, was adjusted is incorrectly fished. Many inexperienced fishermen, when bringing the fish to the shore, begin to lift the rod and even move it back (position “B”).
Most often this is caused either by the absence of a landing net or by its incorrect choice (which we will discuss separately). At the same time, the shock-absorbing properties of the rod, at least, do not improve, and the friction on the rings increases. As a result, greater force must be applied to operate the friction brake. As a rule, this ends with the leash breaking.
The fact that at the end of the line, if not a trophy, then something close to it, we will understand by the operation of the friction brake at the pull-up stage. And therefore they must monitor the position of the rod and not raise it, but lower it as it approaches the shore, keeping the angle between the blank and the line close to 90 * (position “A”). In addition, the length of the line in position “A” is shorter than in position “B”, and it is easier to get the fish into the landing net.
author of the article Valery Fedorov
Categories:
Reels, Feeder.
Post tags:
Reels, Fishing, feeder…
What is reel backing?
To answer this question, you first need to understand the reel spools themselves. There are reels with deep and shallow spools. Deep spools are used for winding thick lines, and shallow spools for thin lines. The question arises - how to properly wind a thin fishing line onto a deep spool.
The winding should be such that the fishing line fills the spool almost completely, so that only 2-3 mm remains from the end of the spool side to the fishing line. In the case of using thin lines on deep spools, it is necessary to first wind an auxiliary line onto the spool; this line is called backing. This way we will fill the inside of the spool, and on top there will be a thin line with which we will fish.
If you are going to fish with thin braided lines, we highly recommend choosing reels from Shimano and Daiwa . They have a wide range of suitable reels at different prices.
Storing line on a reel
An important condition for long-term use of scaffolding is proper storage. Caring for the forest is necessary both after each fishing trip and during the off-season.
When preserving a coil for the winter, you must:
- Remove the line completely from the spool. You don't have to touch the backing.
- Dry the wood thoroughly. In this case, a regular hairdryer will be very useful.
After each fishing, it is not necessary to dry the entire length of the line; it is enough to process the segment of maximum casting.
After drying, the line is wound back onto the spool with a slight tension. At the opening of the season it will need to be rewound again with greater tension. It is better to store the reel in newspaper for a long time: it will absorb the remaining moisture from the winding and prevent minor damage to the cone. Monofilament is afraid of ultraviolet radiation, so the storage place should be not only dry, but also dark. For greater safety, the fishing line can be treated with fat or glycerin.
Finally, a few tips to help you wind the fishing line perfectly:
- When winding the line onto the spool, you need to pay special attention to the first few turns. They give direction to the rest of the winding, so they must be laid with special care.
- To tension the line when winding, it is very convenient to use a small book, passing the line between the pages. The book will prevent your hands from getting damaged and straighten out uneven areas.
- When winding new line, you need to wet it a little. It will gain greater flexibility and curl less, preventing the formation of a “beard.”
- When using braided fishing line, you need to place a small piece of fabric on the spool - this will prevent the entire cone from sliding along its surface.
Winding a line onto a reel is one of the main keys to successful fishing, since if the winding system is incorrect, the line fiber gets tangled or torn off. It is for this reason that you need to know the correct winding systematics, as well as be able to use special devices that can make this task easier.
How to adjust the reel clutch
By properly setting up the reel, you will minimize the possibility of line breakage and will be able to catch large fish. All models of spinning reels are equipped with a friction brake that allows you to adjust the force.
When loaded, the reel spool rotates and the line is gradually released, which allows you to “extinguish” sharp and strong jerks of the fish. The clutch can be front (located on top of the spool) and rear (at the bottom of the reel).
When setting the friction brake, you need to focus on the breaking load parameter of the fishing line. So, if the latter is about 7-8 kg, then the clutch is adjusted to 4-5 kg. If the fish jerks, the friction brake mechanism will work and the reel will “release” a certain amount of fishing line, protecting you from the gear breaking.
In order to adjust the clutch, ordinary weights with a certain weight are most often used, which are attached to the end of the fishing line. Although many fishermen practice adjusting the clutch in a different way, right before fishing. To do this, the spinning rod is fully equipped and put into working condition, and then the bait with a hook is hooked onto a tree or other static object.
Next, you need to step back a little and tighten the spinning rod as if fishing for a potential catch, and, having reached the maximum tension at which the rod bends into an arc, release the friction brake until the ratchet operates. Do not overdo it, otherwise, instead of a adjusted drag, you will only get a broken rod.
There are two types of friction brake: front and rear. The front clutch is more accurate and reliable, the rear clutch is more convenient to set up. Read more about friction clutches in the article - friction brakes.
In conclusion, we note once again that no special skills or knowledge are required to secure and configure the coil. These procedures are quite simple to perform, but they are very important, because the success of fishing and the preservation of gear largely depends on the reliable fastening and correct adjustment of the reel.
Friction or friction brake of the reel - how to set it
The friction brake is an important component of a spinning reel. Its main “strategic” task is to protect the line from breaking, and the tackle from possible breakage under dangerous loads. An equally important “tactical” task is to smooth out the jerks of the fish and not let it get away. How to properly set up and adjust the friction brake during fishing?
Setting the clutch of the spinning reel to “maximum”
We have already talked about tightening the clutch “to the maximum”, when the brake is set to a “subcritical” value by feel. This value is directly related mainly to the strength of both the fishing line and partly the rod - therefore it cannot be exceeded. But doing less is possible, and sometimes necessary. To better understand this issue, let's look at what and how tightening the brake affects.
To begin with, let us remember that the friction brake is an automatic safety system for our gear. Sometimes, even under unplanned extreme loads - for example, getting caught in bushes during a sharp cast - an activated clutch will help avoid damage to the rod or reel. Therefore, some companies specifically make sure that this mechanism is not tightened to the end - “just in case.”
Setting the drag of a spinning reel for fish
An equally important “tactical” task of the clutch is to avoid line breakage or spinning rod breakage when catching large fish. Released (within reasonable limits) the brake makes the fishing “softer” - that is, it better compensates for both the jerks of the predator and our possible mistakes. It comes to a seeming paradox: we turn the reel “towards ourselves”, but the fish manages to pull “back” even faster. In this situation, you can only break the fishing line or break the spinning rod on purpose.
In addition, the drag can also help in performing ultra-long power casts. For example, when fishing for asp, it may be necessary to send a fairly heavy spoon over a maximum distance. And this is only possible with a reasonably thin fishing line - which, however, may not withstand a sharp force cast. Preliminary weakening of the clutch to some extent “smoothes out” this powerful starting jerk.
However, weakening the clutch also weakens the hooking - after all, during a jerk, the load increases sharply, the spool rotates and loses a little line. And the actual fishing with a weak brake is sometimes unjustifiably delayed, and this is dangerous - the fish can go into the grass or snags.
It turns out that, depending on the specific fish and local conditions, “slipping” can be both useful and harmful. Therefore, the correct setting of the friction brake is almost always a reasonable compromise between hooking and retrieving. However, if there are any doubts, always “adjust” in favor of hooking - after all, during fishing, we will still have time, if necessary, to further loosen or tighten the brake.
For example, when fishing for pike and pike perch, due to their bony mouth and “bulldog” grip, a hard hook is always necessary. This means that the clutch must be tightened to the maximum. In addition, these predators usually try to go into the grass or snags - then only strong braking will help stop them.
And in general, it’s better to fish out small (up to 2 kg) “toothy” and “fanged” ones with force – without letting them come to their senses, because the strength of the tackle allows this. And if you suddenly come across a real “crocodile”, then even a tight clutch is a small hindrance for him. In addition, if necessary, it can always be weakened.
The opposite example is perch. Everyone knows that the “striped” has rather weak lips - which sometimes you pull out instead of fish. To prevent this from happening, hooking and landing the perch must be delicate, which is ensured by appropriately weakening the friction brake. A “hard” brake is not needed when catching predators such as asp, ide and chub. After all, these fish have a fleshy mouth and are well caught, often even without hooking. However, after this, the asp and chub usually make a sharp jerk, and the “soft” clutch helps to restrain this dangerous first impulse. The ide has a habit of “tumbling” when fishing, and the adjusted brake here also neutralizes all dangerous jerks.
Therefore, before starting each fishing trip, it is necessary to again set the appropriate value of the friction brake and, during fishing, adjust it if necessary, but in no case exceeding the “safe maximum”. Naturally, the same must be done when installing a new spool - especially with thinner line - which some people sometimes forget about.
Working with a clutch involves not only its initial setting, but also, if necessary, adjustment during the fishing process. For reels with a rear brake, it is more convenient to turn the adjuster, and it is easier to evaluate the degree of tightening using numbers. That's why I prefer these models when fishing with thin line.
However, many anglers still do not know how to use the reel brake correctly. Some forget to set the clutch correctly, others tighten it “tight”. Alas! How many rods and lines will still break because of this, how many fish will fall off the hook!
By the way, competent use of the clutch already in the process of fishing clearly indicates the mature skill of the fisherman. This is especially noticeable when catching large and strong fish in difficult conditions. For example, a fighter such as salmon requires a particularly subtle approach. On the one hand, the mouth of this fish is quite hard, and the grip is strong - all this requires a strong hook and a tightened clutch. However, immediately after this there follows a powerful breakthrough and a further long and persistent struggle. Feeling strong opposition, the salmon simply goes crazy. To the extent that he makes “candles” or even “breaks his nose” on stones, trying, as many believe, to knock the bait out of his mouth. But with a slightly weakened brake, the fish behaves calmer, so in a clean place the clutch is released a little. However, it is impossible to let it into stones or into a threshold; no fishing line will withstand this. Here you already have to “tug on” with all your strength - who will win? The brake, of course, must be tightened. At the fisherman’s feet, the salmon more than once shows all its power and “scoots away” so sharply that it often gets away. Before the final stage, you have to slightly loosen the clutch again.
Related video: How to adjust the reel friction brake
How to adjust a spinning reel?
There are times when even a new and even very expensive spinning reel sheds loops and forms “beards”. But this is not a reason to write it off; you can and even need to adjust the winding profile and it will properly perform its functions. This happens especially often if the spool is wound with braided fishing line. Braided line tangles more than simple monofilament line.
Why do you need to adjust the spinning reel?
Imagine the situation - you bought a new reel, wound a brand new cool Japanese line and went fishing for the first time with a new reel, and this is where the surprises begin. Especially, they lie in wait for those who like to fish with twitching, i.e. jerk wiring. The main problem is the dropping of loops, or “beards” as they are called. Unraveling them takes a lot of nerves and time, and when fishing there is never enough of it. And often we don’t untangle them, but simply cut off the tangled piece of braided cord. If she often sheds these same “beards,” then you can lose half of the line on just one fishing trip. To avoid this, you just need to try to adjust the winding profile on the spool and in 90% of cases, this will help avoid loops.
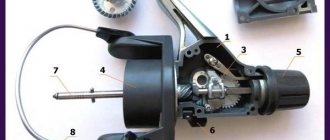
Selecting a spinning reel
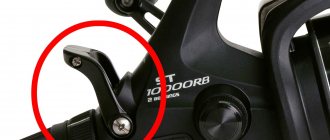
Sixthly, when choosing a spinning reel for a spinning rod, you should find out which spring is on the line handler. If it’s a pin, then we guarantee that over time it will definitely break, and right while fishing, rendering it unusable. As a rule, a spare pin is not included with the coiling, and you will have to tinker a lot to bring it back to life. Coils with a twisted and long spring, often called a perpetual spring, completely eliminate this problem and, as a rule, outlive the main mechanism. But even if there is such a spring on it, you should still check the reliability of fixing the line handler arm in the open position. A poorly fixed bow can drive even the calmest angler to a nervous breakdown after his favorite lures fly away irrevocably while casting because the spool suddenly closes.
Seventh, no matter what modern and sophisticated reel you have, pay attention to the fact that the braid is wound to the very edge of the spool if using hard braid, and 1 - 2 mm from the edge if the braid is very soft. Carelessness in the matter of winding can take away from 15 to 25 meters of casting if the line is only 3-4 mm away from the edge of the spool. The easiest way to solve this problem is to buy a reel with 200-500 m of fishing line and wind it to the edges without using a thick winding layer (a thin winding layer is still necessary to prevent slipping of the entire mass of the braid, which can happen on metal spools under load). By the way, having a supply of fishing line on the spool never hurts, especially if there is a chance of a bite from a really large fish, which can go quite a distance while fishing. In addition, after every 4-5 active fishing trips, according to statistics, from two to seven meters of braid are lost, which occurs as a result of snags and deliberate cutting by the fisherman himself of 1.5-2 m of frayed and lost strength fishing line closest to the bait.
Winding profile - what is it?
A profile is a conventional section of the spool along with the cord wound around it. There can be three options: straight cone, reverse cone and “camel mountains”. When the turns lie unevenly and lumps of fishing line form.
The last “bumpy” profile is the most problematic, and if you wind the cord on the spool and see these bumps, then there will definitely be “beards”. From experience, the most correct option is a reverse cone; it gives the least number of problems with dropping loops, or rather, there are practically none. With a straight cone, the situation is 50 to 50. If there are no loops, then nothing needs to be adjusted, if the coil is a no-no and drops a couple, then you need to adjust. How to do it?
Adjustment using washers
But, not the ones we use with bolts and nuts, but very similar. Based on the above, our task is to obtain a reverse cone. With which there will be the least number of loops and “beards”, in most cases there will be none at all.
The essence of adjustment using washers is essentially very simple:
- We take the reel and perform the standard procedure for winding the braid onto the spool.
- We look at the resulting winding profile. If after winding we get a light reverse cone, then we leave everything as is.
- When the profile is far from the reverse cone, you need to try to change it using washers that are located under the spool. Usually, it is enough to remove the washer or replace it with a thinner one and you will get a reverse cone. But it often happens that this cone is too steep and this is bad. Then the adjusting washer should be thinner. This can be cut out of plastic, which is used in boxes for wobblers and spinners. It is just a little thinner than the standard washer that comes with the spinning reel.
Some reel models already come with spare washers in the box specifically for adjustment. Moreover, they are different in thickness. If you bought just such a spinning machine, then adjusting the winding profile will be a little easier and faster.
After all these adjustment manipulations, only real fishing will show whether we have adjusted the winding profile correctly. If during the entire fishing there was not a single beard or loop, then everything is normal, but if there were problems, you still need to work with the washers.
Operation of spinning reels
Another important issue in the operation of spinning reels is the method of closing the line handler arm immediately after casting. As a rule, most fishermen do not pay any attention to this issue, since it is structurally provided that the line guide bracket returns to the reeling position automatically at the initial moment of reeling in the fishing line. But in fairness, it must be admitted that the shock loads that occur at the moment of a sharp slamming of the bracket do not benefit any coil. Experienced anglers solve this problem very simply by moving the line guide bracket to the reeling position using their hands. At the same time, no shock loads arise in it; everything happens very quickly and quietly. From the outside, closing the bracket in this way may seem too complicated and burdensome, but in fact, experienced spinners perform these actions purely automatically, without even looking at it. To believe this, you can simply train deliberately for 10-15 minutes, and we can assure you that the necessary automaticity will appear very quickly. We always use the closing bracket of the line guide by hand, even in conditions where reeling must begin immediately the moment the bait touches the water. We do not experience any discomfort or lack of time at all. Our site of useful tips advises you to do the same.
How to install and configure a spinning reel? Let's help!
Spinning fishing for predators is becoming increasingly popular every year. This is not surprising, because it has many advantages over other fishing methods.
This is the excitement of hunting, the constant search for predators in a body of water, health benefits and, with proper luck, the capture of large trophies.
In this article we will talk about how to properly attach and how to set up a reel for a spinning rod, because this is one of the main conditions for successful fishing.
Setting the freewheel clutch to maximum
There are many opinions regarding the use of friction clutches. Some fishermen claim that it reduces the intensity of fishing, preferring to fight even with large trophies with the mechanism clamped as much as possible. Others, on the contrary, set it up so weakly that it starts working even when biting a 200-300 gram grass pike.
Read: Nuances when choosing a spinning reel
Well, this is their point of view, which has the right to life. And there can be no universal advice here: a competent fisherman operates the clutch selectively, to suit himself, and even adjusts it to the fishing conditions.
However, if you do not yet have sufficient experience and a sense of gear, it is worth adjusting the brake “to maximum” in accordance with the breaking load of the fishing line declared by the manufacturer.
For correct adjustment, you will need a load of appropriate weight. It should be slightly lighter than the tensile strength set for the line. The ideal value is 70-80% of this load (for example, for a fishing line with a tensile strength of 7 kg, we take a load of 5-6 kg).
The setup is performed on a fully equipped spinning rod (feeder, donk). We proceed as follows:
- We equip the tackle and attach the weight to the fishing line (or hook it to the hook of the bait).
- We place the load on the floor at a distance of several meters from ourselves. Any flat surface is optimal.
- We tighten the clutch completely and release it one click (the release will give some reserve necessary for shock absorption).
- We simulate hooking and begin reeling in the fishing line (raise the tip of the rod, maintaining an angle of approximately 45°). Sometimes they lift the load vertically, but you need to be careful not to damage the tackle - in this case, it bears critical loads.
- Gradually release the clutch, making sure that the load remains in place.
- As soon as the brake works (you will hear a ratcheting sound and the line will begin to unwind), we stop adjusting.
Many anglers adjust the drag directly on the pond. It is not possible to achieve such precision as in the previous example, but the brake can be adjusted specifically for you.
To do this, just hook the hook to the tree trunk, step aside a few meters and act as in the previous case. However, here the marker of correct tuning is the subjective sensations of the fisherman. As soon as the rod bends close to critical, slowly release the regulator until the ratchet is activated.
How to wind fishing line
To do this, you must perform the following steps.
- Pull the tip of the line through the spinning rings, starting with the smallest one located at the top of the rod.
- Fold out the line guide ring and tie the line onto the spool. This is best done using a special self-tightening knot.
- To make it, you need to make a double loop and tighten it on the bobbin. The protruding end of the fishing line must be cut off.
- Next, you need to correctly wind the fishing line onto the spool. To do this, you need to create a slight tension. It is convenient to wind the fishing line with a partner who holds the reel with fishing line in his hands and controls the resistance. If you don't have an assistant, you can do it yourself by putting the spool in your pocket.
- You can also pass the line through the fingers of the hand with which you hold the spinning rod, and rotate the reel handle with the other.
- It is also not worth creating excessive tension, as this can lead to the formation of knots and uneven winding.
- It is recommended to reel in the line without stopping and constantly monitor the process.
- The winding process must be completed at the moment when approximately 25-30 millimeters remain to the edge of the spool. This is considered its optimal filling. It is not recommended to reel in any more fishing line, as this can create some problems (the appearance of knots, the line jumping off the spool when casting).
Purpose of the friction brake
Currently, most fishing rods, spinning rods and donkeys are equipped with reels. For a good catch you need to know how to use them correctly. For some, a reel is just the place where the fishing line or device is located, designed to allow you to cast gear as far as possible.
But for some anglers who know why a drag is needed, this device helps them bring truly exclusive species of prey to shore. Indeed, a flexible fishing rod and skill when working with the drag guarantee the angler to catch a big fish without breaking the tackle, without breaking the fishing line or bending the hooks.
Typically, coils consist of:
- a solid body made of metal, plastic or carbon fiber, with a mechanism inside and a special attachment to the rod;
- a rotor, which is equipped with a moving line guide bracket;
- fixed spool for storing fishing line;
- handles that set the entire mechanism in motion;
- friction brake.
The friction brake is one of the most important components of an inertia-free spinning or feeder fishing reel, which is designed to preserve the fishing line from damage, and the tackle and rods from damage to their integrity under heavy load. The clutch also smoothes out sudden movements of the fish and prevents it from escaping. Thanks to the friction system, it was possible to use thinner lines to catch larger fish.
Correct clutch setting
Surprisingly, many anglers ignore the friction brake device because they don’t know how to set it up or don’t want to use it. And some fishermen simply forget about it, trying to quickly catch their treasured trophy. Also, unfortunately, there are those fishermen who simply do not have the funds for good reels and have to buy cheap and low-quality ones, not made in the best way and quickly breaking down. As a result, it turns out that in one case the brake is fully tightened, in the other it is weakly tightened or not tightened at all.
For those who do not know how to use a clutch, there is the following adjustment technology:
- A reel with a fishing line wound on it is attached to a fishing rod, then the fishing line is threaded through the guide rings and tied to something stationary.
- The line laying arc is reset. The fishing rod is placed at an angle of 45 degrees and the arc is closed back.
- Slowly rotate the reel handle until the rod tip bends.
- By turning the clutch adjustment mechanism counterclockwise, we find the moment it operates.
- With small jerks of the fishing rod you need to check whether the line is coming out of the reel. Thus, the clutch must operate before the maximum tension is reached, at which a breakage may occur.
However, this is not the end of the shore inspection. There are several more important adjustment details directly during the fishing process:
- After hooking a fish that gradually begins to move away from the shore, you need to monitor how much fishing line is left on the reel and gradually tighten the clutch adjusting screw. In this way, resistance is created, and the fish quickly gets tired, which will allow you to quickly pull it ashore.
- When playing fish, there is a risk of the clutch tightening on its own. As a result, the force on the line increases, which is why it simply cannot stand it and breaks. In this case, the fisherman constantly needs to monitor the spool and, if necessary, unscrew the adjusting screw.
How to set it up correctly
This is probably the main point in pre-setting your spinning rod. A lot will depend on him.
A properly configured reel will prevent line breakage and allow you to catch large fish .
Almost all inertia-free reels are equipped with a friction brake, which allows you to adjust the force.
At a certain load, the spool begins to scroll and release the line. This is necessary to “dampen” the jerks of large fish.
There are two types of positioning of the regulator - on top of the spool and on the bottom of the reel. The second option is practically not used in new models, although it is quite common among spinners.
There are many ways to increase your fish catch, but the most effective ones are. Below, the site editors share with you the 3 most effective ways to increase your catch:
- Bite activator. This is a pheromone-based additive that activates receptors in fish. ATTENTION! Rybnadzor wants to ban this bait!
- Any other baits with flavorings are less effective; it is better if they contain pheromones. But the most effective way is to use the new product of 2016 - DYNAMITE EFFECT!
- Learning different fishing techniques. For example, it is written here about spinning wires.
To adjust, you can use weights from ordinary scales, which are hung on the end of the fishing line. Experienced fishermen adjust the drag a little differently. This can be done directly while fishing.
- Fully equip the spinning rod and hang a spinner on it.
- Hook it on a tree or other object.
- Move 5-10 meters away and pull the spinning rod as if you were fishing for fish.
- Apply maximum tension (the rod should bend into an arc), and gradually release the clutch until the ratchet operates.
- You shouldn't pull too hard, as you can break the rod.
As you can see, there is nothing complicated about attaching a reel to a fishing rod and setting it up, and any beginner will have to perform these steps.
But it is very difficult to overestimate their importance, since success in winning a large trophy may depend on it. Happy fishing!
Watch the video to learn how to wind the fishing line onto the spool. Enjoy watching!
How to adjust taper
Branded reels come with adjustment kits. You can find washers in their composition. They are installed during manufacture, but the coil profile can be adjusted independently. True, rarely does anyone know how to do this at home.
Spacer washers are located where the spool and reel are attached. Expensive spinning wheels are equipped with four or more washers of different thicknesses. With the help of these elements it is possible to adjust the spool profile. You can read more about reels in the article “A reel for jig fishing as the key to successful fishing.”
For the vast majority of reels with a front clutch, the winding taper of the line is regulated by the number of washers that are placed above the ratchet. The regulation diagram itself with a detailed description and pictures can be found in the attached instructions.
It is recommended to study the diagram before installing the reel on the rod, since it happens that all the washers are already on the axis. The fisherman places the line on the spool, and when he begins to cast the tackle, he cannot understand what is going on, since a beard forms over and over again. To prevent this from happening, adjustment is needed.