Is it necessary? How far from the hook should I set it? What size should it be? What is its real return? Here is a constant set of questions that come to the editorial office every day about the shepherd.
I will try to answer them as simply and clearly as possible, but, first of all, it seems to me important to know what we are talking about. Who was the first to talk about shepherding? I confess that I have no idea about this, but in my opinion this person made a semantic error. In fact, if you consider only the words, you understand that this is a sinker that causes or indicates a bite (direct translation - “biting sinker”). This is partially true, but this is far from its only function: the most important is its influence on the forest, and especially on the bait. So it could be called a demonstration sinker." But why not make life easier and call it the “end sinker”: after all, it is nothing more than the sinker closest to the hook!
The simple fact of using this terminology allows us to answer the first of the questions: “Is it necessary?” In fact, it immediately becomes clear that unless you are using a rod with only one olive, the “last sinker” is present in any type of installation. Neither their size, nor their shape, nor the distance at which they are from the hook are of great importance: as soon as there are sinkers on the fishing rod, it means there is always the latter, and it is this that plays the role of a biting sinker. Does everyone agree with this definition? Okay, let's move on. Now we can take a closer look at what it actually serves.
As I just said, the main feature of the under-sheath is its influence on the presentation of the equipment, therefore the bait. Considering that it is the one that is closest to maggots, bloodworms or corn grains, it is easy to understand that it noticeably changes their behavior in the water mass, especially in the presence of a current. The larger the feed and the closer it is to the nozzle, the more the latter will tend to tend to the bottom. And on the contrary, the smaller the feed and the further away from the nozzle, the more the nozzle will fluctuate under the influence of water movement: it will acquire “natural” behavior, but - contrary to what is almost always written - this is not necessarily what contributes to more frequent bites.
These are the basic rules that everyone can understand, but if I stopped there, it wouldn’t be worth writing an article for D_clic. So the size and placement of the hook is paramount, but couldn't the same thing be achieved by using a large lead mounted far from the hook and a smaller one placed closer to the hook? Of course not, and these issues need to be analyzed carefully to determine the components that actually influence each of these two aspects. As for the distance to the hook, this can be the length of the bait dragging along the bottom, the type of bait, or the nature and visibility of bites, the latter depending on the size of the sinker, the type of bait used or the lifting force of the float. Although all of this is closely related, let's look at all the factors one by one.
Slack length
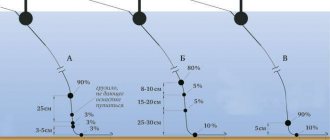
The longer the line lying on the bottom, the less the demonstration influence of the bite sinker. In order for this sinker to play a truly active role, it is necessary that it be as close to the bottom as possible and even at the very bottom, in an overhanging or other form. The importance of measuring the depth and subsequent adjustments immediately becomes clearer. Indeed, measuring the depth should not serve only to determine the position of the float, but also to determine the position of the sinkers, and especially the bite sinker. That is why, as I already wrote in one of my previous articles, it seems to me that after measuring the depth it would be necessary to always make two marks on the fishing rod: one for the float, and one indicating the real depth; and another higher, at a distance equivalent to the length of the lower part of the line, which would allow you to always know at what distance from the bottom the bite sinker is located.
Loading the float for lifting
This is a method of loading in which the fisherman does not expect the float to sink, but rather to surface above the surface. We highly recommend it when fishing for bottom fish such as crucian carp, carp and especially bream.
How to make the float rise when biting? Using three main pellets, load the float a little weaker than usual so that part of the body is still visible above the surface. And then load the rig 10 cm from the hook and 30-40 cm from the rest of the pellets under the heap. The weight of this pad should load the float to the middle of the tip. When biting, the stock will rise first, thereby raising the float.
Bait type
It is a fact that the placement of sinkers in general, and the bait in particular, can vary significantly depending on the type of bait, simply because the behavior of the fish itself is not identified. The two extremes are, of course, bait with a lot of flour and groundbait. In the first case, the fish are concentrated at the bottom, and the main part of the sinkers should be concentrated in the lower part of the water column. But the bait is aimed at moving fish that move at all levels, and the weights should be distributed more evenly. Therefore, it is logical that for fishing with bait, the bait should be further away from the hook than for fishing with flour-based bait. But here we are talking only about general data: in practice, everything is much more complicated, in particular when fishing with bait, and when you start to lure fish, especially if you do it with a mixture that forms suspended clouds in the water, and this mixture is not very compacted. Then you find yourself in an intermediate situation, where the distance from the sinker to the hook is also related to the correct interpretation of bites, as well as the presentation of the bait.
Loading the float for fly and Bolognese fishing rods
In order to properly load the float for fly and Bolognese float rods on crucian carp, carp, bream and other fish, we will need the following components:
- a float weighing less than 5 grams with a thin tip and a ring at the bottom of the float, or without a ring, more on that later;
- rubber cambrics with a diameter the thickness of the float antenna;
- lead pellets in special sets of different sizes;
- main line;
- hook;
- plastic bottle with water if the float will be loaded at home.
We will connect the float, the main line and lead pellets, place them in a plastic bottle and add weights if there is not enough weight, or we will cut off the excess lead with pliers if the float has sunk or is overly weighted.
When fishing for crucian carp, bream and other cautious fish, it is very important to make the tip of the float sensitive, so place it at the very end of the body.
Character of bites
The closer the bait is to the hook, the clearer and faster the bite is transmitted to the float, but the greater the chance for the fish to detect it and, therefore, spit out the bait. Once again you are convinced that it is necessary to take into account one particularly changeable parameter - the mood of the fish! You can even come to the following paradox: the most effective placement of sinkers is not the one that allows you to better see bites. In this case, I don’t hesitate for a second: I prefer to have a little less bites, but few missed ones, than to spend time doing false strikes, or removing a completely sucked bait. The distance between the hook and the sinker is of great importance here, but the size of the sinker is still more important. The larger it is (and therefore heavier), the more the float is destabilized when the fish grabs the bait. That is why I am not at all a supporter of using very small pellets as a bite sinker, of course, with the exception of the case when using floats with very little lifting force.
Loading a float while fishing
It is much easier to load a float near a pond. Use the same instructions, just make sure that the distance between the float and the sinker is as small as possible, otherwise when testing the weight in shallow water, it may seem to you that the float is unloaded, but in fact the weights will lie on the bottom.
An example of a poorly loaded float, too much of the float is visible above the surface. It will be difficult for the crucian carp to pull the bait down, it will feel resistance and spit out the hook. And you won't see any bites.
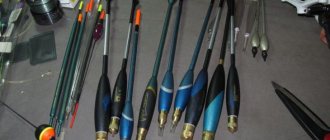
Float size
So, the largest bite sinker, but this does not mean that you need to put N 6 on a float weighing 0.5 g! I am absolutely convinced that the size of the bite sinker is closely related to the size Micro beads are used only with the smallest bobbers and a mud worm on the hook Large bait does not work well with a small bite sinker, and vice versa float, and vice versa, I have never been able to understand why install N 13 for a river fishing rod with a sinker weighing 2 g. Not only will such a sinker have no effect on the presentation of the bait, but how can moving such a small mass transfer the bite well to the level of the float? But, with the advent of large flat floats and fishing with rod locking, you can safely use huge bite weights (up to one or two explosives, i.e. from 0.40 to 0.80 g!). In the end, if you calculate the percentage difference between the weight of the bite sinker and the total weight of the fishing rod, in other words, if you install an N 10 sinker for a float weighing 1 g, then for a flat float weighing 40 g you need an SSG sinker (i.e. weighing 1.6 G!). It is worth dwelling on another issue, the diameter of the antenna, or the surface part of the float; It’s equally stupid to use a large sinker if the float has a thin metal antenna or fiberglass antenna, and to use an N 13 pellet complete with a plastic or bamboo float with a diameter of 2 mm for catching carp!
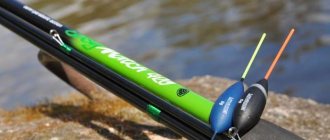
Float rod equipment
Mukharev F. | April 13, 2002
A blind float fishing rod is perhaps the most common fishing gear. However, despite its apparent simplicity, this is one of the most complex gear. Equipping a blind fishing rod requires a precisely calibrated selection of all components of the equipment. Those who want to seriously master float fishing should know the basic principles of constructing a blind rig.
Let's start with the length of the line relative to the rod. The length is largely determined by the weight of the fish you catch and the action of the rod. For example, if we catch a roach weighing 100 grams or more with a bleak fishing rod, and do not use a landing net, then, accordingly, the length of the fishing line on the rod will be shorter than the so-called standard length. And, really, we are not going to catch a fish with our hands somewhere half a meter below the handle. The question immediately arises as to what I mean by standard line length. In my opinion, this is a length that is 9/10 of the entire length of the rod, i.e. allowing you to freely both attach the bait and take the caught fish with your hand, and in the future we will proceed from this.
With the fishing line already decided, we smoothly move on to the float. Let me note that the article discusses a blind fishing rod, which means that we take a float intended for it, the so-called sports one, as someone generously dubbed it in stores. This float has 3 attachment points. The first is a ring located closer to the top of the float, the other two are two cambrics on the keel - one in its upper part, the other in its lower part. The reader may wonder why two cambrics; one may be enough. I'll explain. If we take a float with a metal keel, then the second cambric protects the keel from deformation when the depth changes. And the second reason is explained simply - the upper cambric simply holds the float more tightly, for example, when the lower one flies off, and does not allow the carefully set depth to change.
Finally, the float is strengthened and we begin to load it. There are many ways to do this. For example, they have now begun to sell special devices called dispensers for loading floats. Using them, you can load the float with an accuracy of 0.03 g. But you don’t often see dispensers on sale, and they’re not cheap, so we’ll use a regular 1.5-2 liter bottle filled with water and the neck cut off. The float must be immersed so that only its antenna sticks out of the water. How many weights do we need? It all depends on the carrying capacity of the float itself, but their number on the equipment on average ranges from 5 to 10, plus 1-2 auxiliaries installed on a leash for more accurate loading.
Although if you listen to Sir Bob Nad, three-time world champion, then the number of sinkers should be no less than 15-20. It is a common belief that the smaller the size of the sinkers used, the more sensitive the tackle. When loading a float, especially a very light one, we do not forget that we still have a reserve stock, and most importantly, a hook with a fatty maggot or worm attached to it, in some cases ready to sink all your precisely calibrated equipment. Fortunately, this does not apply to large floats with a carrying capacity of 2-5 g. The correct distribution of sinkers on the fishing line affects both the conditions in which you fish and the tangling of the gear when fishing, especially during casting. If you are fishing in shallow water and want the bait to sink slowly, use a lot of small pellets. If it is necessary for the bait to sink quickly, then surround the float with large weights, placing them close to each other, right next to the leash (Fig. 1). Do not squeeze the sinker too hard on the line, as this may damage the equipment. Squeeze the sinker slightly so that you can always move it up and down along the line if necessary.
We tie the hook we have selected to a obviously thinner fishing line - a leash, which is on average 0.02 mm thinner. We tie the leash to the main line. The question is, how long should we make the leash and where will our dust shot be located (approximately translated into Russian as sub-grazing). Of course, it all depends on the reservoir and, again, on the fish. In still water, a 5-10 centimeter leader is sufficient, while the sub-lead is also 5-10 cm from the hook. But if we catch bottom fish, such as bream, which bites more often on the rise, then the sub-grass can be moved closer to the hook at a distance of 2-4 cm. When catching surface fish, we strengthen the sub-grass above the hook by 10-20 cm, by the way, this also applies , the length of the leash, it can be increased by the same 10-20 cm. But on some bodies of water, usually with a current, the length of the leash fluctuates depending on the rise and fall of the water. For example, on the navigable Neva River and Canal.
In Moscow, constantly roaming barges, motor ships and similar vessels create changes in the water level, fluctuations of which range from 30 cm to half a meter. And of course constantly changing the depth is not fun. Then we increase the length of the leash to 30 cm, and make the sub-lead sliding. Accordingly, when the depth increases, we move the underwater closer to the hook, and when it decreases, on the contrary, further. As a result, we get a fairly universal equipment for variable fishing horizons.
And one last thing. How to attach line to the tip of a rod. There are several different methods, let's look at the most common ones. The most convenient way, from my point of view, is to purchase a special connector that is tightly glued to the tip of the rod. They are available in different diameters, and to find the right one, I recommend taking the upper elbow when going to the store to buy it. The second way is to attach a piece of 5-10 cm of elastic rubber in a braid to the end of the whip, for example, like the cowboys in various westerns have a hat attached to, at the end of which make a knot, and secure the fishing line using a self-tightening loop to this knot. And last. Take two cambrics, put one into the fishing line, and secure the second tightly to the fishing line. We fix the second cambric on the whip 30-40 cm from the tip, then 5-7 turns of the fishing line around the rod, and fix the first cambric at the very tip. That's all.
Nozzle type
In the water, the bait - or rather the hook with the bait - has a certain weight that must be taken into account. The mass of the mud worm can be neglected, since more than 95% of the worm consists of water. It’s a completely different matter when it comes to wheat or corn grains. Therefore, it seems to me important to use a bite weight that matches the weight of the bait, i.e. do not put N 13 if the bait is corn, and vice versa, N 6 if the bait is bloodworm on N 22. I emphasize that in this case, this has nothing to do with the size of the float: thus, for specific fishing for carp, for example, you have to use a fishing rod of large diameter, a large hook with two grains of corn, but a float whose mass does not exceed 0.30 g. So, in this case, you can safely use a bite sinker N 8 and even N 6. Trying to be more clear and precise, I I intentionally omitted various factors that influence the choice of a bite sinker, but do not forget that in the fishing process all these factors are closely intertwined. However, don’t grab your head; after all, if there’s no bite, it’s not at all difficult to change or move the sinker!
Nicolas Beru
Article from the site https://matchfishing.ru
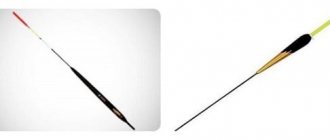
What is a shepherd
Typically, most anglers have a float loaded in accordance with its own weight . It reacts to bites, stays on the current correctly in accordance with its own markings, but does not have any particular sensitivity. This means that a cautious bite, like an active one, can be ignored by the fisherman.
What conclusion follows from this? The float must be loaded correctly so that it is able to respond to the slightest changes in the hook and bait. This will help you not to miss the moment of the bite of the most cautious fish and make a timely hook.
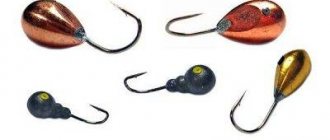
The so-called under-feed will help to load the float correctly. It plays a vital role in the equipment of fishing rods. This is the small pellet that is closest to the hook or jig. The equipment is made in such a way that the weight of the float is balanced not with one sinker, but with several pellets, distributing them along the entire length of the leash.
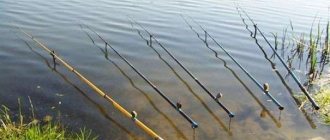
Fishing nuances
Of course, fishing conditions always vary, and you have to adapt to them.
Sometimes it is necessary to make the feed a little lighter or heavier, depending on the circumstances. This is not surprising if you use soft lead for the pellets, so the weights will move easily along the line. There should be a distance of two to three centimeters between the underhook and the hook if fishing is done with wiring. In calm water, some fishermen increase the distance to half a meter. And if the fish bites on a slowly sinking bait, then it is better to move the bait as far as possible from the hook. Some fishermen, when fishing in the current, use fairly long leashes from 15 to 60 centimeters. This allows the leashes to “walk” from side to side with the current, and this looks very attractive to the fish.
But there are times when such a long leash needs to be loaded with an additional pellet, which will also be called a pod. You can even put two or three subs, and then, on such a correctly loaded float in the current, the bait will move more smoothly in the water column. In addition, by distributing the pellets you can regulate the speed at which the bait sinks.
However, due to the fact that the line is stretched quite tightly, the fish can feel the catch and immediately spit out the bait, so such weights do not always help out. Large fish, of course, will not be afraid of the resistance of the equipment, but large specimens, unfortunately, do not bite as often as we would like. Much more often there is a bite of a small fish - the size of a palm. Therefore, the equipment must be done as roughly as possible. The neater, thinner, and more inconspicuous the tackle, the greater the chance of success in fishing.
Thus, correct loading of the float in the current is of great importance for the fisherman. The bait on the fishing rod helps not to miss most of the bites and allows the float to react as clearly as possible to the touch of the fish, and the fisherman to quickly hook the trophy .
What are the sinkers for?
Here is a list of their activities:
- sinkers or weights bring the float rod into working condition, i.e. compensate for excess buoyancy;
- the load transmits bite information to the float;
- help deliver the hook (with nozzle) to the fishing horizon at a given trajectory and in accordance with the time that is set;
- the load holds the nozzle;
- keeps the line in tension, because it is in this state that she will convey accurate information about the bite;
- sinkers help you cast the rig to the fishing distance you need;
- loading provides information about the behavior of the hook and bait in the current.