There is nothing complicated about properly equipping a float rod, and in the previous guide to fishing with a fly float rod, we touched on this issue in some detail.
In this article you will learn how to assemble a float fishing rod, equip it with a reel, float, weights, hook and other components, and then set up the tackle correctly.
You will need:
| Rod | Flywheel without rings. |
| Bolognese with rings. | |
| Coil | Light plastic round shape (only for Bolognese fishing rod). |
| Inertia-free for catching large fish / long casting (only for Bolognese fishing rod). | |
| fishing line | From 0.12 to 0.25 mm depending on the size of the prey. |
| Float | It is better if it has 2 rings, but it will work with 1 ring. |
| Leash | This is a piece of fishing line thinner than the main one (0.04-0.05 mm). |
| Hook | Size matters. It should easily fit into the mouth of future prey. |
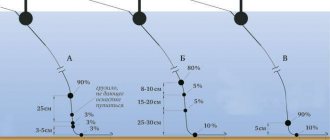
Fishing rod rigging diagram (for the fastest)
A diagram of the structure of a float rod, according to which you need to sequentially assemble all the elements into a finished tackle together
- The main line, for example, is 0.18 for catching small crucian carp.
- A float with a ring on the body and a silicone cambric in the lower part (on the keel).
- Weights.
- Leash 20 cm (a piece of thinner fishing line compared to the main fishing line).
- Hook, for example, No. 5 Russian numbering or No. 8 European (for catching small crucian carp about the size of your palm).
Let's move on to detailed instructions for step-by-step assembly of a float fishing rod.
Float rod equipment
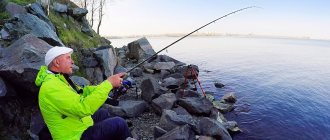
A float rod is perfect for beginner fishermen. This is a relatively simple tackle that is sold ready-made in specialized fishing stores or in online stores. There you can also buy other fishing equipment - a protective suit, rubber boots, a tent, a boat and various fish baits. Fishing with a float rod is popular among beginners and professionals, so new gear is constantly being created for it.
Preparing the rod
There are 2 options for equipping the rod before attaching the fishing line and other components of the tackle. Decide what kind of fishing rod you have.
Do you have a fishing rod with rings?
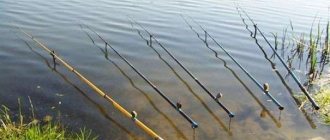
If you have a rod with guides, it is called a Bolognese rod (or bolognese). In this case, you will need a coil. If you are a beginner, we recommend equipping your fishing rod with a lightweight plastic drum-type reel.
When actively fishing for small fish, choose a lightweight plastic inertial drum-type reel
The inertia-free rod will be superfluous in a Bolognese fishing rod if active fishing is carried out 5-8 meters from the shore. The task of the reel in this case is only to act as a storage line for the fishing line. And long casts in float fishing with spot feeding are not needed at all. You will need a spinning reel if you use the match fishing method, but this is a professional type of fishing, not for beginners.
But a spinning reel has one undeniable advantage , and even the author of the article will definitely take it if the goal of fishing is carp or other large fish that will provide serious resistance when fishing. Inertialess reels have a friction brake that releases the line from the reel when the load is too strong. Thanks to this, when fighting against strong carp, the line will not break, but will slowly be pulled into the water. Nevertheless, sooner or later the fish will get tired and you will be able to pull it out by evenly tightening the reel handle.
Attach the reel to the Bolognese rod holder. Typically, there is a screw mechanism unscrewed, the reel handle is inserted into the slots, and then the screw is screwed back in. Sometimes, instead of a screw, there is a clip that first opens to allow room for the reel handle to be inserted, and then closes.
We attach the fishing line to the reel. To begin, thread the tip of the fishing line through all the rings, starting with the last small one and gradually passing through the largest ring, which is located near the reel. Now you need to secure the line to the reel with a strong knot or connection.
The photo shows an example of a self-tightening loop for attaching fishing line to a reel
Be careful! If you fasten the fishing line to the reel with a regular knot, it will come undone very quickly, but such a knot will not come out accurately.
You have a fishing rod without rings
A fishing rod for float fishing without rings is called a fly rod. Gear collection proceeds as follows:
At the end of the fishing rod, attach a special connector (a small element that has a winding serif, which is then covered with a cap). The connector serves as a way to attach the main line of the float to the rod. The connector must be secured with superglue. Apply a drop to the tip of the fly rod and then insert the connector, pressing firmly. If the tip of the rod is too thin, then you can even shorten its length a little so that a section of the tip of a suitable diameter fits into the connector.
Make a loop at the end of your main line. Pull some fishing line out of the reel and create a loop, for example, with a Figure Eight knot. This knot has the property of not stretching and not moving along the fishing line, therefore, with any tension, even during the hooking of the tackle and strong impacts, the knot will not unravel or come apart.
Pull back the connector cap and insert the connected loop into it , then close the cap. The fishing line is securely tied to the fishing rod.
Types of fishing rods
You need to select gear for a fishing rod depending on its type. There are 4 types of rods:
1. Plug
– the longest fishing rod, up to 20 meters in length. As the name suggests, this type of fishing rod is made up of several legs.
2. Bologna
– the rod here is relatively small, only up to 8 meters in length. Unlike other fishing rods, here the design is as close as possible to a spinning rod - there is a spinning or inertial reel, a float for loading.
3. Flywheel
– the length of the rod is up to 7 meters, there is no reel, only a drum for winding fishing line. The fishing rod is suitable for fishing in large bodies of water and is excellent for long-distance casts.
4. Match
– rod length up to 6 meters. In its design, it is very similar to a flywheel, excellent for long casts, fishing on lakes, open reservoirs and ponds.
Assembling a fishing rod begins with selecting the necessary gear. There is one for each type.
Equipping a fishing rod with a float
If you are using a fishing rod without rings , then you need to remember that the length of the fishing line should be equal to the length of the rod, or exceed it by a maximum of half a meter. It is this amount of fishing line that makes it easy to cast and easily pull the equipment or fish out of the water directly into your hand.
How to attach a float with a ring at the top to a fishing line
- First, thread the line through the ring from the bottom to the top.
- You put a special rubber casing on the fishing line, which you should have bought in the store (perhaps it was included with the float, and they also often come in sets of lead pellets, which we will also need to equip the float fishing rod).
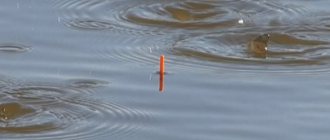
- And insert the lower part of the float (keel) into the rubber casing, as shown in the figure at the beginning of the article.
How to attach a float without a ring to a fishing line
There are also floats that do not have a ring. Cambric alone is no longer enough here. You will have to use two (we put both on the fishing line and insert the ends of the float into them - the tip and the lower keel). The tip is often larger in size, so the cambric must be selected according to its diameter.
Try not to get too shallow with the cambrics; when you change the working depth of your equipment (move the float along the line), the cambrics wear out and tear. Therefore, it is important to use elastic bands that are not very narrow.
An alternative version of the equipment for those who do not use cambrics, but prefer stoppers. Very simple and convenient.
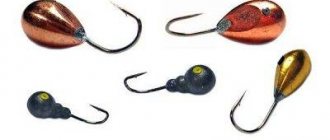
Selecting and loading a float
The float is one of the most important parts of a fishing rod. Its purpose is not only to give a signal about a bite, it also holds the tackle at a given depth, and is used to carry out retrieving. In addition, it is needed when casting. It is extremely important to choose the right shape and size of the float, because the further equipment of the fishing rod depends on this: for a light float, a lighter sinker is also selected, which is necessary for its immersion.
Thanks to this, the tackle as a whole is lighter and therefore more sensitive, and more bites can be recorded. So, for fishing at shallow depths - up to half a meter - the rod is equipped with a float with a carrying capacity of 1.0 g, loaded with 1-2 pellets.
When preparing the tackle, you should also take into account that a heavy load does not attract, but repels fish. To increase the number of bites, a heavier float is often replaced with a lighter one. Therefore, experts advise having different floats in the kit so that you can change them depending on the fishing conditions. The rule that applies when choosing: the weight of the equipment should increase with increasing depth of the reservoir and the strength of the current.
There are a great many types and designs of floats, but not all of them are universal. Different conditions require floats with certain characteristics. The body of the float - its main part - is lighter than water, which determines its buoyancy. Its vertical position in the water is ensured by a heavier keel. The antenna gives a signal about a bite, it is made bright and noticeable to the fisherman. There are floats that do not have an antenna or keel.
Float body shapes vary.
- Olive – can be used under any fishing conditions.
- Ball – designed for use in windy conditions.
- Olive and ball are universal floats.
- Drop – used for waves and ripples. This float has a lower center of gravity, making it more stable.
- Inverted drop - used in strong currents at great depths - more than 3 meters.
- The spindle is useful at shallow depths in still water. This float is highly sensitive and is used for catching capricious fish.
- Straight float - used in calm weather on shallow, calm waters.
- The float is flat - one of the most stable.
The “olive” shape is recommended for floats weighing from 2.0 g for the main load. If the equipment is lighter, several small pellets are used for loading at a distance of 2-3 mm between them.
Correct loading of float equipment
Correct loading of the float (at the very beginning of the tip)
Some people call this a float load, although in fact it is actually called a load. You need to attach lead pellets to the fishing line so that only the upper part of the float (its tip) remains above the water. This type of gear setup allows you to improve sensitivity to bites from small and medium-sized fish.
If you have previously seen large floats with most of their body sticking out of the water, and anglers are trying to catch something on them, this is the wrong approach, unless the angler is catching pike with live bait (or any other fish, in which case the sensitivity of the equipment does not play a role at all and it is important that the live bait does not greatly distort the movement of the float with its presence).
Loading at home
At home, you can set the correct float load in a large bottle (from 1.5 to 5 l). Simply add weights, clamping them with pliers (lastly with your teeth) 30 cm from the end of the fishing line and lower the equipment into the water. As soon as you notice that the entire body of the float is submerged under the water, and most of the top remains above the water, then you have completely submerged the float.
How to load a float on a pond
The principle is similar to checking the load at home, but here you can throw directly into the water. Keep the float close to the weights and cast it 2-3 meters from the shore. If the body of the float is still visible above the water, you need to add more weights.
Be sure that the minimum depth is set, or that you are casting to a sufficient depth, the weights should be suspended and not fall to the bottom.
Load the line with lead pellets until only the tip of the float appears above the water, preferably so that the body is completely under water. This will provide the best sensitivity. Although it is acceptable to have a small portion of the body visible above the surface in windy conditions, this will reduce visual deception as the float passes through the waves.
If you have loaded too much , use scissors, thin-nose pliers or tongs (teeth last, take care of the enamel) to pinch off a small piece of lead. Be careful not to damage the line.
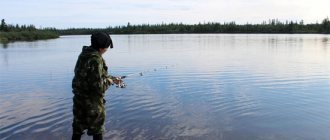
The principle of fishing with float gear
Immediately before fishing, it is necessary to point-feed the selected place. Moreover, it is advisable to throw bait in the form of medium-sized balls.
Next, you need to set the distance from the float to the hook, commensurate with the depth of the chosen fishing spot. And only then can you start fishing. Most fish bite from the bottom of the reservoir, and not in the water column or on top. Although small species of fish, such as bleak, verkhovka and sometimes even chub, get food from the surface.
In this case, it is recommended to constantly experiment with baits and flavors. Moreover, you can fish not only from the surface of the bottom of the reservoir, but also at half-water or at some distance from the ground.
Leash attachment
A leash is an essential component of a float rod. It serves faithfully in the following ways:
- When hooking, the thinner line of the leader will break faster and you will be able to save the rig with a float and lead pellets. To restore, you only have to tie a new leash with a hook.
- The fish is afraid of a thick fishing line, but it hardly notices a thin one, and even one made of fluorocarbon, and bites the bait much more actively.
We recommend using fluorocarbon lines for tying leashes. Actually, this material was made specifically as a leash. Fluorocarbon is much more expensive than monofilament fishing line, but stores sell reels of 5, 10, 15, 25, 50 m. This will reduce the spending of the fishing budget, and even a 10-meter reel will last almost the entire season, because only 25 are spent on one leash mm fishing line.
Leash thickness:
- If you use monofilament , then it is 0.05 mm thinner than the main fishing line. For example, you have a main line with a diameter of 0.18 mm, then use a mono line leader of 0.13-0.14 mm.
- If using fluorocarbon , then leave the thickness of the leader the same as the main line. Since fluorocarbon is a less durable material than monofilament line, there is no need to reduce the thickness of this section.
How to tie a leash with fishing line
The easiest way is to use the same figure-eight knot (the knitting pattern of which you could see above in this article), although there are other knots for knitting leashes, nevertheless, the figure-eight knot is quite suitable and the strength of the knot is at its best. Bloody knot is also suitable for these purposes.
The length of the leash after tying and attaching the hook should be around 15-20 cm, so initially take a piece 25-30 cm long.
All about the leash
A leash in a float rod is used so that the tackle in the area of the hook and bait is invisible to the fish. Another important thing is that it allows you to save the fishing line from breaking. The choice of leash length depends on the type of fishing rod and the type of fish being hunted. For example, a leash 10-15 m long is placed on bream or bleak, and 20-25 m long on roach, 25-40 m on a mast fishing rod, as well as on a Bolognese rod. A long leash does not scare away the fish so much, but a large one the length reduces the information content of the bite.
Based on these rules, a leash is often chosen experimentally. Its strength should be less than the strength of the main fishing line, because if it gets caught on something at the bottom of the reservoir, it must be torn off. This measure will allow you to save the main line, and it will be much easier to replace the leash. But this does not apply to large predatory fish, for catching which the leash is made of a very strong fishing line so that they cannot break it when fishing. A good fish hook is guaranteed when the leader is located on the inside of the hook. A knot is tied at the end of the leash.
How to properly tie a hook to a fishing line
Now is the time to tie a small hook to the end of our fluorocarbon leader.
Step-by-step instructions for crocheting a simple knot:
- Thread the end of the fluorocarbon leader through the eye of the hook from the inside.
- Pull the line out 5 cm and form a loop.
- Make 5 turns around the hook (if the line is thinner than 0.15 mm, 6-7 turns can be used).
- And then thread the end of the fishing line into the loop formed earlier.
- Wet the fishing line and tighten the knot tightly (both actions are important, a wet knot cannot burn out during tightening and the fishing line will not be injured, but you need to tighten it tightly because after tightening we will cut off the tip, and further tightening if the fishing line is cut prematurely can unravel the knot).
- Cut off the excess end of the fishing line with scissors. But leave at least 1mm from the tip.
What hook size should I choose? The size depends on the size of the fish's mouth. Imagine what kind of catch you are hoping for and buy the appropriate hooks. If the prey is a small crucian carp up to the palm of your hand, then hook No. 8 will suit you according to the European numbering, and hook No. 5 according to the Russian numbering. If you catch bleak , then significantly less. European No. 14, Russian No. 2-3.
Is the color of the hook important? This is more of a myth than any serious hook evaluation parameter. Pay more attention to the strength and sharpness of the hook than to its color. Japanese hooks from Owner are a good choice, they are sharp and durable.
Short forend or long? A long fore-end (the fore-end is the part of the hook from the ring to the bend) is well suited for fish with a small mouth (for example, bream, crucian carp, roach). For fish with a large mouth, a short forend is more suitable (for carp, perch).
Installation
A float fishing rod can be assembled using one of the fastening methods - blind or sliding. The assembly method depends on the fishing conditions. Blind installation - when the amendment is fixedly attached to the fishing line - is used for fishing near the shore, when the depth of the float is small. On the contrary, sliding installation - when the float moves between the stoppers - is used when making long casts and fishing in deep places. The essence of this device is that the float during casting is located close to the hook and sinker, which allows you to use the length of fishing line necessary for the swing.
Using a sliding float eliminates the need for a long rod. It is very important to set the depth at the beginning of fishing, for example, adjust the fishing rod so that part of the leash lies on the bottom. You can check how the fish behaves by changing this length. Experienced fishermen constantly change the depth of the bait. In order to regulate this indicator, there is a marker mark on the rod “initial position”.
The correct scheme for assembling a float fishing rod (using the example of a fly fishing rod; other types of fishing rods are assembled similarly) is as follows.
- Installation begins by attaching the connector to the end of the rod.
- Then you need to tie a fishing line the length of the height of the rod to the connector.
- Attach the float to the main line using any method.
- Equip the float with weights by placing it in a mug or pan of water; you can also do this right at the fishing spot. It is important that the float is straight.
- It is necessary to install sinkers on a leash depending on the conditions in which you will have to fish. For fishing in still water, they are installed at the same distance from each other. If we are assembling the equipment for fishing on a wave or on a current, we move it closer to the float, leaving a catch below.
- We knit a loop under the hemline or attach a swivel for the leash.
- We secure the leash with the hook using one of the fishing knots or using the loop-to-loop method.
Thus, you can equip a float rod for successful fishing.
To learn how to assemble a float rod, see the following video.
Source
Checking gear
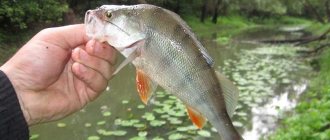
Check out the gear you have assembled using the example diagram below. Here is an example for catching crucian carp up to 500 g, be it very small crucian carp or large ones, much larger than the palm of your hand. Large specimens will give you problems when fishing, but this tackle will cope with them.
Check the following items:
- The connector of the fly rod is tightly secured and will not fly out when the rod is shaken (for example, when the rig is caught on algae in the water).
- The line is tightly secured to the connector (using a figure eight knot ensures a reliable connection).
- The rubber casings of the float should not be too tight and will not be worn out by the fishing line when moving along the line.
- Lead pellets, when attached to the fishing line with pliers or when cutting them with scissors, should not damage the fishing line. Inspect it and if there is still deformation, it is better to move the weights higher along the fishing line and tie a leash to the place of deformation.
- The hook must be sharp and strong.
At this point, the equipment of the fishing rod with a reel, float, sinkers, leash and hook is completed, you can start feeding and fishing. Leave comments and questions, I will be happy to answer!
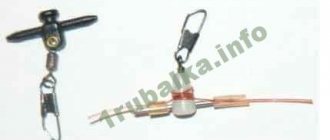
Other elements
A connector is a small fastener with which the finished equipment is attached to the fly rod. Using superglue, it is attached to the tip of the rod. The connector allows you to quickly change equipment, depending on fishing conditions, it is cheap compared to fishing gear.
If the quality of the connector is high, for example, it is made of metal, it will last a long time and will withstand significant loads without changing its shape. Please note that a low quality connector can fray the fishing line. Plastic connectors last much less. The inner diameter of the connector is 0.66-4 meters, this is important when purchasing it and purchasing a fishing rod.
Loading the float can be done in two ways. A single sinker or a spaced weight with an underlay can be used. The first method is used for fishing with a retractable leash, in a strong current or with live bait, to catch large fish. This method allows you to cast over long distances – 30 meters or more – without a sliding leash.
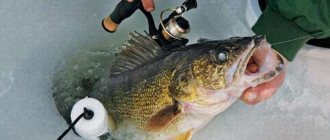
The second method can be used for all types of fishing with a rod. For loading, 2-5 pellets are used, with a total load capacity equal to the load capacity of the float. The undercut is the first, smallest pellet from the hook. In winter fishing conditions, properly loading the float in the equipment is of great importance: it should be recessed into the hole by 1-3 cm, this will prevent it from freezing.
The sensitivity of the tackle is increased by securing the load at the end of the main line, and the leash (or leashes) above the load.
The main advantages of equipping with a mantle.
- Significantly simplifies fishing due to the increased sensitivity of the gear. Even a slight touch of the prey to the bait is transmitted to the float, allowing the hook to be carried out in a timely manner.
- The light weight of the bait determines its invisibility for the fish when it approaches the bait. This applies to “peaceful” fish such as crucian carp or tench. If the fish feels the resistance of a heavy sinker, it will not swallow the bait.
- The bait, lowering slowly, promotes the bite of active fish, for example, roach, rudd. It lives not in the bottom, but in the upper layers of reservoirs. Feeling the impulses provoked by the sinking bait, she pays attention to it and grabs it.
- The bulkiness of the gear is reduced.
However, many fishermen believe that there is no need to complicate the process of preparing gear and use one sinker.
Installation of a float load with a sub-hedge.
- The largest pellet is secured below the float. The distance to the feeder corresponds to the depth at which fishing occurs. The spaced load must be shorter than the minimum depth. But this does not apply to fishing with wiring.
- The pod is secured above the leash or hook. The distance from the hook to the hook depends on the fishing method, the type and buoyancy of the bait, the caution of the fish, the speed of the current, as well as the horizon level, and can vary in the range of 5-50 m.
- The remaining weights are secured below the largest pellet in descending order of weight at equal intervals. If you attach them in a bunch, there will be a splash of water when casting, which will scare away the fish. When they fall into the water one after another, there is no splash.
- In order to prevent deformation of the fishing line, it is advisable to use soft lead for loading.