A fly rod is a so-called guideless rod. Today, these are modified, improved design, lightweight, due to the use of carbon fiber materials, tackle. In post-Soviet countries, tackle using a fly rod is quite popular; only a telescopic fishing rod with rings can compete with it.
The main material from which a fly rod is made is carbon, its marking ranges from IM-4 to IM-9, the higher the marking number of the composite substance, the stronger and lighter the rod, and the price is correspondingly higher.
We'll look at how to choose a fly rod in this article.
Classification of fly rods
There are short fly fishing rods (length from 2.5 m to 4.5 m), the use of such gear can often be found in sport fishing with float gear. Typically, anglers rarely use such a rod, except for catching small fish. The short fly rod itself is very light, no more than 200 g.
Next, let's take a closer look (length from 5m to 7m). A rod of this length is most popular among fishermen. White fish weighing up to 2 kg are often caught with fly tackle of this length. At the same time, the weight of the rod itself, of course made from modern materials and not from bamboo, is about 300 g. The tip of this tackle has an average diameter of about 0.75 mm. and is called glued whip.
The length of five to seven meters for a fly rod is far from the limit; for fishing remote from the shore, fly tackle of eight and eleven meters is used, the main competitor, so to speak, or an analogue of such tackle, is a plug rod. They catch fish weighing up to 3 kg with such a long fishing rod. The weight of a fly rod of this length is no more than 500 g.
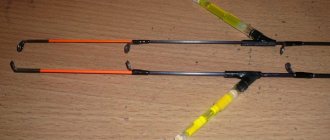
The tip of all the types considered consists of several parts, from the tip, which is made of carbon fiber and a thick hollow part; less often, the whips are made of fiberglass. On modern fly rods, whips serve as a kind of shock absorbers when biting and playing fish; they have good flexibility and excellent strength.
The main form factor of the fly rod is a telescopic assembly, so they do not take up much space when assembled. Among the positive aspects of a fly rod, one can note their lightness and rigid action. On the negative side, one can note their fragility due to thin walls, so they require careful use.
Summarizing all the information, we can conclude that before choosing a fly tackle, you need to decide what size fish you plan to catch and at what distance from the shore. The main criterion remains the length and weight of the rod, as well as the quality of its assembly.
Now that we've sorted out the classification of fishing rods in fly tackle, let's move on to its equipment.
Review of popular manufacturers
Light carbon fiber materials began to be used in production. The rod structure and design have been improved. In our country they are popular, especially famous
Made from carbon fiber, very durable. Equipped with a small butt diameter. With its help you can make precise casts, especially suitable for carp hunting.
- sections 6;
- weight is 430 g;
- length is 600 cm;
- transport length is 118 cm.
"Cormoran"
The telescopic fishing rod is made from composite material, therefore it has high strength and power:
- length from 3 to 6 m;
- weight: 390 gr.
Designed for fishing on lakes and small rivers for roach, carp, and crucian carp.
"Maver"
They are made using the latest technologies. She is fast in action and has good balance. Maver is used for catching large fish. Maver is in demand in sports. Main characteristics:
- the length is 5 m.
- weight is 140 g.
- transport length is 130 cm.
- test up to 18 gr.
"Trabucco"
A series of budget fishing rods from the Italian company TRABUCSO. The upper knee is combined, the tip is soft and thin. They are light and comfortable:
- footage 4 m.
- transport length 1.13 m.
- number of sections 4.
Shimano
Telescopic fishing rod, made of composite materials:
- footage: 4.9 m;
- weight: 270 g;
- has five sections;
- reel seat – classic;
- transport length – 1.43 m.
It easily casts almost any bait over a considerable distance.
Pros:
- light weight;
- excellent test;
- good strength.
Minuses:
- too high cost;
- Takes up a lot of space when folded.
"Daiwa"
The design is plug-in, quite simple and quite reliable. Made of carbon and carbon fiber. It behaves excellently with a test weight of 13 to 20 g, but it cannot be used only with heavy bait.
Pros:
- considerable length;
- quality ingredients
- reliability.
The downside is the high price.
"Black Hole"
Very compact and lightweight. Produced from graphite (grade IM 7) with high modularity. Equipped with:
- with a soft whip;
- good balance;
- performs sweeps perfectly.
"ZEMEX"
Telescopic design with 5 sections. The structure of the form is average. Made from carbon fiber material. It has:
- weight: 214 g;
- footage (cm): 500;
- length of tr. (cm): 132.
"Match"
Plug-in, composite, has a coil. They are especially successfully used for fishing in still water, medium and long distances. She has no competitors here.
"Sabaneev"
Suitable for beginner fishermen. It has good characteristics:
- excellent strength;
- good rigidity;
- ease;
- excellent balance.
Made from composite materials with a high carbon content, equipped with replaceable tips. The main advantage of this model is its excellent price. Moreover, this does not at all affect the quality.
Fly rod equipment
Let's pay attention to the fishing line, or more precisely to the fishing line of various diameters, which is wound onto the reel, necessary for quickly changing equipment. The thickness of the fishing line should be chosen as thin as possible, and the length should not be large, equal to the length of the rod. The diameter of the fishing line used is from 0.05 to 0.2 mm, and the leader should be thinner than the main fishing line. Of course, we attach hooks to the fishing line. Hooks in fly tackle are used from No. 10-20 according to international standards.
A float serves as a bite alarm on the fly tackle. Choose a long float with a thin keel, attach the float to the fishing line with silicone cambric, the most common floats have a carrying capacity of no more than 3g. Depending on the body of water you fish on, either blind or sliding equipment is used. The fly rod floats are loaded immediately on the pond.
In general, fly tackle, like any other tackle, in principle, has its positive and negative sides, and the choice remains with the fisherman.
How to achieve big catches?
Over many years of practice in catching various types of fish, the most effective methods have been found:
- Use of special activators . This pheromone-based activator attracts fish the most at any time of the year. Reviews and discussions of this bait are here .
- Use sensitive gear . Read these methods in the appropriate section.
- Albumin-based baits . You can read it here .
vsegdanarybalke.ru
Loading the fly rod
To understand how loading works, let's look at an example.
Let us assume that the load consists of 4 identical weights (1, 2, 3 and 4) having a spherical shape and located at equal distances from each other (Fig. 1A). After casting the equipment, after approximately equal intervals of time (equal, say, 5 seconds), the weights will take positions “a”, “b”, “c” and “d”, respectively. That is, the equipment will take its working position in approximately 20 seconds. “Approximately” because we do not take into account some unprincipled details here.
If weight “1” is moved to weight “2”, then during immersion the deflection of the line in this area will increase slightly (shown in red) and the water pressure on the line in this area will decrease (due to better streamlining). As a result, both weights will arrive at point “b” faster. Let's say in 8 seconds (Fig. 2B). Then the entire load will take its working position in 18 seconds.
It is known that as the volume of a ball increases, its surface area increases more slowly. This means that if at point “2” you place one spherical weight equal to the sum of the weights of weights “1” and “2”, then the water pressure on it will be less than on two shifted weights and it will sink even faster. You can accurately calculate that in our example it will occupy point “b” in 6.5 seconds, and the entire load in 16.5 seconds.
The important thing here is that:
- firstly, the smaller the distance between the weights in a certain loading area, the faster this area loads and vice versa;
- secondly, one weight sinks faster than a compact group of weights of equal weight, and the more weights in the group, the more noticeable the difference;
- thirdly, with the same weight and configuration of the load, the more weights it contains, the slower the load takes its working position.
If the lowest weight of the load is intended to register a bite “on the rise”, it is called a “podpodska”. The fish, having raised the bait, also lifts the bait - the float also rises and thereby registers the bite. Therefore, if possible, the bait is placed closer to the hook, but not closer, approximately 10-15 cm, so that at the beginning of the bite the cautious fish does not smell the trick.
Since when fishing, amateurs are guided by the rules of amateur and sport fishing (at least they should do so), then they are only interested in the fish that are allowed to be caught by these rules. But for this fish, there is no point in over-growing with grazing. Therefore, for amateur fishing, the weight of the pod is 0.1-0.2 g (and in some cases more) is the norm.
Based on these considerations, as an example, we will design several loads for specific conditions, taken “from scratch” - for example, the depth at the fishing point is 2 m, the carrying capacity of the float is 2 g. Frankly speaking, the conditions are not standard, for such a depth the carrying capacity of the float is somewhat large, but, firstly, this is an example, and secondly, this may be caused by some circumstances, say, a long casting distance.
Let's assume that you need to fish the entire layer of water. Then the load can be made approximately as shown in Fig. 2A: a 0.6 g weight will sink to a depth of 1 m quite quickly, each subsequent weight will sink more and more slowly, and the hook itself will smoothly pass through all layers to the bottom. If this passing speed is too high, then a load can be made, as shown in Fig. 2B. In this case, a weight of 0.8 g will have virtually no effect on the sinking speed of the weight, and the sinking speed of the hook will decrease significantly.
If the small bleak “gets” and you need the hook to pass the top, say, meter layer quickly, and the bottom one slowly, we load it as shown in Fig. 2B. In this case, a 1.5 g weight will “pierce” a one and a half meter layer in a couple of seconds, and the hook will smoothly lower the last meter. If you need to place the hook almost instantly on the bottom, then we leave only the underhang, and the rest of the load should be concentrated approximately 20 cm from it.
From this we can draw the following conclusions:
- In order for the load to be more or less universal (that is, to be able to give it any required configuration), it should consist of as many small weights as possible (but, as a rule, no more than 10), which can be moved along the fishing line in your own way. discretion.
- The heavier weight (group of weights) should be located above the lighter one;
- For fishing only in the near-bottom layer or from the bottom, it is better to have a load consisting of a minimum number of weights (for example, only a graze and an olive);
- The weights are clamped with such force to prevent their spontaneous movement during a hard cast, but at the same time, so that they can be moved, if necessary, without injuring the fishing line, and the olive is fixed using silicone stoppers.
Loading can be done directly on the main line. But it is clear that at great depths (approximately 2 m or more) it may be necessary to have at least two weights for one float. For example, loading from a large number of small weights and loading only from grazing and olives. In this case, the weights can be prepared separately from the main fishing line and attached to it as needed in one way or another. For example, “loop to loop”.
Flying rod leash
It is advisable to have several leashes of different lengths, different diameters and with different hooks in stock. If we talk about the length, then when fishing from the bottom in still water, the length of the leash is usually about 20 cm, and when fishing in a current, the leash is selected depending on the bottom topography so that the hook constantly drags along the bottom. At the same time, in both the first and second cases, the feedstock should not touch the bottom. If fishing is not from the bottom, then the length of the leash can be 10-15 cm. The leash is attached to the load using the “loop-to-loop” method.
The diameter of the leash determines whether it is visible or invisible to the fish. The larger the fish, the more reluctant it is to approach the shore and the more cautious it behaves. Actually, thanks to this, it reached large sizes. For example, if we do not mean the wild Siberian rivers, over more than half a century of amateur fishing experience, I have only had the opportunity to witness the catch of specimens weighing about 1.5 kg with a fly rod. And then, as a rule, on feeding ponds. When jerking, such a fish can create a load of up to 2 kg.
At the same time, catching a fish weighing about 0.5 kg even in a public reservoir, if not an ordinary event, is not unique. Therefore, taking into account the loss of strength of the fishing line in water and at knots, as well as the shock-absorbing characteristics of the main fishing line and the rod, it is hardly advisable to use leashes with a breaking load of more than 2 kg in principle. But in practice, 1.5 kg is more than enough.
Why are Sinkers needed?
Sinkers for Float Rods come in different shapes and sizes (it all depends on the size of the fishing line and the size of the float) and are used depending on the nature of the reservoir, whether there is standing water in it or running water.
When fishing with a float rod, sinkers are most often used from several pellets or a thin strip of sheet lead wound onto a fishing line with a tube.
The pellets are cut to their middle, a fishing line is inserted into the cut, and then the pellet is compressed with pliers. This must be done carefully so as not to damage the fishing line by pressing hard, otherwise it may break during fishing.
There are usually several such pellets, with the lowest one being the smallest, while the rest are attached higher at a distance of 5 - 7 cm from one another.
It is necessary that each subsequent pellet be slightly larger than the previous one. It is desirable that the pellets be soft. Split pellets are usually used with a diameter of 2 to 5 mm.
Device for Loading Floats in 20 Minutes. Video
Main line
The main line should be stronger than the leash, and since the leashes are quite short, it should, if possible, be inconspicuous (that is, have a minimum diameter). In this case, it is necessary to take into account the manipulations of manufacturers with such concepts as “breaking load” and “diameter”. We can give examples where very respected manufacturers have a real fishing line diameter that is up to 25% larger than the declared one.
It is quite difficult to check the real breaking load for compliance with the declared one, but one must think that there is the same leapfrog here. Therefore, in order not to miss and not to break the entire rig up to the tip of the rod when hooking, it is advisable to use fishing lines of the same series for both the base and the leashes. Then certainly the main line and leads will have real or unreal, but guaranteed different diameters and breaking loads.
For example, let’s take a series of fishing lines FORMAX RIG MASTER (unwinding 50 m):
- diameter: 0.10 mm, breaking load: 1.4 kg;
- diameter: 0.12 mm, breaking load: 2 kg;
- diameter: 0.14 mm, breaking load: 2.6 kg;
- diameter: 0.16 mm, breaking load: 3.5 kg;
- diameter: 0.18 mm, breaking load: 4.5 kg;
- diameter: 0.20 mm, breaking load: 5.3 kg.
Above, we decided on the breaking load of the leash - 1.5 kg, when fishing in a feeding pond - 2 kg. In our example, these are fishing lines with a diameter of 0.10 mm and 0.12 mm, respectively. Therefore, a fishing line with a diameter of 0.12 mm is quite suitable as the main one in the first case, and 0.14 mm in the second. Then, even if the breaking loads declared by the manufacturer do not correspond to reality, there will be no breakage of the entire equipment.
In this case, the total length of the equipment should not exceed the length of the rod by more than 20-30 cm, otherwise problems may arise when casting.
Fishing lines
The thickness of the fishing line when fishing with a fly rod rarely exceeds 0.14mm. This is due to the fact that most often fishing takes place in the coastal zone, where catching a worthy specimen is very rare. The exception is wading and fishing in paid reservoirs.
When fishing in a wade, there is a chance to catch a decent specimen, in this case you can use fishing lines up to 0.18mm. And if targeted carp fishing is carried out on a paid reservoir, fishing lines of 0.2-0.22mm are used. In any case, it is always worth using a landing net, since the tips of the fly rods are very thin, and even a 300 gram roach can break this tip.
How to choose the right tackle
What do you need to know to choose gear? All significant factors, which include:
- fish activity;
- the type of fish being caught;
- depth at the fishing site;
- presence and speed of current in a body of water.
The choice of float fastening option, it can be sliding or blind, the equipment of the fly rod is related to the depth at the fishing site and the size of the gear. To install a blind float, the depth must certainly be less than the size of the rod. One of the options for equipping a fly fishing rod can be seen in the video below.
Blind tackle for fishing rod
It is the most convenient for fishing, which is why it has gained more popularity than sliding tackle, and there are a lot of video materials on the topic of “fly fishing rod”.
The body of the float of the blind tackle depends on the speed of the current. The higher the speed, the more streamlined and rounded the float must be. This is explained by the technology of holding fishing, when the fisherman specially stops the float a little , allowing the current to move the hook with the nozzle a little forward. If the body of the float is elongated, it will jump out and fall on its side.
The blind float is attached using 3 tubes on the keel, and the lower half is only partially put on. One of the tubes is needed as a reserve when one of them fails. The line is passed through a small metal eye at the top, or through a channel in the float.
Loading blind tackle for fishing rods
First, let's deal with shipping in conditions of fishing in large currents in pits. For the main loading, a heavy olive is used , due to which the gear is immediately lowered to the bottom, and for protection from the current, a backup of several nearby pellets is placed.
When fishing in rivers without a current, the pellets are installed at a large distance from the main weight to the leash with the nozzle.
For good fishing, the pellet load is evenly distributed on the fishing line. The weight of the pellets decreases as they approach the nozzle.
Understanding how shipments work and using them wisely can help you achieve maximum bite .
The cross-section of the fishing line is selected taking into account the size of the fish and the casting distance. Because as the range increases, the weight of the equipment increases, the diameter of the fishing line also needs to be larger. The leash is knitted thinner.
Sliding tackle for fishing rod
The need for this equipment appears when fishing from a depth exceeding the length of the fly rod, the equipment of which is smaller.
You can use a float with two rings to pass the line, or special floats for long casts (for example, Waggler). This float is quite easy to replace while fishing. Use stoppers to fix the depth.
The shipment of sliding equipment is almost no different from the shipment of blind equipment. The main difference: the main weight plays the role of a lower stopper, so it needs to be well secured to the fishing line.
Hook, leash and line
When choosing fly rods, use a proven and reliable fishing line. Usually a thickness of 0.14-0.18 mm is enough , but in various videos they advise using a fishing line a little thinner.
Some anglers say that very thick line can spook the fish, but this theory does not hold water. If the bite is weak, you first need to look for the problem in another place, and only when all possible causes of the weak bite have been analyzed, you can try changing the fishing line.
If the fish can see the fishing line, it is only in still and clear water. Basically, in our reservoirs it is difficult for fish to see the fishing line.
The size of the leash is selected taking into account the fishing conditions. But the longer the leash, the weaker the sensitivity of the equipment - remember this. The fish has more space to swallow the bait unnoticed, so you need to carefully choose the location of the bait. If the leash is less than 20 cm , the sub-lead can be installed directly on the main line.
An additional leash size should be used in bodies of water with a current, in which the tackle moves over a hilly bottom. To have good bottom control, use a slightly underloaded float with a high hollow antenna and a long leader with a small weight. In this case, the under-grazing even sometimes falls to the bottom. And although now you will feel the bite a moment later than usual, the fish will begin to attack the bait with extraordinary confidence and strength.
It is advisable to replace the leash immediately after you notice damage to it, when nodules appear . A big fish can bite at any time, and then the angler scolds himself for not changing the leash.
When choosing a hook, you need to pay attention to models made of thin, rigid wire. But don’t buy very small hooks either - they are more for competitions than for amateur fishing, and there are many videos on this topic.
The hook must match the bait and the intended fish. If you are attaching an animal bait, you need a long fore-end, while a small fore-end is suitable for vegetable bait.
The color of the hook is only important in cases where the fish has time to look at it (for example, standing clear water).
By and large, you need to clearly draw the line between fishing in a still body of water and in the current. The differences in the tackle and fly rod you choose will be significant. The fly rod for the current is always chosen to be powerful, the hooks need to be chosen larger, and the bait, naturally, will need to be larger. On a large river there is no use for thin tackle with bait in the form of bloodworms. Almost any fish, including large ones, bites well on grain, maggots and dough.
Therefore, for catching fish weighing up to 3 kg on a river with a large current using a fly rod of 6-8 meters, the best option would be a fishing line with a diameter of about 0.17-0.22 mm. And in a standing reservoir, only 0.14-0.16 mm is enough to catch the same fish. The leash must be chosen no thinner than 0.10, otherwise it will not support the fish.
About the current and roach fishing zone
As a rule, a constant water flow keeps the inhabitants of the water area “in good shape.” The current forces the fish to be more active because it prevents the water temperature from rising too high. Springs also play a huge role. In reservoirs with many underwater geysers, fish are more active
Roach does not always stand on the stream, preferring creeks and the border of the water flow. A fly rod allows you to catch roach both from the bottom and in the retrieve, so using it makes it possible to change gears in time. Roach, like other fish, prefers a hard bottom with a slight blockage of snags. If there is a lot of vegetation in the lower part of the water column, then fishing should be carried out at half-water, giving preference to fishing with wire.
The intensity of roach biting rarely depends on the time of day
The fish are excellent in the morning, afternoon and evening. At night, the roach is practically motionless, so it is a rare guest on the hook.
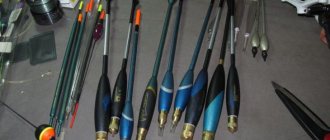
Choosing a float and its types
Over the years, people have invented a large number of floats of various sizes and shapes. It is enough to go to any fishing store to see all the variety of floats for fishing rods. Which one is right for you? Let's try to figure it out.
Float design
The float is an important element in the equipment of a fly rod. In addition to the bite signal, it serves the function of holding the bait at the required depth, helps in determining the bottom, and is needed for long casts and correct retrieving. Therefore, the purchase of a float must be approached responsibly.
All floats have a body , but not every model has an antenna with a keel. It's not often you see floats with a keel.
How to choose a float
To choose a float wisely, you need to understand a number of truths:
- Certain floats work either only in currents or in still water.
- A universal float is much worse than a special one.
- The choice of float weight is affected not only by the influence of the fly rig, but also by the depth at the fishing site, casting distance and wind strength.
- For any type of equipment, only a few types of floats are suitable. Installing floats that are incompatible with the equipment will not give positive results.
ulov.guru
Advantages and disadvantages of a fly rod
Advantages:
- Convenient to use.
- Has a small mass.
- Elementary equipment and lightning-fast replacement.
- Changing knees is not burdensome.
- Tangles and snags are kept to a minimum.
- Casting accuracy is high.
- Universal in use.
- It is not difficult to master the fishing technique.
- Setting up a fishing spot is also easy.
Flaws:
- The casting distance is small.
- Fragility.
- Difficulty in fishing near branches.
- At great depths, fishing is impossible.
- Large fish are impossible to catch.
Fly rod - part 3:
Content:
- introduction;
- equipment elements;
- connector;
- fishing line;
- float selection;
- sinkers;
- leash with hook;
- installation of equipment;
- video about installation of equipment;
Introduction.
Before you start installing the equipment, you must have a fly rod; you can read about their types in my article: “Types of fly rods”. In addition, I hope that you have a general understanding of the fly fishing rod, and distinguish it, for example, from the Bolognese. If you are a beginner, I advise you to read the first article in this series: “Fly fishing rod. General concepts, pros and cons."
Now let's talk about equipment. First you need to decide what size fish you will catch. The tackle must be strong enough to catch fish, but if there is a limit and you can’t just take the thickest fishing line. You also need to know the fishing conditions, for example, different types of floats are used in currents and in still water.
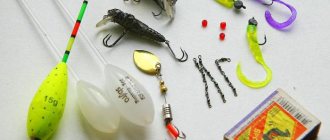
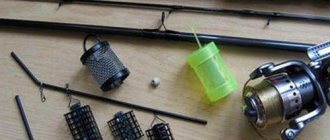
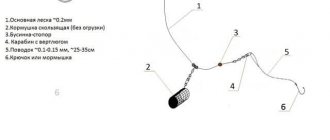
Equipment elements
To assemble a fly fishing rod, in addition to the rod itself, you will need: a connector, fishing line, float, a set of sinkers, a slightly thinner fishing line for the leash and a hook. You will also need a mount for the float; they come in different shapes and are selected depending on the model.
Connector
The connector is not part of the fly rod equipment itself; it is needed to attach it to the rod. The connector will allow you to quickly change equipment, without wasting time when the fish are biting. It is attached to the tip of the rod.
Connectors can be purchased, factory-installed, or homemade. Purchased ones include plastic latches that are glued to the tip of the rod. When purchasing such a connector, be sure to try it on a fishing rod, since they are made for different diameters. On high-quality fishing rods, you usually install such connectors yourself, while on cheaper ones, a special rope is glued. The most popular homemade connectors are copper wire folded in half and tied with thread to the tip of the rod, but I prefer to equip it with a snap hook and glue the thread after wrapping.
Advice !
Use purchased plastic connectors; unlike homemade ones, they do not fray the fishing line, and are more reliable than rope connectors.
Main line
Everything is simple here, having decided on the size of the fish, you choose the thickness of the main fishing line. We try to choose a thinner line, then your tackle will be more sensitive and will not scare away the fish. The fishing line is sold on reels, on which its length, thickness and breaking force are indicated. The breaking force must exceed the theoretical weight of the fish you are going to catch. The fish will not just drag along the bottom, it will resist and create jerks, during which the force on the line increases significantly.
Typically, a fishing line with a thickness of 0.16 mm to 0.2 mm is used. With the proper quality of fishing line and rod, as well as the experience of the fisherman, it should be enough to catch fish weighing up to 1 - 2 kg. But this is a recommendation, not a rule.
Choosing a float for a fly fishing rod
Firstly, I will say that the carrying capacity of the float for a fly fishing rod is selected based on the length of the rod. A fishing rod up to 5 meters long is equipped with a float with a carrying capacity of no more than 1.5 grams, for a rod length of 5 - 6 meters a float of 1 to 3 grams is installed, for a 7 - 8 meter fishing rod we choose floats with a carrying capacity of 3 .. 5 grams, and for 9 - 10 meters from 4 to 8 degrees.
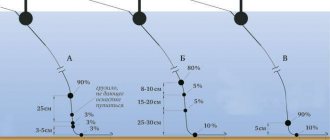
In addition to the carrying capacity of the float, there is one more important parameter - the shape. There are a lot of forms, but I will tell you about the 3 main ones.
A. The body of the float is thickened downwards and tapers towards the antenna . This float is perfect for fishing on stakes, lakes and other bodies of water with weak currents. It is very sensitive, and weak bites will be clearly visible. It is also worth noting that such a float is the best at showing bites on the rise, so it should be used for catching crucian carp, bream and other bottom fish.
b. The body of the float is shaped like an olive. Due to its shape, this model floats better on the water, so it is used for fishing in currents or in windy conditions. Such floats work better for drowning.
V. “Barrel” or “Egg” shape.
Such floats are inferior to other options in sensitivity, but stay on the water better than others. They should be used if there is a strong current in the fishing area, as well as during strong winds.
Sinkers, leader and hook
When assembling the equipment, you need to have a set of weights with you. I will write about how to use them below, in the “Equipment Installation” section. The leash is chosen thinner than the main line, usually 0.02 mm. For example, if the main line is 0.18 mm in diameter, you should take a leash with a diameter of 0.16 mm.
The length of the leash varies from 10 to 30 centimeters. The hook size is selected depending on the size of the fish.
Installation of equipment for a fly rod
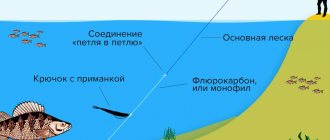
- At the end of the main fishing line we knit a regular loop and put it into the connector.
- We measure the length of the fishing line equal to the length of the rod.
- We put a float and its lock on the fishing line. Usually this is a rubber tube or a special clamp that secures the float to the fishing line tightly. Some anglers use a sliding bobber. Its movement up the line is limited by a silicone stopper; if desired, it can be supported from below with the same stopper. Such equipment is considered unnecessary for swinging, but in its defense I will say that when using light tackle in the wind it is easier to cast than others.
- At the end of the line (below the float) we attach sinkers. First, an olive weighing 1 gram less than the carrying capacity of the float is put on, and the rest of the weight is obtained with pellets. After the sinkers are secured, we move them up the fishing line, and cut off the place where they were crimped (in that place the fishing line loses strength). A properly loaded float should have an antenna protruding 2 to 4 centimeters from the water.
- At the end of the fishing line we knit a loop (some fishermen, including me, put a carabiner on it), onto which a leash with an attached hook will be attached. Thanks to this loop, if the leash breaks, you can quickly change it.
- We leave 1-2 weights at the loop, and move the rest, along with the olive, up the line 30 centimeters. This way, our equipment will be less noticeable to the fish when biting, because it will need to tear off 1-2 weights from the bottom, and not all of them. This is not the only correct option for the placement of sinkers, but let’s say it is universal. You can make more than 2 groups of sinkers, but I do not recommend making more than 4. The more groups and the greater the distance between them, the slower the hook sinks to the bottom.
- We put a hook with a leash into the loop. Using a leader when hooking on the bottom will help preserve most of the rig and you will only lose the hook.
The fly rod rig is ready. Now we take the reel and wind the equipment onto it.
Advice !
You should start reeling from the hook, then it will be easier to unwind it during fishing. Otherwise, you will first have to unwind all the line to the shore, where it can get snagged or tangled.
If you do not have a box in which you can transport the reel with equipment, then I advise you to remove the floats and transport them separately in some kind of case. I use a juice bottle as such a case. It has a wide neck into which all the floats can fit.
Advice !
Prepare some equipment in advance. Then you will be ready for different fishing conditions, and you will be able to quickly replace the gear if it breaks.
podsekai.in.ua
Installation of equipment
It is convenient to fish with a fly rod, having various equipment options in stock. When choosing it, you need to take into account various factors.
Among them:
- The type of fish you are going to catch this time.
- The depth of the reservoir where you are going fishing.
- The presence of a current and its strength.
- Relief and features of the bottom.
- There may be other factors that can affect the size of the catch.
It will be convenient if you prepare several different gear options at home. Why can't you get by with just one of them?
- Sometimes you can decide in advance on a specific type of gear that will suit you best. But this doesn't always happen. It is more convenient to have several different options with you to choose from, from which you can choose already at the fishing spot.
- Another important reason that it is better to prepare gear in advance is that sometimes you can finally decide on the spot. To do this, you need to have plenty to choose from.
- Another important point is that the tackle, no matter how catchy it is, can simply break due to too active fish on the hook or getting caught on the bottom. It is important that at this moment there is a suitable backup option at hand.
Here we will talk about one of the options for installing equipment. As an example, we will look at one of the most typical options.
First, we note that it is customary to store prepared equipment in assembled, mounted form, wound on a reel. They take them with them on fishing trips in this form.
- The rod can be chosen in different lengths. One of the most common options is to take one that will be approximately five to six meters long.
- It is believed that the length of the fishing line should be approximately equal to the length of the rod. Some fishermen take its length to be thirty centimeters longer. A small loop should be made at the end that is supposed to be attached to the fishing rod. One option for this would be to use a figure eight knot.
- Now you need to attach the fishing line to the rod. Nowadays it is convenient to do this using a connector. It looks like this:
- First, the connector must be attached to the tip of the rod. One way is as follows. It is put on the thin tip of the rod, having previously lubricated the joint with superglue. When the glue sets and dries, the connector is ready. Now you need to pass the loop on the tip of the fishing line under the hook of the connector and then close it (picture on the right). After this, the connection will be quite reliable. This connection will need to be made when attaching ready-made tackle to the fishing rod. Since we are still installing the gear, it is better to disconnect the rod for now.
- Now let's start installing the float. To do this, take a float, which has a loop on the side of the body and two stoppers for fastening. First, we put on the upper stopper of the float from the end of the fishing line and move it to the desired place. Then we put on the float connector (it is a swivel with a latch at one end). After this, install the lower float stopper. You will now need to attach a float to the connector.
- We tie a swivel to the end of the main line. One of the most common knots for this is the clinch. It is fashionable to take a leash 12 - 20 centimeters long. We tie a hook on one side and make a small loop on the other. To tie to the swivel, we use the “loop to loop” method.
- Now let's remember that we need a sinker. On modern floats, as a rule, the weight is indicated. This is exactly the weight at which the float will work as it should. Let's assume we are talking about two grams. For this purpose it is convenient to use special fishing pellets. They differ from ordinary ones in that they have a cut that allows them to be put on the side of the fishing line and in that their weight is precisely measured. Let's say the pellet weighs half a gram. We will need four of them. Having put them on the fishing line, they need to be lightly pressed down with pliers. If this is done too forcefully, the pellets can damage the line. The pellets are placed in front of the swivel, which ends the main part of the fishing line.
- That's it, the equipment is ready. They wind it on a reel and in this form they take it with them fishing.
Equipment elements
A fly rod, the equipment of which consists of a fishing line, a float, a set of sinkers and a leash with a hook, is simple and at the same time reliable and convenient when fishing. An additional element of this gear can be called a connector, although it is rather part of the structure, since with its help the main fishing line is attached to the rod. Often the connector comes with the rod.
If it is not there, then there are always a variety of models on sale, and besides, the connector is not at all difficult to make yourself. The simplest version of a homemade connector, which is used to modify a fly fishing rod, is a wire folded into a loop and tied to the tip of the rod with a strong thread. If you are going to buy a connector, keep in mind that they all have different internal diameters, so it would be better to buy it at the same time as the rod, since in this case you will be able to try it on. The fishing line for a fly fishing rod is something without which the equipment is impossible. It should be strong, but thin. Its diameter depends on which fish will be the priority. A main line with a diameter of 0.16 mm will be universal for crucian carp of almost any size. It will support weight up to 2 kg. Depending on the size of the individuals and the degree of snags in the reservoir, fishing line with a diameter of 0.09 to 0.12 mm is used for leashes. Typically, the length of the leash is from 10 to 30 cm. It is more convenient to connect the leash to the main fishing line using the “loop to loop” method.
In general, the fishing line for a float fishing rod is selected so that its breaking force is slightly higher than that expected in the conditions of a particular reservoir, taking into account the type of fish found in it. That is, equipping a fly rod for catching crucian carp requires careful selection of fishing line. If there are no more palm crucian fish in the lake, a thin rig will be enough; if the crucian carp is large, then it is better to use the fishing line mentioned above with a diameter of at least 0.16 mm. The equipment of a fly rod for catching roach requires a thinner line with a diameter of 0.10 - 0.12 mm, and a couple of millimeters less for the leash. A mandatory element of the flywheel equipment is a float. Its carrying capacity depends on the conditions and the fishing object, the thickness of the fishing line, as well as the length of the rod. So, a five-meter fishing rod is equipped with a float of up to 1.5 g, a fishing rod about 8 m long will require a five-gram float. The shape of the float determines how visible the bite will be and how timely the hook will be. A sensitive float allows you to notice even a sluggish bite, so before equipping a fly rod, you need to decide where and under what conditions you will fish. The most sensitive equipment is considered to be one that uses needle-shaped floats. They perfectly capture the most careful bite, but at the same time they are the most unstable, so they are not used in waves, and they are also inconvenient in windy weather or in currents.
When choosing a float for a fly fishing rod, you need to separate floats that work “for flooding” and “for rising”. A needle-shaped float will be the most sensitive in both cases. If the object of fishing is a fish that pushes the float out of the water when biting, you need to choose a float with the thinnest upper part. When biting “on the flood”, the optimal shape will be an inverted drop.
Fishing line loop
Another very simple and common way to tie a fishing line to a fishing rod
- A piece of thick fishing line 8-10 cm long is folded in half and applied to the tip of the rod so that the loop sticks out 2-3 cm.
- The fishing line should be attached to the whip using a nylon thread, winding along the entire length of the ends. The first pass is rough; its task is only to secure the ends of the fishing line. The second is wound more carefully and accurately - turn to turn.
- The entire winding is impregnated with quick-drying, moisture-resistant glue.
- You can tie the loop and the main line in any convenient way.
The disadvantages of this method are that untying the main line from the loop is quite problematic - it’s easier to cut it off. And this will gradually reduce the length of the entire tackle.