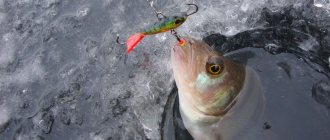
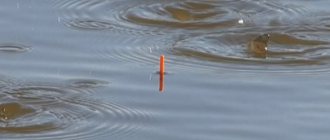
For a novice fisherman, the word “jig” seems mysterious. In fact, everything is simple: it comes from the name of the crustacean - amphipod - jig, and the jig itself is an artificial bait for fish that imitates the movements of this aquatic inhabitant.
A jig is a small piece of fishing equipment; it is a hook soldered into a piece of metal. It is made from tin or lead, sometimes from tungsten.
There are two types of jig designs - with lugs and without lugs. The steps to attach them to the main line are completely dependent on the design of this part.
Jigs can be purchased where fishing equipment is sold, or you can make them yourself.
Which one to choose?
When choosing a jig, you take into account the depth of the reservoir where you are going to fish, the speed of the water flow in it, and most importantly, what kind of fish you are going to catch. It is very important for a novice fisherman to understand the truth: the greater the depth, the greater the mass of the bait, and also to take advantage of information from the arsenal of experienced fishermen:
If the depth of the reservoir is no more than two meters, the weight of the jig is 0.3-0.5g.- If the depth is four to five meters, the weight of the jig is up to 1.0 g.
- At a depth of seven to eight meters, winter bait should weigh 1.2-1.5g.
It’s not enough to buy a jig; you also need to figure out how to tie it to the fishing line, what kind of knot to use to attach it so that it is of high quality and does not come undone. If the knot is knitted incorrectly, it will come apart, and the jig will fly into oblivion, and the fisherman’s mood will be ruined.
The design of the jig determines the method of tying the knot that should be used. How to properly tie a jig to a winter fishing rod? This question is asked by all novice winter fishermen. Let's figure it out in order.
How to achieve big catches?
Over many years of practice in catching various types of fish, the most effective methods have been found:
- Use of special activators . This pheromone-based activator attracts fish the most at any time of the year. Reviews and discussions of this bait are here .
- Use sensitive gear . Read these methods in the appropriate section.
- Albumin-based baits . You can read it here .
How to tie a pair of jigs on one line
In fact, the performance of both baits can become noticeably worse and lose their attractiveness. In addition, it becomes difficult to win the trophy due to the risk of another jig catching on the edge of the hole with its free sharp hook. However, for those who are truly interested in the question of how to attach two baits to a winter fishing rod, we will suggest a good reliable solution.
So, the lower jig should be heavier than the upper one so that there are no distortions in the structure. It is attached in any of those ways that are known to you. The upper one is mounted on a leash (about 15 cm long) and attached to the main fishing line, approximately 40 centimeters from the lower one. Therefore, the logical answer to the question “how to tie 2 jigs” would be the situation when the top bait moves away from the working line, instead of getting tangled in it and interfering with fishing. The leash can be secured using the usual “loop to loop” technique.
How to tie a jig without an eye
For a jig that does not have an eye, a simple and popular method among fishermen is used, the procedure is as follows:
- Thread a piece of fishing line into the hole of the jig, the end of the piece should extend beyond the edge of the hole by about 10 cm (the hook points up).
- Form the required loop near the hook.
- Press the hook of the jig with the resulting loop. Wind five turns of fishing line around the hook and loop.
- Insert the end of a piece of fishing line into this loop.
- Tighten the knot after moistening it.
- Remove excess line.
Step-by-step instruction
Methods for attaching jigs
Methods for attaching a jig
So, let's tell you what methods of attaching a jig are. Basically, tying a jig is practically no different from attaching conventional hooks. But there are some differences, for example, tying the hook to the eye or to its base or shank. Tip: when attaching the jig, try to place it at an angle of approximately 145 degrees, the position will be hook to top, this will slightly reduce the risk of line breakage. We remind you that it is better to tie the jig at home in advance and do it as reliably and professionally as possible.
If you bought a jig that has a hole in it, then the task becomes a little easier. To begin with, of course, you need to stretch the fishing line into the hole; you can secure it using a self-tightening knot. It is best to use not the simplest knots, but for example, tying with a Canadian figure eight, you can first practice on a rope.
A jig in which a hole is made inside. This requires more dexterity; even tightening the fishing line is more difficult here. Simple knots will do here. First, we pull the fishing line into the hole, after which we tie it tightly with simple knots and wrap the fore-end with additional fishing line so that the bait holds better. You can make five or six loops around the fore-end, after which we tighten the line well. Everything is ready, you can go fishing.
Third way. Pass the line through the hole three or four times and wrap the line around the hook several times.
to contents ^
How to tie a jig to a fishing line with an eye
With an eye, a jig can be tied to a fishing line in several ways: a simple knot, a clinch and a figure eight. Let's look at each in more detail.
Clinch
For a bait that has an eye, the “Clinch” knot is used.
The procedure is as follows:
- Take the fishing line and pass it through the eye.
- Wrap the main piece of fishing line four to five times, making sure that the very first loop is not tight.
- After completing the second step, thread the end of the fishing line through the loop.
- Tighten the knot tightly, but wet it first.
- Trim off excess.
A variant of this unit for a winter jig of the “Drop” type:
- Form a small loop from the fishing line passed through the eye and return the fishing line to the eye.
- Wrap around the forend five times.
- Insert the end of the fishing line into the resulting loop.
- Moisten and pull tightly.
- Remove excess line.
Eight
The “Eight” knot is no less popular; the procedure is as follows:
- Take a jig with a hook, the tip of which points upward, and insert a fishing line into its eye.
- Roll the line into a ring.
- Wrap part of the ring with fishing line and make several turns.
- Pull the resulting winding, i.e. end of the wound fishing line and pull the rest of it to form a figure eight.
- Pass the point of the hook through each ring of the figure eight.
- Moisten the knot and tighten.
These methods of tying jigs are not suitable for tungsten products. This is a hard metal, jigs made from it (even very high-quality ones) quickly destroy it in direct contact with the fishing line.
Mormyshka without an ear
The greatest difficulties are presented by models that do not have a ring. They have a through hole in the body of the bait. Typically, breaks occur due to the fact that the fishing line frays on the uneven edges of this hole. The problem is solved by pulling the cambric. But the hole is too narrow; simply inserting a cambric into it will not work. And this is done like this:
Now you can tie the bait. To do this, we use one of the most reliable and simple nodes:
- From the side of the hook tip, we pass the fishing line through the hole.
- We make a loop and press it with our fingers to the fore-end.
- Wrap the free end around the hook and pressed loop 7 - 10 times.
- Pass the fishing line through the loop, tighten the resulting knot well, not forgetting to wet it.
Tips for a fisherman: How to tie a jig without an eye to a fishing line - Let's take it step by step.
In this way you can quickly tie everything you need, even in the cold. It will be in the correct position, and thanks to the cambric, the line will not fray.
To tie these baits, you can use any of your usual fishing knots.
Tungsten jig
There is a way to improve a tungsten jig so that it does not fray the fishing line. You need to do the following:
- Heat an elastic PVC cambric in boiling water, stretch it to the desired diameter size and pass it through the eye of the jig.
- Fix the casing and release it beyond the edges of the countersunk hole. This way the line will be protected from chafing.
This problem can be solved in another way. To protect the line from the sharp edges of the tackle, you need to use braid.
To do this, a loop is made from a cord and fishing line, which is threaded into the hole, while the cord should protrude beyond the edges by no more than 1 mm. The cord is attached to the tackle, and the fishing line is attached to the loop made in the form of a knot. The most famous knots for tying tungsten jigs are Palomar, Trilene, Improved Clinch.
Rigging a winter fishing rod for bream with tandem jigs
In clear water, small jigs with a diameter of no more than 4 mm are used to catch bream in winter. There is a problem with additional loading, since in winter you have to catch bream in deep (from 4 meters) sections of the reservoir. Fixed pellets on the main line make the rig bulky, and this is undesirable when catching cautious fish. Even when tying small tungsten jigs, the equipment slowly sinks to the bottom, and if there is a current, it can move away from the feeding area.
Features of equipment with two jigs
To catch bream from ice, use a winter fishing rod with a nod or a float. Two small winter jigs are selected, the total weight of which ensures correct balancing of the tackle:
- In the “working” position of the gear, the deviation of the nod in relation to the line of the whip should be within 30-60 degrees;
- If a winter float fishing rod is used, then the jigs should submerge the bite alarm by 1-3 cm.
The lower jig should have more weight. When baits of the same size are used, then the lower jig can be tungsten, and the upper jig can be lead or tin. The optimal distance between baits is 15-20 cm. With a smaller distance, the jigs will be located close to one another, and this may alert the bream. If you attach the top bait at a greater distance, it will play the role of an additional sinker used to load the winter float.
Tips for beginners
It would seem that what is so difficult about tying a knot? The difficulty is in acquiring the right skills and finding the assembly diagrams that you need. The ability to tie knots varies from person to person. Some people will remember for a long time, while others will tie a knot with a very complex pattern the first time.
Correctly tied knot:
- does not unravel either under load or after removing the load;
- “does not crawl” under variable load;
- fits its purpose.
It happens that incorrectly and ineptly tied baits bring big trouble: the knot will come undone and the bait and the fish will fall off. The result is a bad mood and big problems.
Choose hooks whose sharpness should be maximum. Use products from Gamakatsu, Mustad, VMC.
It is also necessary not only to study diagrams of how to properly tie a jig to a fishing line, but also to set a goal - to fish with or without an attachment, since the choice of the type of bait depends on this decision.
In conclusion, we can say the following about jig fishing. Fishing with this winter bait is a purely Russian invention (if anyone doesn’t know). This type of fishing became very widespread after the Second World War, although people still remember that in Moscow they fished with jigs back in the 30s of the 20th century. Today this type of fishing has spread throughout the world. Professional fishermen are constantly improving old forms of jigs, creating new ones and developing improved techniques for playing with fish.
Currently, jigs have appeared that are used without a traditional ordinary attachment, the so-called “reelless”. In them, an important role is played by the “decorations” strung on the hook - various shiny and colored chains, cambrics, beads, etc., their vibrations in the water attract the attention of the fish.
Tips from an experienced fisherman:
- If you want your fishing to be productive, prepare well for it in advance: stock up on fishing line, jigs, and a rod.
- Prepare a line that is strong and strong so that it can support the weight of a large fish.
- Practice in advance how to properly attach the jig to the fishing line, tie loops and knots.
- If this is winter fishing, learn how to drill holes well.
Fishing has centuries-old traditions. Experience is passed on to both amateur fishermen and professionals. From this experience comes valuable advice that is so necessary for novice fishermen. With the development of the Internet, fishermen themselves are ready to share their individual tricks and tricks in various articles and videos. All this only contributes to the further development of such an exciting activity.
vsegdanarybalke.ru
Blitz tips
- How to increase the catchability of jigs: Some fishermen string bait on the hook to additionally attract fish. If a bare hook and a lead ball are used, then the fish begins to bite after visual detection of the bait. To attract fish with the smell of bait, the hook is equipped with bloodworms or maggots. You can use a “sandwich” of various baits attached to one hook.
- Canned corn can also be used as bait. Its smell attracts many peaceful fish.
- If the tackle is used with a bare hook , then here you can “work” on the attractiveness of the lead pellet. You can polish lead with automotive polishing pastes.
- You can paint the pellet black. During winter fishing, you can successfully catch pike perch and pike perch with this bait.
- The red cambric placed on the shank of the hook attracts predatory fish well, both in winter and during fishing in the summer months. Fish are caught especially well if the jig is constantly in motion. This twitching of the bait provokes a large number of bites.
- Good results when fishing with this tackle can be obtained if you use beads. Small beads are strung on a hook and secured to the shank. The shine, which is visible to fish in clear water for tens of meters, will help increase the catch using such bait.
- Golden jigs , which can be prepared at home, have very high catchability.
You can gild tin or lead bait; the process is carried out in 2 stages:
The product must be coated with a layer of copper
For this, the electrolytic method of applying a thin layer of metal is used. To perform this operation you will need the following materials and tools:
- Copper sulfate.
- Water.
- Sulfuric acid.
To prepare a solution for electrolytic coating, 40 g of copper sulfate is dissolved in 100 ml of distilled water. The mixture is thoroughly mixed and 2–3 ml of sulfuric acid is added. The acid must be concentrated, so it should be added to the mixture very slowly, taking precautions. Be sure to use rubber gloves and safety glasses.
The mixture is poured into a glass container and copper plates connected to the positive pole of a direct current source are lowered into it. Then a jig attached to a steel conductor is lowered into the mixture, to which the negative pole of the battery is connected. A 12 V battery can be used as a power source. After several hours, the part will be covered with a sufficient amount of copper film.
Briefly about the jig
A jig is a type of fishing tackle often used for winter fishing. In simple terms, this is a hook that is soldered into a lead or tin ball, or as it is also called, a pellet.
Mormyshka comes from the name of small freshwater crustaceans - mormysh.
Both amateur fishermen and athletes fish with jigs (Jig fishing competitions are also held). Usually, to attract fish, part of the jig, that is, the shot, has a shiny surface (bronze, gold or silver) or simply painted.
Also, sometimes dark-colored jigs bring good results.
The material from which jigs are made varies: tungsten jigs, jigs made of silver and steel, jigs are also made using luminescent materials so that they glow in the dark.
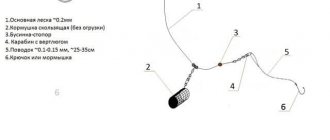
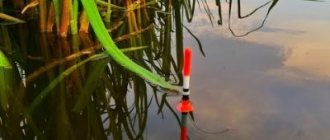
Equipment for a winter fishing rod with a float
The equipment of a winter float fishing rod is the float itself, a jig or a hook with sinkers located on the fishing line of a winter fishing rod. The equipment is built based on the fishing conditions - depth and current. There are the following options for winter float equipment:
- Winter rig with hook;
- Equipment with jig;
- Combined equipment with a hook and jig, with two jigs or hooks.
The main hook or jig is tied to the main fishing line without any leashes. An additional hook is tied above the main hook or jig using a leash. An additional jig is tied above the main one, usually without a leash - directly to the main fishing line (garland or locomotive). The jig can act as a sinker located above the hook.
Arranging a winter fishing rod is a creative endeavor. Based on the basic options, you can create your own.
Winter float fishing line
Many sources advise using a monofilament line with a diameter no thinner than 0.14 mm, in case a large fish like a large bream or crucian bites. A strange recommendation is to sacrifice the number of bites and fish caught for the opportunity to bring out a random “big fish”.
If we are purposefully catching bream or other large fish, it makes sense to use a fishing line with a diameter of 0.13 - 0.15 mm, and if we are catching, for example, small roach or silver bream, a fishing line of 0.1 - 0.12 mm is suitable. A fishing line thicker than 0.14 mm is used if you are catching really very large fish.
You can always have several winter fishing rods with fishing lines of different diameters in stock. Considering that anglers usually fish with two or more rods in holes drilled side by side, it is possible to conduct “A” “B” testing of the catchability of different equipment.
Loading the winter float
Unlike the summer float, the winter float does not have an antenna, since it does not need it, because in winter fishing, the bite is visualized from above, and not from the side.
In addition, the winter float is completely immersed in water to prevent it from freezing and freezing into the film of ice that quickly forms in the hole.
The winter float is immersed in water to a depth of 1–2 cm from the surface. The total weight of the weights and jigs should provide just such a load on the float. Fine-tuning the loading of the winter float is done by selecting the weight of an additional mini-weight.
How to tie a jig with an eye
A jig, like any other tackle, has several ways of tying it to a fishing line.
Let's consider the method of tying a jig with an eye:
- The first thing to do is thread the line from above into the eye of the jig. For further ease of installation, make the end of the fishing line long, approximately 10-15 cm.
- Now you need to make a loop of fishing line along the entire hook, and wrap the other end of the fishing line tightly around the shank.
- When you have made a sufficient number of turns, take the remaining end of the fishing line and, threading it through the loop along the hook, tighten it on both sides.
- Next, the remaining tip of the fishing line is cut off.
It is important that before tightening, be sure to moisten this section of the fishing line with water so that it becomes softer and more elastic. It is also advisable to tighten it slowly so as not to burn the line due to friction.
Some fishermen, in order to prevent the line from breaking, thread a cambric into the eye of the jig, thereby installing the equipment lasts longer.
How to tie a jig on a leash
Usually, additional jigs are attached to the leash, often in quantities of several pieces, for example, when fishing in a current. To avoid overlap, when tying, it is worth placing the leashes so that they are directed upward, towards the tip of the fishing rod.
The easiest way is to use a knot such as a counter or Flemish eight, used when tying two fishing lines. It looks like a regular figure eight, but is performed not on one fishing line, but on two. In this case, not both ends are cut, but only the downward one. Pointed upward and will be an additional leash.
How to tie two jigs
So, there is nothing difficult in installing equipment with two jigs, everything is very simple.
There are several ways to tie two jigs:
- At the beginning, take a light jig, it will be our first (upper jig) and tie it in the usual way: that is, thread the line through the hole in the jig, make a few turns around the shank of the hook and thread it back into the hole; Or tie it as written above with a loop and tighten it. The main thing is to leave the end of the fishing line about 40 cm, for tying a second, heavier jig.
- Now pass the end of the fishing line again through the hole of the first (upper jig), and at a distance of 20 - 25 cm, tie the second jig, cut off the tip of the fishing line.
Here the installation of equipment with two jigs is ready, or as fishermen also call it: “The People’s Locomotive”.
Two jigs on one line
Tying two jigs at the same time remains a rather controversial issue . Some fishermen often use this method of tying, while others claim that fish are not caught with tackle tied in this way. However, this method does exist, so it’s worth familiarizing yourself with it.
How to tie two jigs correctly:
- The first (upper) tackle must be tied using any of the previously listed methods, after leaving the end of the fishing line 35-40 cm long.
- Then we need to insert the tip of the fishing line through the hole in the tackle and wrap the jig around it.
- After this, use a knot to attach the second tackle. You can choose any node. The distance between the two jigs should be 20 cm. That's it!
Knots for jigs
So, the most common knots for jigs with an eye are Trilene, Improved clinch and Palomar. Of these three knots, the Improved clinch is the leader for jigs with an eye.
- Trilene is a very strong and reliable unit. Its reliability is ensured by the fact that a double loop passes through the eye of the jig.
- Improved clinch – the same clinch, only improved. One of the most popular and most frequently used. Designed mainly for monofilament fishing line of small diameter, since thick fishing line will be impossible to tighten. It is absolutely not suitable for braiding, as the knot begins to creep and after a short period of time the equipment will become unusable.
- Palomar - this knot is knitted quite simply, and is also used for knitting braided cords, which makes it even more attractive. This knot is used almost everywhere possible, both in winter and summer. They fit perfectly with both spinning baits and jigs (with or without an eye).
For classic, simple jigs, you can use ordinary knots, with which you, for example, tie ordinary fishing hooks to the fore-end.
It’s just that when you tie a jig, you first pull the fishing line through the entire body of the jig, and only then tighten the knot on its hook.
How to tie a tungsten jig
- Using a piece of braided fishing line. Using the main fishing line, we pull a piece of braid through the hole in the jig, as shown in the figure. Next, we take the two ends of the braid and wind it around the shank of the hook: one end clockwise, the other counterclockwise. And we tie it with a regular knot, the way you are used to usually doing it. We also tie the main line in a knot. That's it, the installation is ready.
- The second method is a little more complicated, but more advanced than the first. It is popular both among many sports fishermen and amateur fishermen. In this case, the jig is tied using PVC cambric, which is selected according to the diameter of the hole in the jig.
Nowadays, it won’t be difficult to find a cambric of the required diameter; they are available in any radio parts or power tool store. Even if you haven’t found the required diameter, because the jig holes are different, the cambric can be easily pulled out to the required diameter. Boiling water is usually used for this.
To prevent the cambric from falling out of the jig hole, it is cut a little longer so that it sticks out a little at the edges. Then they take a regular lighter and countersink the edges. A tungsten jig is tied, just like a regular fishing hook, with a regular knot.
Also read:
www.ulovanet.ru
How to properly assemble tackle with a jig and a hook for winter fishing
First we need some fishing line. It is best to use fishing line with a diameter of 0.12mm
Now we take the fishing line and thread the tip into the eye of the jig, you need to take it with a reserve. After all, at some distance from the jig we will have to have a hook. Therefore, this supply should be enough for the hook.
The next step is to tie a single knot; you need to make no more than three turns.
Next, we put a loop on the shank of the jig hook. Before tightening the knot, it is better to wet it, then it will hold more firmly. And you need to tighten the knot gradually and smoothly. We talked about how to tie a jig to a fishing line in one of our articles.
After the jig is tied to the fishing line, we should have enough tail left to tie the hook on which we will then bait the bloodworm.
The hook can be tied with any knot you like. We also talked about fishing knots in one of our articles.
I tie the hook to the fishing line as follows: we thread the tail that remains from the jig into the eye of our hook.
Next, we make a loop and press it with your finger to the shank of the hook. Then we wrap the tail around the loop five to seven times.
Then we pass the remaining tip through the loop, wet the knot and tighten it smoothly.
Our tackle is almost ready, all that remains is to get rid of the extra tails. Carefully cut off all excess.
And that’s it, the tackle with a jig and a hook for fishing in the winter is ready.
Knots for jigs with an eye
I’ll start the review of jig knots with those that are used for baits with an eye (built-in ring), of which the bulk are tungsten.
All knots for tying such jigs can be divided into three categories.
Tight knots
These include those that cover the ring and are firmly fixed to it. By the way, similar knots are used for artificial flies and eye hooks. The most famous and strong of them are “Palomar” and “Improved Clinch”.
Advantages:
- Both knots are easy to knit.
- Compact.
- As mentioned above, they turn out to be quite durable.
- The angle at which the jig hangs can be adjusted within certain limits, which allows you to experiment with jigs.
Flaws:
- Strong fixation, less freedom of movement, and therefore a somewhat rougher game (for some jigs this minus turns into a plus, for example, for a devil, which needs to be played strictly along the vertical axis).
Hard knots are recommended for use on thin fishing lines.
Loop knots
Here, nothing fixes the bait; it slides freely along the fishing line loop. Similar knots are also used for tying wobblers, some oscillating spinners and flies.
As an example, I will give the most universal knot, very popular both here and abroad - the “Non Slip Loop Knot”.
Advantages:
- Knitting is relatively simple.
- The best bait game.
Flaws:
- The knot turns out to be less strong due to the fact that the ring presses on the end of the loop, where the fishing line is bent.
- The knot is not compact enough, thanks to it the bait can visually increase slightly in size. In the wilderness, this nuance is definitely worth taking into account.
- The bait cannot be given an arbitrary orientation in space - it always hangs at an angle at which balance is maintained. However, this shortcoming is more than compensated by the impeccable performance of the jig.
Loop knots are unrivaled on reelless rigs.
"Hook" knots
They can be considered a compromise between hard knots and loops. Here, only the fishing line is threaded into the ring, and the knot itself is tightened onto the shank of the hook. At the same time, the strength is somewhat inferior to a rigid knot (the line rests against the ring), but it is noticeably higher than on a loop. The game of the bait turns out to be quite high quality. Statistics have shown that experienced fishermen without rewinders like to tie a jig using the “hook” method.
By the way, similar knots are also used to tie a jig without an eye - with a hole, so we will look at them in the next chapter.
Knots for jigs with a hole
Instead of a ring, a lead jig has a hole through which the fishing line is threaded, so the only sure way to tie it is by the shank of the hook. From time immemorial, the same knots have been used for this as for a traditional forged hook.
Classic way
In past centuries, a hook was tied in the following way: the fishing line was placed on the shoulder blade, stretched along the fore-end to the bend, then rewound back, forming a loop, made several turns around itself and the fore-end to the shoulder blade, after which its free end was pulled through the loop and the knot was tightened. By the way, this knot is called “Easy Snell Knot” abroad, which means “simple driving knot.”
This knot was so good that when the first eye hooks appeared, it was also used “out of habit” for tying them. Then they began to use it for jigs, but not immediately, namely at the time when they acquired their modern appearance.
However, over time it was supplanted by another - a more advanced and durable unit.
The best knot for a jig with a hole
It's called "spindle". And it deserves not just a picture, but a small “cartoon”.
Advantages:
- Ultra-high strength. So much so that when using this unit, breaks often occur in those places where the fishing line rubs against the rod rings.
- Good bait game.
- Compactness.
Flaws:
- Some difficulty in tying. It’s not easy to tinker with thin fishing line and small bait in the field, especially in the cold, when your fingers get cold and stop listening. And it’s clear that you have to remove all the “jewelry” from a reelless jig, otherwise tying a knot will be extremely tedious.
- The knot takes up some part of the hook. For moth baits this drawback is not significant, but for mothless baits with beads it may be undesirable. You can forget about it, but only if the diameter of the hole in the beads is larger than the diameter of the knot. However, if it is smaller, then the beads will bounce off the knot when played and will no longer be able to “clink” against the body of the bait and attract fish with sound. If the diameters of the hole in the bait and the knot are more or less the same, then sooner or later the beads will get stuck on the knot, causing the bait to stop playing normally altogether.
The hole is like an ear
From time to time on fishing forums there are messages about attempts to tie a jig as if the hole were an eye. That is, a knot is formed on the fishing line, tightly encircling the jig with a loop (in “tungsten frames” with a wide hole, the knot is generally hidden inside the jig). Moreover, this is offered not only by novice fishermen, but also by fairly experienced fishermen.
I will say this - this method has the right to be used, but not everywhere, but only where you can’t do without it. For example, in order to tie a specific “fly jig” to a fishing line, which has a small soldered head with a hole, and almost the entire fore-end is occupied by dabbing (although, if you get used to it, you can tie a knot on the hook here too).
As for the specific knot, you can use any one used for baits with an eye.
By the way, you can tie any other jig this way, in which the hole is located closer to the side that is opposite the hook. There should be the same amount or more to the sides, but no less, otherwise the loop will not lie along the axis of symmetry and then there will be no point in tying it like that - this will be especially noticeable on jigs like “rice”, “ovinka”, etc.
Subtleties of tying tungsten jigs with a hole
Typically, tungsten jigs are equipped with a ring. However, some of these baits sold in fishing shops may have a hole. It’s clear that any fisherman, without hesitation, will tie such a jig in the classic way.
However, it often happens that the hole is not processed enough at the factory - it remains with sharp edges, which lead to breakage during fishing.
With a lead jig, everything is simple here - we can “bore away” the burrs at any time with any thin and sharp object like an ordinary needle. With tungsten, this trick will not work at home - it is so hard that industrial equipment will be required.
The fishermen found two ways out of this situation.
Cambric
The easiest way to protect the fishing line from a sharp edge is to thread a piece of cambric into the hole, the length of which is slightly greater than the thickness of the jig, so that its ends stick out slightly on both sides. It will be very useful to fix the cambric with glue (if, of course, it does not sit tightly in the hole).
Next, the fishing line is threaded into the cambric and tied in the usual way.
Artificial ring
Unlike “monofilament”, braided line is much more resistant to abrasion (I know for sure that some fishermen do not shy away from making leashes out of it for catching pike, which are enough for a certain number of bites), therefore this line is not afraid of an insufficiently flared edge of the jig hole.
People got excited about making an artificial ring out of braided wire.
- We pull the double-folded monofilament line (blue) into the hole, and use it to hook up the braided line (green), then pull it into the hole until a small loop appears on top.
- We fix the free ends of the braid on the fore-end with a simple knot, and at the same time tighten it.
- We knit another knot with the ends of the braid, but on the opposite side of the forearm.
- We make another knot on the braided line - on the same side of the fore-end - thanks to which the previous one will not come undone. The ring is ready. Now you can knit any knot for a jig with an eye using monofilament fishing line (see the corresponding chapter above).
Something about double and triple pulling
Some fishing literature mentions a tying method in which the fishing line is pulled into the hole two or more times, while looping around the body of the jig. It is quite obvious that this is not possible with all baits, but only with those whose hole diameter is several times larger than the thickness of the fishing line.
The point of this method is supposedly to better fix the jig on the fishing line, they say - this way it can be given an ideal horizontal position, even though its center of gravity will be shifted far to the side.
I believe that this practice is not justified, because the extra loops make the whole structure too cumbersome. If the hole is really wide, then it is better to insert a piece of cambric into it. This way, the line will not “slip”, and there will be additional protection against chafing at the edge of the hole.
Well, then - I really don’t want to trust a simple knot that, with a good pull, can come undone - no matter how tightly it is tied.
Tying with a stopper knot
References to this method can be found in some literary sources. Its principle is this: the jig is not tied to a hook. Moreover, it does not attach to the fishing line at all. Simply thread the fishing line into the hole, then tie a locking knot on it, which prevents the jig from slipping. It's funny, isn't it?
Advantages:
- Knitting is very simple, and most importantly - fast.
- The line does not touch the hook at all, which is very useful for baitless baitfish.
Flaws:
- Poor fixation of the jig on the fishing line - now it is able to slide up along it, which to some extent can worsen the game of the reelless jig. For bloodworm baits, this drawback is not significant.
- If the hole is not narrow enough, when fishing for a large trophy, the knot may become deformed and slip through, as a result the bait will be lost.
Double jig
Double jig
There is also a double jig, which is used for catching large predatory fish, for example, large pike and even large perch, but mainly with its help they hunt for pike. Therefore, those who want to have a larger winter catch often have a question: how to tie 2 jigs at the same time? Many fishermen use exactly two jigs for reliability. So, basically, the first part of the double jig is heavier, and the second is lighter, which is attached 15 or 20 centimeters higher from the first.
Sometimes a second lighter jig is attached using a separate leash, the length of which is 2-5 centimeters. The most important rule is to knit the knots tightly and well, the technique is the same as with one jig, you can knit with any convenient knot. The difference is that you will need to attach two jigs, one of which is an additional bait. How exactly to tie 2 jigs at the same time is up to you, you can use any convenient methods, the main thing is that it is convenient. Let’s say that fishing with two jigs is more convenient, but still, cliffs here are no exception. In addition, we advise you to see how to tie two jigs at once in the photo. Experienced fishermen call the double jig a “locomotive”.
The methods of tying a jig with a train can be different, with or without wiring, but the main condition is to attach each jig at a distance of 15-20 centimeters from each other; beads can be attached to the upper and lighter one to attract fish. The bait is attached to the lower jig, which is heavier. So choose the most convenient method for you, the main thing is to have a good catch!
to contents ^
An alternative “hook” method of tying both types of jigs
Any jig - be it a tungsten jig with an eye, or a lead jig with a hole - can be tied to the hook without forming a knot completely on the fore-end, but only by fixing it there. The result is a kind of alternative to the classic leader knot and “spindle”.
Advantages:
- It is noticeably easier to knit than a knot on a hook, this is especially noticeable on reelless jigs with bait. And especially in field conditions, where this unit is usually in demand.
- In fact, it does not take up any space on the forend, which is very good for reelless rifles with refills. This knot has virtually no effect on the movement of the beads.
Flaws:
- The strength of the knot is inferior to the classic one, because the coil with which it is fixed to the fore-end experiences maximum loads.
Adviсe
- When tying a knot, the fishing line should be moistened with water or saliva . This will provide it with lubrication, which will cause it to tighten more tightly and form more firmly. In addition, the liquid will cool the rubbing outer surfaces of the fishing line, which, by the way, at the moment of tightening for milliseconds heat up to considerable temperatures - this is quite enough for the material of the fishing line to deteriorate.
- If you want to make the knot super-strong, then first let it dry, and then you can drop a tiny drop of superglue , which will immediately be absorbed and harden. Such a knot is much more difficult to break, and it certainly will not come undone. True, with thin fishing lines and small jigs, this adventure requires a jewelry approach.
- The free end of the fishing line sticking out from the knot should be cut short, and then melted until a “ball” is formed . This will make it somewhat more difficult to involuntarily untie the knot, and now the fish will not be able to prick itself on the fishing line when biting.
Tools and devices designed to help tie a jig
I believe that even a novice fisherman can tie a jig without any equipment. However, some of the following list can sometimes be very useful.
- Thin pin with an eye . With its help, you can clear the hole of the jig from paint, and to some extent, roll it up so that there is no sharp edge. In addition, it is useful for untying old knots when changing jigs, or for unraveling fishing line.
- Syringe needle . It can very efficiently “erase” the sharp edge of the jig hole, and it also helps out if the jig hole cannot be cleaned with a pin.
- The smallest feather holder from a fly fishing kit . Can be useful when tying a knot on a jig hook. True, seasoned fishermen who know a lot about tying jigs and have trained their hands do everything with their fingers.
- Stationery knife (or other sharp blade) . With its help, you can quickly cut off the old knot from the jig. It also makes sense for them to cut rings from cambric to secure the attachment of a reelless jig. It can also be useful for removing paint from the jig from the shank of the hook.
- Miniature scissors . They are indispensable when tying any knots in general; with their help, excess fishing line is quickly and efficiently cut off. For cutting cambric rings they are worse suited than a stationery knife, because they crush the material during the cutting process and deform the rings. Then there may be some difficulties with putting them on the hook.
- Lighter . Necessary for melting the free end of the fishing line.
urochishe.ru
A way to tie a jig with an eye
Each jig has its own purpose, therefore it differs in weight, shape and color. Every angler should have a whole set of such baits. The weight of the bait is selected depending on how fast the current is in the fishing area and the depth of the reservoir in this place. As for the color and shape of the bait, fish can bite on any jig. At the same time, it should be borne in mind that it doesn’t happen every time and the fish bites today on one type of bait of a certain color, and the next time it can simply ignore the same jigs, preferring a completely different shape and a different color.
The color of the jig or its shade is selected based on certain natural factors, such as the presence of sunlight and the color of the bottom of the reservoir. On a bright day and at shallow depths, darker models are suitable. If the bottom in the fishing area is light (sandy), then darker shades should be used here as well. In conditions where the weather is cloudy and rainy outside, preference should be given to lighter specimens.
Several fastening methods have been invented for attaching jigs.
If the jig has an eye, the knitting process is somewhat simplified. For example:
- The fishing line is threaded through the eye, after which a loop is formed. For ease of knitting, the threaded end of the fishing line should be long.
- The loop is laid parallel to the hook, after which the free (long) end is wrapped around the hook.
- After several turns (about six), the end of the fishing line is threaded into the laid loop, after which everything is tightened on both sides.
- Finally, all excess is cut off so that it does not interfere.
To prevent the fishing line from fraying during use, a cambric is placed on the ring. Before tightening the knot, the fishing line must be moistened with water (saliva) so that it does not lose strength.
As a rule, the jig is attached to the fishing line at an angle of 45, 90 or 180 degrees, so you should always remember this.
How to tie a jig to a fishing line
The method of tying a jig to a fishing line depends on the design of the jig itself. If the jig has a fastening ring, then there shouldn’t be any problems. But there are jigs in which there is no ring, but there is a hole in the body of the jig, which serves to attach the jig to the fishing line.
As a rule, such baits are tied in one way - with a noose. At the same time, you need to monitor how the bait is balanced or at what angle it is tied.
Method of knitting jigs with a train
Jigs tied with a “train” are always more catchy. It's connected:
- with the fact that it is possible to use baits that differ in both color and size;
- with the opportunity to demonstrate different game of baits;
- with increased attention of the fish to two objects at once. At the same time, the jigs should not be placed close to one another. As a rule, they are located at a distance of 25-30 cm.
The lower jig may have slightly more weight, but the upper one can be attached both rigidly and movably. The movements of the upper jig are limited by two beads fixed at a certain distance from one another. At the same time, you can adjust the gap, which determines the movement of the upper jig.
First of all, the top bait is tied. This is done very simply, using a loop that is inserted into the ring of the jig. After this, the bait is passed through the same loop and tightened.
Then the bottom bait is tied. How to tie the lower jig has already been mentioned in this article. Despite this, every angler has every right to attach jigs in his own way. The main thing is that the knot is reliable and cannot come undone during the fishing process.
After the two jigs are secured, we can say that the “locomotive” is ready for use.
How to tie braided fishing line to a leash?
Step-by-step knitting of a leash to a “Stren” type braid:
- The braid and leash are folded overlapping, after which the leash end is taken and a loop of a universal knot is formed from it.
- The end of the leash is made several turns around the braid. The number of turns depends on the size of the fish that is supposed to be caught.
- After this, take a leash with braided wire and tighten the knot.
- After this, a clinch is made around the resulting knot, which is also fixed. To do this, again the leash and braid are pulled in different directions.
It should be noted that using braid for fishing in winter is somewhat problematic, since it is afraid of low temperatures and quickly freezes, which is not entirely convenient.
We tie a jig with an eye
If you choose such a nozzle, then you are given two ways to tie the jig to the fishing line. It is worth distinguishing between methods of tying a jig for fishing with and without bloodworms. For bait fishing, the process looks like this:
- First you need to thread the fishing line into the ring of the jig.
- Wrap the working end of the fishing line around the hook 6-7 times, so that a loop is formed near the ring.
- Thread the working end of the fishing line through this loop.
- Grasp the main line and tighten the knot.
This method of tying a jig to the line of a winter fishing rod guarantees the vertical position of the hook tip. This position of the jig in the water is most suitable for bait fishing. But how to tie a jig to a winter fishing rod for fishing without bloodworms? Rewinders are tied in the following sequence:
- The line is pulled through the eye on the jig.
- Now you need to fold the working end in half.
- Attach the resulting loop to the shank of the hook.
- Wrap the free end of the fishing line around this loop about 6 times.
- Pull the end of the line through the resulting loop and tighten.
This method of fastening allows you to ensure that the jig is positioned at an angle of 45 degrees to the fishing line. It is this position that is considered optimal when fishing with reelless jigs, and many fishermen do not know how to achieve it.
The primary parameters for the knots for winter fishing are dictated by the fishing criteria. If in the warm season nothing prevents you from calmly wrapping the torn tackle, then in the winter it is more problematic to do all this due to the cold and wind. The knots for equipping winter fishing rods are strong and simple. They communicate quickly, but this will require a little practice.
Knots for tying jigs
Nodes for attaching artificial baits:
Figure Eight Knot
How to knit the Figure Eight knot:
- The hook is positioned so that the tip points upward, after which the fishing line is threaded through the eye.
- A loop is formed at the end of the fishing line.
- The loop is wrapped in one place several times.
- After this, a figure eight is formed from the loop. To do this, the end of the fishing line and its other part are pulled in different directions.
- Finally, the point of the hook (bait) is passed through each half of the figure eight and tightened.
Clinch Knot
“Clinch” is tied behind the eye of the jig:
- The end of the fishing line is threaded through the eye, after which two ends of the fishing line are obtained: one end is the end of the fishing line, and the other end is the main fishing line of the tackle.
- With the end of the fishing line, in the opposite direction, several turns are made around the shank of the hook and fishing line.
- After making 5-6 turns, the end of the fishing line returns and is threaded into the resulting loop.
- After threading the fishing line into the first loop, a second loop is formed, into which the same end of the fishing line is threaded.
- Finally, the knot is tightened.
Simple knot
How to knit a simple knot:
- The end of the main line is passed through a hole made in the body of the jig.
- After this, a regular fly fishing loop is formed.
- Inside the loop, with the second end of the fishing line, several turns are made.
- Then the knot is tightened, and the tackle moves along the line to the knot.
Double slip knot
To do this, you should perform the following operations:
- The line is passed through the hole in the nozzle.
- A spiral loop of several turns is formed from the fishing line.
- This spiral tightens a little.
- The bottom, largest loop is put on the hook.
- After this, they begin to tighten the knot.
Tying two jigs
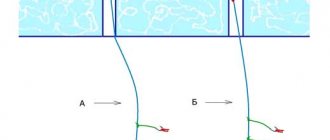
Scheme for attaching two jigs
The scheme for tying two jigs can also be organized on a leash with a jig attached to the main line, however, you can fix the second jig and higher directly on the main line, as can be seen in Figure 1 .
Successful fishing with a winter rod and during summer vertical fishing !
The only difference in this method is that the ends, pulled into the hole of the rewinder, are not wrapped around the forend. A locking unit is made, which, together with the tips, is melted with a soldering iron, a heated knife or a screwdriver.
Let's look at the most popular knots: regular fisherman's knot, Palomar, clinch, surgical loop, double surgical loop (figure eight).
Regular fishing knot
- 10-15 cm of fishing line is threaded through the ring.
- Fold the threaded line into a loop and press it with two fingers to the fore-end.
- Wind the remaining free end of the fishing line around the forearm and loop from the base of the body to the sting several (4-6) times.
- The tip is threaded through the loop and gently tightened on both sides.
- The excess end is cut off with a knife or scissors.
How to knit "Palomar"?
- 20 cm of fishing line is folded in half.
- Thread the folded fishing line through the eyelet.
- Make a loop.
- Thread a loop through the jig.
- Tighten and trim the tip.
How to knit “Clinch”?
- A 15-20 cm fishing line is passed through the eye.
- Wrap in the opposite direction several times (4-6).
- The tip of the fishing line is passed through the loop near the eye.
- Tighten and trim the tip.
Double surgical loop (figure of eight)
- Pass a 15-20 cm fishing line through the eye.
- Make a loop from fishing line.
- Pass the fishing line through the resulting loop twice.
- Pull the loop until you get a figure eight.
- Thread a jig through two loops from the figure eight and tighten.
- Cut off the ends.
Cloudflare Ray ID: 63a9cb3e2afd10ad • Your IP: 195.64.208.251 • Performance & security by Cloudflare
- First you need to thread the fishing line into the ring of the jig.
- Wrap the working end of the fishing line around the hook 6-7 times, so that a loop is formed near the ring.
- Thread the working end of the fishing line through this loop.
- Grasp the main line and tighten the knot.