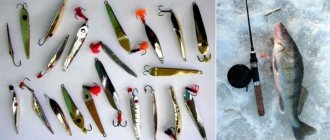
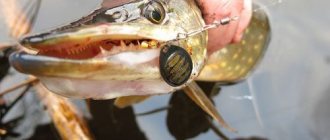
Some fishermen prefer to make fishing lures with their own hands, and this is not surprising, because this way you can save money, have fun and try to bring your own ideas to life. In the article we will look at how to make some basic spinners used in summer and winter for catching fish such as pike, perch, and pike perch. To complete the task, practically no purchased materials will be needed; for the most part, improvised means will be used.
Benefits of DIY
To begin with, let’s note a number of positive aspects that accompany self-production:
- ease of creating bait;
- minimal cash expenses - the process is almost entirely based on the use of unnecessary materials that are available in every fisherman’s home;
- the process is limited only by imagination, which allows you to try various techniques that have not yet been used in mass production;
- it takes a minimum of time to work;
- The number of created baits is not limited, which means there is no need to be afraid of losing them.
With the proper approach, you can get a spinner that will not be inferior, and in a certain sense even superior to the serial versions. You should start studying the process by making a universal model suitable for any fishing conditions.
How to make a universal spinner with your own hands
The option, which can be used in any conditions, is called “Torpedka”. The bait is capable of diving strictly vertically under water and playing with minimal movements.
For manufacturing you will need the following materials:
- sheet metal, preferably stainless steel;
- small diameter wire (should not rust) or guitar string;
- swivels (2 pcs);
- paste GOI;
- winding rings.
When everything is ready, you can start production. It includes the following steps:
- Creating a template and transferring it to a sheet of metal. It is recommended to first draw the template on cardboard and then trace it onto the aluminum. You need to cut carefully to avoid the appearance of sharp jagged edges. The simplest form you can use is a tablespoon.
- Folding the workpiece in half. You should end up with two identical parts arranged symmetrically.
- Processing irregularities with sandpaper or a file.
- Soldering a fastener consisting of two swivels connected with wire. In order for the solder to stick to the aluminum better, the latter needs to be sanded with coarse sandpaper.
- The workpiece is filled with solder. After hardening, it is polished with GOI paste. If desired, one of the sides can be painted in the color of copper or gold.
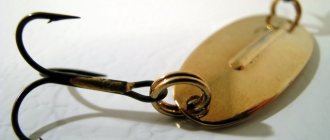
This completes the main part of the production. All that remains is to hang the treble hook on a loop and decorate it with multi-colored cambrics to attract the attention of the fish.
About a homemade fishing product from a spoon
Judging by numerous reviews, some fishermen do not use branded lures and fish using “homemade” ones. It’s not difficult to make a lure for an asp with your own hands. According to home craftsmen, fairly catchable baits are obtained from ordinary teaspoons. You can make a spinner as follows:
- Saw off the handle of the spoon.
- At the cutting point, drill a hole, the diameter of which should not exceed 0.2 cm. Equip the workpiece with a similar hole on the other edge.
- Attach a swivel and carabiner to the upper hole, and a treble hook to the lower hole using the winding ring.
- Polish the workpiece thoroughly.
In the water column, the “homemade” fish performs an attractive game during the retrieve, provoking the asp to attack.
Do-it-yourself spinner for pike
Predatory fish live in water jungles, and catching them from there is very difficult. With every bait cast, there is a risk of getting caught in algae, snags and other debris hidden under the water. As a result, this will lead to the loss of an expensive spoon, and possibly the disruption of the entire fishing trip. To prevent this from happening, experienced fishermen use a “non-snag” spinner, the hooks of which are covered with wire.
Necessary materials:
- Cheap spinner spoon.
- Hook with one point.
- Screw with washer and nut (2 pcs). The best option would be rivets, if they are available, of course.
- Weight weighing 1 g.
- Steel wire.
Sequence of work:
- Two holes are drilled in the spoon: the first for the covering antennae (almost at the very top), the second for attaching the hook (measured so that the tip of the fixed hook is located at the level of the edge of the spoon).
- Taking into account the weight of the hook, you should install a small weight cast from lead on the opposite side of the spoon. The metal is melted and poured in the form of a drop; a hole with a diameter of 2 mm is drilled in its center.
- The wire is bent in half. At the bend, a ring is created into which the screw will be threaded.
- The homemade lure for pike is almost ready, all that remains is to secure all the elements in place:
- The hook is threaded into the factory hole where the tee used to be located. The rounding on its upper part is matched with the previously drilled hole, then a bolt is inserted there. A washer is inserted on the reverse side and the nut is tightened.
- The wire antennae are attached to the second drilled hole. On the reverse side, a weight is placed on the bolt and the nut is tightened.
- Excess length of screws is cut off if necessary. The edges are filed or sealed with solder. If rivets are used, they only need to be flattened.
The spinner is ready. Now you can take nail polish of different colors and apply attack points.
DIY loko spinner
You can make almost any spinner with your own hands. There are plenty of available materials for this: dessert spoons, metal plates and even coins. Let's look at some of the simplest options for creating the main types of spinners.
A unique version of a spinner with a propeller, or as it is also called, a spinner. This species attracts fish very well with its noise. Experienced fishermen say that this is an excellent option for a homemade spoon for pike perch.
What do you need:
- Thin wire or paper clip;
- Tee;
- A metal plate (optionally, a lid from a tin can);
- Beads;
- File;
- Ballpoint pen refill;
- Drill for metal.
Manufacturing process:
- First of all, we make a petal propeller. We draw a template on cardboard, cut it out and apply it to the lid of a tin can, tracing it along the contour.
- Using metal scissors, cut out the blank.
- Take a file and process the edges.
- For the wire axis, we drill two holes at the top and bottom of the future propeller.
- Bend surfaces with holes to one side at an angle of 90 degrees.
- The next step is to attach the tee to the core.
- The next step is to assemble the propeller. We put a bead on the wire, then the propeller itself, and don’t forget to insert a rod from the handle that was previously cut to the required length, and put another bead on top.
- Next, using pliers, we bend our plate, giving our propeller its shape.
Oscillating spinners from a spoon
“Spoons” or oscillating spoons are a special type of metal bait made of a curved metal plate to which a hook is attached. The store sells a great variety of them, in various shapes and colors. However, we are not looking for easy ways, and today we will find out whether it is possible to make such a spinner yourself, what is needed for this, and how much time it will take.
After reading fishing forums and talking with professionals in this matter, we identified the easiest way to make a spoon at home - from an ordinary metal spoon.
The main thing here is to decide for yourself what size you need. Some people use the dining room, others the dessert room. The dining room is for hunting large trophies, the dessert room is for relatively small predators.
What do you need:
- Metal spoon;
- Balgarka or file;
- Metal drill;
- Winding rings.
- We prepare all the tools and ask my wife for a metal spoon.
- Use a grinder or a file to cut off the handle from the scoop.
- Drill two holes at the top and bottom. One for attaching a leash or fishing line. The second is for attaching the hook. Insert the winding rings.
- If desired, we sand the resulting lure or paint it in any color you like.
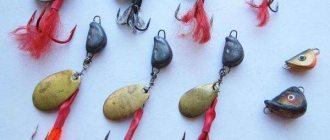
Rotating spoons from scrap materials
This type of spinner consists of two elements - a petal, thanks to which the spinner rotates, and a core, on which the petal and hook are attached. When animated by a spinning rod, the petal rotates around the core, and the fish pays attention to the bait. Let's look at the two simplest options for making such rotators.
Option #1. What do you need:
- Metal plate;
- Metal scissors;
- Metal drill;
- Bearing ball;
- Lead base for mold;
- Hammer;
- Beads;
- Wire with a diameter of 0.6 mm - 0.8 mm.
- We take a metal plate and cut out a blank of the required length and width. We drill one hole in the upper part of the future petal.
- We take a ball from a bearing of the required diameter, place it on the surface of a lead blank, and, using a hammer, knock out the sphere.
- We place our petal into the resulting sphere, press it with the same ball from the bearing and hit it with a hammer. The metal plate becomes curved.
- Sand until shiny.
- You can give the petal facets. To do this, we place it on the same ball from the bearing, and tapping the petal with a hammer, we get edges.
- We take the wire, mount the winding ring on one edge, and attach a tee to it. Next, we put a sinker and 1 bead on it. Then we mount our petal through a clamp, or directly through a pre-drilled hole. We bend the wire.
We suggest you read: How to plant onions before winter in Siberia
Option No. 2
This method of making rotating spinners with your own hands is very original. As we managed to find out, this bait works great for perch, which is not whimsical and attacks almost everything that moves under water.
What do you need:
- Metal plug;
- Old spinner spoon;
- Lead balls;
- Pliers.
- We take the old “rotator” and remove the load from it. Use pliers to roll up the beer cap so that you can put lead balls inside it.
- We reassemble the spoon, leaving space between the tee and the petal for the beer cap.
- We put the resulting structure onto the core of the spinner, and squeeze the plug all the way. We put balls inside. “Close” the plug with pliers. The main thing is not to overdo it - the balls should dangle freely inside.
- The noise bait made from scrap material is ready.
Metal tube spoon
An interesting option, which is the fastest of all listed in terms of time. Such spoons are made in two variations.
Option #1. We cut the metal tube of the required diameter at different angles. We process and polish the future lure. Drill two holes from different ends. One for attaching a fishing line or leash, the second for attaching a tee.
Option #2. The same principle, but there are several tubes that are connected through winding rings. The result is a composite spinner, like a mandula. The bends of such a spoon make it almost indistinguishable from the movements of a live fish.
Vibrating spinner made of coins
An interesting way to make it, especially if you have a lot of small items accumulated at home. However, before you start creating a bait, you need to decide how many coins you will use. Their number affects not only the bait’s action, but also its shape. For example, you can use three coins in a row of the same denomination.
https://www.youtube.com/watch?v=6X4qZ8_Awsk
What do you need:
- Coins;
- Drill;
- Small metal drill;
- Four winding rings;
- Tee.
- In each of the coins we drill two holes next to the edge, opposite each other.
- Next, using sandpaper, sand the coins until shiny on both sides. A bait that sparkles under water is more interesting to a predator than a simple, dull one.
- We connect all three coins with winding rings.
- We attach a tee to either end of the resulting snake. The spinner is ready.
- Other
- Agriculture
- Tubers
- Fruit
- Nature
- Plants
Source: https://peschanoepans.ru/blesna-loko-svoimi-rukami/
The most catchy spoon
Once upon a time I literally prayed for “branded” baits and thought that it couldn’t get any better. However, with age, I began to understand that even today’s ideal can be improved tomorrow.
After all, there is no absolute bait that is suitable always and everywhere. Each spoon is created for its own fish, its own fishing, its own depth - and for these conditions it can be ideal (although even here different colors will make a noticeable difference in the bite).
Therefore, it is always useful to remember that a good spinner is the one that best suits today's fishing conditions.
I remember an anecdotal incident when three “packed” spinners arrived at a pond where, as they were told, “there are a lot of pike!” They catch one hour, the second - empty. They played it, they think. But a local guy comes and starts dragging kilogram pike onto a rusty spoon.
How??? Why???
It turned out that only decent pikes and sleepers live in this pond. And the local “toothy” one was so accustomed to slowly swimming dark prey that it did not even react to any shiny “toys”. And our branded spinners were also generously covered with the newly appeared “flex”.
I had to urgently rip off the stickers and “smoke” the vibrators over a fire. Only then did we start getting bites.
So which spoon is the most catchy?
Homemade spinner spoons – is it necessary to “reinvent the wheel”?
I'm actually a big fan of DIYs. And the village grandfather had his own spinner, ideally adapted to local conditions. True, already on the neighboring river it was useless.
But making an oscillating spoon yourself is not easy - and, perhaps, it is not necessary. But choosing the most successful samples and, if necessary, modifying them to suit local conditions is within the power of everyone.
The most catchy do-it-yourself oscillating spoon
When buying an oscillating spoon, you must first evaluate the body of the bait itself. Everything else is easy to replace. You can only take blanks from craftsmen and equip them yourself. By the way, it is much easier to work with such blanks, because they are usually stamped from sheet brass and are subsequently easily processed.
DIY cicada spinner
To make such a spinner you will need sheet metal. Stainless steel is often used, but you can use any other that is thin (0.5-0.8 mm), light and at the same time durable. It should be mentioned that not all stainless steel is soldered. Galvanized steel works well.
|
In this example, the cicada will be made in the form of a small fish. A pre-prepared template is used for marking. After marking on the sheet, the part is cut out with metal scissors. You can make several spinners at once.
Further making of spinners with your own hands includes the following steps:
- The workpiece is given a concave shape. To do this, take a hammer with a rounded head or a 6 mm thick matrix. If a hammer is used to give the shape, then the cut piece of metal is located at the end of the wooden beam; if it is a matrix, rubber is placed under the workpiece, and a recess is tapped on the matrix.
- The loaded part is soldered. A soldering iron with a power of 60-100 W and tin solder will do. In the case of an oxidized metal surface, only the soldering area is cleaned; this limits the area where the solder spreads. On bare metal, the borders are covered with masking tape. When soldering the second side, you must ensure that the first does not melt. You can also solder the bottom tee at this stage.
- The irregularities are cleaned up and a streamlined shape is given. Coarse sandpaper is used for painting, fine sandpaper for polishing.
- The location for attaching the carabiner is marked. It should be located strictly in the center of the top of the bait. To determine it, the spoon is taken with tweezers with sharp edges. When the first hole is drilled, 2.5 mm are retreated from it in both directions and two more similar ones are drilled. This is done so that when suspended from the front hole, the bait plays less actively, and when suspended from the back hole, it plays more actively.
The spoon is ready, all that remains is to paint it and hang the hooks. It is used at great depths from 8 meters. The length was approximately 6.5 cm, weight - 25 g.
DIY hard drive emery
Greetings, Samodelkins!
Today we will continue the topic of recycling hard drives and try to make sandpaper for sharpening soft hardware.
We quickly disassemble the hard drive, leaving only the motor attached to the case.
Next, we will need the cheapest control board, these are sold on Aliexpress (you will find the link in the description under the author’s video).
There are more compact models, but I stupidly burned the one I had. To attach the sandpaper, we buy at a hardware store a sanding attachment for a drill with Velcro, and the sandpaper itself with a Velcro mating part.
Then you need to tear off the fabric with hooks from the nozzle. To do this, pick up the edge with a knife and tear it off.
I think the theme at work here is that the cheaper the drill attachment, the easier it will be to peel off the Velcro. Next, we outline the disk in order to cut out the Velcro as accurately as possible.
I think there is no point in pressing the sandpaper with a pressure ring, so we widen the hole.
Amazing! Now we prepare sandpaper circles using the same principle.
By the way, one of my relatives told me that you can sharpen scissors by cutting sandpaper with them. What do you think, is this true or bullshit?
Now you need to attach the Velcro to the disk. I will be gluing with Moment glue, so let's sand and roughen the surface as much as possible on a smooth and hard disc. Then we apply glue to the surface and glue the parts together, pressing them tightly against each other for a while.
Depending on the design of the disk, we assemble everything so that the pancake is pressed. Well, actually, we immediately see the problem, the body makes it difficult to sharpen, for example, scissors.
Let's saw it off. As a result, we will get an even square with a side of 10 cm. The body is aluminum, sawing with a regular hacksaw is very easy.
I think it would be cool to add a housing for all this mess. A 10 by 10 cm distribution box was very suitable for this - just perfect.
There are flatter distribution boxes, but unfortunately I have run out of them. The controller board almost fits into the case and there is room for a 12-volt power supply. More precisely for its filling.
We disassemble the power supply housing. Probably the cunning Chinese hid the screw under a sticker.
But no - well, that means latches.
Whoa! Look, the Chinese “glued” the board with double-sided tape:
I want to make everything cool, so we cut it clearly here and a little more here:
We take all dimensions and drill the body.
We attach the board with double-sided tape and connect everything.
3, 2, 1 - nothing banged, the LED lit up - and that’s good.
We connect the hard drive motor according to this diagram:
More details about the connection nuances and the motor circuit were described in the video about starting the motor from a hard drive, but I think they are all typical. We bring the wires out through the cover and everything works.
In that same video, I showed that this module has unstable operation at the maximum position of the twist and needs to be set to about 90 - 95 percent.
The direction of rotation, by the way, is not where I wanted it to be. But this can be changed. To do this, you can swap the two control wires to the motor, but the controller on the board has a switch, which you will agree is very convenient.
Oh, just what we need. By the way, there is no need to tighten the pancake too much, since, if you didn’t know, it is ceramic and may simply burst.
For the same reason, it cannot be heavily loaded in the transverse direction. So for strength, you can attach two pancakes instead of one.
Next you need to make the fastening. We will need some kind of plastic, for example, from the lid of a food container. From it we make these parts with a hole with a diameter of 3 mm and assemble everything.
Well, that’s all, our grinder from the hard drive is ready.
All that remains is to glue the sandpaper and you can start grinding. In general, if you have several discs, you can stick the sandpaper directly onto the disc, and then the surface will be just perfectly flat, because the Velcro still gives some unevenness. As I already said and showed in the video with tests of these motors, they have very little power. The motor can be stopped even by simply pressing the nail firmly, but if the pressure is maintained, it is very possible to work.
The drills sharpen absolutely wonderfully, the metal is literally eaten away.
But sharpening something more massive becomes problematic. All that can be done is to bring the cutting edge to the sharpness of the blade, especially if you use very fine sandpaper.
It makes no sense to break, buy magnets and re-glue them. It’s cheaper to just go and buy a normal motor for model aircraft. Well, the second, partially solvable problem is the winding.
It is thin and can be rewound with a thicker wire if desired. The current will be higher - the motor will be more powerful. But I couldn’t remove the stator with the coils without trying to hook it. It is also quite fragile and begins to delaminate. In general, in our time it is simply unprofitable to remake these motors, so that’s all for today.
Thank you for attention. See you again!
Video:
Source
Become the author of the site, publish your own articles, descriptions of homemade products and pay for the text. Read more here.
DIY spinner spinner
Loading …
Let's imagine design options that will be easy to make even for an inexperienced fisherman. The procedure includes the following steps:
- A petal-shaped blank is cut out of sheet metal. A hole is drilled in it for the location of the clamp.
- Using a bearing ball, the workpiece is given a curved shape.
- Now the metal surface is polished using a special attachment for a drill or screwdriver.
- The diamond edge version is manufactured using the same bearing ball. The workpiece is placed on top and struck with a hammer. Each hit creates one edge.
- Pre-purchased clamps and beads are placed on the wire.
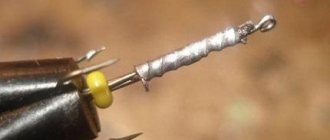
- A pinwheel can be made using copper wire, which is tightly wound onto a thicker rod. One end of the pinwheel is sharpened on an emery wheel until it is shaped into a cone.
- As a result, a wire is hooked onto the hook, onto which a pinwheel, multi-colored beads, and a petal blank are sequentially put on.
You can play with the length of the pinwheel, the size and thickness of the petal. These parameters will affect the rotation speed.
DIY bat spinner
This bait is used for spinning fishing. It attracts predators with its noise and vibration. Manufacturing is reminiscent of creating a universal spinner. The only difference is in the shape of the workpiece. You need to create a template that will resemble the shape of a bat's wings. It is then transferred to sheet metal and cut out.
The next step is to create the bulge. For this you will need a ball bearing and a hammer. When the desired shape is ready, another blank is soldered in the center of the bait - the “bat body”. To impart special dynamic properties, several holes are drilled in the wings and body.
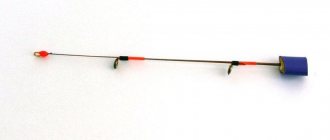
Do-it-yourself spinner from a tube for pike perch
This is a fairly simple bait to make and requires a minimum amount of materials. Any tube will do, the color and material don’t matter. The current example uses chrome plated steel.
To create a spinner:
- The tube is cut to the required size at an arbitrary angle. Each end may have the same or different angle. You can make several at once, so that later on a pond you can test their performance in different conditions.
- Sharp edges after cutting are processed with a file.
- A hole is drilled in the top and bottom of the tube. One will be used to secure the tee, the second for the swivel.
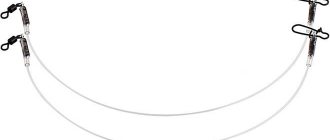
- A do-it-yourself winter spinner for pike perch will require the appropriate equipment: a tee, several winding rings and a swivel. The dressing sequence is as follows: first a tee, then a ring and a swivel at the other end. Rings are sometimes replaced with clasps, this allows you to quickly change the bait.
Fishermen note good catchability and low manufacturing costs. It is effectively used both in summer and winter.
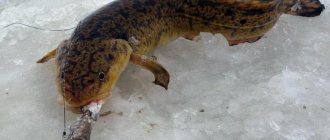
Who gets caught? 3 predators that cannot resist this homemade product!
Good day, friends. I want to tell you an interesting story about fishing on liquid water. After all, March will come soon, then April, and then we’ll get the spinning rods. Wow, how I miss casting. And probably you too!
However, we will talk about a spinner, which can also be used for fishing with vertical fishing, that is, in winter. You won’t believe how an ordinary nut sometimes catches legendary mepps and other tins that cost the fisherman far from a pretty penny.
That evening I firmly decided that I needed to prepare a modest set of spinners from nuts of different weights. Chromed and regular, painted. But after I spent one of them in the bath, I realized the peculiarity of this homemade product. It was precisely in the game, or rather in its complete absence. But the gurgles that formed during movement were amazing.
The incident happened in the fall. We were fishing on the lake and trying to catch a pike. Wobblers, jigs and regular spoons were not successful. Suddenly, out of hopelessness, I decided to try fishing with a nut. I saw her in my fishing shmurdyak.
Of course, there were no holes. I had to cling to the leash, with a little trick. To be honest, I didn’t hope for anything. And in vain, because literally from the 3rd wiring step a small pike landed on the tee. Next I saw more tails from the heels, they were all released back, growing up. How to make a spinner out of a nut?
That evening I firmly decided that I needed to prepare a modest set of spinners from nuts of different weights. Chromed and regular, painted. But after I spent one of them in the bath, I realized the peculiarity of this homemade product. It was precisely in the game, or rather in its complete absence. But the gurgles that formed during movement were amazing.
In the end, I just drilled two holes in the nut for the winding rings and tee and the job was done. Since then, such homemade products have always been in my drawer and sometimes pleasantly surprise me. No, this is not a panacea for bitinglessness. The nut is a cheap tackle that can bring results when everything else is silent!
Who is caught with a lure made from a nut?
I don’t have a complete list of people who want to try a piece of iron. However, according to my personal observations, the following lures will definitely be tempted by: pike, pike perch and asp, which I caught during the trip. For perch you need to try a smaller nut, I wonder what will come of it? Maybe someone has already tried it?
YandexGen
Similar articles:
Incidents → GAZelle collided with a car. 6 people were injured in a serious accident on the Astrakhan highway
About the main thing → The simplified procedure for registering pensions and social benefits has been extended. The main thing you need to know
About the main thing → From July 1, Astrakhan residents began to receive new “children’s” 10 thousand
About fishing → The famous Astrakhan festival “Vobla” is postponed to September
About the main thing → 40 new cases and the coefficient is above one. New data on COVID-19 in the Astrakhan region
Spinner for pike from a spoon
With your own hands, it’s easy enough to create bait for such a dangerous predator as pike. The following components will be required:
- aluminum tablespoon;
- file or sandpaper;
- hammer;
- nail;
- hook;
- winding rings or clasps.
The creation procedure is more than simple:
- The handle is cut off from the spoon.
- The cut area is sanded with a file to remove sharp edges.
- Holes are drilled at the top and bottom points. Winding rings are threaded through them.
- The hook, swivel and any other components are put on. If necessary, use bright cambrics.
The most catchy spinner spoon with your own hands
Once upon a time I literally prayed for “branded” baits and thought that it couldn’t get any better. However, with age, I began to understand that even today’s ideal can be improved tomorrow.
After all, there is no absolute bait that is suitable always and everywhere. Each spoon is created for its own fish, its own fishing, its own depth - and for these conditions it can be ideal (although even here different colors will make a noticeable difference in the bite).
Therefore, it is always useful to remember that a good spinner is the one that best suits today's fishing conditions.
I remember an anecdotal incident when three “packed” spinners arrived at a pond where, as they were told, “there are a lot of pike!” They catch one hour, the second - empty. They played it, they think. But a local guy comes and starts dragging kilogram pike onto a rusty spoon.
How??? Why???
It turned out that only decent pikes and sleepers live in this pond. And the local “toothy” one was so accustomed to slowly swimming dark prey that it did not even react to any shiny “toys”. And our branded spinners were also generously covered with the newly appeared “flex”.
I had to urgently rip off the stickers and “smoke” the vibrators over a fire. Only then did we start getting bites.
So which spoon is the most catchy?
Homemade spinner spoons – is it necessary to “reinvent the wheel”?
I'm actually a big fan of DIYs. And the village grandfather had his own spinner, ideally adapted to local conditions. True, already on the neighboring river it was useless.
But making an oscillating spoon yourself is not easy - and, perhaps, it is not necessary. But choosing the most successful samples and, if necessary, modifying them to suit local conditions is within the power of everyone.
The most catchy do-it-yourself oscillating spoon
When buying an oscillating spoon, you must first evaluate the body of the bait itself. Everything else is easy to replace. You can only take blanks from craftsmen and equip them yourself. By the way, it is much easier to work with such blanks, because they are usually stamped from sheet brass and are subsequently easily processed.
Layout
Let's start with the fact that you can often find spinners of a good shape, but put together somehow.
Sometimes when stamping, burrs remain - we grind them off, and at the same time round off the sharp edges. Then we will work on the holes for the winding rings. For free play, it is desirable that the diameter of these holes is at least twice the height of the winding rings. If necessary, drill holes and countersink their edges.
The sizes of all elements must be harmonious. Let's pay special attention to the hooks. Not only are they of high quality and the right size, but it is advisable to have dark hooks. After all, a light anti-corrosion coating is made for salt water, and in fresh water, excess shine can only alert the fish.
Changing shape
The easiest way to change the action of a spinner is to reduce its convexity. Once upon a time, I “ruled” an overly active “wave” with a cobblestone while fishing. If, on the contrary, the “wave” played sluggishly, it was necessary to additionally bend its front and back parts.
But the spoon bait behaves differently. Here, the flatter model, on the contrary, activates the game - the vibrator moves even further to the sides and even begins to rotate.
If necessary, you can change not only the convexity, but even the very shape of the spoon. True, it is difficult to predict in advance what will happen later. But if the bait doesn’t suit us in some way, why not try it? After all, for filing you only need a file or an emery wheel.
For example, let's take a wide S-shaped vibrator and see what can come out of it (Fig. 1).
Fig.1. Filing of the spoon: a) symmetrical, b) front, c) rear, d) asymmetrical.
If you evenly remove the metal from the top and bottom edges of the spoon, you will get a similar, but narrower model (Fig. 1a). The new bait will not oscillate as actively, but more steadily, which means this modification is useful for faster retrieval or for fishing in the current.
If you “cut” the top and bottom only on the front part of the spoon, then the frequency of its oscillations will increase and the amplitude will decrease (Fig. 1b). And vice versa, if we “cut” the back part, we get a vibrator with wide slow play (Fig. 1c).
To give the spinner game an unstable, “hunting” character, you can remove part of the metal only from the top (Fig. 1d).
If you want to leave the shape of the bait unchanged, then you can adjust the activity of the game within small limits by changing the bevels (Fig. 2).
Fig.2. Changing the bevels: a) to strengthen the game, b) to weaken the game.
Another way to change the game is to make your lure lighter or heavier. In the first case, part of the metal is ground off from the surface, in the second, it is soldered. If at the same time different “pairs” appear, then a bimetallic spinner with its own electric field is obtained.
Soldering is often useful for giving the vibrator better planning properties.
Additional items
To give the spoon new properties, you can experiment with various additional elements.
First of all, these can be acoustic holes and channels, both transverse and inclined. They are made on some “cut” spoons, but they can also be justified on ordinary spoons.
A faceted glass eye is considered a very useful element, and drilling three holes and inserting the desired bead on a wire is not difficult.
Why, for example, not try adding one or two additional petals to the vibrator?
If there are no hooks and the fish takes sluggishly, an additional hook installed in front or in the middle of the spoon will help.
And finally, you can make a non-snagging lure out of your favorite spoon by replacing the “standard” tee with a hook with a safety mustache.
Hook attachment
A bright additional element on the tee not only camouflages the hook itself, but also attracts the attention of the predator and serves as a “sight” for it. Usually a bright cambric or a thin plastic tail is used for this (Fig. 3).
Fig.3. Additional element on the hook: a) cambric, b) plate.
For brightness, the tail can be pasted over with orange or acid-green “flex” - sometimes this significantly revives the bite.
An even greater effect can be obtained if you put a twister on the tee of the spinner (Fig. 4a).
Fig.4. Additional bait on the hook: a) twister, b) rubber tail.
However, it makes the tee heavier and can negatively affect the performance of the entire bait, so the rubber nozzle must be used selectively.
You can cut a twister yourself from thin rubber gloves (Fig. 4b) and put it on the forend. The lighter version has less influence on the spinner’s own play, and has the same attractive effect on the fish.
Color change
Even the most proven model can misfire if its color does not match specific conditions. For example, the spoon is white and shiny, and there is a bright sun in the sky. Even if a predator comes to such bait, it does not want to peck.
I used to take coarse sandpaper and scratch overly shiny surfaces. Now I prefer to reduce the “shine” of the spinner by applying a design with paints or waterproof felt-tip pens (Fig. 5).
Fig.5. Typical color options for spinners.
By the way, this is not a waste of time at all, but a completely justified action. I have had repeated cases when only painting the spoon “like a perch” made the pike still take the bait. And try to guess which fish ended up in her stomach during cleaning?
But the lure can not only be painted.
Reflective stickers sometimes double or triple our catch. The most typical options for using “flex” are shown in Fig. 6.
Fig.6. Options for using reflective stickers.
Flex is especially effective on an active and aggressive predator. In this case, a bright sticker will attract the fish’s attention to the spoon much faster.
Once on the Kola Peninsula I saw an incredibly decorated fiddler. However, it was with this that a local angler caught a one-kilogram brown trout on a sunny day in clear water.
Rather, for fun, I covered my entire lure with the four brightest segments of yellow, green, orange and red “flex” - and three spotted beautiful fish became a “valuable gift” for the invention.
It seems that at that time the northern fish was let down by its aggressiveness.
To the south, the picture is the opposite - in good light, muted colors work better: pink, gray, bronze. They are also preferable for a cautious predator.
Small contrasting details are always useful on a spinner. For example, I like to stick on diamonds, circles or thin strips of “flex”. It seems to me that when the bite is good, silver and red elements are more effective, and when the bite is bad, golden and pink elements are more effective.
Small parts are glued to the convex side without problems, but large parts sometimes become puffy. In this case, we will cut out several narrow side “wedges” on the sticker in advance. And so that the “flex” does not lag behind, we first degrease the surface of the spoon and lightly heat it with a hairdryer. Now all the fish are ours!
Source: https://zen.yandex.ru/media/id/5e3276ee98c8d5208531ab89/samaia-ulovistaia-blesnakolebalka-svoimi-rukami-5e7f02b2a4b70d29713d0333