Using the proper method for tying your lure can be very important. Often a fisherman uses one knot he likes, without thinking that others can be used. In order to choose the most suitable knot option depending on the fishing conditions, you need to familiarize yourself with the different types of knots that are used to tie a spinner.
You can tie a lure with different knots, but not all of them are equally good and reliable.
Why is it important to tie lures correctly?
Each fishing tackle has to use one or more knots. If they are not tied correctly, they can come undone or cause the line to break under mechanical stress. When a fishing line or cord is tied in any kind of knot, it reduces the strength in that area.
But correctly made knots reduce the strength minimally. To ensure that strength losses are minimal, the following methods can be used, for example:
Do not tighten the line all the way. In this case, it will be compressed to a lesser extent, which will increase its strength.
- Use a self-tightening or moving knot.
- Place a small piece of fishing line inside the knot. This method of tying is more labor-intensive than usual.
- The knot must be wetted before tightening. This reduces the friction force.
- The strength of the fishing line is determined by the strength of the weakest section. Most often it is an incorrectly tied knot.
Each node reduces the strength of the entire equipment as a whole.
Basic rules and tips for tying spinners
When attaching spinners, it is not always necessary to tie them with knots. If the spoon can twist the line or cord (rotating spoons always, some spinners), you can use a swivel to prevent this.
The spinner can be tied to the spinning rod not directly, but through a carabiner or swivel
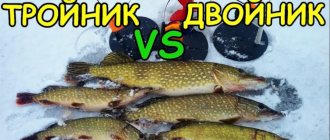
When fishing in areas with an overgrown or snagy bottom, it is recommended to use spoons with one hook. This reduces the risk of them getting caught on obstacles underwater.
When fishing for pike and some other fish, you should consider using a metal leader. When using it, you can be sure that the bait will not be bitten off.
Often the spinner is attached not directly to the fishing line or braid, but to a swivel or factory ring attached to it. However, in some cases the fisherman may deviate from this rule. This can be useful in cases where, for example, the required part is not at hand.
When removing excess fishing line, you cannot cut it at the knot itself. If a large fish is caught, then the small tip of the fishing line under tension will be able to pass through the knot and thereby untie it.
If you tie the bait too tightly, it will affect its performance. The movements will become more constrained and unnatural, which will likely scare the fish away.
When making ultralight equipment, it is important to make the equipment as light as possible. In this case, it is also convenient to tie the spoon directly.
When choosing a suitable node, you need to take into account that it must satisfy the following conditions:
- The knot must be as strong and strong as possible.
- It must be effective at the moment when the fish is hooked.
- It is necessary that the fisherman can tie it quickly and securely.
- The choice of node is determined by whether it will correspond to the planned game of the bait.
The knot must be strong enough to support the weight of the fish. Finding the perfect option is very difficult. Therefore, in each case, the fisherman must look for the most effective option in these clearly defined conditions.
Micro wobbles are best tied directly to a fluorocarbon leader.
Weak link
Attaching the spinner to the equipment is the weak link of the installation. The bait itself is often attached to a carabiner or twisted steel leash. But the fishing line or braid is already tied to a swivel or clasp. Therefore, it is technically correct to consider not tying the spinner to the fishing line, but the attachment points to the swivels and fasteners. But sometimes you need to tie a fishing line directly to the bait - the article also considers these special cases.
Beginners often tie simple knots without thinking - and lose their lures. In spinning fishing, the load on the system is high, especially when working with heavy equipment (on casting), stubborn wobblers on twitching or when fishing for strong fish. In order to properly tie a lure to a spinning rod, it is important to understand that for each method of attaching the bait and type of fishing line (monofilament, fluorocarbon, braided cord), the strongest knots are different.
How to properly tie a spinner to a fishing line
The following describes the most popular types of knots that are used for fishing lines. They need to be tied carefully, only in this case they will demonstrate maximum strength.
Non-tightening knot
Sometimes a non-tightening knot designed for free play of the lure may be required. For this purpose, the following binding option can be used:
- A simple loop is made at the end of the fishing line.
- After this, the tip of the fishing line is threaded into the loop of the spinner.
- The tip must be threaded into the prepared loop as follows. It is inserted into the loop from top to bottom, and passed on top of the main fishing line. Then they are brought into the loop from top to bottom, passed under the fishing line inside and taken out of the loop from above above the outer part of the loop.
- The knot is tightened and the excess part of the fishing line is cut off.
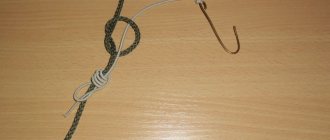
This node is shown in detail in the following diagram:
Non-tightening knot
After tightening, the spinner's loop is in a small loop that does not tighten. This option is used for some types of postings in which it is necessary to ensure the necessary play of the bait.
Attaching the spinner with a clinch knot
This node is very popular. Both beginners and experienced fishermen love to use it. Clinching is done as follows:
- The free end of the fishing line is threaded through the ring of the spinner.
- Return the tip back and repeatedly circle the main line with it.
- The free edge is passed through the eye of the spoon and wrapped repeatedly inside the loop again.
- After wetting the fishing line, the loop must be tightened.
How to tie a spinner to a fishing line using a Lindemann knot
This knot is used when fishing with monofilament. Its important advantage is high strength. To link it, you will need to do the following:
The fishing line is passed through the eye of the loop and pulled through it a little.
Then it is brought back and threaded through this eye again, forming a loop.
The free edge is brought back, then threaded into the resulting loop.
It is circled inside the loop 5-6 times, wrapped around a double part of the fishing line.
The knot is tightened after wetting it. The tip is cut off so that it does not stick out.
This knot is easy to learn. By tying it several times, the fisherman can use it regularly.
Possible mounting options
Today, fishermen tie several types of knots.
Universal
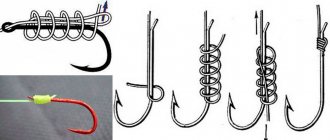
It consists of using braid and monofilament. The main advantage is the efficiency of hooking the trophy at the moment of hooking. There is nothing complicated about tying. It is necessary to thread the fishing line into the eye of the hook, and then stretch its end about 10 centimeters so that a loop is formed. Next, you will need to wrap the end of the fishing line around the shank of the hook for at least 5 turns. The free end of the fishing line will then need to be threaded through a loop prepared in advance. Before tightening the knot, be sure to wet it.
Important! To ensure a good hook and excellent stability of the hook fixation, it is better to thread the line from the inside of the eye.
Simple knot
A simple knot is somewhat easier to tie, and the good thing is that the possibility of deformation is practically eliminated. However, it should be remembered that a knot of this type cannot be tied on all types of fishing line. Having selected the one you need, you can begin. To do this, you will need to thread the same fishing line into the eye that is on the hook. Next, twist it several turns around this hook. It is important to hold the ends of the fishing line tightly. Make a loop at one end of the fishing line and thread the other through it.
With a blind loop
The task of this node is similar to the previous one. True, not all fishermen tie it, because it is necessary to use a dense fishing line, which is dictated by the tightness of the knot. The initial tying steps are exactly the same as in previous cases. First, the fishing line is threaded (although a simple knot is first formed), and then one end (the length of which must be at least 10 cm) is passed through the middle of the knot that was tied the very first. The end must be brought above the main fishing line. Then you should repeat the manipulation again, but in this case the knot needs to be tightened a little. Next, the end is passed into the lower space between the curls, where a knot is tied. True, it will first need to be moistened.
How to tie a spinner to a braided line
The use of braid has its own characteristics. This material has high rigidity and can only be tightened weakly. This places additional demands on tying knots. The following describes the nodes that are usually used in such cases.
Palomar - a proven knot for tying spinners and other baits to a cord
This knot is most often used to tie a spinner to a braided line. It is done as follows:
- The cord is folded in half and threaded through the loop of the spinner, after which it is tied.
- The spoon is threaded through the loop.
- Tighten the knot.
- Trim off the remainder.
This knot is rarely used with thick braid and for spinners with a wide eye.
Gripping unit
It is considered one of the simplest. Step-by-step instructions for knitting it are as follows:
- The fishing line is threaded into the eye of the spinner.
- The tip is circled several times (usually 3-4) around the main part of the fishing line
- It is threaded under the twisted part of the line, then into the space between the line and the twisted part, then tightened.
- The remaining protruding piece is cut off.
Rapala knot
To connect this node you need to do the following:
- Make a loop near the edge of the fishing line. There is no need to tighten it at this stage.
- The tip is threaded into the eye of the spinner.
- It is passed into a pre-prepared loop and returned to its place.
- The tip is wrapped around the main part of the fishing line 4-5 times.
- The tail is pulled through the loop again. At the same time, another loop is formed.
- The free edge of the fishing line is pulled through it.
- Tighten the knot.
To make it more durable, you need to wet it before tightening.
Rapala knot
Double clinch
This knot has relatively high strength. To connect it, perform the following steps:
- The free edge of the fishing line is threaded through the eye of the bait.
- The extended tip is folded in half. To do this, it is necessary to provide 10-15 cm. The single tip should protrude a few centimeters outward.
- The double part is wrapped around the main line 5-7 times.
- The protruding single tip is threaded through the fold of the part wrapped around the fishing line.
- Tighten the loop after wetting it.
This angle can be used in a variety of situations, but it is most popular when fishing for larger fish.
Attaching the spinner to the braid
There are several main attachment points for attaching the spinner to the braided line:
Palomar
Palomar is a simple and durable knot that is suitable for all types of fishing lines and can withstand a load of more than 10 kg. Disadvantage of the knot: when tying it, the leash is significantly shortened due to the use of folded fishing line.
The knot tying technique is as follows:
Rapalova knot
The Rapal knot, which ensures freedom of “play” of the bait, is as follows:
The disadvantage of this type of knot is that it somewhat reduces the strength of the fishing line.
Double clinch
The double clinch is a fairly simple knot with high efficiency, making it versatile and unique.
The technique of knitting it consists of sequential actions:
The advantage of the double clinch, in addition to the ease of tying, is its ability to withstand up to 10 kg. The disadvantage is that it is impractical for lures with a wide eye and large line diameter.
How to properly tie a spinner to a fluorocarbon line
For fluorocarbon line, you can use a Grinner knot. It is known for its high strength and good load-carrying capacity.
This knot is also applicable to other types of fishing line. To connect it, do the following:
- Pass the end of the thread through the eye of the bait, leaving an end 15 cm long.
- Attach it to the fishing line.
- Make a simple loop on the main part.
- Wrap the tip several times around the main part of the line inside the loop.
- Wet and then tighten the line. The protruding tip must be cut off.
The Grinner knot is suitable for hooks and swivels and for spinners and other lures.
This knot seems complicated only at first glance. Fishermen master it well after practicing just a few times.
To tie the bait and flurry, the Homer knot can be used. To connect it, follow these steps:
- The fishing line is threaded into the eye of the bait and pulled out 15 cm.
- Form a simple loop.
- The free edge is wrapped around another part of the fishing line. Make another simple knot.
- Wrap the main part of the fishing line 5 times.
- The free tip is pulled into the original loop.
- Then the knot is tightened after wetting it.
This knot can be used for other types of fishing lines.
How to tie a lure to a leash
For tying to a leash, relatively simple types of knots are often used. The most commonly used is "Eight". To do this you need to do the following:
- The line is folded in half.
- Turning, make a loop.
- The fold of the doubled fishing line is threaded through it twice.
- The noose is tightened.
Double figure eight is a more reliable knot than a regular figure eight.
This knot is often used, but they try not to use it under heavy load.
The stevedore loop is a popular way of tying to a leash. It is done this way:
- You need to pass the tip of the leash through the eye of the bait.
- After this, you need to circle the edge on the other side and thread it through the eye again.
- The free part is wrapped around the main fishing line.
- Then the tip is threaded through the loop formed when the leash is wrapped around the spinner.
- Then the knot must be tightened.
This option, despite its simplicity, is durable. It is easy to learn and will always help out if you need to quickly tie a lure to a leash.
How to properly attach a spinner to a spinning rod:
Knots for amphipods
We are talking about one of the varieties of artificial baits. It looks like a small fish with three hooks and a tail part. This bait is able to quickly reach the desired depth.
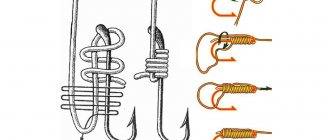
To tie an amphipod it is convenient to use the following knot. To use it, you need to do the following:
- You need to thread the line through the hole in the middle of the bait. Usually it is started from the convex side.
- Then you need to fold the tip of the fishing line in half. In this case, you need to provide a margin of 25-30 cm.
- Form a loop and fold the free end to form a figure eight.
- The free end must be wrapped 4 times at the point where the two loops touch. After this, you need to put it in a loop and tighten it.
- You need to take a tee and pass the line through the ring.
- The loop must be placed on the tail of the bait and then tightened.
In order to use another method, you need to use a bead. To attach a bait you need to do the following:
- The fishing line is threaded through the middle of the amphipod from the convex side.
- Next it is threaded through the bead.
- A self-tightening loop is made as described in the first method.
- The line is passed through the ring on the tee. It is passed through the loop, then the knot is tightened.
The process of tying amphipods is discussed in detail in the video:
Selecting a node and fastening for a specific case
Some novice anglers use direct attachment of the bait to the fishing line. But this method takes time when fishing, so they use others. The bait is attached through a carabiner, which is tied to the fishing line.
Rules for attaching baits:
- Non-rotating ones are tied through a swivel. It prevents the tackle from getting tangled;
- A correctly placed knot does not impair the performance of the bait;
- A metal leash is used to catch pike.
Methods for attaching bait to fishing line:
- Straight;
- Through a swivel (carabiner);
- Through the winding ring.
Knots for securing the fishing line
- The most exciting is the simplest. Pass a cord through the hole in the eye of the spinner, run this end 3-4 times around the working line, pull the free end into the loop at the beginning of the bait and tighten. Cut off the unnecessary piece;
- Homer is highly reliable. After threading the thread through the eye of the spoon, make a loop out of it.
Wrap the other end of the main line 5-6 turns, pull it into the starting loop, tighten;
- Grinner is easy to tie. Start by inserting the line into the eye of the spinner, making a simple loop. Make a couple of turns along the working line and pass it into the initial loop. Twist the working thread and tighten;
- Lidemann - more suitable for monofilaments. The fishing line is passed into the upper hole of the spoon 2-3 times, a loop is formed. Then pass it back through the eye, making a double loop. Pull the end of the fishing line through this double loop again and wind 4-5 turns, tighten;
- Clinch is the most common fishing knot. Stretch a thread 10-15 cm into the hole of the bait, fold it in half, and twist the bait around its axis 5-6 times. Now hold the free end near the eyelet and tighten;
- Double clinch - more suitable for braiding. Pull through the top eye 15-20 cm twice, making a double loop. Tie the working end around the main line, pass through the loop, tighten;
- Stevedoring knot - common for spinning lures. Pull the line twice into the upper hole of the bait. Place one end along the main line and make 3-4 turns around it. Then bring it into the formed ring near the eye of the bait and tighten it;
- Eight - used for urgent replacement of baits, it is easy to knit. The thread is folded to form a loop. Use the long end to twist it from above, pull it inward, tighten the connection;
- Albright - used when connecting fishing line and leash, complex in execution. Fold the thread twice, pass the end of the leash through the loop of the fishing line and make 5-7 turns on top of the double fishing line. Make 5 more turns on top of these turns and thread the remaining end into the loop where you first threaded it. Tighten the knot and glue it.
One of the varieties is locking knots. They are used to restrict the movement of floats and loads. Although there are special locking devices, nevertheless, such a knot is convenient to use directly during fishing.
Knitting is simple: a piece of another fishing line, already folded in half, is pressed to the fishing line. With one end, wrap all three threads towards the loop. After 7-10 turns, this end is threaded into a loop and slightly tightened. The knot should move along the main thread with some effort.
Attachment to carabiner
How to properly tie a fishing line to a carabiner or a swivel should not bother spinning anglers. The connections are quite simple:
- “Executioner” - the fishing line is pulled into the eye of the carabiner, this end is twisted around this very thread entering the eye. With each turn it must be pulled through the loop. After 5-7 turns, tighten the connection and cut it off;
- “Offshore swivel-knot” - a 10-15 cm loop is pulled into the eye of a swivel or carabiner, while the loop and scaffolding should be directed upward. Turn the carabiner 5-6 times around its axis and tighten.
How to attach a wobbler to a spinning rod - the fisherman must first think carefully. After all, this is an expensive bait.
Rapala connection: a knot is tied on the thread at a distance of 20-25 cm from its end. It is pulled into the eye of the wobbler and into the knot on the fishing line. The end is wrapped around the main thread, again pulled into a knot on the fishing line, then smoothly tightened.
Many experienced fishermen tie the wobbler directly to the cord with a loose loop. Then he plays as he should. All the same, the leash, with its weight and rigidity, influences the performance of the wobbler.
But with the bait secured in this way, there is a possibility of losing it. The pike can simply cut the line. Therefore, she should still be tied to a leash. A moving figure eight will do. And if braid is used, then Albright is suitable.
How to properly tie a lure for a fisherman is one of the important issues. An angler, especially a beginner, should be able to knit a dozen different connections. The correct knot is the key to preserving the bait.
How to tie a spinner to a fishing line for ice fishing
For this purpose, you can use the "Executioner" node. It is done as follows:
You need to insert the fishing line into the loop of the spinner.
The fishing line is taken out of the loop by 20-5 cm and a loop is made.
The tip is wrapped around the main part of the fishing line and passed inside the loop. This operation is performed three times. Then the loop is tightened.
Now the loop is ready.
This unit is simple to make and reliable.