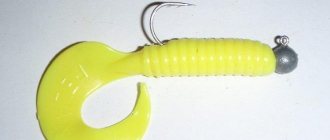
A jig head is a lead sinker of various shapes with a hook attached to it. The name comes from the name of the English fast old dance "jig".
During the retrieve, the bait also jumps and dances. This type of fishing has become popular among fishermen for several reasons:
- It can be used all year round.
- The catch is usually larger compared to other types of fly fishing.
- Jig heads and attachments for them are much cheaper than spinners and wobblers.
- Predatory fish are caught: pike, pike perch, perch, chub, ide.
- With a jig head you can explore the bottom of the reservoir.
- You can fish equally successfully from the shore and from a boat.
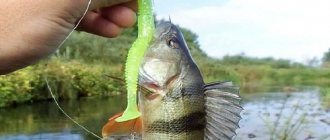
When fishing using a jig head, the bait is cast and the weight is dropped to the bottom of the reservoir. Then sharp movements of winding the line or jerking the rod are made, during which the jig head jumps and flies several meters above the bottom. After 1-2 seconds the movements are repeated. The resulting movements of the head are similar to jumping or steps.
At the moment of bouncing and further falling to the bottom, the tail of the bait oscillates, imitating the movements of the tail of a real fish. The predator attacks at this moment, swallowing the jig head. All that remains is to hook the fish and land it.
Choosing a Jig Head
When choosing a jig head you should consider it:
- Form.
- Weight.
- Mounting method.
- Workmanship.
The shape of the head is:
- Ball-shaped. It is the most popular, universal and suitable for almost all bodies of water. Its disadvantage is its poor stability at the bottom - it often falls on its side and quickly falls into the silt.
- The jig head in the form of an iron, or “eri” as it is called, is very popular. Its flat bottom prevents it from falling to the side, falling into silt and soft ground, and also helps keep the bait with a hook above the ground.
- In the form of an oval, reminiscent of a rugby ball.
- In the form of a bullet.
- In the form of a fish head.
The main indicator of a jig head is its weight. It is indicated on the head itself from 5 to 100 grams. You should choose a head that, after touching the water, reaches the bottom in 5 seconds, in shallow water - in 1-2. The slower the jig head falls to the bottom, the more the predator pays attention to it, and the slower the retrieval is, the higher the likelihood of an attack, that is, a bite.
If the reservoir is unknown, it is necessary to explore the bottom with a jig head with increased weight. When fishing on a river, it is necessary to take into account the speed of the current. If wiring occurs along the current, the weight of the head must be reduced, and if against the current, it must be increased. When fishing with a heavy and short step, the weight of the head is taken more than with a light and long one. When fishing from a boat, the weight of the head is greater than from the shore.
Based on the attachment point, they are distinguished:
- Frontal.
- Central.
- Standard.
It determines at what angle the bait will pass over the bottom topography, horizontally, with the hook up or down, which ultimately affects the frequency of bites. Depending on the method of attaching the jig head, there are:
- Stationary.
- Articulated, which are called “ushastik” or “Cheburashka”.
With the same weight, they behave differently. The fishing line is rigidly attached to the stationary head through a leash. Therefore, when retrieving, the hook always faces upward, reducing the number of hooks on the bottom of the reservoir and on snags, and the play of the bait is even and smooth.
This type of connection has disadvantages:
- Due to the rigid connection, there is more air resistance when casting, which reduces the distance.
- The hook of such a head can only be fitted with a nozzle of one size.
- And the main thing with this method of attachment is that the fish often unhooks itself and leaves.
The hinged head is a sinker with rings attached on both sides, reminiscent of ears on the head. On one side, the leash fastener is attached, on the other, the hook. The result is a ring-in-ring connection. This allows the bait to make a variety of movements. The big advantage of this head is its longer casting, the ability to attach hooks and bait of different sizes.
The quality of jig heads depends on the price.
Cheap specimens often have low-quality hooks: blunt, barbless, with a larger barb to secure the bait. More expensive specimens do not have such defects, which, of course, affects the “catchability” of the gear.
How to fish with a jig and why you need to count while casting. We catch pike perch from a boat.
Every new season of “open water” I see the same mistakes among beginning spinners – jig anglers. The casting technique is lame (or not at all), the same with the retrieving technique and the tactics of finding a place for predatory fish.
It seems that it couldn’t be simpler...threw the bait - waited until it fell to the bottom - made a couple of turns of the reel handle (relatively “a couple”, maybe one, three, or four turns) - again waited until the bait fell to the bottom (the tip will win back), etc. But the reality is that how to make a normal cast (especially from a boat), and how to wait for the fall, and where to cast, and how to select the weight is not at all clear to a beginner.
Most likely, I myself still don’t understand much about jigs, so I’m unlikely to be able to explain on paper how to cast correctly, I’ll just say one thing - the rod itself should throw the bait, you just have to give it its potential. Load the blank so that it shoots like a catapult. If it doesn’t work out, train on the shore. Other issues identified above - problems, one way or another, have already been considered in my articles, but here we will try to clearly consider exactly the count, and why it is necessary to count when fishing with a classic jig.
Start.
You have a boat and all the accompanying accessories to search for pike perch.
Having passed some section of the water area, you managed to catch on to this kind of relief.
Of course, an echo sounder will never draw you exactly this way, but let’s say that, while tackling in some promising place of the river, such a very wonderful picture “drew” in your head.
*As the material progresses, we will dwell in more detail on the features of such turning reliefs and answer the question of why there are always different fish in such places, but now we will continue.
Let's consider options for setting up the craft, and also clarify the situation with casting angles.
Option #1.
I have a picture in my head, but after going through the control once here and there, it turns out that the distance between the channel hole and the “can” (“belly button”, “bump” - whatever you like) is quite large and it is not possible to pass two anomalies with bait at once in one throw (casting range is not enough). In this case, the best place to place the boat would be -
Casting angles look as indicated in the diagram. Numbers, 1-2-3, etc. correspond to the order of “firing” of sectors. —
Now about the count and the first sector.
To understand the picture of the bottom, with the first casts you need to grab the upper part of the dump, that is, put the bait on the riverbed watering. It doesn’t matter whether the cast is with or against the current. It is necessary to catch the small fish in order to refresh the “picture” in our head and understand the beginning of the bait’s movement down to the riverbed.
We choose an approximate landmark on the shore (for example, it could be a lonely or elaborate tree) or on the water (for example, it could be a buoy or someone’s boat standing far away from you).
We throw it - it flies... as soon as the bait touches the water, close the line handle (required). We start counting – one, two, three, four, five…. We did the math, let’s say it turned out to be “10” at the moment when the tip of the spinning rod moved back and the bait touched the bottom.
What have we learned? The falling speed of an ounce (28 g) Cheburashka in a reservoir without a current is approximately 1 m/s, if we counted at approximately the same speed... once and twice... then in this case, our bait did not hit the top of the dump. You need to correct the angle (according to the diagram, you are already in the third sector). For example, if you started by studying the hole, then you need to make the next cast to the right and again count the time the bait falls. Accordingly, when studying the “banks” of the sector will look the same (the first one is stranded)
and to get into it, you need to throw it to the left.
It is important to understand that in shallow water there is no particular current, but at a turn it can generally go astray, which means that the load with bait will fall quickly. We saw from the echo sounder readings that when watering 4 - 5 meters, in about five seconds the remainder should fall to the bottom. If the load is more than 28 grams, it will fall a little faster, but that’s not the point. The task is to catch the top of the fall. Again, all body movements are in order to choose the correct angle of delivery and not miss the picture in the future, but you need a reporting point, this point is the first sector.
What to do if the bite was on the first cast? - you ask. Nothing. You are very lucky! You just need to throw along the same guideline, count to 10 again to make sure that you didn’t miss... you didn’t miss... make a retrieve and fish along this “path” while the bites are coming. You can return to a detailed study of the relief later.
If the count ends at eight (let me remind you, we cast downstream at a slight angle to the riverbed and found fish in sector No. 3)
and during this wiring there were no bites, then we make an adjustment to the left. (you are in the second sector, and the pike perch is standing along the lower part of the channel at the upper edge of the channel hole)
If the count continues after “10”, and the bait has not yet touched the bottom, then you have “gone” too far to the left and the next cast must be made much more to the right.
Keep in mind that it is always better to count, even when you are absolutely sure that the cast was made with the same force, in the same direction and exactly along the landmark. Why? The fact is that depending on the wind and the strength of the current (sometimes it changes several times a day), a boat on one anchor with a long halyard can move a little, literally by 2 - 3 meters. This will be quite enough to prevent you from getting into the desired sector, although the cast was exactly according to the guideline.
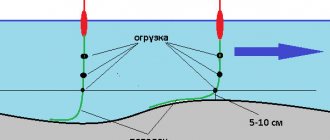
Why do we count so scrupulously and why is all this necessary? The diagram shows 6 very promising sectors upstream
(at the “bank”, passage along the “bank”, behind the “bank”) and 6 sectors downstream
(near the hole, pass along the hole on both sides, behind the hole). It often happens that the pike perch stands in one sector, and until we read the entire picture received from the echo sounder, it can be difficult to understand the optimal angle of the sector in which we can count on repeated bites. Train yourself to count! At first, this will be forgotten, but later everything will be taken for granted and will help to quickly confirm the data obtained using sonar.
Following. Counting is useful not only when casting, but also during retrieving.
Why is this still necessary?
Option No. 2
Super ideal conditions when you have found anomalies on the bottom and the casting distance is enough to make holes and “cans” with the bait.
Let's take 5 sectors, but in this case let's imagine that we have already qualitatively broken through the upper part of the dump (sector - No. 1,2,3). There are no fish there. Now we cast in the direction of the main current (sectors No. 4 and No. 5) in order to: pass part of the riverbed with the rig; “fall” into a hole; go through the hole itself; get back on track;
climb the “bank”; go down from the “bank” to the riverbed and bring the bait to the boat.
We cast to a depth of 9 meters.
* Let’s say the count stopped at 15 during the fall, adjustments for the strength of the current, windage of the bait, turning eddy - it turned out to be about 9 meters, or when you passed over the point you clearly noticed that in this area there are 9 meters. That’s not the point, you’ll soon learn to understand all this yourself, let’s get back to counting.
Why and what is there to count besides the time the bait falls to the bottom?
Conventionally, on such a terrain, the pike perch can stand anywhere, but most likely the active predator will be at the exits from the hole, at its upper edges and on the upper edges of the “can.” (Yes, he would have been in the first three sectors and would have proven himself long ago). But a passive zander will most likely stick to the riverbed and stand behind the “can” from you, or, most likely, at the bottom of the hole. *"Lies" drunk, digests food at depth.
We do the retrieving, counting the number of turns of the reel handle until the time the rod tip returns has changed. In our case, walking along the riverbed, the bait will jump and fall at approximately the same speed, and as soon as it falls into the hole, the wagering pause will increase noticeably (stop counting! Remember the number! Let’s say, “5”).
Then, along the bottom of the hole, the step will be even again.
Then, when the bait “crawls” upward along the side of the hole, the pause will sharply decrease (if the angle of rise is steep, then the equipment can generally be dragged), and as soon as the bait leaves the hole onto the riverbed, the pace will stabilize and will be even until the start of the rise to “ jar."
Why did they stop counting when the bait began to fall into the riverbed hole?
Yes, because you need to focus on the hole itself.
*For now we are only talking about the hole and forget that there is also a “navel” on the way.
On the next cast we do the following... The same casting force, the same reference point... the bait should be placed at approximately the same distance... we calculated the time of fall, everything came together, we begin wiring and counting the turns... one turn, two turns...! We slow down the wiring as much as possible (at the same time, the wagering pause should decrease), turn... “three”, the wiring speed is the same (slower than usual) - the wagering pause has become shorter... another turn is “4” and another... - “5”!
“5” is the control point! Then the bait went down... pause... win back... a turn. The bait went along the slope of the hole, at this moment the pause for returning the tip of the rod to its original position will increase slightly (if there are turbulences in the flow in the hole, then the pause will increase significantly). In any case, we wait for the fall and again make a slow turn of the reel handle (one slow, uniform turn). The bait goes at the very bottom of the hole (it doesn’t fly up high due to the slow rotation of the handle), the playback pause after the turn lasts less than a second (don’t forget that the pause between turns should be the same (a second - one and a half)) ... and so we pass the entire bottom of the hole.
We repeat casts to the same place, methodically “freezing out” the passive predator with a short, low step, passing the bait close to the muzzle. With each new retrieve, try to achieve a shorter pause when the bait passes the drop into the hole, and a shorter step along its bottom. Believe me, the pike perch will react.
Now we return to the “navel”.
We realized that an active predator would have long ago grabbed the bait on the upper part of the channel bank - when shelling sectors 1 and 2, but there were no bites. What to do? We continue to “swing” the hole, counting until we begin to fall into it, then we remember the slow short step... we walk slowly... the step is over (the bait crawled out of the hole “uphill”, dragging began) and... as soon as the step appeared again, we begin new account. This count will be the distance that the bait will travel along the riverbed from the moment it leaves the hole until the moment it begins to rise to the “bank.”
The pause has shortened and the counting has stopped! Let it be 8 revolutions.
The new wiring goes like this….count “2” - slowing down the speed of rotation of the “roll” handle in front of the hole. Next, a clear short step from the beginning of the fall into the hole, a walk along its bottom with a minimum pause of acting out (low, short step), when the ascent to the exit from the hole begins, we turn on the rod. We make a wrist toss of the bait (there is no point in it dragging uselessly along the rise from the hole). After the toss, you need a sharp turn of the handle (don’t forget about this either). With such tosses we reach the riverbed. The terrain is already painfully familiar to us and, according to our particular scheme, the bait will jump out of the hole after the third toss. The pace has stabilized, we start counting... one, two, five... while we are counting, we lead the bait, making one revolution of the reel handle at medium speed.
Five! Pause. The bait touched the bottom (the tip of the rod moved back) ... we take our time, hold the bait on the bottom for a couple of seconds (increase the pause between rotating the handle) and only after that we start retrieving again, at a lower speed, but with an increased pause between turns. ...Oh, I'm getting a bite! )))
It happened at the moment the bait was torn off the bottom! ))) You felt it, no?
What is the essence of such complex maneuvers, speed changes and pauses a few meters before the navel?
Sometimes it is the instability of the behavior of the bait that forces the pike perch to follow it, but it is in no hurry to attack. So take your time! Let Zander make sure that he is the true master of the situation and this incomprehensible thing is already “dying” before his eyes. All that remains is to open the mouth or hit it closed (press down so that the eyes are not an eyesore ). It doesn’t matter to us how he will attack, why or why. The very fact of contact is important to us!
Conclusion.
The account is necessary and important, I hope, using the analyzed diagrams and examples, I was able to convey this information to you, and you went fishing with me. I repeat, what is presented in the diagram is simply an ideal place; in nature you can look for such anomalies all your life and not find it. But you and I, first of all, considered the issue of counting and why it is needed, and knowing this, you will find your fish on a simpler terrain.
The main thing to understand is to pay attention to the speed at which the bait falls during the retrieve (the time after which the tip returns (plays back)), keeping count on casts (the time the bait falls to the bottom after splashdown (depth)) and keeping count during retrieves (distance to the anomaly or a dump), you can “draw” a picture of the relief in your head in 15 - 20 postings without any echo sounder. And with a good “stick” you will feel the entire structure of the bottom without a structure (where there are pebbles, where there are pebbles, where there is sand, where there is shell rock, etc.)
Yes, I promised to tell you why there are always pike perch in such places. “Always” is not a strong statement! In 99% of cases this is true, however, it is not always possible to “irritate” him.
Let's return to one of the schemes -
Red arrows indicate different currents that form at river bends. In reality, there are much more of these currents, eddies and changes in the behavior of water. The water swirls, pulls various living creatures from the shallows (caddis flies, jigs, all kinds of crustaceans), all of this gets stuck in the gyres and accumulates in one place at the bottom. Therefore, in these places there is a lot of “whitewash”, and weak fry are also pulled by the current to the depths from the riverbank shallows, that’s the whole secret. Where there is whitefish there is pike perch.
Remember, when fishing there are no trifles! If this article didn’t help you in any way, then you missed other important points, such as: choosing bait; selecting a load suitable for a given place, it’s also possible that it’s a matter of the “stick” (you just don’t see the pokes of a sluggish predator), but in general - “There’s always pike perch! At one of the points you passed during the day, he was 110%, and the fact that you didn’t catch him was not his fault. You have to be able to catch!”
NHNCH.
Spinning rod for jig fishing
It is fished with a jig head using a spinning rod. The gear must meet the following requirements:
- Reliability.
- Strength.
- Sensitivity to bites or, as they say, to be “ringing.”
- Small sizes. The optimal length is from 2.5 to 3.0 meters.
- Jig head weight (test range from 5 to 40 grams).
- Build. There are slow, medium and fast.
- Aggressive wiring.
- Fishing depth.
The test indicates what weight the jig head should be. This indicator is indicated on the spinning rod in grams (g). Another indicator that you need to pay attention to is the build. It shows the rigidity of the rod and the speed of straightening of the spinning rod after casting, and affects the casting technique. So, with a fast action rod there is a sharp and short swing, and with a slow action rod there is a wide swing from behind the back.
There are special spinning rods for jig fishing on sale. It is advisable to use it for catching pike perch, as its bite is gentle. Sometimes it can only be seen by the vibration of the rod tip. But for catching pike and perch, a regular spinning rod is also suitable, because their bite is sharp and aggressive.
If you want to find out what gear pike perch bites best with, you can read our article.
Three types of reels are used for spinning:
- Inertial.
- Inertialess.
- Animators.
Inertia-free ones are more popular, since with their help, casting occurs farther than with inertial ones, the line is reeled off exactly as far as the jig head has flown, and the line does not get tangled. After the bait falls to the bottom, inertial reels continue to unwind the fishing line, which often results in it getting tangled. The only drawback of a spinning reel is its higher price.
Multipliers are powerful reels that are used when catching large fish with heavier bait in lakes and seas. The reel is attached to the spinning rod so that the center of gravity is 5 centimeters higher.
Line for jig fishing
For spinning, you need to choose a thin and strong fishing line. The thinner it is, the further the cast will be. Strength is needed, firstly, so that a break does not occur during casting, and secondly, when landing fish. For beginner fishermen, nylon monofilament is suitable. All its parameters are indicated on the packaging. The thickness of the fishing line and the weight of the fish that this fishing line will support are indicated there. The disadvantages of monofilament include its stretchability, that is, an increase in length under a load of 15 to 20%.
This fact leads to the fact that some bites of large fish are unnoticeable on casts of 50 meters or more. Experienced fishermen purchase more expensive braids and fluorocarbon fishing lines, which have the same light refraction as water and are completely invisible to fish. They are more tensile, do not stretch at all, and transmit the weakest bite to the rod that the hand feels. When fishing for small pike and pike perch up to 5 kilograms, a fishing line from 0.2 to 0.4 mm is suitable.
Leashes
When fishing, you need to secure the jig head with the main line using a leash. It should withstand a load one third less than the main line, and protect it only from getting caught on the bottom of the reservoir or on snags. By the way, when fishing for pike and pike perch, you also need a leash between the jig head and the breaking leash. It prevents the fishing line from being cut by the teeth of a predator, and is made of braid, tungsten, and thin steel wire of different lengths.
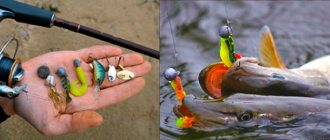
Jig bait
Plastic (hard, passive), silicone (soft, active) and foam artificial baits are used as attachments for the jig head. The most popular among fishermen are silicone ones. Their selection in stores is huge. You can choose any color and size.
You can make plastic ones from polyurethane foam and foam rubber yourself on the shore of a reservoir. Use scissors to cut out fish or other shapes from dishwashing sponges of different colors. Polyurethane foam is also easy to make. A rectangle of the required size is cut out of the sheet with a knife, heated over a fire, a figurine is made with your hands, for example, a fish, and the hook is pressed in.
If the fish is active, it attacks more often passive baits, that is, plastic ones. And when the fish is passive, the active baits are silicone. Sometimes, especially during the autumn feast, predators (most pike perch) bite better on foam rubber baits.
To properly attach bait, for example, a silicone fish, to a hook, you must:
- Place the hook of the jig head on the side of the fish with the tip pointing towards the back.
- We remember the place on the fish where the curve of the hook ends.
- We insert the point of the hook into the head of the bait.
- We plant the whole body like a worm.
- We place the point in the back of the silicone fish in the previously noted place.
- We place the head of the bait on the thickening of the sinker or spike near the hook. This is done so that the bait does not jump off the hook during retrieving, touching the bottom and snags.
Jig fishing methods
There are many ways to catch fish with a jig head:
- Search.
- Step-uniform step.
- Stepped heavy.
- Stepped easy.
- Stepped long.
- Stepped short.
When fishing in an unfamiliar body of water, they always start with a “search” method, which will allow you to study the bottom and possible habitats of the fish. To do this, take a heavier jig head. The casts are made randomly and as far as possible, after which the wiring is done. After examining the bottom and a few bites, we proceed to traditional spot fishing.
To do this, attach the necessary jig head and choose a different fishing method. If there was not a single bite during the “search” method, we move to another place in the reservoir until we determine the accumulation of fish.
Stepped-uniform wiring is good when passive predators lie on the bottom of the reservoir:
- The cast is made.
- When the jig head has reached the bottom, we begin to slowly wind the line with the reel at a speed of one revolution per 2 seconds. Make 3-4 turns.
- Let's stop for one second.
- We continue the action with the coil.
- With this method, the jig head with a nozzle seems to hover above the very bottom, flies in front of the fish’s nose, and sometimes crashes into it, provoking an attack.
The most common wiring for jig fishing is stepped. It has several varieties:
- Heavy.
- Easy.
- Long.
- Short.
The meaning of the work is the same for everyone, but with different parameters:
- A jig head with a nozzle is cast.
- The spinning rod is held at 45 degrees relative to the water.
- When the weight reaches the bottom, the line loosens and the rod tip straightens. At this moment, the sinker raises a cloud of silt.
- It is necessary to remove the slack in the fishing line by rotating the reel handle. Usually this is 2-4 turns.
- We make several sharp rotations with the reel handle. If you make 3-4 turns, you get a long step, and if you make 1-2 turns, you get a short one. At this moment, the jig head comes off the bottom and flies through the water column for several meters: in the first case 1-2, in the second 0.5-1.
- The rotation of the reel handle stops, and the head falls to the bottom again.
- After 1-2 seconds, sharp rotations are repeated.
And so on until the jig head approaches the fisherman, or a fish grabs it. Some fishermen replace sharp rotation of the reel handle with twitching the rod, or with a joint movement. Each fisherman adapts individually. The result is a jumping or stepping motion.
At the moment of the bite, it is necessary to make a sharp upward movement with the rod from 45 degrees to 90, which will lead to hooking the fish, and reel it in.
With a heavy retrieve, the weight of the jig head is a little heavier and it almost slides along the bottom. With a light head, the weight is less and it bounces high, as if swimming in the water, making wave-like movements.
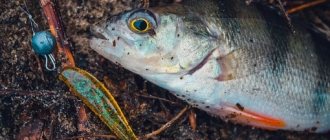
"Bottom shake" (or the power of a heavy jig)
Date: January 18, 2021 | 075
Depending on the weight of the sinker, we divide the classic jig, conditionally, into microjig, light, medium and heavy. I want to talk about the features of the heavy jig and its capabilities in this review. After all, this class of gear for fishing with silicone baits is not as simple as it seems at first glance.
So, let's start with the definition of a heavy jig. All this, of course, is conditional. But I would classify the use of weights of about 30g or more as heavy jigs. These can be weights around this mark, or much heavier - 40g, 45g, 50g.
It’s clear that to work with a jig of this weight, you need appropriate gear. The rod is quite long, from 2.7m to 3m. Fast build. It would be good if it had an increased number of passage rings to better distribute the load across the form. Powerful butt. Of course, a suitable test range is, for example: 20-60g, or something like that.
Installing a heavy jig involves two main options. Or a heavy jig head, or a joint with a “Cheburashka” sinker. There are, of course, other options, like hanging weights, etc. But few of us are seriously involved in them.
For heavy jigs, for catching pike perch or pike perch, you can use a variety of silicone baits. But, I would give preference to narrow-bodied vibrotails, slugs, and silicone fish.
A little behind are twisters (someone is about to throw a rotten tomato ;)), crayfish and large silicone worms. Slugs are ahead for passive fish, vibrotails are for active fish.
And yet, what is a heavy jig used for? What's wrong with it?
There are two situations when using a heavy jig.
The first is when the fish are located deep, and also in a place with a current. Then, in order to quickly lower the bait to the desired depth and control the bottom, you need to use a more or less heavy jig.
The second, less obvious. But also quite interesting. Let's start a little from afar.
What happens when a heavy lead weight, a sinker, falls to the bottom of a reservoir? Firstly, a cloud of turbidity rises from the bottom. Secondly, there is a wave, a vibration, along the bottom and through the water, like an earthquake, only on a micro scale. The fish catches such vibrations with its lateral line. She approaches, interested, to the place where the bait falls. And he sees a dissipating cloud of attractive haze. And suddenly, the bait that we blew up flies up from the bottom. This is where a lot of grabs happen.
This happens at great depths. But what changes in the shallows, at medium depths? Nothing! So, a heavy jig can and should be used not only where the depth and strength of the current requires it, but also in shallower and quieter places.
Those. where, it would seem, according to all the canons, it is logical to use the smallest possible weight of the weight, for example, 7g, we can put all 20g and arrange a series of micro-quakes, holding the bait with a step with tosses. This is also how they catch pike at medium depths. And pike perch in the shallows, both during daylight hours and at night.
So, when fishing shallows, you should not always follow the rule about the minimum weight of the sinker, which ensures the most natural play of the silicone bait. Sometimes it makes sense to do just the opposite and attract a predator precisely with the crash of a heavy sinker on the bottom.
* * *
For fishing in shallow waters, counting on impacts on the bottom, on a cloud of turbidity, it is better to use a hinged mount rather than a jig head. And also a floating edible. In this case, the blows are most accentuated, and the silicone during the pause will take a position above the bottom, like a feeding fish. This will additionally attract fish.
* * *
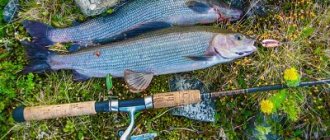
Just the other day, on one of the fishing forums, I came across this photo. A small pike-perch, just encroaching on a heavy jig.
So it works. We have been convinced many times.
Share with your friends:
Categories: Rigs · Tags: Jig, Jig head, Rigging, Slugs, Walleye, Technique, Pike
Features of fishing.
You can fish with a jig head from the shore or from a boat. Using a boat has its positive and negative aspects compared to shore fishing:
- More locations explored and usually a larger catch.
- It is necessary to use a shorter spinning rod.
- Use heavier jig heads due to greater depths.
- Missing fishing spots are possible, as the bait jumps in longer segments.
There are some peculiarities when fishing for pike perch, pike perch and pike perch. Pike perch and pike perch can be caught using passive baits made of plastic and foam rubber, and active baits made of silicone. Their length is from 3 to 7 centimeters. But pike prefer active baits, mostly large silicone ones (up to 15 centimeters long), so that they move and play (vibrating tails, fish).
Those same “catch points”...
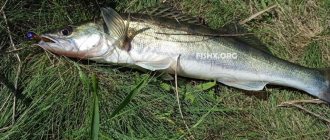
When it comes to catching trophy fish like pike perch, in most cases, we start thinking about fairly deep sections of the river. Abundant with interesting underwater terrain and some local shelters, and in most cases this is exactly the case. A large predator clearly feels better in underwater deep rubble - this is both an ambush and a shelter at the same time. With this setup, eleven years ago, I tried to catch monster pike perch in the Oka, breaking through the macrorelief day after day, in a certain sense, it brought results, but the weight of the fish did not exceed the treasured 5 kg.
Pike perch over 3 kg, not the most trophy specimen
One season I decided that only active search, only pike perch! And such tactics bore fruit. What happens to stubborn fishermen happened. In the summer of 2009, the coveted trophy pike perch were found in places that were not distinguished by either great depths or extreme relief, but they still had a number of striking differences. All these places were underwater microspits, cut by several shallow ditches forming pockets. In all these local and at first glance inconspicuous places, local shelters stood out in the form of small mounds, local large stones or submerged concrete blocks or other local elevations. It is interesting that these local relief features bordered the ditches and seemed to be the boundaries of these ditches. Most of the interesting and promising places were found when fishing from the shore without the use of echo sounders. With each new season, unusual places appeared on my fishing map. Gradually, these local places were marked by me on sections of the river, and sections of several kilometers were combined into zones. Each zone, in my understanding, is a kind of separate local biogecenosis, i.e. such a section of the reservoir differs in some way from the other bordering it and is inhabited by its inhabitants. Naturally, the river itself is already a kind of global biogecenosis, but the experience of fishing and an attempt to somehow systematize what is happening in sections of the river several kilometers long led me to just such a systematization. Zone - areas - places in areas that fall out of the general background in terms of microrelief as potentially the most promising.
Typical Oka local ditch with internal microrelief
I don’t see any point in continuing the topic of zander ambushes, but I can’t help but note that the mere presence of the “right” places does not guarantee 100% results. It is not immediately possible to solve the mystery of a particular point and understand whether it is a hunting point for pike perch. With the number of fishing trips, the “right” places remain, while others fade into the background. It often happens that a new found place, later explored with an echo sounder from a boat and seeming extremely promising, does not bring a single significant trophy, fish are certainly caught here, but do not differ in size, and a local log lying on the navel brings trophies from year to year.
The accumulation of large, but not trophy, pike perch at a point is more likely a guarantee of the absence of a dominant predator in the area than a good sign