Feeder fishing in still water, part 2 - fishing technique
Continuing the topic of feeder fishing in still water, in this material we will talk directly about the technique of feeder fishing and some of its features. Let me remind you that in the first part we looked at the preparatory operations that need to be done before you start fishing with a feeder. When feeder fishing in still water, it is very important to cast the tackle correctly and accurately to the same point in order to form a carpet of bait in the chosen fishing spot.
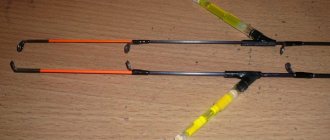
Only in this case can you count on success, and not hope to catch a randomly passing fish. High casting accuracy can be achieved by casting the feeder tackle over your head. Technique for casting tackle in feeder fishing. There is nothing complicated about the casting technique in feeder fishing. After the fishing distance has been established and a reference point for the casting direction has been selected, the fishing line is wound onto the reel so that the attached equipment almost rests against the tulip of the feeder tip. The left hand is on the edge of the feeder butt, the right hand is on the reel mount, the line guide is open, in fact, the usual grip when fishing with a spinning reel. The rod is carefully brought back behind the back (photo a).
After releasing the line, the feeder rod is almost vertical, slightly tilted forward (photo b). With such a cast, the tackle with the feeder flies in an arc to the fishing point. After the equipment has flown most of the given path, the rod is tilted slightly and moved forward, and after touching the water feeder, it is immediately raised to an almost vertical position.
This manipulation prevents heavy feeders from being “shot” and the fishing line fixed in the clip from breaking. Next, the rod is put into working condition so that the feeder equipment hits the fishing point and when the feeder falls to the bottom, the feeder is placed on a stand.
How to avoid overlapping of the feeder rig lead when casting gear? When using loop installations of feeder equipment, some anglers use a technique such as slowing down the fishing line before splashing down the equipment in order to minimize the overlap of the leash over the main fishing line. During casting, the feeder flies in front of a long leash, which is parallel to the main line. But before falling into the water, the equipment loses speed and the leash can become tangled with the main line. It is at this moment that you need to slow down the line with your hand, thereby tightening it, and after splashdown, immediately close the line-laying arm.
How to properly install a stand and a feeder rod on it for fishing in still water?
During fishing, the feeder rod can be installed on a stand either almost vertically with an inclination towards the reservoir, or horizontally parallel to the shore. For feeder fishing in still water, the second option is more applicable. To accurately register bites, it is very important to correctly install the stand and the rod itself on it. Three main mistakes that beginners in feeder fishing very often make:
Feeder fishing technique in a still body of water. Once the feeder tackle is cast and set up, all attention turns to the tip of the feeder. Often, at the beginning of feeder fishing, small fish are suitable for bait. A small fish bite looks like a slight trembling of the tip, after which the hook is often left without a nozzle. When larger fish approach, the small fish bites stop. Big fish bites can look different. This can be a series of small nods of the tip, and with active biting - several short energetic jerks.
The hook is made with a quick, but not sharp movement. In this case, a smooth sweeping movement is made with the feeder, up and towards the shore. If there is a small fish on the hook, then fishing can be done without ceremony. If you come across a worthy specimen, then you need to fish it out by “pumping out”, when the pull-up is done with a rod, then the tip is lowered to the water, while simultaneously reeling in the slack line with a reel and pull-up again with the feeder. The cycle is repeated the required number of times until the trophy is at the distance necessary to bring it into the landing net. This technique allows you to reduce the load on the reel and on the tackle in general. It is better to use a landing net with a long handle.
How often do you need to recast your feeder rig when fishing in still water? If there are no bites for 20-25 minutes, then the feeder tackle definitely needs to be rethrown to check the bait and refill the feeder. The normal bite when fishing with a feeder is considered to be bites at intervals of 10 minutes. If bites occur more frequently, you can change the feeder to a sinker of a suitable weight to increase the fishing intensity.
How long should the leash be when fishing with a feeder in still water? It would be incorrect to recommend a specific leash length for feeder fishing in still water. Since their length can vary from 30 to 100 cm, it all depends on the fishing conditions and the activity of the fish. You can start fishing with a 50-60 cm leash, and then depending on the circumstances.
If the fish bites, but the hook cannot be made, the leash should be lengthened. If it manages to swallow the bait too deeply, the leash should be shortened. If there is no bite or it is too sluggish and uncertain, you need to try changing the bait or lengthening the leash as much as possible. It happens that after pulling out the rig, we notice that there is no bait on the hook or it is pretty tattered, but there were no bites. In this case, the leash should be radically shortened.
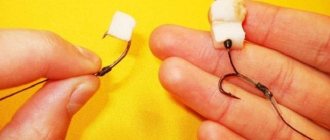
What baits should I use for feeder fishing? To conclude this material, a few words about attachments. The most commonly used baits for feeder fishing, both in still water and in the current, are bloodworms, maggots and worms. Maggot is perhaps the most versatile bait, as it is more difficult for small fish to knock it off the hook. Sometimes corn, pearl barley, rolled oats, mastyrka, dough, etc. also work well. It all depends on the fishing conditions and the preferences of the fish in each case. It's always worth trying different options.
Types of feeder equipment
Currently, there are more than a dozen installations of feeder equipment:
- For installation of the feeder: blind and sliding
- According to the type of feeder used: open and closed (for live food).
- According to the placement of the leash: above the feeder and below the feeder.
Paternoster
The most common and convenient for beginners to use is blind installation with the leash placed below the feeder.
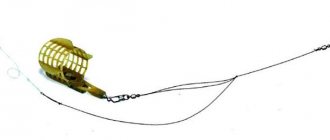
A paternoster is a piece of equipment, during installation of which two loops are knitted on the main fishing line. A small loop at the end of a fishing line to which a leash with an attachment is attached. A second larger loop (with the possibility of a feeder passing through it) is made at a distance of 25-30 cm from the end of the fishing line. A feeder with a swivel or with a swivel and clasp is attached to this loop.
Loop systems (symmetrical and asymmetrical loop)
The equipment is an installation with a sliding feeder above the leash. To make a sliding installation with a feeder, take a piece of fishing line up to 1 meter long and fold it in half so that one end of the fishing line is 20-25 cm longer than the other.
At the end of the double fishing line we knit a small loop to which the leash will be attached.
After tying the loop, twist the fishing line tightly (5-10 turns) and tie a surgical knot at the end of the twist.
We put a swivel or a clasp with a feeder on a long piece of fishing line.
The ends of the fishing line are tied with a surgical knot so that the loop in which the feeder slides is symmetrical.
At the long end of the fishing line, another loop is knitted to connect to the main fishing line.
For an asymmetrical loop, the short end of the line is moved toward the end of the long section, and they are both tied with a surgical knot. In this case, it turned out that the section of the loop along which the feeder slides is longer than the other section of the loop.
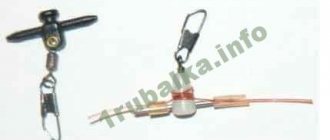
Anti-twist tube
The equipment is a sliding installation with a feeder, which is attached to a tube with an anti-twist. The tube is put on the main fishing line. There are locking rings on both sides of the tube that prevent the tube from moving significantly along the main line. At the end of the fishing line (below the tube) a loop is made to which the leash is attached.
"Harvester"
Modified installation with an anti-twist tube. The feeder is attached to the anti-twist tube through a leash - a loop 10-15 cm long.
"Inline"
The inline rig is a simplified design with a sliding feeder along the main line. A locking ring is put on the main line, then a swivel or feeder clasp and a second locking ring. Next, a loop is knitted at the end, to which the leash is attached.
"Helicopter"
Equipment with a blind mounting of the feeder at the end of the equipment and a leash sliding along the main line. We attach a swivel to the leash loop. On the main line we put a locking ring, a swivel with a leash (through the free eye) and a second locking ring.
We tie a loop at the end of the fishing line and attach the feeder to it. Using locking rings, we adjust the location of the leash rotating around the main line at a distance of 20-25 cm from the feeder.
The helicopter rig is used for fishing on rivers with strong currents. The feeder holds the equipment at the bottom, and the leash rotates freely around the main line, preventing the equipment from twisting.
Complete step-by-step instructions for equipping the feeder:
- We assemble the rod together, installing the necessary tip. The rings must be in the same plane.
- We install the reel on the reel seat of the rod.
- We wind the main line onto the reel. If the fishing line is already wound, then we pass the end of the fishing line through the rings of the feeder rod from the large ring to the tulip.
- We tie a shock leader to the end of the fishing line. It should be mandatory when catching large fish and using heavy feeders.
- We tie the equipment to the shock leader. The equipment option is selected for specific fishing conditions.
The feeder tackle is ready for use.
How to cast a feeder - the correct technique and methods
Beginner fishermen sometimes do not know how to cast a feeder correctly. Transferring the experience of casting a spinning rod or a regular donkey to a feeder tackle entails shooting of the equipment, breaking of tips and even rods. Feeder fishing often occurs under conditions of maximum load on the gear due to the large weight of the feeders and the long working distance. Feeder gear is specific and requires appropriate techniques for working with it. Casting a feeder is performed slightly differently, taking into account the characteristics of fishing and equipment. In this article, we will look at the features of the technique of correctly throwing the tackle, we will analyze the key points and execution options.
Line and cord
When casting at 50-70 meters, it is better to take a braided line of 4-8 cores with a thickness of 0.06-0.18 mm. It has a high tensile strength, does not stretch and lasts a long time. Thanks to the use of such a cord, the sensitivity of the gear increases significantly. For fishing from a shorter distance, for example, from 20-30 meters, a monofilament with a diameter of 0.18-0.35 mm will be sufficient. But the choice of fishing line or cord is still up to the fisherman; the main difference is in stretchability. The cord does not forgive mistakes in casting, does not dampen excessive efforts and, as a result, the feeder is shot. The disadvantage and advantage of monofilament fishing line is that it stretches. On the one hand, it will work on even the most unprofessional casting of a beginner, but at the same time the bite will be less visible due to the same stretchability of the line.
Monofilament line MASK SPINNING 150 m AKKOI 170 for 1 pc. Line FEEDER PRO 250 m COLMIC 860 for 1 piece. Cord G-Soul Upgrade X8 150 m YGK 2 140 for 1 pc. Line METHOD FEEDER 250 m COLMIC 496 for 1 piece. Line MOLTRES FEEDER 150 m Brown Hitfish 130 for 1 piece. Cord G-Soul Upgrade X8 200 m YGK 2,860 for 1 pc. Cord PE JIGGER ULT(4braid) 200 m Sunline 3,950 for 1 pc. Cord G-Soul OHDRAGON WX4 150 m YGK 1,760 for 1 pc.
-30%
Cord Guide 8X 150 m Ultra Lite Dragon 2 035 1 424.50 per 1 pc.
A variety of fishing lines and feeder cords to choose from
The importance of accurate and correct casting
The key feature of feeder fishing is repeated throwing of gear at the same point with bait. In addition, you often have to fish at a fairly high pace. The feeder is not a donk that you cast, set and wait for a bite. The feeder equipment is often recast, even if there is no bite. This is part of the correct tactics and fishing technique. Therefore, the feeder must have a correctly set and perfect cast. More details about the features of fishing with a feeder.
The casting distance, its accuracy, the heaviness of the feeder with bait, and the frequency of repetitions add up to a dangerous mixture of factors that increase the likelihood of damage to the equipment in case of incorrect actions. If in a spinning rod the fishing line gets caught in the ring, then nothing bad will happen - the spoon will just fall next to the fisherman, and will not fly where it was sent. With feeder equipment weighing 100 grams or more, the quivertip will simply break due to overlap. If you place the rod incorrectly, the braid at the end of the flight path of a heavy rig will come off on the clip (the so-called shooting). If the clutch is not tightened during a power long cast, the thin cord is likely to deeply cut the angler’s finger.
However, all these moments are not scary if you perform the correct technique. Feeder casting is not difficult in principle. However, the technique of its implementation requires the angler to be attentive. Over time, the fisherman will perform these nuances automatically. At the beginning of the journey, each feeder casting needs close attention. Let's look at how to throw a feeder into one place correctly, consider the nuances of the technique and various types of execution.
Feeder rigging hooks
The thickness of the hooks for the feeder is not regulated; both thin and thick ones can be used. They are selected depending on the size of the expected prey. For carp, it is better to take special carp hooks. Do not use too large hooks that the fish cannot swallow. For large bream, size 12-10 is sufficient. Roach and crucian carp will prefer numbers 16-12.
Hooks AJI (AJ-BLN-14) METSUI 44 for 1 pack. Hooks FISH GAME No. 10 METSUI 70 for 1 pack. Metsui ROUND hooks color red, size No. 10 (RO-RED-10) METSUI 60 for 1 pack. Hook Saikyo Crystal KH-11004RBN-012 (10pcs)_ Saikyo 57 for 1 pack. Single hook 50921-14 OWNER 120 per 1 pack. Single hook 50457-12 OWNER 105 for 1 pack. Hook Ryusen (HS-RY-16) Helios 90 for 1 pack. Single hook 50922-16 OWNER 105 for 1 pack. Hooks TOKYO SODE (TS-RED-14) METSUI 50 per 1 pack. Hooks SODE (SO-BLN-14) METSUI 50 per 1 pack.
Select suitable hooks for the feeder
Newbie problems
Before casting the feeder, you need to eliminate the reasons that lead to the breakdown of the gear. At first, novice feeders just need to keep an eye on these points. As you gain experience on a pond (literally several fishing trips), this approach simply becomes a habit.
Why does the feeder come off when casting? Usually the equipment breaks on the clip at the end of the load's flight path. The reason is the horizontal position of the rod, with the tip directed towards the landing of the equipment. The force impulse of the flying load is not absorbed by the rod blank, but directly hits the fishing line attachment point. In addition to shooting the equipment, an even bigger problem can happen - the clip on the spool will break. To prevent this from happening, the rod after the swing, while the rig is flying, is moved to such a position that an angle is formed between the flight vector of the rig and the direction of the blank. To do this, the feeder is raised with its tip up and positioned at an angle to the surface of the water (60-70 degrees). When the entire length of the working cord is straightened, the flight impulse of the heavy rig no longer directly affects the clip, but is absorbed through the rod blank.
The correct position of the feeder at the moment of landing of the equipment is also important from the point of view of the accuracy of casting along the length. Therefore, at the moment of landing, the tip of the rod must be at a working distance from the fishing point in order to properly maintain the distance, up to a meter. Experienced feeders dampen inertia by not lifting the rod, but by moving it to the side, almost to the working position, just as it would be lying on the stand. In this case, an angle is also formed between the vector of the flying rig and the fishing rod, only in a different plane.
When casting forcefully, the rig can be shot off even if the cord overlaps the ring. In the worst case, it is not the braid that breaks, but the tip or ring that breaks. To prevent this from happening, the angler needs to constantly monitor the free passage of the fishing line through the guides at all stages prior to casting. I changed the bait, filled the feeder and checked. I took the tackle back and checked it again before actually swinging. This is done simply with a finger, which presses the line against the butt during the swing. By simply pressing this finger on the cord, we check with tactile sensations that the equipment moves freely along the rings and nothing interferes with it. At first, it is better to monitor this moment visually, accompanying the entire length of the cord through the feeder rings, from the reel to the overhang.
What else you should know about inline equipment
The leash on the inline can vary from 15 cm to one and a half meters, if we talk about catching bream. A short leash is used when fishing in muddy water. 50-60 cm long - in clean, clear water or in a good current. And in order to catch a roach, the leash must be extended to one and a half meters, since roaches often bite in the water column.
If you fish in a muddy place, be sure to mount the feeder on a twist so that it does not bury itself in the mud and it is easier for you to pull it out. If you fish on a reservoir with a rocky, sandy or clay bottom, you can mount the feeder directly on the main cord.
Equipment compliance
In order not to break the rod at all, you need to equip it with a weight that does not exceed the test blank. With some experience, a good rod can throw weights much higher than the test weights. However, it is better not to do this for beginners. If the feeder is swung incorrectly or sharply with overload, the rod blank may not be able to withstand it. It is possible to make such long and heavy casts, exceeding the rod test, but only when the equipment has already been installed, at your own peril and risk. A good stick throws the weights intended for it on its own due to its properties, without the use of force. It is better to leave power throws of large weights at a distance for later - after mastering the basic technique.
Equipment with anti-twist
The simplest form of anti-twist is a thin tube that is placed on the fishing line. It is used to prevent the leash and the main leash from twisting together. Typically used by anglers who are just starting to gain experience in feeder fishing. Having gained experience, the fisherman, as a rule, abandons this device, as it greatly reduces the sensitivity of the gear.
Straight anti-twist (8951389) Three pillars 11 for 1 pc. Curved anti-twist (8951388) Three whales 13 for 1 pc. Curved anti-twist (8952889) Three pillars 11 for 1 pc. Anti-twist CAIMAN (61293) 25 per 1 piece. Curved anti-twist (8952888) Three pillars 11 for 1 pc. Anti-twist installation S (GM5017) 221 for 1 pc. Curved anti-twist (8951387) Three pillars 11 for 1 pc. Anti-twist installation LL (GM5017) 221 for 1 pc.
Select anti-twist in the catalog
Feeder casts
Casting a feeder cannot be done according to the canons of a spinning rod or donkey - the force effects on the tackle are much greater, which leads to breakdowns if the technique is incorrect. Spinning allows sharp swings, since the baits are relatively light. Donochers have short rods. The load in the feeder is large, and the rod is long. As a result, the force impact during casting increases many times (according to the laws of physics). Therefore, the technique of casting a feeder is not a shot (as on a spinning rod), but rather a catapult - a sweeping acceleration of the weight of the equipment and sending it in the desired direction. Sharp, biting jerks are unacceptable. Feeder casting of the tackle is a strong, but soft and sweeping movement. The lighter the rig and the shorter the rod, the more abrupt movements are allowed. Understanding this will come with experience when using feeders of various calibers. Read more about feeder gear.
Casting technique
Almost all feeder casts are based on the same technique. In this article we will take a closer look at the standard cast, from the top position from behind the head. More complex pendulum or English (match casting) are basically the same, just some aspects of tackle control are omitted. Such options are used for tempo fishing, when the main technique is absolutely established.
At first, every long cast with a feeder requires attention from the angler at every step. To correctly cast a feeder with a feeder in the absence of experience working with bottom gear, you should practice with a simple weight. The weight of the weight depends on the test of the rod. We clip the braid, for example, at 40 meters. To do this, we unwind the fishing line (possibly on pegs), measuring the required distance, and insert the braid into the spool clip. At the initial stages, it is better to clip with an elastic band. Article about clipping the feeder.
It is better to train on a monofilament line with a diameter of about 22 mm. The monofilament stretches, adding elasticity to the system, which further protects the tackle from breakage in case of an error. Usually an hour or two on a pond is enough for a person to learn how to cast a feeder correctly, even if he has never fished before.
Casting Variations
When the basic cast is mastered, you can adopt its variations - pendulum or English cast. This can be done when the anti-twist control is already automatic, and the angler literally feels the gear. In principle, the pendulum cast of the feeder is the same, the control stages are simply skipped before moving the tackle back and before the swing. This saves time, which is important for sports feeder fishing. After changing the bait and hammering in the bait, the equipment is moved forward. At the same time, the fisherman intuitively feels that everything is fine with the equipment and it has not overlapped. The tackle is wound back (observing the grip characteristics) and immediately thrown.
The English cast is performed in the same way as when fishing with match gear. The technique is the same as for the pendulum. The difference is the large overhang of the working part, reaching almost to the coil. This method is very accurate and fast when fishing at pace at a short distance. When shortening the overhang, time for winding is removed from the complex of movements. It is recommended to do it only by experienced feeders.
Casting the feeder from under you is like a nearby spinning pendulum. The rig seems to swing out from under itself by moving the rod forward and upward. This type of casting allows you to throw the equipment close, up to 20 meters. However, it is indispensable on reservoirs when bushes and trees behind the angler do not allow standard casting.
A power cast is performed in exactly the same way as a standard cast, only with the investment of force. Such casting is necessary for launching heavy equipment over long distances. Walking also allows you to increase your force input. To do this, the swing is carried out when the left leg steps forward, which adds the inertia of the fisherman’s body to the force impulse. Power swings must be performed especially carefully - any mistake will lead to shooting or failure in 100% of cases of error. It is recommended to use a special feeder fingertip. If the clutch slips, the finger will be cut by the braid. Equipment for heavy loads must have a feeder shock leader. It is not recommended for a beginner to start heavy casting until the standard technique has been mastered.
Feeder leashes
The leash for the feeder tackle is made of monofilament, the thickness of which depends on the weight of the prey. If the catch consists of roach and small crucian carp, then a diameter of 0.08-0.12 mm will be enough. If you plan to extract larger quantities, then it is better to take a monk with a thickness of 0.12-0.18 mm.
Line BROAD 100 m OWNER 331 for 1 pc. Line ICE CRYSTAL Nylon Transparent 30 m Helios 95 for 1 pc. Fishing line MONOLINE Green 100m Nylon Nisus 87 for 1 pc. X-Line Pikeperch line 100 m AQUA 75 for 1 piece. Line Crystal 150 m light gray Rubicon 120 for 1 pc. Line MONOPOWER FEEDER 100 m Green Nylon Premier Fishing 85 for 1 pc. Line UNO Clear Nylon Premier Fishing 54 for 1 pc. Line UNO F.Yellow Nylon Premier Fishing 66 for 1 pc. Line UNO Blue Nylon Premier Fishing 54 for 1 pc. Line UNO Green Nylon Premier Fishing 68 for 1 pc.
Monofilament lines for feeder leashes in the catalog
Fluorocarbon is also perfect for leashes; its characteristics are no worse than those of monofilament, in addition, it is not visible in the water. The thickness may exceed the recommendations for monofilament, since it is invisible to fish. The length of the leash can vary from a minimum of 15 to 20 cm. For fishing in the current, you need to increase its length to 50 cm and above. The choice also depends on the target fish, for example, for a stable bite of finicky roach in the water column, sometimes you have to fish with a leash from 2 to 2.5 m. The river is the best place to experiment with the length to find the optimal one.
Feeder casting accuracy
It is correct to cast a feeder with a feeder in still water, on a current, and in general in any conditions - place the installation at the same point. It is believed that the feeder, even at long distances, should fall within a square meter of area. To cast the feeder correctly, you need to set a certain working length by clipping, and always place the rod in the same position when splashing down the feeder, so that there is no error in length. Aiming in azimuth is carried out visually. To do this, a fixed landmark is selected on the opposite bank - a tree, a building, a fold of the bank, etc. When casting, aiming is carried out at this landmark. For accuracy during the starting position, you need to compare your hand on the butt of the feeder with a landmark in the line of sight. With experience, this moment happens automatically. Constantly throwing the feeder into the same place on the feeding point is the main goal, a feature of the tactics, in contrast to donks.
How to equip a feeder with a feeder with your own hands
Usually, for beginners, the abundance of types of equipment and installation methods is a problem. Equipment may differ in the following parameters:
- type of installation (fixed/sliding);
- type of feeder (open/closed);
- location of the leash (below/above the feeder).
To properly equip the feeder, you need to familiarize yourself with the main and popular types of installation. All beginners are recommended to first master such types of installation as paternoster, inline, asymmetrical and symmetrical loops. This is enough to use the feeder effectively under different conditions and catching different types of fish.
Feeder casting range
The normal operating distance of the feeder is up to 90 meters. If you try, you can throw it further (if you have the appropriate gear and skill for this). The peculiarity of feeder tactics is tempo fishing, constant recasts. It is physically impossible to fish for a long time, constantly casting 100 meters and reeling in a heavy load. In addition, bites at such a length are practically undetectable. You can only work on your own.
The flat feeder allows you to cast even further – up to 120 meters. In this setup, catching makes sense. The tempo of the flat method is low. Therefore, such a range may be advisable. Even greater distances can be used when fishing for large carp with fishing rods specially equipped for this purpose. In carp fishing, the tackle is installed, and in anticipation of a bite, it can stand in this position for many hours before the bite. Sometimes carp anglers bring equipment on boats to bait points, and wait for a bite on the shore. But this is no longer standard feeder fishing. The usual working distance for a comfortable pace of fishing and casting is up to 80 meters. At 90-100 meters, fishing is already much more difficult physically and technically. A finely tuned feeder is required for long-distance casting, and control of the equipment with each casting. And even this is not a guarantee of shooting a heavy feeder.
The other side of the coin is the obvious blurring of the feeding point. At such a distance it is impossible to place food at one point over and over again. The error is up to several meters. It is not a feeding point that is formed, but an extensive spot weakly saturated with bait. The main tactical meaning of feeder fishing is lost. It is better to look for a promising point closer - at least 70-80 meters. More details - breaking through the bottom with a feeder before fishing.
It is possible to make a long cast with a feeder, the question is whether it is advisable. The further the better approach does not work here. The main thing is to find the point and constantly feed it. To cast a feeder far, you need ideal tackle designed for this purpose, and such fishing rods are quite expensive. One cast per hundred square meters can be done with budget equipment, if you try. However, with a hundred such casts, something will definitely happen that will lead to breakage or shooting of the equipment. Therefore, long-distance casting does not mean overloads of 100+ meters, but the longest distances that do not leave the comfortable fishing zone (70-80 meters). Throwing the feeder correctly at such a distance and fishing on it is not difficult, provided the correct equipment and equipment are installed. This is the standard operating distance on large rivers and reservoirs.
Source
A type of paternoster equipment - Gardner loop or Gardner equipment (PG)
It has an impressive number of positive characteristics:
- universal
- easy to manufacture;
- good sensitivity
- self-cutting ability
- no additional elements needed
- this installation is very quick
- almost doesn't get tangled
- catches bottom fish well, especially bream.
How to do:
- Prepare the main line.
- Form a loop for the leash on its edge
- Make 2-3 turns around the resulting loop.
- Tie another knot.
- Form another loop, but of a larger size, moving 10–15 cm away from the previous one. The feeder will be attached to it.
- Pass the main thread through the resulting rings.
- Pass the large loop through the swivel on the feeder, casting the loop over it.
- Attach the vein to the swivel.
- Remove any excess.
- The equipment is ready for use.
Technique for throwing a feeder into one place without errors
In this article we will talk about important aspects in feeder fishing. Specifically, how to accurately cast the equipment to the intended fishing location, and how to regularly throw the feeder (bait and groundbait) into one sector, avoiding a wide spread of the feeding spot. Let's look at ways that will help eliminate moments that lead to annoying mistakes such as lack of bite, broken tackle and rod breakage. This material will be useful for both beginners taking their first steps in advanced bottom fishing and experienced feeders.
Inline equipment
One of the most used types of equipment, it has the following qualities:
- can be used on rocky bottoms and shell rocks;
- does not prevent cautious fish from trying the bait;
- ease of manufacture, even directly on a pond;
- 100% effectiveness when fishing in the current;
- good efficiency in calm water (80%);
- low entanglement in water (10%);
- Great for catching fish from the bottom.
This installation is the safest for fishing. If for some reason the main line breaks off, the fish can easily free themselves from the feeder. Inline is widely used by sport fishermen as the only permitted installation.
Necessary conditions for quality casting
As soon as you have acquired feeder tackle, you have to master a number of very important points in fishing with this method, and in the first place is casting the feeder.
It’s best to start training by attaching lead weights to your main line rather than feeders, as they are cheaper and you won’t feel so sorry for them if they come off. The next important point is to pay close attention to ensuring that when assembling the rod, all the rings in the blank are placed correctly in one line, and there are no distortions, because they greatly affect the line yield and the flight range of the equipment. It is recommended to equip your first reel on your first feeder rod with a monofilament line of medium elongation. Unlike braided cord, which has an inextensible and rigid structure, it forgives inexperienced anglers some mistakes, both when casting and when catching large fish.
I would like to note a couple more nuances for beginning anglers, namely that it is best to master this style of fishing with a rod 360 centimeters long, the reel for such a form is most often optimal in size 4000, and the diameter of the first monofilament in the spool is more suitable 0.22 millimeters.
Selecting a coil
The key requirement for a feeder reel is reliability and good traction qualities. If your goal is trophy bream or carp, then you should choose a reel with a baitrunner. The size of the reel directly depends on the length and thickness of the cord. It must be at least 150 meters, and for large fish it can be longer.
Reel Cast Master Feeder 5000 Flagman 2,783 for 1 piece. Spinning reel Diamond BAITFEEDER 6 50BR (3150BR) Salmo 2,785 for 1 pc. Inertialess coil Blaster FEEDER (140FD) Salmo 1,010 for 1 piece. Inertialess coil Sniper BAITFEEDER 1 4000BR (2740BR) Salmo 1 530 for 1 piece. Reel Sherman Pro Feeder 4000 (SHPRO4000) Flagman 4 330 for 1 pc. Inertialess coil Sniper BAITFEEDER 1 5000BR (2750BR) Salmo 1 605 for 1 piece. Reel Okuma Longbow Baitfeeder (LB-50) Okuma 4 125 for 1 pc. Inertialess coil Sniper BAITFEEDER 1 6000BR (2760BR) Salmo 1 640 for 1 piece.
Buy a reliable feeder reel
What mistakes should you not make?
To avoid unpleasant mistakes during casting, you need to take into account some conditions that will allow your gear and installations to remain intact and reduce the cost of money on components.
Using these simple tips, you will be able to successfully master the feeder casting technique, you will successfully throw your tackle at the same promising fishing point, your tackle will serve you faithfully for a long time, trophy fish will be hooked noticeably more often, and your technique will become even better!
Source