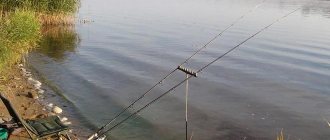
Feeder fishing is based on an everyday trick: in a certain place of the reservoir, fishermen create a bait table, where first the bottom trifles are collected, then trophy specimens are pulled up. The “treat” is delivered in cargo containers, the price of which in stores starts from thirty rubles and ends in a thousand. But a do-it-yourself feeding trough for a feeder made from various household items is cheaper and often works more efficiently. After all, you will improve the designs taking into account your own experience and knowledge.
Shape selection
The geometric shape affects the aerodynamics, buoyancy, and stability of the product on the bottom with a complex structure and in watercourses of varying intensity. Classic fishing attributes are considered to be cylindrical, pyramidal, spherical, as well as spherical and parallelepiped-shaped structures.
Types of feeder feeders
The main parameter - feed capacity - shows how much complementary food will fit into the container. But the speed of filling the feed with compositions of various fractions is also important, because the feeder is active fishing, based on frequent casting of tackle with the obligatory filling of the accessory with a fresh portion of the edible mixture.
Rectangular containers are more difficult to fill with food, but at the bottom of the reservoir they look more natural and do not frighten cautious inhabitants. The Method container camouflages well with the terrain, but is used only for bulk fractions. It follows from this that discussions about the best or worst forms of containers are untenable.
Installation of feeder feeder
For complete installation we will need:
- feeder outlet
- leash lead
- fishing tackle
Materials for removing the leash:
- fishing line
Making a leash:
- we make a twist identical to the twist for the outlet
- At the end of the twist we make a double knot, the so-called locking knot. Tighten it tightly, cut off the ends
Making tackle:
- Either monofilament or braided line is used
- string a swivel onto the fishing line with an outlet for the feeder
- put a small silicone stopper on the fishing line
- tie the fishing line to the leash outlet
- cut off excess antennae
The leash is ready, all that remains is to attach the feeder and leash.
We looked at a variety of options for making feeder feeders. The article provides the most optimal and fairly simple methods. Producing your own feeders will become automatic after a short time, you just have to want it.
This way you will save a lot of money, plus you will have something to do on winter evenings. Treat this activity as a hobby in which you can show your creativity.
What weight is suitable for a river and a lake?
The weight of the feeder is not chosen arbitrarily. You should be guided by two considerations:
- How far do you intend to throw the load?
- What is the depth of the reservoir and the speed of the current.
Determine the casting distance by testing the rod. If you plan to fish from the lake shore, take a pickerel with a weight of up to 60 g. For long-distance casting into the river, Heavy and Extra Heavy class fishing rods weighing 90 grams or more are suitable. The most common are the medium variants of Medium rods. Follow the rule: the weight of the equipped feeder should be 70-80% of the feeder test.
The relationship between the mass of the feed and the flow speed is as follows:
- for weak water, use containers weighing up to 40 g;
- moderate flow rate – up to 60 g;
- on a strong watercourse - 120 g or more.
Miniature, heavy feed containers are held at the bottom better than large, but lightweight products.
Feeder weight
For feeder fishing, when fishing in medium and strong currents, it is worth using models weighing from forty to 100 grams. The weight of the feeder should also be selected according to the depths in the reservoir, since the deeper, the more fishing line ends up in the water, and the higher the water pressure on the fishing line. The same thing is worth noting with the wind, a side wind pulls the line into an arc, which in turn moves the feeder from the desired fishing spot.
When fishing in reservoirs without a current, it is worth using light weight feeders, where the weight is needed only for long-distance casting. In addition to the shape and weight, feeder feeders are divided into closed and open types. The opener the cell, the faster the food is washed out of it, and vice versa, the closed, the slower. Closed feeders are also used to feed the food spot with maggots and worms.
Closed or open
Bait devices differ not only in geometry. Structurally, they come in two types:
- Closed. The body of the accessory is made of mesh or perforated material: the feeder cannot be completely sealed. Use such products when you want to create a trail of bait, a column of feed turbidity or an extensive feeding area. Through the cells, the loose or low-moisture mixture is washed out with water in portions.
- Open. In stagnant and slow-moving waters, use devices in which a thick, plastic nutrient composition is held in place by rigid ribs. The hook is usually pressed into the edible mass or placed on a leash in close proximity to the feed, with or without bait. Fill open containers by hand if it is a spiral type, or squeeze the mixture out of the matrix.
Designs with a removable or non-removable end cap can be classified as semi-closed options.
About the feeder on the current
Now a little about fishing in the current. The main task of the feeder angler in such conditions is to keep the feeder at one point so that the current does not carry it away. Heavy metal feeders of any shape with lugs that dig into the bottom and hold them in the current cope well with such conditions. The shape of the feeder itself has virtually no effect on its stability in the current. The main pressure of the water occurs on the fishing line, due to which it blows away the feeder.
To wash out the bait more slowly, use feeders of a more closed type.
Advice! To make the feeder drift even less, you can use a fishing line of a smaller diameter, and raise the rod up as much as possible, so that fewer meters of fishing line are in the water.
Feeding trough
This device is used as an auxiliary equipment for starting fish feeding. At the beginning of fishing, to determine a promising point, use large containers. Even an additional fishing rod is suitable for this purpose.
But if, after bulk feeding, you start working with a container of smaller capacity, then there is a high probability of not getting into the same spot. Therefore, use devices of the same size as feeding containers. You can make such feeders with your own hands from wire, a plastic bottle, or metal. Only cork bottles will be ineffective.
DIY plastic feeder for feeder
Such feeders are usually created from improvised materials, so you do not need to look for and buy materials in stores, because every home has them. The advantage of this option is its cost and ease of manufacture.
Feeder made from a plastic bottle
Another name for a plastic feeder is Cheboryukovka. It is called after the name of its creator in the mid-2000s - Igor Cheboryukov. Cheboryukovka is famous for its simple design and ease of manufacture, literally from improvised means.
A number of advantages of such a feeder:
- floats well to the surface of the water
- variability of shape and thus achieving the functional features you personally need (any volume, feed capacity)
- ease of manufacture and availability of materials
To create a Cheboryukovka you will need:
- plastic bottles from which the body of the future device will be made
- scissors
- stapler or soldering iron
- hole punch or soldering iron
- lead sinker
- pliers or pliers
- paper clips
Good to know! So, you have decided what purpose (for what fish) the feeder will serve. Accordingly, we found out the required weight of the sinker and estimated the required volume and feed capacity.
Manufacturing stages:
- Cut blanks for housings in the form of rectangles from plastic bottles. Namely, cut off the bottom, then make a cut along the straight part of the bottle to the neck and cap of the bottle, or to the narrowing or ribbed part (if the shape is unusual). Leave only the straight part, cut off the rest
- on the resulting blanks, outline the required dimensions (length and width), mark the locations of future holes with dots
- cut the plastic according to the outline
- in cases where the feeder is large enough, you can use a hole punch to make holes
- Roll the edges of the plastic towards each other into a cylindrical shape. Staple them or solder them
- Use a soldering iron to burn holes if necessary.
- secure the sinker
On average, sizes vary from 4-4.5cm to 5.5-6cm in length and diameter up to 4cm. When unfolded, the length remains the same, but the width ranges from 11cm to 15cm. Before you start working with scissors, it is recommended to mark the dimensions with a marker directly on the plastic.
Good to know! As a sinker, you can use either specially cast ones in homemade molds or purchased in a store, or you can use ordinary lead plates, which are easily attached to the feeder. For the last option, just buy sheets of lead and cut them with metal scissors.
The length and width of such plates are selected depending on the required weight of the sinker using a simple formula:
- Thickness x Length x Width x 11.34 (specific gravity of lead) = weight, g
Feeder made from women's curlers
It would seem, how can a fisherman use women's curlers? The fact is that they make good feeders, because they initially have a suitable shape and the necessary holes for feeding.
It is also worth noting that the sizes of such feeders are easily adjustable. All you have to do is use the cutters and the optimal diameter is achieved. You should choose curlers made of durable plastic that does not have a strong repulsive odor.
DIY cork feeder
Materials:
- plastic bottle cap
- copper or brass wire
- ordinary paper clip
- lead sinker
Manufacturing stages:
- cut out pieces of lead plate with a diameter slightly smaller than the diameter of the plastic plug
- 4 holes are burned in the cork
- pull the wire through the holes made and tighten it tightly
- 4-5 holes are burned on the sides. Of which 3-4 are needed for leashes with hooks, and 1 for a ring
Homemade feeder feeders from photo printing machine filters
Such filters are excellent in all respects to the future design: light and durable plastic, cylindrical shape, mesh structure.
It's quite easy to get them. To do this, you need to contact photo centers. The fact is that filters wear out and are thrown away, you just need to agree that you will take them for yourself.
Materials:
- lead sinker
- copper or brass wire
- directly filters from photo printing machines
Manufacturing:
- a bend with an eye is twisted from the wire, which is necessary for attaching to the tackle
- cut the cylindrical filter into 3 equal parts, this will become the body of the product
- We cut lead plates with the necessary parameters. They are usually 6 to 7 centimeters long and 1 to 2 centimeters wide.
- We fix the sinker and wire to the body, bending the edges of the plate
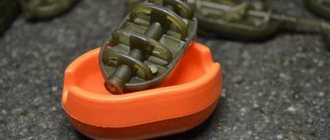
Flat "Method"
These are open feeders weighing more than 110 g. The unique shape ensures that the accessory with a wide lead bottom lies flat on the bottom, does not roll along it under the force of the current, and does not fall into the silt.
Step-by-step instructions for a feeder “Method” for a do-it-yourself feeder:
- Draw an egg-shaped shape on a wooden beam, hollow it out with a chisel (2-3 mm). In the blunt part of the “egg”, make a groove for the embedding pin.
- Make three arcs from steel wire: two of the same size, one larger.
- Place the resulting ribs in the mold perpendicularly, install the embedding pin.
- Melt the lead and pour the mold.
Tip: To reuse the container for pouring, wet it with water.
Your question to an expert
Luka Strelnikov
Professional fisherman with extensive experience
Ask a Question
DIY feeder “Method” for feeder
A fairly popular and effective feeder model, recognized by many anglers. But at the same time, there is practically no description of the production of the Method on the Internet, despite its prevalence.
Material:
- rubber plug from electrical junction box
- plastic disposable glass or small glass
- lead plate of the required size
- flat head screws
- soldering iron
Manufacturing stages:
- From the cup we will make a container of the desired shape. We cut out the bottom and attach a rubber stopper in its place. To ensure that the structure remains strong, we glue the cork to the cup.
- select the desired length of the body, cut off the excess
- edges are processed with sandpaper or sandpaper
- Cut out 2 circles from the plate, with a diameter slightly less than the diameter of the cup. We place one plate on the bottom, screw screws into the other so that the bait holds tightly
The advantages of the Method are the relatively large volume of complementary foods and the proximity of the hook to the bait. The feeder shows itself both in calm areas of the reservoir and in areas with current.
Sliding feeder
This installation differs from the blind one in that a hollow tube is laid inside the feeder through which the fishing line is threaded. The container slides freely along the cord, reacting especially sensitively to bites.
Sliding feeder
Place a tube for free passage of fishing line into a flat feeder before pouring lead or into a wire barrel-shaped structure.
How many feeders to buy
First, let's remember the test of the rod that we chose for fishing. Let's say you bought gear with dough up to 120 grams, you need to select several sets of feeders, of the same shape, and of different weights.
Several sets are needed so that in the event of a break, it is possible to replace the feeder with a similar one. Don’t be afraid that there will be a lot of feeders. Take feeders in 20 gram increments.
As you gradually master the gear, you yourself will understand which feeders you need, but for starters, this will be enough. Also, don’t be afraid that half of the cells will be lying around idle. Feeders are consumables; it often happens that there are a lot of snags at a promising location.
Someone will ask, what if I found a fishing spot and it requires a 70 gram feeder, what should I do with the rest? Believe me, they will come in handy in the future. It happens that your favorite place is occupied, or perhaps you will be invited to fish in another body of water, and then you will need the rest of the feeders. Well, as a last resort, you can sell them.
How to close any feeder
The situation at the fishing session may require maintaining the bait. Close the mesh feed container as follows:
- Take heat shrink tubing. The optimal diameter for all sizes of feeders is 50 mm, shrinkage is 25%.
- Measure the container, cut the tube according to this parameter, leaving 5 mm allowances for the edges.
- Place the device in the tube.
- Immerse the structure in boiling water for 5-10 seconds.
If the bottom of the cormak has hooks, then in hot water a complete fit of the shrink material will not work. Correct the matter by heating the bottom part with a lighter or torch. Press a cloth onto this part and hold until it cools completely.
DIY floating feeder for feeder
When fishing on reservoirs with muddy bottoms, this feeder is best suited. It is also suitable if bottom feeders are ineffective; the fish are poorly fed at the bottom.
Materials:
- mesh cylindrical body. The material is not so important; a galvanized mesh rolled into a tube and a metal or plastic cylinder, etc. will do.
- carabiner
- fifty centimeter leash
- construction foam
- thickened wire rod. It is acceptable to use part of a motorcycle wheel spoke
- heat-shrink tubing
Manufacturing stages:
- lace one edge of the cylinder crosswise
- fasten the wire rod
- fill the edge with foam
- remove excess foam that has gone beyond the cylinder
- coat the foamed part with glue
- we paint the foam in a color that stands out against its background
- We attach the clamp to the rod. Heat-shrink tubing secures the rod tightly, ensuring a secure fit
- We use a carabiner to secure the collar with the leash, which then needs to be attached to a 25-centimeter loop of fishing line
Sinker casting mold
The equipment element, the sinker, is a frequently lost consumable.
Sinker casting mold
Therefore, it is advisable to make your own mold and cast the weights at home.
Casting the weight for the feeder
Prepare a sample sinker (purchased or made yourself), a plastic container, and plaster.
Further process:
- Pour gypsum into the water, ratio 1:1, stir until creamy.
- Grease a plastic container with rich cream and fill it with plaster to the middle.
- When the mixture begins to harden (2 minutes), place the sample in it, insert guides made of toothpicks and lollipop sticks along the edges.
- Lubricate the surface with cream, fill the second half of the container with plaster.
- Let the workpiece dry for 30-40 minutes, remove it from the container, separate the two halves.
- Dry the resulting parts for 2 days.
- Place wire lugs along the guides for further fastening.
- Secure the plaster halves together with a clamp.
- Drill a funnel for casting.
- Melt the lead on a burner and pour it through the funnel into the mold.
After cooling after 20 minutes. Pull out the finished sinker.
DIY metal feeder for feeder
The advantage of this option is its cost and availability of materials. Durability and design variability. Such feeders (for example, a spring) open up additional opportunities for the angler.
Feeders made of metal mesh, wire or galvanized
You need to purchase galvanized mesh from a hardware store. One square meter of such a net is enough for about 10 feeders, despite the fact that its cost is minimal.
As a sinker, just as in the case of Cheboryukovka (a little lower, in the section on making a feeder from a bottle, this method is described), you can use lead plates. But it will be more convenient to cast sinkers of the desired shape and weight yourself.
Let's celebrate! This is, in fact, the most difficult stage of production. The mold for casting can be purchased at specialized stores or you can cast it yourself.
Here is the list necessary for making a mesh feeder:
- copper wire
- galvanized mesh (it is advisable to choose one that is not too soft, with 5x5 cells)
- wire cutters
- wooden or metal blocks of any shape (they will be needed to make an even rectangular shape of the body)
- pliers (to secure the lead tightly)
Instructions:
- First you need to cut small pieces from a large mesh with wire cutters. Rectangles measuring 8cm by 21cm are perfect for creating a rectangular feeder body
- Using any block, bend the grid into 5 cells, then 5, then twice more into 5, in the end there are 3 cells left.
- the edges overlap each other by exactly one cell each
- the resulting rectangle is secured with copper wire. If there is no wire at hand, then fixation can be done using a lead weight, which should hold firmly enough
- Now that we have formed the shape we need, it's time to cast the lead. Casting lead is a simple matter, but it requires accuracy and a careful approach. Remember safety: wear gloves and make sure the room is well ventilated during the melting process. Pre-clean and dry the form itself. The most suitable shape will be a flat shape, which will later be easy to bend around the mesh. A budget option is a plaster mold. Using a plaster mold, you can save on buying a store-bought mold, and also adjust it if necessary.
- now you need to make a wooden sinker blank
- mix the plaster and carefully lower the previously obtained wooden blank into it. In case of any troubles, you can always work with a chisel, changing the unsuccessful shape
- after the operations performed, not quite even edges of the shipments may emerge, grooves may remain, fortunately, all this can be easily sanded. It is advisable to make a thickening in the middle part, and the edges will accordingly become thinner, which will ensure a high-quality strong bend
- the resulting sinker is installed on a pre-prepared mesh
- Remember to attach the feeder to the equipment. The swivel and carabiner can be installed either on a finished structure or during installation
Spring feeders
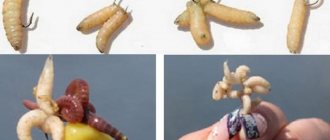
The principle of operation of the feeder: the internal spring is compressed, fixed with fertilizer (any easily soluble in water, most often pieces of bread) and thrown into the water.
The feeder has 2 holes through which you can push an oblong piece of bread, which will allow you to secure the spring. After a few minutes, the bait gets wet and the spring unclenches, throwing the contents out.
To create such a design with a spring you will need:
- copper or brass wire
- ballpoint pen refill
- pliers or wire cutters
- lead sinker
- a cylindrical object for winding wire (for example, a bolt)
- monofilament
The wire thickness varies from 1mm to 3.5mm. To equip the spring, you need a piece of 0.3mm monofilament, 50cm long.
Manufacturing stages:
- the wire is wound around a cylindrical object. Depending on the selected size, from 7 to 12 turns are made, then the wire is bitten off
- Now you need to achieve a barrel-shaped workpiece. To do this, expand the diameter of the central turns using pliers, and, on the contrary, narrow the outer turns
- then the rod from the handle is inserted into the spring
- excess wire and rod are bitten off with pliers
- sinker is installed
How to attach a feeder to a feeder
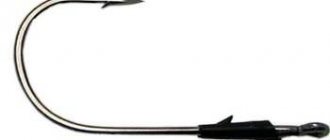
There are many ways to mount a cormak to a fishing rod. But the main division is between blind and sliding fastenings. In the first option, use all kinds of knots (“Clinch”, “Loop to Loop”, “Surgical”), loops (Gardner, symmetrical and asymmetrical), as well as a swivel with a clasp.
However, even in loops, installing a feeder feeder with your own hands can be done in two ways: you let the container move along the cord or firmly attach the accessory. In sliding installations, the fishing line must be passed through a hollow rod, allowing the equipment element to move along the thread. You can limit movement with stoppers (beads, rubber tubes, knots on the fishing line).
An excellent way to attach the feeder to the feeder is through a swivel with a carabiner. In this case, you will easily manipulate the containers in accordance with the fishing conditions.
Feeder feeders
The main purpose of the feeder is to deliver food to the fishing point. It also plays the role of a load. Therefore, it is worth choosing a feeder based on the test of the feeder rod (the weight of the feeder along with the bait should be no more than 80% of the upper limit of the test).
Now in the fishing world there are many options for feeder feeders:
- Cork feeders for feeding feed (Feeders for feeding animal feed);
- Checkered (mesh) feeders (used for crumbly bait);
- Open feeders (viscous bait is used so that when it hits the water it does not immediately crumble).
Cork feeders for feeder
These feeders come in fully closed, semi-closed and open types. They are made of plastic and have slots on their side surface through which the bait is washed out.
Cork feeders are designed for feeding fish with animal food.
Open ones are best used for feeding in standing water or in weak currents, and closed or semi-open ones are best used in medium or strong currents.
Mesh feeder feeders
There are both metal checkered feeder feeders and plastic ones. In turn, each category is divided into types according to the shape and nature of the flow of the reservoir.
Metal mesh feeders
There are such feeders:
- In the form of a cylinder (only for standing water);
- Cylindrical with a flat bottom (suitable for a reservoir with a current);
- Rectangular (current-resistant);
- Triangular.
These feeders for feeder fishing are convenient because they are heavier than plastic ones and easily cut through the water column. They also sink to the bottom faster.
When choosing such feeders, you should inspect the entire surface to ensure there are no nicks or sharp edges.
The disadvantage of such a feeder is that it is not convenient to use them in places with algae or snags - they can get caught - they do not float up well.
Plastic feeders for feeder fishing
As a rule, they are made in a cylindrical shape. Available with or without wings.
The disadvantage of such feeders is the casting range and the inability to use them in currents.
Otherwise, they are very good, especially in standing water and in places with algae.
Feeder feeders with load hooks
The peculiarity of these feeders is the presence of spikes on the flat bottom-load, which reliably dig into the soil of the reservoir.
Designed for fishing in intense currents.
Feeder feeders "Bullet" - for long casting
Such feeders are especially great in the fall, when it is necessary to make long casts. An additional load is installed on them, due to which long-distance throwing occurs.
Silent - fits perfectly into the water.
There are both metal and plastic, cylindrical.
Feeding troughs on the feeder
These feeders are designed for the first feeding of fish, for delivering the first food to the fishing site.
They are most often made of metal, but plastic ones are also found. They are open at both ends.
They have a larger capacity than other types of feeders to deliver food faster.
Open feeders for feeder fishing
Such feeders are used for catching fish in still waters or weak currents.
The flat method is a more modern version of the nipple. Thanks to its flat and wide base, it works great in muddy bodies of water, and can also be caught in weak currents.
Feeders and feeder in the form of a spring (spring)
This type of feeder was used by our grandfathers and fathers. The feeder itself consists of a spring and a hollow plastic tube located inside this spring. There is a weight on the tube - either in the middle or at the ends.
The main line is passed through the hole in the tubes. And three such spiral-shaped feeders connected in series form a tackle known to us as the “Crucian Killer” (in the following publications I will tell you what kind of tackle this is and how it can kill a crucian carp).
When choosing a feeder for a feeder, pay attention to what place for fishing you choose - whether there is a current there or not. Look at the weight of the feeder and monitor the test of the rod.
It is also worth choosing several options for feeder feeders for a flat bottom of the reservoir and with silt, so that God forbid you do not lose your precious feeder.
I also draw your attention to reading interesting publications:
How to do starter feeding correctly
On our website we have repeatedly published articles on how to find the best fishing point for a feeder:
Measuring the depth with a feeder on video
Study of the relief and characteristics of the bottom, the depth of the reservoir
Studying the bottom
After such a point has been selected, they begin feeding. When fishing with a feeder, bait is most often delivered using a feeder, regular or special with an increased volume. If the fishing distance is short, then you can feed with balls from your hand, a slingshot or a cobra, as in carp fishing.
In any case, there should be one rule:
The bait should be delivered as accurately as possible to the selected point.
When fishing for carp and grass carp on a flat feeder, it is customary to feed areas of several square meters. But there the fish are larger and a different approach is needed. When fishing with a classic feeder, the bait should be as compact as possible.
Varieties of classic feeders
The best feeders for feeders are those selected for specific conditions. We have already discussed the parameters above. Round, square - for everyone. The main thing is that the design is reliable. It is more important to choose the right option directly while fishing in order to comfortably hit the feeding point over and over again. Let's look at different options for feeder feeders based on their design and shape.
Square cells
Conventional square-shaped feeder cages are used on any bottom rigs. They are often supplied with a plastic bottom covering the back. These versatile feeders are made in a variety of sizes and weights. For feeder fishing, the bottom must be removed.
Round
Cormacs with a round cross-section fly better. In the current, contrary to popular belief, they hold up just as well – you just need to choose the weight and shape of the sinker. For fishing in the current, it is better to use feeders with a wide flat bottom, with rounded edges on the inside in the shape of a net cylinder. The current will not be able to turn this form of cormak over. Designs with an oval cross-section hold up even better in the flow. These feeders are flattened from top to bottom. Some manufacturers produce a conical shape, which is wider on the side where it is attached to the equipment. This mesh shape provides good aerodynamics and casting range.
Bullets
For long-distance tempo fishing, it is convenient to use bullet feeders (missiles). Not to be confused with carp feed for boilies and pellets. The bullet feeders on the feeder are loaded with a sinker, shifted to the bow of the structure. The load is located on the axis. Such feeders fly the best, and at long distances, especially in the wind, their use is justified. They can also be used in shallow water to less frighten large fish. When dropped into water, the bullet splashes more quietly than a standard flat-bottom design.
For live bait
Feeder feeders for live food, bloodworms or jigs, closed. They are a closed container with holes through which larvae or crustaceans slowly emerge in the water and settle nearby in uneven bottom topography. Such feeders are indispensable when fish go only for live feeding, often in cold water.
Floating feeder
Floating feeders are used when fishing in still water for carp, grass carp, and silver carp in the water column. In this case, the feeder floats on top, releasing the food stuffed into it downwards. To do this, you can use special store designs that look like large floats with a spring at the bottom, as well as regular feeder feeders by inserting a piece of cork or foam into the mesh. With this equipment you can also catch river fish - roach, sabrefish, blue bream, chub. Floating Feeder is a separate direction of feeder fishing with its own nuances and features.
Inline feeders
Another large direction of feeder feeders is structures for attaching to the main line using the inline principle, through the entire body along a through channel. Moreover, such sliding feeder feeders can be mounted in both a blind and running version. These are a variety of devices for method feeder fishing - petal models, flat-bottomed flats, banjos and pelet scoops (sticks). A spring feeder for the feeder is also suitable - in the equipment as on a regular donk. However, in feeder fishing it is better to use feed devices specially sharpened for this gear.
Flat method
Flat feeder feeders are a further development of method designs that work on a similar principle. The feed is stuffed on one side, the other is loaded with a flat sinker. A hook with a nozzle on a short leash is hidden in a lump of bait. After entering the water, the lump is destroyed and the bait is released. Because of this, flat rigs can be used on overgrown reservoirs - the hidden hook will not catch on grass and algae when casting. A flat sinker prevents the rig from sinking into soft mud. The scope of application of flat equipment is fishing in still water for crucian carp, carp, carp and other pond fish. In a strong current, this principle does not work, since the lump of bait will quickly be washed away and carried away to the side.
Nipples
On feeder gear, you can use bottom nipples (tops, plugs), crucian carp killers and other bottom rigs. However, with the right approach, it is better to use the methodical method - it is more active and universal. Bottom spring equipment operates on a passive principle when installed for a long time. A nipple or crucian killer can be put on a regular spinning rod - troubles with a feeder rod and thin equipment lose their meaning. With a good bite, both the feeder and the bottom work normally. However, the feeder is more versatile and allows you to successfully catch fish when the bite is bad and the bottoms are silent - due to active work with bait and subtle experiments with equipment.
Feeding troughs
Sometimes in feeder fishing it is advisable to use special feeding cages with a large feed capacity and low load. They are needed when you need to quickly deliver a large amount of bait to the point during the starting feeding at the beginning of fishing. This may be required during summer fishing for crucian carp or crucian carp. In strong currents, it is better not to use feeding feeders, since after changing to a working one, the configuration of the equipment will change. Due to other drift by the current, the working equipment may simply not reach the fed point.
DIY feeder feeders
You can make feeders for feeder fishing yourself. The simplest option is to attach the desired weight to the plastic curlers with screws or rivets. The cage can be rolled up from metal - mesh or a solid sheet, followed by drilling holes. The design can be anything - the main thing is to adapt it to the fishing conditions. For successful fishing, you need to comply with the features that are described in detail at the beginning of the article.
Installation
Feeder fishing is not passive. A set of fishing feeders should be at hand. First you need to select the weight at the beginning of fishing. Often in the process it is also necessary to change equipment, increase or decrease weight and feed capacity. Therefore, a bag for feeder feeders should be at hand, as well as leashes with hooks.
In standard installations, the feed device is attached to the equipment with a noose loop or through a regular carabiner clasp. In the sliding version - a running feeder, a symmetrical or asymmetrical loop, the fishing line is passed into the eye of the swivel or the outlet bead. Anglers make the attachment point to the equipment differently, depending on the installation used and personal preferences. This is not critical - the main thing is that it is simple and reliable, without additional unnecessary elements.
Source
Feeder shape
I suggest buying feeders of one shape, because no one knows for sure which is better, I personally use square feeders, and my friend prefers triangular ones, and both shapes hold up well in the current.
With the correct weight, the shape does not matter, since the bait is washed out faster than the current can turn the feeder over. It is better to pay attention to the type of sinker. Personally, I divide the sinkers (for square feeders) into 2 types, narrow and wide.
Narrow sinkers are better to stay in the current, flat ones float up well. Which form do you prefer? It all depends on the fishing conditions.
If you fish on the edge, it is better to choose a feeder with a flat (wide) sinker. In such places, the feeder is carried under the edge, and it is held by the edge and not the bottom. If fishing is carried out on a flat area, for example on sand, then it is better to choose feeders with a narrow sinker.