Casting with a carp rod, tips for increasing range
Using the long-range universal casting technique, you can use both single nozzles and special PVA packages. When carp manifest themselves at large distances from the fisherman and regular casting does not allow delivering the bait to the right place, long-range casting will come in very handy. With practice, you will be able to cast the rig not only very far, but also quite accurately.
During such a cast, the rod will compress more than with a standard cast from behind the head, and therefore the speed of the tip and sinker increases, which in turn has a positive effect on the distance.
Such an ultra-long cast requires a rather unusual position of the performer’s body, so first it is advisable to practice only with the rod itself, without weight or equipment.
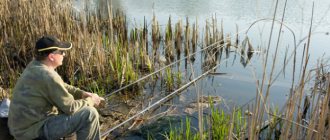
So, first you need to position your feet correctly at an acute angle (about 45°) to the direction in which you are going to cast the rig. We turn the body so that the chest is at a right angle to the casting direction. The position of the straightened left arm is slightly above the head, while the right arm is laid back and slightly bent to make it more comfortable for the fisherman, and the tip of the rod pointing down is about 1 m from the ground. The gaze should be directed a little further than the chosen target location, in order, if necessary, to stop the cast being too low. In the photo you can see the approximate position of the fisherman’s body when performing this universal casting with a carp rod.
Having learned to take the correct initial position, it is worth practicing only with a “naked” rod in order to get the correct arc. Remember that the rod in this case also moves over the shoulder, and not from the side around the body.
After practicing the technique itself, you can move on to full-fledged attempts at ultra-long casting. Having taken the required position, pay attention to the location of the sinker itself, which ideally should be on the line between the tip and the heel of the left foot. The sinker and rig will lie on the ground. This position of the equipment should not confuse you, since directly during casting it will instantly rise and will not drag along the ground.
If you want to bring this casting to perfection, sending the bait to a distance of 180-190 m, pay attention to a number of small, but quite important points.
Sliding float - equipment and use of equipment
The first question that arises when considering a sliding float is what is it for?
Let's imagine a situation: you need to cast a tackle 10-15 m with a rig depth of 6 m, using a 4 m long fishing rod.
Imagine how you suffer and try to quit? This task is not possible if you use a fixed float.
How the tackle works
The float, sliding along the fishing line, lowers to the main load, which makes it possible to wind the fishing line under it.
When casting, you have a dangling line of no more than 1 m, which will not interfere with casting using a 4 m long fishing rod; after casting, the line is released through the float to the depth set by the rubber lock.
Which float to choose
The range of sliding floats is quite extensive. They vary in weight categories, just like regular floats. The more weight you can put on, the easier it will be when casting long distances. Also, for ease of casting, such floats are equipped with a certain weight inside the body.
But I would like to pay a little more attention to the shape of the float itself. Conventionally, they can be divided into three types of forms:
- round – for casting over a short distance in calm weather;
- oval - for medium distances, with average wind;
- extended – designed for long casts in windy weather.
Rigging a fishing rod with a sliding float
Since this tackle is intended for long-distance casting to great depths, the fishing rod must have rings and be equipped with a reel.
The installation of the sliding float itself does not have any special tricks. You just need to know a few nuances and you're done.
In order to set the depth, use a locking unit for the float. Some fishermen stop the float with rubber (silicone) stoppers or lead shot, which makes it very difficult when casting, clinging to the fishing rod rings.
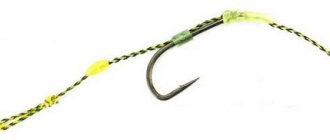
Stopper assembly for sliding float. Such a knot passes through the rings much easier and does not interfere with casting. For the knot you need 15 cm of fishing line, which is used as the main one (you can also use soft nylon rope, thin section). How to tie a knot is demonstrated in the picture.
For convenience, sometimes a knot is tied on the insulation of an electrical wire or some kind of rigid tube. Then the fishing line is pulled through the tube and the locking knot is pulled off the tube onto the main fishing line, all that remains is to tighten and trim the excess ends.
When tightening the knot, be sure to wet it so as not to deform the main line. Also, when cutting off excess line on a knot, you need to leave 2-3 cm at the ends so that the knot can fit well through the guide rings of the rod.
I suggest watching an example of tying a stopper knot in a short video.
Now we pass a special swivel onto the main line to attach the sliding float. You can see several types of such swivels in the picture on the right. This will allow the float to slide freely along the line.
We need to decide what type of cargo we will use. If we use a sliding one (in the form of an olive), then it must be threaded after the float swivel. If we use a simple fraction, then it can be attached later.
Now we attach a small swivel to the end of the main line, to which the leash with a hook will be knitted.
Loading the sliding float
Some fishermen use one weight, without additional weights (light weight shot) and, in my opinion, this is not entirely correct.
When using one weight, your tackle will be vulnerable to snags and not very practical when fishing with a wire, but it will be suitable for fishing in still water.
When fishing in a current, the loads should be placed in descending order, starting from the float and leaving 1-2 pellets at the lower end in front of the leash (picture No. 3).
Which equipment option to choose is up to you. Figure out what suits you best under the conditions of the reservoir and act.
You can either buy a sliding float or make it yourself. Before answering the question: How to make a sliding float? It is necessary to consider the difference between a sliding float and a regular one.
They differ only in the presence of a ring (spring) for fastening at the bottom of the float. If your float does not have such a fastening, then you can make it yourself by bending a loop of wire, which we glue to the float. If we use a goose feather, take a pin with an eye, which we stick into the lower part of the float.
A float rod with a sliding float is very effectively used when catching bream, carp, perch and many other fish.
In order not to be unfounded, let's watch a video that dynamically displays the entire process of fishing using a sliding float.
Long casting with a carp rod (tips)
- The smaller the nozzle, the less air resistance will be. For this reason, it is better to use small (1-1.5 cm) nozzles.
- When the rod feels too stiff during an ultra-long cast, you should increase the line hang, and vice versa, reduce it when the rod feels too soft.
- The sinker must be aerodynamic and weigh at least 3 ounces.
- Use short leaders that keep the bait close to the sinker during flight.
- To reduce friction, the line is wound onto the spool almost to the very edges.
- Lower guide rings with a diameter of 50 mm also reduce line friction well and increase casting distance.
- Thin monofilament line or braided cord flies further. However, remember that during casting there is still a chance of getting caught on grass or a branch.
How to make the longest cast?
In our recent articles, we looked at how to make the correct cast, deal with wind directions and correct the work of the rod. We also looked at the problem of the rod overlapping around the guides and subsequent line breaks. Today we will look at several theses on how to achieve the longest cast and at the same time maintain accuracy.
fishing line
The most important thing in a fishing line if you want to cast very far is its diameter. At the moment there are several options for monofilament fishing line with diameters of 0.25-0.26 mm. They are produced by Fun Fishing, Shimano, and FOX has released this line since last fall. We successfully caught it at the last competitions, we really liked it and for the next season we decided to switch to FOX Exocet 0.26. Before this, we always used Shimano fishing line, but it is one and a half times more expensive than FOX. We even did a review of this fishing line - here.
Shock leader
be sure to use a shock leader. The optimal length of the shock leader is a length that will be sufficient so that, with enough overhang of the equipment, there will be at least three turns of the shock leader on the spool. We always use a braided shock leader. According to our observations and experience, a longer distance can be achieved with a braided shock leader than with a mono leader. Although the monoleader does make it much easier to catch fish under the shore.
Sinker shape and weight
Bullet. There's not much to talk about here. The most aerodynamic shape, the best flight qualities. The bullet shape of the sinker is the most popular among all anglers who want to fish far from the shore. As for the weight, it usually ranges from 4.5 to 5 ounces. Such heavy sinkers help to load the form well, and at the same time, even at a distance of 150-160 meters, you can tighten the line and record the bite. Sinkers are suitable for any well-known carp companies that everyone knows.
Rod
We are currently using Horizon X5, but this is a competition. Watch our video with a review of the Exocet 0.26 fishing line; we cast the rig with a FOX EOS rod at 150 meters. The main thing is the test and length. The length should be 13 feet and test 3.5 ounces. So you can easily use a 4 oz sinker on a 3.5lb rod. On regular fishing trips, 150 meters is above the roof. Of course, this may not be enough for sports, but in sports the requirements for equipment are completely different.
How to prevent the equipment from getting tangled?
We catch with a helicopter, and sometimes we don’t catch with a helicopter and we still don’t get confused. The answer is simple - a small stick. We make a stick for long casts of about 1.5-2cm, and we always wait for the clip to hit before the rig touches the water. If this does not happen, we reel it in and make another cast. We will throw over and over again until we are absolutely sure that the rig is positioned the way we wanted. Don’t be afraid to waste time; if you’re not sure, re-cast.
If you don’t throw to the point with the stick and the only way out is to remove the stick, then you should throw clearly into the clip. When you hit the clip, the rig will stretch into a line and lie parallel to the water. In this case, it would be better if your partner monitors the flight of the rig, ideally catching the splashdown point with binoculars or a rangefinder and making sure that the rig stretches into a string after hitting the clip and does not get wrapped around the leadcore. But we are now talking about the most extreme distances.
Clipping
We always clip exactly the same way, with a marker and a spod. Purely mathematical if you calculate that the straight line to the fishing point on the surface of the water and the depth are two legs, and the distance from the shore to the fishing point on the bottom is the hypotenuse. Simply by calculating using the Pythagorean theorem, you will understand that the error there is so insignificant that the meaning of all these distance adjustments that many people talk about is generally unclear. You will say if there are obstacles on the way to the fishing point - well, here you were working as a marker and had to explore everything. This is a slightly different topic, we are just talking about what length to measure on the fishing lines.
So, it’s always the same on all fishing lines – marker braid, spod, and working rods. Moreover, you must realize that carp fishing is a constant spread of equipment, rockets in a 5 by 5 meter square for the best athletes, and even 10 by 10 meters for ordinary fishermen. Therefore, there is absolutely no need to measure centimeters. You should be approximately in the area of the fishing point. Even if you move a little to the side, it’s even better, all the big fish are standing away from the spot.
Full or partial copying without the consent of the portal editors is prohibited
Carp reels for long casting
The casting distance is also greatly influenced by the reel. The reel should be large, roomy and have a smooth spool surface. The maximum casting range is achieved in reels that have a cone-shaped elongated shape (Long cast). The quality of the line laying machine is no less important.
Long casting carp fishing
Often, carp, especially true trophy specimens, can only be caught at a considerable distance from the shore. Therefore, there is a need for either a boat or long casting if you are fishing from the shore. We will talk about this in more detail.
For such fishing, you will need special equipment, both in quality and, accordingly, in price. It’s true that you can also benefit from this if you choose something most suitable from the promotional fishing kits https://www.mirrybolova.com.ua/aktsionnye_komplekty.html.
- First of all, we need a strong and rigid two-handed match rod, at least 4.5 meters long, with a forward reel seat and a weight of 10 to 25 grams. Such gear will allow you to fish a fairly large area, at a considerable distance from the fisherman.
- It is better to take a power reel, inertia-free, with a sufficiently capacious spool and preferably with an adjustable brake.
- As for the fishing line, in our situation I do not advise you to get carried away with a large diameter, since for long casting the tackle must be balanced. Therefore, fishing line with a diameter of up to 0.35 mm will be quite sufficient.
- The type of sinker depends solely on the bottom of the reservoir - for clay it is taken to be elongated, for silt - round.
The bait should also be special here.
- First of all, it is of sufficient density and viscosity, which will not allow it to crumble until it reaches the bottom.
- The bait is rolled into balls, which can be thrown using a special bait slingshot.
- It is better to use bait in such a way that in the future there is no need for repeated feeding, which will probably only scare away cautious fish. After all, we primarily count on catching large carp!
It is better to cast the tackle a little further than the feeding point, after which the line is slightly submerged. At a considerable distance from the shore, carp can grab the bait quite decisively, so the angler has to be on guard all the time. A large carp hooked in time, as a rule, ends up sitting securely on the hook, and the likelihood of an escape is minimized. Here everything will depend on the strength of the gear and the skill of the fisherman.
Catching carp in spring on a feeder
morefishing.ru
Swish sinkers
Of course, a novice fisherman has many mistakes and inaccuracies in technique. However, the first thing I want to draw your attention to is a simple but important thing - sinker hang. By this I mean the distance from the rod tip to the sinker before casting.
As a rule, it should be 1.5-1.8 m. Since we are using a 3 meter long rod, the optimal length would be 1.4 meters. In order not to measure the distance with a ruler every time, it is best to install the sinker at the level of the joint of the rod’s knees.
This is an extremely important aspect in order to load the entire rod evenly and generate more power. Many novice anglers often wind the sinker close to the tip, so only the tip of the rod is involved during casting.
The optimal length of the sinker overhang is usually equal to the joint of the rod knees.
After this, the girl makes a few more casts with the sinker hanging correctly, so far without any other changes. It is always important for a quitter to feel the difference from one change and “accept” it.
Correct grip
The next step on the path to success is a secure grip on the rod. Beginners, including our girl, often hold the rod in place of the reel foot between the middle and ring fingers. At first glance, placing your fingers “in the center” may seem logical, but a more secure grip for a carp rod is to place the reel leg between your ring finger and little finger.
Katya again makes a series of casts and already feels that this arrangement of fingers is much more convenient. In addition, when the index finger releasing the line is higher, it is easier to catch the moment the line is released.
Mark changes his grip on the rod and reel.
1. Beginners often hold the rod by the reel leg between the middle and ring fingers.
2. It is safer to position your fingers so that the coil leg is located between the ring finger and little finger.
Hand placement
As with the near-rod grip, many beginning anglers hold the rod closer to the center with their front hand rather than near the edge. When you take a carp rod in your hands for the first time, it is more comfortable to place your hands close to each other in order to better control it. But this is a deceptive feeling, taking away several meters and accuracy.
Your front hand should be as close to the base of the rod as possible. Thus, when making a cast, the thrower will push it towards himself, putting a load on the entire form.
The front hand should grip the base of the rod to fully load the blank when casting, as in the second image.
The girl makes several casts and you can already see how her range has increased by several meters, and the sinker began to fall in one area of the water area, which indicates an increase in accuracy.
How to properly catch carp on a feeder
When developing method feeders for catching carp, grass carp or barbel, the main idea was related to the need to present the bait directly under the nose of the fish. The hook with the nozzle should be located in close proximity and provoke it to bite.
The consistency of the bait is made such that it does not fly out of the feeder when casting and gradually dissolves at the bottom of the reservoir after it gets into the swim. Dissolution time is 20-40 minutes, it all depends on the presence of current and water temperature.
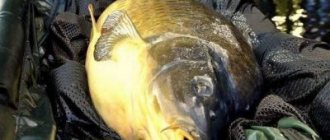
The carp approaches the feeder, attracted by the smell of the bait, and begins to “vacuum clean” it. The hook dangling nearby falls into the fish’s mouth, and it is caught under the weight of the feeder. The fisherman can only carefully place the caught trophy in the landing net and, after taking a photo with it, release it back into the reservoir.
Studying the fishing spot
Preparation for feeder fishing for carp occurs in almost the same way as in classic carp fishing, because in both cases it is necessary to choose the right distance and fishing location. To do this, use marker equipment, with the help of which the bottom topography in the fishing sector is studied, and promising points are selected.
It can be:
- eyebrows;
- exits from pits;
- places with significant differences in depth;
- on a silted reservoir there are areas of hard bottom.
Feeding the point
After determining a promising point, starting feeding is carried out using Spomb - a feeder in the shape of a “rocket” for delivering bait to distant points.”> spomb or feeding rocket.
The attractiveness of bait serves as an additional factor that helps attract large trophies, which are the main goal of the fisherman.
Fishing for carp in current and still water
Fishing conditions also influence the strategy and tactics chosen by the fisherman, because the time of erosion of bait in reservoirs with current and standing water differs significantly. In rivers with strong currents, carp and carp are also successfully caught using feeder tackle, but more sticky bait is prepared that stays in the feeder for a long time.
The leash is also different, it is made up to 15 cm long, and the equipment at the bottom is located in a cloud of food washed out of the feeder. In reservoirs with stagnant water, the bait is made crumbly so that it is washed out faster.
During those 20-40 minutes while the equipment is in the water, the bait should be washed out of the feed.
Bait for the feeder method
Special baits for the feeder method are sold in specialized fishing stores and have information on the packaging. But those who want to save money make such bait themselves from available ingredients.
To prepare bait for carp you will need:
- powdered milk – 1 part;
- fresh flour - 2 parts;
- ground corn - 2 parts;
- corn flour – 2 parts;
- semolina -2 parts.
All ingredients are crushed and mixed, and already at the pond water is added to them to achieve the required consistency. Carp will like homemade bait no less than store-bought bait, but in financial terms it will be cheaper than store-bought food.
Carp baits for feeder fishing
The following baits are used for catching carp on a feeder:
- fresh and dry corn;
- boiled peas;
- Boilie is a fishing attachment used in modern fishing for carp species of fish.”>boilies, bottom and dusty;
- pop-up floating boilies;
- floating plastic corn;
- neutral boilies and dumbbells;
- airy dough with different smells.
The use of small hooks when fishing for carp using the feeder method also requires small bait sizes. It should be attractive to fish and provoke a bite.
The choice of a particular bait depends on the composition of the bait mixture and the seasonal gastronomic preferences of the carp. When fishing with bottom boilies, it is better to use a snowman setup, where half of a sweet clover is used in the lower part, and half of a floating pop-up boilie is used in the upper part.
The bright color of the pop-up attracts the attention of the carp and its curiosity causes a bite. Single pop-ups and artificial corn are also considered great baits because they perform the basic functions of lifting the hook and attracting fish.
Boiled peas and corn are also mounted on the hair using a thin needle, and in order to raise the hook, a replant made of plastic corn or half a pop-up is used
Single pop-ups and artificial corn are also considered great baits because they perform the basic functions of lifting the hook and attracting fish. Boiled peas and corn are also mounted on the hair using a thin needle, and in order to raise the hook, a replant made of plastic corn or half a pop-up is used.
Installing the spool
A quick tip that should become a habit. Ideally, the reel spool should be at its highest point. On some reels, the spool rises several centimeters, lengthening, and this should have a positive effect on the accuracy and casting distance.
Katya adds this aspect to her technique and makes several casts. The learning process proceeds gradually and each new element is practiced.
It is advisable to have the spool in the top position before casting.
Aim high and...push
A major problem many beginners have is that they don't use their front hand and only push the rod with their back hand. The beginning of the movement of the rod should just be provoked by the movement of the front hand towards you towards the chest. This needs to be worked out in your head.
It took Kate 20 minutes to stop pushing the rod with her back hand and actually use her front hand. The brain thinks that since I need to move forward, I will push the rod forward. But in fact, the front hand should push towards itself as hard as possible, and only then the back one turns on.
This is the first element of casting technique that a novice angler needs to remember. Then you can add the following. You can't try to explain everything at once. Training should be gradual so that a person can calmly assimilate all the information and then apply it.
I also gave her the optimal trajectory. It is necessary to release the line at a moment when the sinker can fly at an angle of 45 degrees. To do this, it is advisable to look at the sky from this angle.
The front hand should push the rod toward your chest. The stronger the push, the further the sinker will fly.
Choosing a carp rod
However, before starting my detailed explanations, I would like to especially emphasize that the forces that will be applied during this super/powerful casting can test any carp rod for lice, revealing (and punishing) all its weaknesses. That is why, before starting training, be sure (!) to make sure that your rod can withstand these loads. In principle, the modern assortment of equipment for carp fishing contains a lot of good and high-quality forms, but I recommend that immediately before choosing and purchasing, be sure to consult with more experienced carp anglers. Since the price for such rods (i.e. capable of powerful casting) will always be – not small!
Even I had many cases when, when performing this particular type of casting, the forms completely broke. But if you (after consulting with more experienced fishermen) wisely choose a suitable rod (i.e. designed for ultra/long casts) and do everything technically/correctly, then there should be no problems! As a rule, there are 2 main points that you should always be wary of:
- Before you make a long cast, be sure to make sure that your braid does not overlap around the top of the rod (this happens very often).
- As for the casting itself, you need to start it - slightly relaxed and slowly, using all your strength and speed - at the very end!
To achieve the best results, it is preferable to use 13-foot carp rods, because they allow you to create a rather large arc. Although, 12-foot models (with a test weight of at least 3.5lb) may also be suitable for this purpose. A Test Curve of less than 3.5lb will not allow your rod to properly cope with long casting, since it will seriously “resist” all the forces (i.e. tension and compression) that will act on it.
Body weight transfer
Now let's move on to another extremely important aspect of the technique, which can bring the most meters. I am a former professional golfer, so I understand the importance of transferring body weight. Every carp angler should realize this.
Let's start with the rack. The legs should not be too wide apart or too close together. The fisherman must stand confidently and not dangle from side to side. The front foot points in the direction of casting, the back foot to the side.
Since the girl is not very tall, her legs are located 35-40 cm from each other on the same line. The main weight before casting should be concentrated on the back leg. The leg can be slightly bent at the knee for comfort and shock absorption.
As you cast, take a slow, deep step with your front foot and shift your weight from your back foot to your front foot. At the same time, as we have already discussed, the front hand pushes the rod towards you, and the back hand pushes forward.
A deep step allows you to transfer weight from the back foot to the front foot and load the rod, which then “shoots”.
On the first try, the girl correctly distributes her weight and the sinker flies into the distance with a whistle. A few more throws and the beginner is no longer completely new to casting techniques. In just a couple of hours, Katya mastered the correct technique, remembered important nuances and practiced well.
Feeder
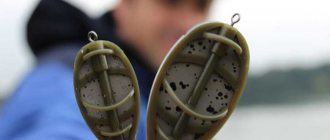
The most important part of the feeder equipment is the feeder. It delivers bait to a specific fishing spot. The market can offer many of its models. When choosing, you need to consider:
- aerodynamic. These are the flight properties of the feeder. They must be good so that you can fish at a great distance from the shore.
- fixation at the bottom. This fact is very important. The feeder should resist the water current, while at the same time coming off well when the fisherman reels in the fishing line. This factor is influenced by the correct loading of the feeder, its weight and shape.
The range of feeders is huge. It is worth highlighting several types:
- Classic “cages”, also known as mesh feeders. Their shape is varied. Its choice depends on the current in the reservoir. Round ones are used in still water, other types with angles are used during currents for a good position on the bottom. In turn, “cells” are divided into:
- Open. Complementary food comes out of it quickly. Use in still water or weak currents.
- Semi-closed. The complementary foods come out slowly, forming a trail behind them. Used during the current.
- "Spirals" (springs). This is a sliding type of feeder. They have good aerodynamics and a simple design. The disadvantages are the impossibility of using it on currents due to its shape, as well as its lower sensitivity due to its design.
- Frame (frame). The most common models for carp. An improved version of springs, where wire coils are replaced with plastic elements.
- Containerized. These closed feeders are used to feed carp with live fillers (maggots, bloodworms, etc.)
- Feeding. These are huge mesh feeders. They work by creating a feeding spot to attract even distant fish. Mostly homemade, rarely seen on the market model.
These are not all types of feeders, but only the most popular ones. To successfully catch carp using the feeder method, it is enough to have two or three types of feeders, even of the same model, but of different weights.
Further work
With each cast, I try to correct the nuances of the stance and the trajectory of movements. The girl tries to remember everything and put it into practice. In a couple of hours of training, she has come a long way for a beginner and is already boldly sending the sinker a decent distance.
She already notices her mistakes and corrects them. This is what I call real casting technique training. I should note that from the very beginning, our ward correctly straightens her arms above herself before making a throw and does not pull them back. Many even experienced carp anglers often instinctively try to swing before throwing, so they move their hands back behind their heads. There is no need to do this!
Already before casting, Katya herself evaluates her mistakes.
It already looks like a power throw.
The real training is if by the end of the day you no longer have enough strength to reel out the fishing line.
Now it's time to compare the results. Katya makes several power throws, some of which fly along an ideal trajectory, so I am confident of a pleasant outcome. Two throws approaching the 115 meter mark! Even considering the fact that she was casting without a rig with a bare sinker, it was very impressive. In a couple of hours, progress of 50 meters cannot but rejoice.