What is hair rig
Hair rigging is a rig , when fishing with which the bait is placed not on a hook, but on a special small leash located next to it - the hair.
If a fish takes the bait, it inevitably pulls the hook into its mouth and is then hooked. Hair rig is the number 1 rig for hunting carp and carp, which was invented in England back in the last century.
Today it is used by carp anglers all over the world. The hair rig has undeniable advantages that explain its popularity and make it the best choice for hunting big fish.
- The bait is fixed on the hair very securely and does not fly off when casting, even with long and powerful throws.
- If the bait is attached to a hook, there is a high probability that a carp or carp will prick itself on the tip when it tries it. After this, the fish may quickly spit out the bait and lose interest in it. In the case of hair rigs, this happens much less often.
- The fish is caught very well. The probability of empty bites is minimal. Often when using this rig, self-hooking occurs - the hook digs into the lip of the carp when it tries to spit it out.
- Hair installation is quite simple to make. To make it, you do not need to use any expensive materials or tools.
- The sting pierces the lower lip of a carp or carp. In this case, the chance of seriously injuring the fish is reduced to zero. This is an important point for anyone who fishes using the catch-and-release principle.
Hair equipment also has disadvantages.
- This type of installation easily clings to grass, stones and snags, since the hook is completely open. Therefore, when fishing in overgrown and snags, you must either use special equipment designed for fishing in such conditions, or be prepared for frequent snags.
- There is another leash coming from the hook, albeit a very short one, this increases the risk of tangling and overlapping.
Hair rig: what is it?
Hair rigging is considered one of the most catchy and safest types of attaching a bait to a hook. It is characterized by the fact that:
- the hook remains completely free of bait;
- the fish, flattered by the bait, pulls the treat into its mouth, and along with the bait, the hook also gets there, which most often clings to the lip;
- it is worth hooking at the moment when the carp is trying to spit out a foreign object and swim away;
- such a device was born in England;
- its manufacturers are Maddox and Middleton.
They often watched carp feeding in an aquarium and noticed that the fish ate everything except the bait itself. Then they realized that this fish was wary of the hook, so it was necessary to separate the bait from it, for this they began to use hair. After this, the fish calmly took the bait, not paying attention to the rest of the equipment.
They also noticed that the hook only catches the lip when the fish tries to spit it out. At the same time, it was not seriously damaged, which made it possible to use hair equipment for sport fishing.
Advantages and disadvantages
The main advantages of hair equipment:
- Easy to manufacture and install.
- High efficiency of catching large specimens.
- Reliability, because the fish does not notice the danger, so it is not afraid.
- Availability, because the necessary materials are easy to buy in any store.
- Safely removing the hook from a fish.
The disadvantages include:
How to catch more fish?
I have been active fishing for quite some time and have found many ways to improve the bite. And here are the most effective:
- Bite activator. Attracts fish in cold and warm water with the help of pheromones included in the composition and stimulates its appetite. It’s a pity that Rosprirodnadzor wants to impose a ban on its sale.
- More sensitive gear. Reviews and instructions for other types of gear can be found on the pages of my website.
- Lures using pheromones.
You can get the rest of the secrets of successful fishing for free by reading our other articles on the site.
- frequent snags, especially in bodies of water with a lot of vegetation;
- any error during installation will lead to ineffective equipment;
- twisting of equipment.
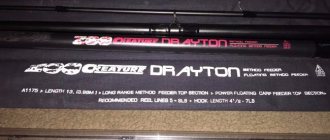
DIY hair rig for carp
Materials and tools
To mount the hair rig , you will need:
- monofilament, braid or special leader material for making hair;
- hook;
- rubber cambric, silicone tube or soluble PVA tape for attaching the hair to the shank of the hook;
- scissors.
Choosing a hook for catching carp with a hair
Every experienced carp angler has his own favorite hooks that are used most often. It is worth paying attention to the following options.
- With a short straight fore-end and a sting located parallel to the fore-end, they are excellent for carp on rivers and for fishing on pressed-in fly boards.
- With a long straight fore-end and a sting located parallel to it, it is a good option for fishing with sinking baits in areas clear of vegetation and debris.
- With a straight short fore-end, the sting is curved inwards - well suited for fishing in difficult conditions, among shells and grass, in rocky areas.
- With a curved short fore-end - better suited for fishing in clean areas. They reliably detect carp, but can cause severe injuries to them during forced fishing, which should be taken into account when fishing using the “catch and release” principle.
- Long Shank – came to carp fishing from fly fishing. Very versatile and can be used in almost any situation. They detect fish well, as they quickly turn around in its mouth.
The size of the hook for a hair rig, as always in fishing, must be selected to match the bait. In the case of boilies, the optimal size is one in which the distance from the forearm to the sting is equal to half the diameter of the bait. This rule should be followed when using any other round-shaped attachments.
Choice of hair material. Hair length
The softer the line or leader material used to make the hair, the less likely it is to scare away wary carp.
The disadvantage of soft leashes is that they get more tangled when casting. Based on this, it is worth choosing the best option for fishing in a given situation.
To make the soft leash tangle less when casting, it can be treated with a special gel, like Kryston Superstiff. It makes the leader material or braid rigid, and dissolves when it gets into the water.
The optimal rigidity of the leader material is also selected according to the size of the nozzle. The smaller the bait, the more rigid it should be.
The length of the hair directly determines how well the carp or carp that is interested in the bait will be hooked. If the hair is too short, the hook digs into the upper lip of the fish, sits in the corner of the lower lip, or even flies out of its mouth when hooking. If the hair is too long, the rig will often get tangled when casting. Also, in this case, the hook often digs into the very edge of the lower lip and does not hold well, accordingly, many slips occur.
In order not to change the equipment every time, adjusting it to one or another size of the bait, you can tie one universal hair equipment, and use stoppers of different sizes for different baits.
Is a rubber tube needed in a hair rig?
A rubber cambric or silicone tube is placed on the hook to prevent the hair from twisting around the shank. As a result, after casting, the installation will lie on the bottom in the best possible way. In such a situation, the probability that the carp will be spotted is maximum.
On the other hand, due to the rubber tube on the fore-end, the chances of the carp getting off during fishing increase. If you do not use it, the number of gatherings will be less. You can replace the rubber cambric or silicone tube with PVA tape , which will ensure the correct position of the hair during casting and immediately after falling to the bottom; it will dissolve some time after it gets into the water.
What baits to use with hair rigs when fishing for carp and carp
The best attachment for hunting medium and trophy-sized fish is boilies . These baits are quite hard, so getting them on the hook is quite problematic. Hair rigs are best suited for fishing with them.
But you can use other baits :
- corn;
- peas ;
- boiled potatoes .
How to bait
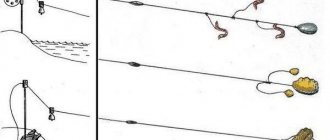
The boilie or other bait must be pierced with a mounting needle, hooked onto the hook located on it, the loop at the end of the leash, and the hair pulled through the bait. Then you need to secure the stopper in the loop and place the boilie close to it.
How to tie a snap: step-by-step instructions
A simple and effective equipment option.
- First of all, you need to take the material for making a leash with hair and cut off 12-15 cm. At its end you need to tie a small loop. It will house the stopper.
- The next step is to tie the hook. This must be done in such a way as to obtain the optimal hair length. To tie a hook, you can use a knotless knot (literal translation - knotless knot).
- Then you need to cut a piece of silicone tube about 6 mm long and thread the leash into it.
- Place the silicone tube onto the shank of the hook. In the following way.
- The final step is to tie a small mounting loop on the end of the leader opposite to where the hook is located to attach the swivel.
This completes the hair rigging . All that remains is to check whether it is connected correctly. To do this, you need to place the rig on the edge of your palm and pull it. In this case, the hook should turn with its point down and stick into the irregularities on the hand. This setup will work as it should and detect fish well.
How to tie a rig for fishing with pop-up boilies
Using a floating boilie together with the appropriate equipment, you can achieve better results than with a sinking bait on a standard hair rig. Pop-ups are in demand primarily when fishing in silty areas.
They do not sink in viscous soil and therefore remain accessible to carp. But recently, floating boilies are increasingly used when fishing on hard bottoms. A bait that rises slightly above it has a much better chance of attracting the carp's attention.
A good setup for pop-up fishing can be done as follows.
- You need to cut off 35 cm of the leader material, and then peel the 12 cm long end from the casing.
- Tie a simple loop on the leash that will secure the boilie.
- Using a needle, place a pop-up boilie or several boilies onto your hair. A good option is to use 2 baits.
- Place the tube on the leader and place it on the shank of the hook. Adjust hair length.
- Start knitting the hook with a knotless knot.
- Wrap the leader material around the shank of the hook 6-8 times, and then pass it through the ring in the direction of the sting.
- Cut 10 cm of heat shrink tube, attach it to the leader material and bring it to the eye of the hook. Then hold the heat shrink over the steam. While it cools, you need to hold the hook with one hand and pull the leash in the right direction with the other to get the right angle.
- As a result, the finished installation should look like this.
- At the end of the leash opposite the hair, you need to tie a loop to attach the equipment to the main fishing line.
- To make the installation even more attractive, you can add a PVA bag to it. The leash must be threaded through it using a needle.
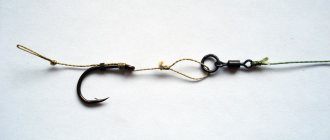
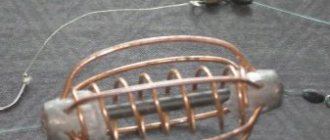
Hair rig
In addition to reliability, hair rigs for carp fishing must provide the following:
- should reliably detect the carp as soon as the carp with the hook in its mouth begins to move. For this to happen, the hook must quickly turn point down when the leash is pulled.
- should not get confused when casting.
The question remains - how to make hair equipment so that it meets these requirements.
Let's consider what recommendations for installing hair equipment for carp fishing are given by the famous carp fisherman Alexander Nosovets.
Selecting hair length
The performance of all hair equipment largely depends on the characteristics of the hair itself. The main parameter remains its length. (The length of the hair is the distance from the bend of the hook to the edge of the nozzle (boilie).
The length of the hair is selected depending on the type of hook, the size of the nozzle and the conditions in which carp is fished. Therefore, we will consider the features of installing hair equipment for the following conditions:
- a standard carp hook is used;
- a hook with a bend in the forend is used;
- fishing is carried out using floating boilies;
- There is a current in the fishing area.
Rigging using a regular carp hook
By ordinary carp hook we mean a hook whose shank has no bend and is parallel to the sting. The recommendation for installing hair equipment here is simple:
- The length of the hair should be 60-70% of the diameter of the boilie (the transverse size of the nozzle).
Therefore, for a 16 mm boilie, the hair length is taken to be 10 – 11 mm. If you make less hair, then the hook will not have time to unfold in the fish’s mouth, the carp will simply spit it out. If you increase the length, the entanglement of the equipment will increase sharply.
Hook with a curved shank
Here it is better to use shortened hair:
- its length should be about 30 - 40% of the transverse size of the nozzle.
This length is quite enough for the curved hook to have time to unfold in the fish’s mouth. But increasing the length will again lead to an increased risk of entanglement (with a bent hook, the probability is greater) and to the fact that the hook will not be swallowed by the carp, since it can rest against the mouth from the outside.
Pop-Up boilies
For floating boilies, it is better not to use hair as such:
- the bait should be right next to the hook.
Floating boilie in equipment
The effectiveness of the equipment will increase if the nozzle is attached to the hook fore-end using a special thread (which is preferable due to increased reliability) or using silicone to metal rings that are located on the fore-end between the stoppers.
Fishing on the current
On the river, for catching carp, it is better to use shortened hair, which should be approximately half the length recommended for use in still water.
The fact is that in such conditions the bait does not remain motionless on the bottom and sways with the movement of the water, and the fish usually takes it on the move. The worse unfolding of the hook here is always compensated by the fast movements of the carp. The hook reliably catches the fish at the corner of its mouth. With long hair, the probability increases that the hook will not get into the fish’s mouth at all. And on the river, a carp that does not take the bait on the move on the first try may not return for it, so the chance of catching will be missed.
Place where the hair is attached to the fore-end
The hookability of the hair rig is also greatly influenced by the place where the hair is attached to the hook.
If we talk about sinking and neutral baits, we can recommend the following.
- For hooks with a straight shank, the usual recommendation is to attach a hair to the shank opposite the point. For fastening, either a steel ring or a silicone tube placed on a hook is used.
- For curved hooks, it is recommended to move the attachment point closer to the bend of the hook. If hooks with an extended shank are used, then two attachment points are made.
How to secure a floating boilie
For floating boilies the situation is a little more complicated. After all, the buoyancy of different types of boilies and other baits is completely different. And hooks can also be applied in different shapes and weights. Therefore, the position of the nozzle on the hook should be checked experimentally in a transparent container with water for each specific installation.
The general requirement is:
- the tip of a hook with a floating nozzle should be positioned at 45 degrees to the horizontal.
A practical test of how the hair rig assembled with the Pop-Up behaves should be carried out in water with any changes in nozzles, hooks, or design.
In conclusion, we can say that for any hair accessories you need to use soft hair. The softer it is, the better the hook unfolds. Therefore, if hard leashes are used, for example, fluorocarbon, another softer material is selected for the hair.
Also, after mounting any hair equipment, do not forget to check its performance (the swivel of the hook) first of all on your hand. Based on materials: Alexander Nosovets
Features of hair fishing technique
More often, several gears are used when fishing for carp and carp. Then the chances of a good catch increase significantly. When fishing with hair, hooking as such is often not necessary, especially if you use a blind mounting of the feeder rather than a sliding one. The carp, trying to spit out the boilie or other bait that he decided to try, plunges the hook into his lower lip.
For this, of course, you need sharp, chemically sharpened hooks . They cannot be cheap; it is better to give preference to products from trusted companies. And even using them, to be sure, you still need to hook each time after a bite. Then a minimum of fish will leave.
Common mistakes when fishing for carp and carp using a hair rig
One of the most common mistakes is the mismatch between the size of the hook and the bait. Many beginners do not pay attention to this point at all. You can still fish with an incorrectly selected hook, but the percentage of bites realized will be lower.
Another common mistake is using hair that is too short or too long. This also leads to a decrease in the percentage of successful strikes, a decrease in the likelihood of self-strikes and frequent derailments.
hair length recommendations On wild reservoirs, where many people catch carp, and on paid fishing grounds, you can experiment with making your hair longer. As a result, the carp may begin to bite more readily.
If the rig uses metal elements that are susceptible to corrosion - for example, weights with lugs that are not made of stainless steel - you need to keep in mind that rust can quickly ruin the leader material. On your next trip to the pond, it may break while fishing for carp if, after fishing, it was in contact with the wire, which caused rust. To avoid unpleasant incidents, you need to monitor this and re-tie the equipment more often.
Elements of hair accessories
To ensure the correct operation of the hair rig for catching carp, carp, crucian carp or bream, it is necessary to optimally select its component elements:
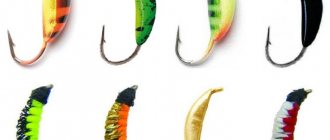
1.Hair. This element is so named because the thinnest fishing lines are most often used: nylon monofilament or braided. You can also use thin fluorocarbon or simple sewing thread.
2.Hook. Carp hooks for hair rigging are used in a special shape; most often in this installation the so-called “bananas” are used.
Banana-shaped hooks have better grip when used in hair rigs.
Advice! You should not skimp on hooks for fishing with hairline equipment; you should choose high-quality products from the most famous companies on the market.
3. The leash for fishing with a hairline rig must be both soft and prevent overlapping of the equipment. In this case, it is best to use leadcore - a soft lead core in nylon braid. It camouflages well on the bottom and submerges the equipment.
4. The rings on the forend, silicone tubes and stoppers for making the rig are selected according to the size of the hooks and lures.
What is hair rig
Back in the last century, in England, a variant of such equipment installation appeared, in which the bait was not attached to a hook, but was attached to a special leash. It is still used today. Especially when fishing for carp and other large fish.
A distinctive feature of the hair rig is that the hook always remains open and free from the nozzle. In this case, the hooking on the fish’s lip occurs due to the fact that it draws or sucks the bait into its mouth, where the hook also falls along with the bait. The carp simply mistakes it for a small twig or some kind of debris, which it has to regularly suck in and spit out when feeding. However, this was not the case. By spitting out the hook, the fish is hooked.
“Hair” installation is done in various ways. However, the basis is a lead made of fishing line, braid or special leader material. This is where the nozzle is placed. It is believed that hair rigs are ideal for catching large bottom fish. This includes carp, which prefers to suck food into its mouth rather than grab it on the move or swallow it sharply, like many predators.
That’s why hair rigs are very popular in carp fishing. It takes into account the peculiarities of the feeding behavior of carp, and also allows you to avoid those situations when the fish, having swallowed the bait, feels the hook and spits it out, “avoiding meeting” the fisherman. This equipment option also has other advantages. We'll talk about them further.
Technique for catching carp with a hair rig
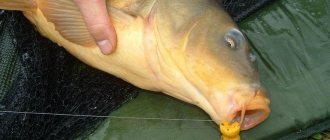
Fishing with a hair rig is one of the effective methods for catching carp.
But fishing should take place in a lake or pond where there is no current or it is very quiet. This method is more appropriate to use in the summer.
When using a hair rig, the fish only sees the appetizing food, but does not see the hook. When the fish tries the bait, it does not feel the hook. As soon as the carp swallows the bait in its mouth, the hook follows on its heels. The equipment is designed in such a way that when the leash is pulled, the hook becomes a sting in the downward direction. Thus, it penetrates the victim's lower lip.
Advantages and disadvantages of hair rigs when fishing for carp
The first step is to become better acquainted with this equipment option. Find out all the pros and cons so that you don’t get an unpleasant surprise while fishing. Let's start with the disadvantages of hair equipment. Essentially there are two of them:
- Predisposition to getting caught on stones, algae, snags and grass. After all, the hook remains completely uncovered. Therefore, it is necessary to fish especially carefully in overgrown water areas.
- There is an increased risk of overlapping and tangling, because from the bare hook there is another, albeit short, leash.
That's probably all. Hair equipment has no other disadvantages. But there are many more advantages:
- The most reliable fixation of bait (boilies, pellets, corn), allowing you to make long casts without fear of losing the bait.
- A more natural presentation of the bait, which is not loaded with a hook. Due to this, the number of bites increases.
- Minimal chances of harming the fish itself (this is important, because most carp fishermen fish using the catch-and-release principle), since the sting mainly pierces the lower lip. Thus, the carp is not injured, and the hook is easily pulled out of its mouth.
- Higher number of successful hooks compared to other rig options. Often the carp even hooks itself, trying to spit out the hook.
- Easy to install. This is another advantage of the hair rig, because it does not require expensive materials, and every angler can make it.
How to make a hair rig for carp with your own hands
Whatever gear you choose for carp fishing, hair rigs will show their best side. Many carp fishermen actively use it even on a float rod when fishing from the shore. In addition, fishing for carp with a hair rig allows you to efficiently attach boilies, pellets, corn, peas, chickpeas and other baits that do not hold well on the hook.
So it will be useful for every carp angler to learn how to make a hair rig with your own hands:
- We prepare the leash (aka “hair”). For this you will need fluorocarbon, braid, etc. Special material for leashes is also available in fishing stores. You can use it. The length you need is about 20-25 cm. The excess can then be cut off.
- At one end of the “hair” we knit a loop necessary for attaching the stopper, which will then hold the bait. This can be done in different ways - using a figure eight or a regular strong knot.
- Then we take a fairly thin silicone tube (thick enough so that it fits securely around the hook). It is also sold in fishing stores. Cut a piece about 3 mm long from it. You can do more - focus on the size of the hook.
- We put a silicone tube on the shank of the hook. Let us remember that this is the straight part located between the hook and the head. In this case, the tube should take place opposite the hook tip.
- Next, we pass the fishing line (or cord, braid, etc., whatever you chose for installation) through the silicone tube and the eye of the hook. And precisely at the end where there is no loop for the stopper. At the same time, we pay attention to the length of the leash - after all, the more fishing line you pass through the tube and eye of the hook, the shorter it will be.
- Then we tie the free end of the fishing line (where there is no stopper) to the hook and/or to the main leash. You can also, for greater reliability, first wrap it around the forend several times.
- Although this is not necessary, it does not interfere with gluing the various connections of the leader material with the hook. Both waterproof “Moment” and special glue from popular carp brands are suitable for this.
Installation of hair equipment
Installation of hair equipment is simple, but at the same time it requires the utmost attention and caution from the performer, because if a mistake is made at any stage, it will lead to a decrease in work efficiency.
A few tips for proper installation:
- It is better to use an elastic leash, as it significantly reduces the number of tangles;
- you can use a torsion tube;
- you should not skimp on materials, it is better to give preference to quality, because carp is a strong opponent and can easily break the tackle;
- When installed correctly, the hook should quickly turn over when cutting down;
- It is necessary that the hook, when it enters the fish’s mouth, clings precisely in the middle of the lower jaw;
- It’s worth checking the quality of the installation before you start fishing, especially paying attention to turning the hook over to the fore-end down position.
It is important to follow all installation rules so as not to waste time on useless fishing. If the hook cannot turn over and properly engage the jaw, the fish will simply spit it out and swim away. In this case, there is no prey to be seen.
Which hook to choose?
There are several requirements for catching carp with a hair rig:
- The banana shape works best for this type of rig. It guarantees a hook and painless swallowing of the bait.
- It is worth taking a model with a long point, as it helps to hold the prey more tightly. But you should not take one that is too long, as this will cause severe injury to the fish and may cause it to break off.
- High-quality metal and sharpness are a guarantee of success.
- The best hook sizes for catching carp are 6-8.
- You should not buy forged hooks. They have low quality material and poor sharpening, which leads to their breakage.
Hair rigs are considered one of the most successful and catchy ones for carp hunting. With its help you can catch a really large specimen. It does not scare the prey, since the hook is located at a small distance from the bait, so the number of bites increases significantly.
Alternative options for installing hair accessories
However, not all anglers use the method described above. Many people also use alternative installation options. Therefore, we will also tell you how to tie a carp rig differently:
- For example, a “hair” is often tied simply by lifting a hook. Moreover, the length of such a leash can vary from 0.5 to 5 cm.
- With another option for installing a hair rig on a carp, several plastic or rubber cambrics are taken, which are distributed on the fore-end and hook hook. Their task is to hold the leash, which is also tied to the eye of the hook (or just below it), and to minimize the chances of the main line intersecting with the “hair”.
- Some carp anglers prefer knotless installation, where the “hair” is simply an extension of the leash.
- Recently, a variant of hair rigging has also become very popular, in which a moving ring is put on the fore-end or by prying the hook. The “hair”, previously tied to the ear, is attached through it.
- Professional carp fishers do not use cambrics or silicone pipes for fastening. They believe that such elements interfere with both fishing and hooking itself. As a result, so that the “hair” cannot overlap around the hook when casting, it is tied with a special PVA tape, which after some time dissolves in water.
By the way, the “D-rig” rig (for floating boilies), popular in capfishing, can also be considered as one of the alternative hair rig options. Its basis is a hook with a loop (or ring) made of fluorocarbon or nylon, which is almost half the size of the forearm. It is to this loop (or ring) that the bait is attached. For example, boilies, which only need to be tied with dental floss or thin fishing line, and then tied to a loop.
As you can see, there are a lot of options for hair accessories. At the same time, an experienced carp angler does not need to carry out installation focusing on only one of them. You can try to come up with your own way to secure the bait on the “hair” separately from the hook, thereby improving the number of effective hooks.
Types of installation of hair equipment
There are several ways to make a hair rig. Each type of installation, when assembled correctly, turns out to be catchy and productive. The choice is up to the fisherman, so you can attach a branch to:
- separate leash;
- regular knot;
- knotless installation;
- D-rig loop;
- ring;
- rotating circular installation.
Each knitting method is easy to learn. Let's look at them in detail.
Separate leash
The hair, made of any suitable material, is attached to the main line with a regular loop. At the same time, the eye of the hook does not allow him to jump down. A loop is knitted at the second free end of the outlet for attaching the bait. Installation ends with fixing it to the forend using a piece of nylon thread.
Recommended reading: Flies for asp fishing
Knotless installation
A simple but catchy option, which is done like this:
- At the free end of the fishing line we make a loop for attaching the bait.
- We put a piece of heat-shrinkable tube of the required diameter on the fishing line so that it passes through the eye of the hook.
- We pull a loop into the eye, and from the second free end of the thread we knit a knot, fixing the hair.
- All that remains is to pull a piece of the tube onto the fore-end and warm it with a lighter to secure the hair.
When heating the thermophyte tube, it is necessary to protect the fishing line and the hook shank from deformation, trying not to damage the integrity and reliability of the tackle.
D-rig loop mounting
To assemble this equipment, it is customary to use fluorocarbon fishing line:
- We make a knotless fastening on the hook.
- We put a small ring on the free end.
- We pull the free line into the eye of the hook and attach a swivel to it.
- We fix the boilie using a piece of thin fishing line, which we fix in the ring.
This design ensures high mobility of the bait and allows the fish to pull it into its mouth at any angle.
Ring mounting
In this case, the hair is tied to the hook with a regular knot, and its extension is fixed on a ring that slides freely along the fore-end. Next comes the usual loop, nozzle and stopper. This setup is designed for catching passive and cautious carp.
Rotating circular mounting
We put two swivels on the hook. The first is designed for attachment to the main fishing line. The second is attached through a winding ring and fixed to the fore-end with stops. We tie a hair to it and attach the bait. We get a movable equipment that rotates in all directions.
Regular knot
The easiest way is in which the hook is tied to the fishing line with an ordinary knot, but the remaining tail is not cut off, and its length is initially selected so that a loop can be formed for attaching the bait to it. Recommended for beginner fishermen.
What is important to remember when installing hair rigs on carp
To ensure that the carp hair rig is truly reliable and does not get tangled when casting, you need to consider the following:
- The leash must be strong and elastic. Therefore, it is best to use fluorocarbon or braided cord. Regular monofilament line is usually not suitable. Pay special attention to the flexibility of the hair. It should be much more flexible than the main line or leader structure. If the “hair” turns out to be too hard, then when biting the hook will rotate, interfering with hooking.
- The length of the leash is another important parameter. If it is too long, it will be difficult to hook the fish. Therefore, if we are talking exclusively about the carp version of the hair rig, then the length of the leash should not be more than 5 cm. At the same time, for beginners, we recommend using a “hair” of about 1 cm. This is enough to catch carp weighing up to 6-8 kg. It’s not worth taking a shorter “hair” - the nozzle will touch the bend of the hook, which, when biting, can prevent the sting from properly entering the mouth tissue of the fish.
- An equally important component of the hair rig is the hook. It should not only be of high quality and sharp. Its shape is also important. As a rule, experienced carp anglers advise taking banana-shaped hooks, which, in their opinion, work ideally with this type of equipment. In addition, the point of the hook should be long enough, which will reduce the number of unsuccessful hooks.
Choosing hooks for hair rigs for carp
Before tying hair rigs on carp, it is important to prepare the correct hooks. The greatest dependence of the hook size is observed not on the size of the fish, but on the size of the bait used. In most cases, it is optimal to use a hook with a distance between the forearm and the tip - half the size of the nozzle. When using a boilie Ø14 mm, it is better to take a hook that has about 6-8 mm between the forearm and the sting.
With the right choice, when retracting the bait, the hook immediately penetrates into the mouth, and large sizes rest against the lip from the outside. If several sizes of boilies are used, the largest diameter is used as the basis for the calculation. The length of the nozzle and the number of boilies do not affect the size of the hook.
If a floating type of tackle is used, it is recommended to increase the hook by 1-2 numbers. The reason for the increase lies in the peculiarities of the location of the floating attachments; they are fixed close to the forend.
Which attachments are best to use with hair accessories?
Fishing for carp differs from fishing for any other fish in the variety of baits used. However, not all of them are successfully combined with hair accessories. Therefore, various baits (worms, maggots, bloodworms, etc.) and dough are not recommended with it.
It is best to fish with a hair rig on:
- corn;
- peas;
- pellets;
- wheat;
- pasta;
- boiled potato cubes;
- various boilies, etc.
Do not forget that in order to attach many baits to the “hair”, you will need a special needle. With its help, it is easy to make a hole in the same pellets or boilies where the leash coming from the hook is inserted. After that, all that remains is to install a stopper to fix the bait.
The installation of hair equipment will be described in the video:
Source: promysel.com
What is hair equipment?
Content
The essence of the equipment is to attach the bait not to the bait, but to a special leash. Using this technique, carp and other wary fish are most often caught. It is distinguished by the presence of a bare hook on a leash, which always remains open. If the bait is correctly placed on the hair and a sharp hook is installed, the hook is produced while the bait is being sucked. The fish gradually sucks up the bait on its own and becomes a victim of self-hooking.
The peculiarities of fishing with a hair do not frighten the prey - the carp perceives the fishing line as garbage (a branch, a blade of grass), which it regularly sucks in and then spits out. Self-hooking occurs when the hook is spit out.
Hair rigs are great for carp fishing
Installation of hair equipment on carp is carried out using several different methods, but the basis remains the same - they make a bend from monofilament or braided fishing line, and leader materials are also used. A nozzle is attached to the bends.
It has been noticed that it is possible to catch large carp and carp with a hair, which are found mainly in the middle and lower layers of water.
Advantages and disadvantages
The main advantages of hair rigs for carp are:
- Easy to manufacture. Even a novice fisherman can do it on his own.
- Tooling efficiency. It shows excellent results for catching both large and medium-sized carp.
- Availability of materials . All components for mounting the equipment can be selected and purchased at any fishing store.
- Equipment reliability. The carp does not notice the hook, so it boldly swallows the bait, which makes the fishing process much more effective than with other types of carp rigs.
- Safety. When a carp swallows the bait, the hook does not go straight into its throat, but hooks onto the lower lip, which makes removing it from the fish’s mouth much easier.
The disadvantages of hair rigging are:
- Prone to overlaps.
- Frequent snags in bodies of water with a lot of algae.
- If installed incorrectly, the fishing result will be poor.
Advantages and disadvantages of hair rigging
When using any hair equipment, there are positive and negative sides.
Advantages
- Easy to produce.
- Possibility to make it yourself.
- When fishing, it helps to achieve maximum catch.
- Available materials.
- To make the equipment, all the substances you need can be bought in the store.
- The equipment is a reliable design.
- Compared to other types, it is in a more advantageous place.
- This type of equipment is safe.
Flaws
- Prone to overlaps.
- If there is a large amount of algae in the reservoir, then the likelihood of snagging increases.
- Not a very big catch if everything is installed incorrectly.
Required materials and tools
In order to successfully produce hair equipment for carp fishing, you should prepare the following materials and tools:
- Material for leash (hair). It can be purchased at any fishing store. Lines for leashes are distinguished by their tear resistance and softness, which makes them almost invisible in the water. As an alternative to leader material, you can use fluorocarbon monofilament or braid. The latter should have a medium diameter and a soft base.
- Hook. For carp, banana-shaped hooks should be used, since they are the most effective for catching this fish. The hook tip should be long and slightly curved. This shape will make it possible to spot the carp as best as possible. The best sizes of hooks for carp are considered to be 6,7 and 8. In addition, the hook must be made only from high-quality materials so that even after the tenth use it does not lose its shape. To catch particularly large carp, you should use hooks that have a straight hook.
- Silicone tube. It is necessary for the correct direction of the hook to the fish’s mouth at the moment when the carp takes the bait. It is very important that the tube is soft.
- Glue for installation.
- Needle for attachments.
- Anti-twist.
- Scissors.
- Their rubber cone or stopper.
- Boyle (floating, with sweet filling).
Step-by-step instruction
There are several ways to tie a hair rig for carp; we will look at the most common, classic method.
Instructions:
- We measure the length of the leash and cut it off - it is 25-30 cm.
- We retreat 3 mm from the silicone tube. It must be cut off, then the leash must be threaded.
- We thread the hook into the tube so that it ends up directly on the shank of the hook.
- We thread the end of the leash into the hook.
- We hook the boilie onto the needle, use the needle to touch the loop on the wiring to put the boilie on by a hair.
- Place a stopper in the place where you want to fix the boilie and secure it.
- We determine the length of the hair; it characterizes the distance between the leash at the exit of the silicone tube and the nozzle. The length is affected by the size of the boilie, the shape of the hook and the intensity of the current in the pond.
- We attach the hook to the rig, but it is better not to use a knot knot. With one hand we hold the hook next to the tube, and with the other we make 8 turns of the leader on the shank of the hook.
- We lay each turn side by side, strictly parallel, so that no overlaps appear. We pull the second end from the leash through the eye of the hook in the direction of the sting.
- We wet the knot and tighten it as tightly as possible. If there is insufficient strength or there is a desire to increase the strength of the knot, glue is applied on top (necessarily of a moisture-resistant type).
- At the second end of the leash we make a loop with a straight knot; it is intended for connection with the rest of the equipment. At the end we put an anti-twist on the tackle.
Read more
What bait to choose for tench?
If you plan to use hooks with a bent shank or catch carp with large bait (over 10 mm), it is better to make a hair 2/3 of the entire length of the leash. If you use an even larger boilie, take a hair length 1/2 the length of the leash.
Hair accessories are easy to install with your own hands
How to knit correctly?
Making hair rigs for carp
The process of knitting hair rigs occurs as follows:
- First you need to measure twenty-five or thirty centimeters from the material for the leashes and cut it off.
- Measure three millimeters from the silicone tube and cut it off. Put on a leash.
- Insert the hook into the silicone tube so that the tube is at the very end of the hook.
- Pull one of the ends of the leash into the ear of the hook (to its very sting).
- Place one boilie on the needle. Hook the needle into the loop of the leash and pull the boilie onto the hair.
- Place a stopper for the boilie and secure it.
- Next, you need to determine the length of the hair , which indicates the distance of the leader material from the silicone tube to the location of the nozzle. The length of the hair depends on the shape of the hook used, the size of the boilie and the current in the reservoir where the carp will be caught.
- After this, you should tie the hook to the rig. This task is performed using a nodeless node. To do this, you need to hold the hook near the tube with one hand, and with the other make eight turns of the leash along the shank of the hook.
- Then it is necessary to lay all the turns in a joint next to each other in such a way that there are no overlaps. After this, you should pull the other tip of the leash through the eye of the hook to its sting.
- Moisten the knot with water and tighten tightly. To give the finished assembly even more strength, you can lubricate it with moisture-resistant glue.
- At the other end of the leash, make a loop with a straight knot for future tying it to another part of the tackle, and then put an anti-twist on the leash.
After this, the hair rig on the carp is considered complete.
How to increase your fish catch? ">
Over 7 years of active fishing, I have found dozens of ways to improve the bite. Here are the most effective ones:
- Bite activator . This pheromone additive attracts fish most strongly in cold and warm water. Discussion of the bite activator “Hungry Fish”.
- Increased gear sensitivity. Read the appropriate manuals for your specific type of gear.
- Pheromone -based lures .
We make hair accessories with our own hands
The main rule for success in fishing with a hair rig is to avoid tangling when casting. If the installation is done correctly, there will be no snags. It’s very easy to make such equipment yourself; you just need to do everything carefully and take your time, checking the work already done.
Necessary materials
For manufacturing you need to stock up on the following materials and tools:
- braided or monofilament line;
- hook;
- needle for mounting nozzles;
- glue;
- anti-twist;
- stopper;
- silicone tube;
- scissors;
- boyle.
Step by step guide
The stages of work for making hair accessories are as follows:
- First you need to measure the leash. The required length will be 20-25 cm, the rest must be cut off.
- After this, you should measure 3 mm of silicone tube, cut it and put it on the leash.
- The hook must be threaded into the tube so that it is located on the fore-end itself. One end of the leash needs to be threaded into the eye of the hook.
- The boilie must be put on a needle and hooked into a loop from the leash, thereby pulling the bait onto the hair.
- After this, the boilie must be secured with a stopper.
- You need to measure the length of the hair that will lead from the silicone tube to the nozzle itself. It depends on the shape and length of the hook, the size of the bait and the characteristics of the reservoir, or rather the strength of the current in it.
- After measuring, you need to tie the hook at the selected distance. For installation, the nodal type of fastening is better suited. It consists of the following: hold the hook near the tube with one hand, and with the other, wind 8 turns along the length of the forend.
- After this, you need to lay all the turns side by side so that they do not intersect or create overlaps.
- Next, you should stretch the free tip of the leash through the eye of the hook to the sting itself, moisten it with water and make a strong knot.
- To ensure that the knot does not come undone, it is worth moistening it with glue.
- At the other end of the leash you need to make a loop to connect it to another part of the rig. A loop with a straight knot is suitable for this.
- An anti-twist is mounted on the leash.
- Next, you should carefully check each stage of the work; if everything is done correctly, then the equipment is ready for use.
How to fish using a hair rig?
The principle of fishing with a hair rig is as follows:
- First, it is recommended to thoroughly feed the place for future carp fishing. The best bait for him is boiled corn with a lot of sweet flavors. At the same time, it is important not to overfeed the fish, otherwise the carp simply will not bite at the boilie. Complementary foods should be added in small portions every hour.
- Place the boilie on the hair. In addition to this bait, you can also use corn, since it is a favorite dish of carp, or steamed peas.
- Make a cast to the suspected location of the carp. It usually swims in reed beds or in areas near sunken trees where the current is quieter.
- When the equipment sinks to the bottom of the reservoir, you should expect a bite. When the carp swallows the boilie, it will feel the line in its mouth and want to spit it out. In this case, the fish will move quickly and will itself be caught on the hook tip. At this moment, the angler will see that the rod tip is oscillating and the fishing line is being pulled tight.
- Then you need to slowly reel in the line to bring the carp closer to the coastal zone.
- After this, you can already hook the carp. It is important to know that you need to hook it very carefully, since the carp has a weak lip, which can easily break if hooked sharply, so the fisherman must do everything quickly, but not too hard.
- The final stage of fishing is removing the hook from the lip of the caught carp. Usually fishermen do not have any difficulties with this.
Instructions for tying hair
Before knitting, you need to determine the required length of hair, which depends on the shape of the hook used. When using a standard carp hook, the shank of which is parallel to the sting, the length should be 60% of the diameter of the boilie, that is, with a boilie width of 17 mm, the length of the hair should be 10 mm. In the case of a banana-shaped forend, the length should be 40% of the diameter of the boilie, that is, 7 mm in the case of a boilie with a diameter of 17 mm. Having determined the length of the hair, you can begin assembling the tackle.
We begin production by knitting a loop with a diameter of 5 mm at the end of the leash material. It is important to make a strong straight knot that will not come undone. Next, we make 2-3 pieces of silicone tube no more than 5 mm long.
We measure out 50 cm of the leash, cut it off and attach the finished pieces, bringing them to the loop. We pass the hook tip through these silicone tubes, starting from the side opposite the loop, it is important to do this slowly so as not to damage the silicone.
You should get hair of the required length, onto which we will put a boilie with a small loop at the end. We insert the free end of the leash into the ring on the hook from the tip side and make six turns; we insert the rest on top of the ring, thereby securing it with a non-knot connection.
We place the boilie on the hair, for which we make a hole in it with a needle and string it onto the hair. To do this, insert the stopper into the loop you made. Any available material will do, even a thin toothpick, and pull the boilie from the hook. The hair rig is ready.
There is an easy way to check the quality of the made equipment: place the hook on the palm of your hand and pull slowly. If it turns around and clings to the bumps on your hand, then you did everything right. All that remains is to make a loop at the free end for attachment to the fishing line using a swivel.