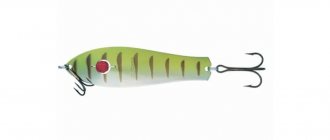
DO IT YOURSELF (Mercedes Kirilych spinner)
I also decided to show my homemade product, which I made today, after reading many sites about this lure over the past week. Here is one of the sites, after reading which, I could not help but think about soldering, so to speak, this spinner for myself.
https://podsekai.ru/podbor-snastei/ekskluzivnye-snasti/zimnie-blesny
I found on one of the forums what it looks like.
Then on one of the sites, its full size. The size, as I understand it, was taken specifically from Kirilych’s spinner, since the letter “K” is engraved.
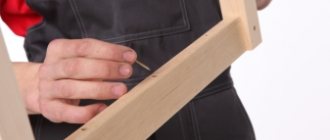
First, I cut out a pattern, which I then used to make blanks for the sides of my future spinner.
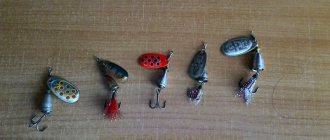
Materials such as copper and brass are not a problem, but with silver it is a little more difficult, although you can buy it for money in a jewelry workshop. At the same time, order the plate thickness you need.
I still have silver-plated plates 0.5 mm thick from old stocks, from some military circuit boards. So I decided to make one from the sides and the other from copper.
Having adjusted both plates to size and slightly bent, I soldered them together.
Maintaining a size of 2mm over the entire area.
After that, I cleaned the finished spoon. True, a little tin got on both sides of the spoon from the edges. It’s not a problem to clean the copper side from solder, but the silver side is a little spoiled at the edges, since the thickness of the silver coating is probably microns.
Well, I’ll make the next one without any flaws, especially since you can make copper-brass, or you can, as I wrote above, from silver sheets.
And this is the copper side, although why not make this spoon from a sheet of copper or brass 2mm thick.
I tried how this spinner plays in a large 20l. bucket and he himself was surprised by her performance. With a short toss, falling down, it goes very far to the side, and with a sharp jerk to the top, during a free fall it sways intensely from side to side.
Yes, I’ll add a photo, I took another one this morning (brass-copper).
All that remains is to test it on the water, which I will do on my first fishing trip.
EVERYONE HAS NO TAIL OR SCALES.
Mercedes Benz drawing
Homemade winter spinners. Spinner based on Merc-60.
Hi all.
Recently, a question was asked on the site about making simple catchable spinners for perch and pike perch. After scouring the web, I found a suitable copy with good reviews, and the simplicity of the “birth” process is simply captivating. So, especially for Dmitry Kornet: - meet the Mercedes-60 spinner :).
The guys from Rusfishing shared these template sizes; later, after digging around the Internet, I came to the conclusion that this size is the closest to the author’s.
Since the thickness is equal over the entire area and is 2 mm, the easiest way is to make a spoon from metal of the required thickness. The only drawback is that the bait turns out to be one color, but this can be easily solved by sticking or painting one or another of the sides.
Go!
After transferring the dimensions to the metal plate, we use a grinder to cut out the workpiece, leaving a gap for sawdust and cutting errors.
Next, sandpaper comes into the process, with which rough features are removed, then a file to adjust the size to size and smooth out the edges a little...
... when we are convinced that the workpiece has reached the finishing line and the spinner has “settled” within the specified parameters, we measure the point for the mounting holes, use a core, and drill holes with a 2.5 mm drill. We remove the burrs and pass the spinner on both sides with sandpaper. * It is better to do this on a flat surface, sanding the entire plane in a circular motion.
... polish the Mercedes using a felt wheel and GOI paste. If everything was done correctly, then the weight of the hardware without body kit should be approximately this:
When all the manipulations with grinding, drilling holes for the winding rings and polishing are completed, we begin to give the desired bend. Using spacers (I used two wooden rulers), we clamp the spoon in a vice so that at the widest point we can bend it a little (literally 3-4 degrees), bend it and assemble it.
My total weight came out to exactly 10 grams -
The author's one has all the corners covered and it looks something like this:
I left it as is for now and tested it in a bucket, to be honest, despite the simplicity of execution, the game is impressive.
Now some advice for those who want to make a Merc in a two-crown version.
To make it easier to maintain the thickness of the spinner over the entire area, you can solder copper rods of the required cross-section to one of the crowns. Let's say the thickness of the metal of your flakes is 0.3 mm, 0.3 + 03 = 0.6, which means the wire cross-section should be 1.3 mm. The rods can be laid both across the crown of 4-6 pieces, and along (one millimeter from the edge, fill the rest with solder and “marry” both sides. Yes, I almost forgot, with a two-crown option it is better to set the bend before the “wedding”, the rest : sawing, grinding, holes... everything is the same.
Third option: single-crown with water. Here you need to cut out the workpiece, accurately adjust it to size, make the desired bend, apply tin over the entire plane a little more than 2 mm, grind off the excess. To make it more convenient to fill the crown with tin, you can cut a hole in a piece of wood in the shape of the future spinner, put the metal there, tin it and fill it with solder, then remove the excess solder, drill it and equip it.
Double-crown and single-crown spoons with the same dimensions will be slightly lighter than those cut from solid metal, so don’t be alarmed, this is normal.
According to reviews, the spinner works from 2 to 13 meters, I haven’t had time to check it yet. Who needs smaller spinners, here is the Mers-40 -
According to these parameters, the spinner should weigh 5-5.5 grams.
Experiment with the angle of bend of this spoon, reversing the tee on the other side and low-low frequency.
How to draw a Mercedes-Benz C Class
Our team of artists and editors love Mercedes-Benz cars. And that’s why we have already drawn many different models of this famous company. But mostly we painted very expensive and elite models. Today we decided to draw one of the most accessible models from Mercedes and created a lesson on how to draw a Mercedes-Benz C Class .
Step 1
Like all previous drawing lessons, the lesson about the Mercedes-Benz C Class will begin with the main outlines of the body. Let us remind you that the lines of this and the next steps should be very light, because in the next steps (more precisely, starting from the third step) we will gradually erase these lines.
Step 2
The radiator grille and long headlights stand out in front of our Mercedes-Benz C Class. Next we draw the outlines of the rear view mirrors and large wheels. Let us remind you that, starting from the next step, we will use darker and sharper lines for the final details of our Mercedes-Benz C Class.
Step 3
Using dark smooth lines, carefully draw the outline of the radiator grille and oblong headlights. Please note that Mysedes-Benz has two types of grilles: either a large logo in the center of the grille or a small logo above the grille.
Step 4
Here we continue work on the front of our car. Using long smooth lines draw the outline of the hood. Now move to the lower front of the car and carefully draw out all the lines of the bumper and license plate. Be sure to erase any unnecessary marks from the front of the vehicle.
Step 5
Now we need to work on the top of our car. Continuing the line of the hood, carefully draw the contours of the roof. Next, carefully draw out the windows and rearview mirrors. Don't forget that the lines should be smooth and clear.
Step 6
Here we continue the lines of the windows and carefully draw out the doors as shown in our example. Continuing the smooth line of the roof, carefully draw out the rear section and taillight. Next, draw the handles on the doors and two longitudinal, slightly curved lines on the side surface of the body.
Step 7
This step is probably the most difficult in this tutorial. Here, using smooth lines, we need to draw out the wheels and wheel arches. These parts should be as round and smooth as possible. At the same stage, we need to erase all unnecessary indications from the body of our Mercedes-Benz C Class.
Step 8
Now let's move on to the wheels. First, draw a small circle in the center of the headbands, and then draw lines going from the center to the edges. But don’t forget that you can draw rims both in this example and in our other lessons (for example, about the Mercedes-Benz GLS) or come up with your own design of rims.
Step 9
If you have drawn the body and wheels of your car, then start drawing shadows. First of all, draw highlights on the body and windows of our Mercedes-Benz. Then, using heavy shading, draw shadows in the areas shown in our example.
If you did everything correctly, now you know how to draw a Mercedes-Benz C Class . Despite the fact that our website already has many different lessons about different Mercedes-Benz models, we will still continue to create new lessons about these cars. Support us by following us on social networks and sharing our drawing lessons with your friends (or on your website if you have a website).
.
How to draw a Mercedes-Benz CLS
We love all sorts of cool cars, especially Mercedes-Benz and especially the Mercedes-Benz CLS. And in this very drawing lesson we want to show you how to draw a Mercedes-Benz CLS step by step .
Step 1
Let's start with the most basic contours of the car. Take a pencil in your hand and draw the general contours of the body, as shown in our example. Let us remind you that in the first stages of all our drawing lessons we recommend using very light lines so that they are easier to erase in the future.
Step 2
Let's now add the most basic parts to the body of our car. Let's start with the front of our Mercedes-Benz CLS and draw out the outlines of the headlights and grille. Then draw the outlines of the mirror, wheels and wheel arches, as in our example.
Step 3
So, starting with this step, we will use very clear and dark lines. For the final drawing of the car, we will start from the front, carefully drawing out the radiator grille with the Mercedes-Benz logo and the headlights.
Step 4
We continue to work on the front part of our Mercedes-Benz CLS and carefully draw the outlines of the bumper with air intakes and a license plate. Next, we rise a little higher and draw out the hood with long smooth lines.
Step 5
Continuing the line of the hood, carefully draw out the low roof of our car, which smoothly flows into the trunk. Then carefully draw a very narrow line of windows, as shown in our example. Draw the mirror and move on to step number six.
Step 6
Let's now go down a little and start drawing the side of the car body. Here we need to draw the lines of the doors with the door handles and the lower edge of the body. In the same step, draw the visible rear of the car and decorative lines on the side.
Step 7
Now is probably the most difficult stage of the lesson on how to draw a Mercedes-Benz CLS , in which we will draw the wheels. First, we need to very carefully draw the shape of the wheels. After this, no less carefully pull out the wheel rims.
Step 8
And the last step of the lesson about the Mercedes-Benz CLS, in which we will draw shadows. Using shading, apply shadows where the light does not fall. In the same step, add some highlights to the windows and draw the grille texture using crossed lines.
In fact, this is our favorite car, and we really want our readers to be able to draw a Mercedes-Benz no worse than the artists on our site. And if you have learned how to draw this car, then all that remains is to buy it in real life and take care of insurance. What other cars would you like to see on our website? Write to us about it in the comments under this article or on our social networks.
.
DIY Mercedes spinner – Funny Video
At the same time, order the plate thickness you need.
Winter spinner, six
I still have 0-thick silver-plated plates from old supplies, from some military circuit boards. So from that I decided to make one on the sides and the other copper.
Having adjusted both plates to size and slightly bent, I soldered them. Maintaining a size of 2mm over the entire area. After that, I cleaned the finished spoon.
True, a little tin got on both sides of the spoon from the edges. It’s not a problem to clean the copper side from solder, but the silver side is a little spoiled at the edges, since the thickness of the silver coating is probably microns.
Well, I’ll make the next Mercedes winter spinner without the Mercedes winter spinner, especially since you can make copper-brass, or you can, as I wrote above, with silver sheet.
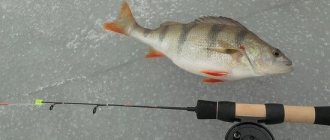
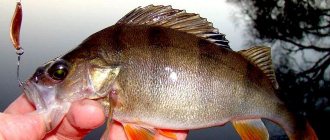
This test will be the simplest at the moment, since I have been fishing with spinners from the Kirilych collection for more than 5 years. There isn't a single bait in this collection that doesn't work! There was a time when there was a queue for a winter Mercedes spinner on a bird and registration was kept for the production of spinners.
Now the master has passed away, but the collection has been preserved. Mercedes belongs to the category of chaotically falling spinners. During free fall, it moves from side to side while swaying intensely.
Often the fall of the spinner is chaotic, that is, the bait in free fall can go a little to the left while maintaining its sway, then to the right and literally after 15 - 25 cm again to the left. Without question, the Mercedes winter spinner is one of the most catchy vertical spinners for pike and pike perch in still water at depths of 2 to 3 meters.
There were times when I caught bream on it, and not always of impressive size. Perch - not always, no more than yes!
MERCEDES spinner
Although striped grams bite regularly from the tee, the Mercedes winter lure was not invented for this fish. Further more As for the method of using this bait, there are many options possible. One of the most catchy retrieves are unusually sharp, 25 - 30 centimeter jerks with pauses of varying lengths.
Sometimes it is useful to make a series of short, centimeter-long jerks; this type of wiring is most often used when biting pike perch or bersh. Mercedes joins the game even after a 5-centimeter jerk, the main thing is that there is a free fall, thereby making itself not fussy about wiring!
The best game with a diameter of 0. Equipped with very durable Owner rings.
From practice
How to draw Mercedes-Benz SLC
We love Mercedes-Benz cars, and we know you love these cars as much as we do.
Our website already has a huge number of drawing lessons on various Mercedes-Benz models, and today we want to continue the line of cars from this company on our website. As you may have guessed, today we will show you how to draw a Mercedes-Benz SLC .
Step 1
First let's sketch out the basic outlines of the car body. Please note that today we are drawing a car without a roof, so the first step of this tutorial is very different from the first steps of regular cars.
Step 2
Now let's add the basic outlines of the body parts of our Mercedes-Benz SLC. In the front part we draw the outlines of the headlights, radiator grille and bumper. Next, draw the outlines of the wheels, mirrors and seats.
Step 3
Starting from this step, we will use clear and dark lines. Using these lines draw the outlines of the headlights and grille. In the middle of the radiator grille we draw a large Mercedes-Benz logo.
Step 4
We continue to work with the front part of our Mercedes-Benz SLC. Here we need to draw the outlines of the bumper, license plate and hood line. Also here we remove all unnecessary indications from the front of the car.
Step 5
Now let's move on to the top of our car. Continuing the line of the hood, carefully draw out the windshield. Next, draw the visible parts of the seats and rear view mirrors.
Step 6
Here we need to draw the back of the car, the outline of the door and the door handle. Don't forget to draw the air intake on the side of the body.
Step 7
Here we will have to try hard, since we will draw wheels and arches. They should be as round and smooth as possible, as in our example.
Step 8
Now let's draw the rims. Please note that we have drawn classic Mercedes-Benz car rims, but you can of course draw any rim design you like.
Step 9
Use intersecting lines to create the texture of the radiator grille. Then add shadows and highlights using dense shading, just like our artists did.
If you followed our instructions exactly, now you know how to draw a Mercedes-Benz SLC . But if you found this lesson too difficult, visit other lessons on our site because we have many easier lessons about cars. Also, don't forget to write your opinion about this lesson under this article or on our social networks.
.