In those days when hunting was the only available way to catch food, many lakes and rivers became fishing spots. Obviously, the more fish you catch, the better. As humans continually evolved, fishing for food fell into second place and fishing became a sport instead. But one thing still remains true - the bait that catches more fish is truly superior.
So let's start making a wobbler with our own hands
Use a hacksaw blade to saw off a piece of hard foam of the required size. Using a knife, we give the workpiece the shape of a future wobbler, sand it with coarse sandpaper, then fine sandpaper to a smooth surface (photo 1). At the bottom of the wobbler blank we make a longitudinal cut (photo 2).
We cut out a blade from plexiglass, file it and use needle files to the desired shape (photo 3). I use plexiglass 3–6 mm thick. We make a cut in front of the wobbler at the selected angle. If necessary, increase the cut according to the thickness of the blade (photo 4).
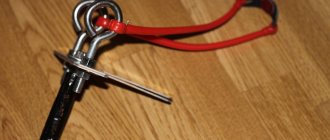
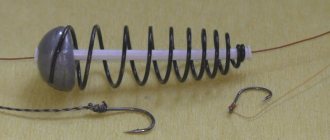
We make the fittings for our wobbler from stainless steel or nichrome wire with a thickness of 0.6–0.8 mm, along the length of the wobbler. We insert the reinforcement into the body of the wobbler from below; the cut under the reinforcement must be made deeper; insert the blade.
Fishing. Information portal "LANDFISH"
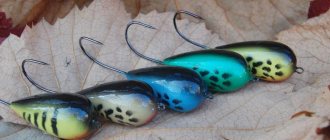
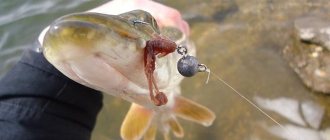
I don’t know how it is for anyone, but for me summer is the time for ultralight spinning, and fishing is done mainly with crankbaits. This is especially true for small rivers - rapids or calm, but with return lines or with bushes hanging over the water. Who, tell me, will be left indifferent by the desperate resistance of the chub, the sharp blows of the asp, or the monotonous, but no less pleasant fishing for pike perch in the twilight? A crankbait is a kind of universal bait for fishing both in calm water and in the current, if it is stable enough. Wide, intense play ensures the fish will lock in in murky water, even in fast, noisy rapids. At the same time, a good wobbler maintains play even at extremely low speeds. Such a wobbler can be pulled as slowly as possible even in still water, giving time to the hidden predator to make a decision to attack.
How to make a Cheburashka sinker with your own hands? Read our article Making a Cheburashka sinker at home
I remember one of my first and most successful crank wobblers. That wobbler, however, cannot be called ultralight, after all, it is 5 centimeters and 7-8 grams of weight. But I couldn’t resist making an ultralight analogue of it. And I didn’t try very hard, let’s put it that way. How about making a smaller template and off you go! But a proportional reduction in all sizes means a sharp reduction in the weight of the bait. Let's say you want to make a 5cm wobbler smaller than a 4cm one. Reduce the linear size to 4/5 = 0.8 from the initial one, that is, by 20%. Not so much. And weight? To recalculate the weight loss, we must take into account the decrease in the entire volume, that is, all dimensions. If you take 20% from each of the three dimensions (length, width and height), the resulting volume and weight will be 0.8 × 0.8 × 0.8 = 0.512 from the original, that is, it will be reduced by almost half.
This is the arithmetic. I wanted to make a crank wobbler no more than 3.5 cm long, which promised a weight reduction of more than 3 times compared to the 5 cm model. And along with the mass, as you understand, the casting range also decreases. What to do? Should I additionally load the bait? Then it can acquire negative buoyancy and will sink. And the floating model has, for example, the advantage that it is more difficult to lose.
You can compensate for the extra load with additional buoyancy by proportionally reducing not all the sizes of the bait, but only some. Let's say the length and height are proportional, and leave the width relatively large. That's what I did with this model. Comparing the above diagram with the diagram of a 5-centimeter “crank”, you can see that instead of the traditional elongated ovoid cross-section, the more miniature model has an almost round one. Experienced wobbler manufacturers probably know that this body shape, all other things being equal, implies a wider game, but at the same time noticeably loses in stability. Let me remind you that we need a stable, universal model, suitable for fishing both in calm water and in the current, both with slow retrieve and at high speeds. And at the same time with a wide game.
Therefore, a mandatory condition: the body is made of the lightest possible material, and the main weight of the bait will be given by the lead weight located below. It’s like with any river or sea vessel: the farther vertically the center of buoyancy and the center of gravity are from each other, the more stable it is (provided, of course, that the first is located higher than the second). It’s the same with a wobbler: the farther one is from the other, the more stable the game.
To make the work easier, I provide a template with a side profile that can be cut out with scissors and glued to a piece of wood before you start planing the wood. The picture also shows the optimal cutting level for the reinforcement.
The fittings are made of non-oxidizing wire 0.5 mm thick. It is best to take hard stainless steel, but soft nichrome will also work.
The blade is machined from plexiglass 1.5-2 mm thick. It should be noticeably narrower than the body. This will not affect the amplitude of oscillations too much, but will make the game more stable.
This bait has, at first glance, insignificant dimensions, but its body is quite voluminous. Accordingly, it is possible, and indeed necessary, to put quite a lot of weight into the longitudinal cut. In this way we will ensure the stability of the game and increase the casting distance. However, in the assembly diagram you can see that the free part of the cut is not so large. And if the main material of the bait is quite buoyant, even completely loading the cut with millimeter-thick sheet lead, which I traditionally surround wobblers with, may not be enough if we want to bring the buoyancy of the model closer to neutral. Then you will have to reload the wobbler, which will make the design and manufacturing somewhat more complicated.
The easiest way, for example, is to drill a vertical hole in the body from below, where you can place a lead cylinder. It’s easier if you have something to make this cylinder out of. It can be made from heavy tin-lead solder, which is sold in the form of wire. Just before you buy, first inquire about the lead content in it or at least the brand. The index after the bouquet indicates the percentage of tin in it. The rest is lead. For example, POS-61 solder contains 61% tin and 39% lead. For our purposes, of course, wire with a lower index is more suitable.
However, if you don’t want to bother with purchasing solder, you can get by with what you have - a millimeter-thick plate. It is this option of additional loading that is shown in the diagram. Such a lead plate is folded in half, and the cut at the location of the resulting two-millimeter piece must be carefully expanded with a sharp scalpel to the depth of the reinforcement itself. In order not to spoil the workpiece with an unexpected chip during the cutting process, you can first mark the expansion boundaries with 2 mm vertical holes - I hope you have the appropriate drill.
Additional weight is placed behind the lower loop close to it. With this arrangement, the wobbler’s play practically does not change. Shifting it towards the tail will increase the amplitude of vibrations, but reduce stability. The exact amount of weight is selected experimentally during pre-assembly tests of the bait in water. Let me remind you that the wooden workpiece before them needs to be provided with waterproof impregnation, otherwise its buoyancy on the basins will increase as the wood absorbs water. I also note that you should leave a small reserve of buoyancy, which will decrease as a result of gluing, painting and varnishing.
A balanced bait can be glued, for which, as before, you will need epoxy resin. We putty the gluing areas with a mixture of resin and wood dust and thoroughly clean them after polymerization of the glue.
Well, all that remains is to prime and paint the model to your liking, then it is varnished. Two layers of varnish will be enough, since such a small wobbler does not have to worry about large pike teeth. We wait for the pack to harden, hang the hooks and carry out the final home tests, setting the optimal position of the blade. Having glued it in, you can proceed to field testing. As already mentioned, the operating speed range of this model, if it is properly made and adjusted, is quite wide. Accordingly, it is suitable for fishing both in currents and in still waters.
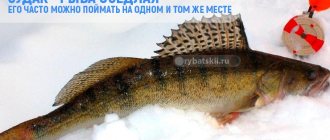
In calm waters, perch and pike take this bait; in rivers with a current, chub, ide, pike perch are added to them, asp and catfish are also possible. So this bait is quite versatile in terms of species composition. Actually, like almost the entire ultralight arsenal. That's why we love him.
DIY Simple Wooden Wobblers Micro Crankbait
Greetings to all lovers of tinkering, I offer for your consideration instructions for making light wobblers with your own hands. Such wobblers work in the upper water horizon, however, they can be loaded more heavily for deeper tasks. The game of wobblers turns out to be quite interesting, fast, everything is done quite simply and quickly. If the homemade product interests you, I suggest you study the project in more detail! Materials and tools used by the author:
List of materials:
- a piece of soft wood;
- a piece of plastic; - stainless steel wire; — paint and varnish in cans; - weight; - permanent marker; - winding ring and tee hook. List of tools:
- hacksaw or blade; - sandpaper; - stationery knife; — round nose pliers and pliers; - Super glue. Homemade manufacturing process:
Step one. Cut out the body of the fish
First of all, we cut out the workpiece, we will need a piece of a board or block, choose a soft type of wood so that it is easy to work with, varnish and paint will still strengthen the wood later.
The author works using a utility knife and cuts out the basic shape. Well, then all that remains is to work a little with sandpaper to make the workpiece smooth.
Step two. Making loops
We take stainless wire, it needs to be laid along the entire body, so the fish will not break off and break the bait. We make loops at the ends of the wire and place the leash in the groove that the author cut along the body of the bait with a hacksaw blade.
Step three. Blade
We cut out a blade for the fish, it will determine the play of the bait and the depth of immersion when retrieving, here you will have to experiment. The author used a piece of plastic from a disk enclosure as the material. We cut out the blade and install it in the corresponding cut.
Step four. Loading
We place a weight in the belly of the bait. The weight of the weight should be such that the bait is almost completely submerged, so when retrieving it it will go a little under the water and play in the water column.
Finally, we fill all the cracks with sawdust and fill them with superglue. That's all, the workpiece is there, we carefully process everything with sandpaper.
Step five. Painting and assembly
We paint the fish from a spray can and be sure to varnish them. It is the varnish that will protect the bait from water and mechanical damage; the paint itself will not be so durable. Finally, you can draw the eyes with a permanent marker and you can install the hooks. The fish look great, play well, and are not difficult and cheap to assemble.
This completes the project, I hope you liked the homemade product and found useful thoughts for yourself. Good luck and creative inspiration if you decide to do this again. Don't forget to share your ideas and crafts with us!
Source
Become the author of the site, publish your own articles, descriptions of homemade products and pay for the text. Read more here.