How to tie a fishing line to a fishing line is a question asked by many anglers, especially those just starting to fish. Anglers often have to tie together two pieces of fishing line when the main fishing line breaks, when tying a leash or shock leader to the main fishing line, or when installing a variety of equipment. In the process of fishing, you have to tie a thinner fishing line to a thicker one, and tie together fishing lines from different materials. The knots for tying fishing line to fishing line should be simple and reliable. The fisherman must own several knots, making it possible to connect the fishing line in any combination.
Carrot knot
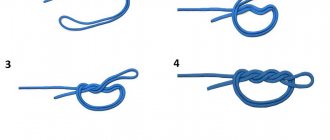
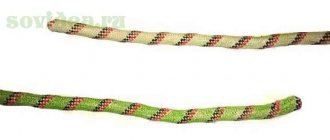
The Carrot knot got its name from its cone-shaped shape. The knot passes well through the rod guides and does not interfere with casting. The Carrot knot can be used to tie together fishing lines made of any materials (nylon, fluorocarbon, etc.), in any combinations, of any diameters.
To tie two fishing lines together using a Carrot knot, follow these steps:
- About 5 cm from the end of the thinner line, tie a simple knot, but do not tighten it
- Insert the 15-20 cm end of a thicker fishing line into the resulting loop
- Use the free end of the thick line to make 10 turns around the thinner line.
- Holding the last turn with your hand, make another 6-10 turns in the opposite direction, on top of the previous ones
- Insert the end of the fishing line into the loop
- Wet the fishing line
- Tighten the knot, pull both ends of the lines, slowly pushing the coils slightly towards the knot with your thumb and forefinger
- Cut off the excess ends of the lines
Some fishermen, to make the knot ideally smooth and increase its strength, glue the knot with glue.
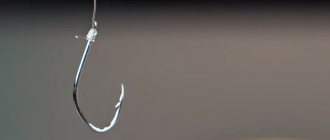
How to tie a fishing line on a hook?
There are many ways to crochet, but we will consider only the most practical and uncomplicated. Everyone knows that fishing hooks are now produced for almost every type of fish, having a wide range of sizes and shapes, and there are also different types of attachment to a fishing line or leash. If for a hook with an eye everything is not so complicated, then in the case of a hook whose fastening is in the shape of a spatula, an unprepared person will be baffled by “how to tie it.” Let's separate these two types of fastening and consider them separately.
Fishing knots for eye hooks
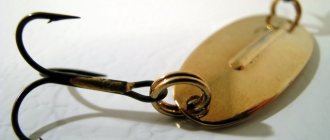
Fishing hub Palomar "Palomar"
A very simple fastening method with high strength values. A well-known knot among all novice fishermen, due to its simplicity of knitting, is used for attaching swivels and carabiners. Folding the line in half gives it the appearance of being a little larger than other fishing knots.
"Crawford" fishing knot for hook
Classic fishing knot for tying a hook and eye. It is used for knitting with both fishing lines and braided cords. The carrying capacity of the fishing line when using the Crawford knot is 95%, declared by the manufacturer.
Read Fishing with an elastic band
Bayonet knot for hook
The knot is designed for tying a hook with an eye, only monofilament fishing line or a flucarbon leash. When knitting with a braided cord, it does not hold and unties due to the excessive elasticity and flexibility of the cord. Ideal for fishing lines, keeps the hook in the correct position.
Fishing knot Canadian figure eight
A classic fishing knot for attaching hooks, it has a fairly strong tying method, and is recommended for catching large fish. If necessary, you can quite easily untie it, which is very difficult to do when fastening with other knots.
Gripping knot (Clinch) for hooks
It has proven itself well when attaching hooks with thin fishing line and braid. Does not hold well when using thick fishing line; the knot is not recommended for use with winding rings.
Fishing knot “Simple”
I think this is the most successful fishing knot for tying hooks and eyes. Due to the knitting method, it obtains high load-carrying capacity.
Fishing knot Snelling A Hook
The classic fishing knot, with a high guarantee of strength, is a little more difficult to perform compared to others. Fastening in this way allows you to keep the hook in the correct direction, eliminating distortions on the sides.
Turtle hook knot
Another very strong fishing knot, very simple to make, designed for hooks with an eye.
Fishing knots for hooks with spade shaped fastening
Among fishermen it is believed that hooks with a blade are stronger than those with an eye. Hooks with an eye are hardened after molding at the manufacturer's factory, but hooks with a blade are made using forging and are characterized by increased strength. But unfortunately, in the age of competition, hooks with a spatula are not always forged, turning out to be far from the best choice. Let's consider several options for attaching hooks with a spatula.
Whip, for hook with spatula
Fishing knot for attaching hooks with a spatula, very durable, easy to make, suitable for fishing for shy fish species.
Step fishing knot
The classic knot provides a very strong fastening and is easy to implement. Also suitable for eye hooks.
Lead knot (Snell) for hook with spatula
A practical classic fishing knot, suitable for all types of hooks. Used for making leashes in feeder fishing.
Albright Knot
The Albright knot is one of the best knots for tying two fishing lines together. The knot is suitable for tying together fishing lines of any type (braided, monofilament, fluorocarbon) and any diameter. Most often, the Albright knot is used to tie a leash to the main line. The Albright knot is easy to tie, reliable, does not weaken the line in the knot, and passes perfectly through the guides of the rod.
To tie two fishing lines together using the Albright Knot, follow these steps:
- Make a loop on thicker fishing line
- Pull a thinner line through this loop
- We bring the end of the thinner line to the base of the loop, fix both lines with our fingers, make 10 turns of the thin line around both lines
- We pass the end of a thin fishing line through the loop in the opposite direction
- We tighten the knot to give it shape without tightening it completely
- We wet the fishing line, tighten the knot to the end, cut off the excess ends of the fishing line
Some fishermen, to make the Albright knot even smoother and increase its strength, glue the knot with glue.
For leashes
Fishing knots for leashes are very diverse and there are quite a lot of them; we will fill this section as information about new knots becomes available. In the meantime, I recommend paying attention to the following materials.
Every fisherman should know how to tie a leash to the main fishing line, because sooner or later he will still have to master the technique of knitting knots suitable for installing a leash. What adds to the complexity is that you have to connect a thick main line with small diameter leashes.
The figure eight knot is best suited for tying leashes. It has gained popularity among fishermen due to its ease of tying and increased strength. Fishing knots of this type do not deform the fishing line, which adds strength to them.
Tie the leash to the fishing line at 90 degrees
This is most often required for winter fishing, although when equipping summer fishing rods it is often necessary to achieve a right angle between the main line and the leash with an additional hook.
Below are ways to tie knots on fishing line.
Any fishing equipment consists of several elements that are connected to each other. The simplest connection method is a carabiner, but on one side you also need to tie a fishing line to it. In general, no matter how you look at it, you can’t do without knots.
Now many manufacturers of fluorocarbon, nylon, nylon fishing lines and cords include special inserts with recommendations regarding knots to their products. They contain enough examples to correctly tie a hook, leash or clasp to a fishing line and not lose interest in fishing after the first failure. So, what are fishing knots and how to knit them?
Cloudflare Ray ID: 63a8734d1cd50d42 • Your IP: 195.64.208.251 • Performance & security by Cloudflare
In order to connect fishing lines with differences in diameter, and connect leader and fly line, we recommend a slightly complex, but very strong Albright knot . “Albright” turns out to be quite compact, easy to pass through the guide rings of the rod.
Improved Albright Knot
The Improved Albright Knot is an improved version of the Albright Knot. The knot is suitable for tying together fishing lines of any type (braided, monofilament, fluorocarbon) and any diameter, but is better suited for tying with thin fishing line.
To tie two fishing lines together using the Improved Albright Knot, follow these steps:
- Make a loop on thicker fishing line
- Pull a thinner line through this loop
- We bring the end of the thinner line to the base of the loop, fix both lines with our fingers, make 10 turns of the thin line around both lines
- We thread the end of the thin fishing line into the loop and make 5 turns inside the loop, wrapping around one side of the loop and the thin fishing line itself
- We wet the fishing line, tighten the knot turn to turn, cut off the excess ends of the fishing line
You may be interested in: Jerky Salmo Slider
Leader knot
The Leader knot is used to tie together the main line and the leash or shock leader. The knot allows you to securely connect monofilament with braid, braid with braid, or monofilament of different diameters. When tied correctly, the Leader knot turns out compact and neat and easily passes through the pass rings.
To tie two fishing lines together using a Leader knot, follow these steps:
- At the end of the fishing line, which acts as a leash, make a simple knot
- Thread the end of the other (main) line through it
- Make a loop from the main line
- Perform 5-6 turns inside the loop, while grabbing both lines
- Wet both lines, tighten the knot, cut off the excess ends of the line
Palomar type unit installation
Many anglers say that this is one of the easiest options. Peculiarity. Instantly “tightly” clamps the fishing line. Can be used, among other things, for attaching the main fishing line:
- hook with ring,
- with swivel,
- jig head,
Flaw. Not suitable for working with small hooks with a small ring diameter. Works great with braid.
Blood Knot
The Blood Knot allows you to tie braided line to braided line together. It can also be used to tie monofilament to monofilament, but they should not differ from each other in diameter by more than twice. The bloody knot retains up to 75% of the strength of the fishing line and passes well through the guides of the rod. The knot got its name because it was used to make a thick knob at the end of a whip, which was used to punish guilty sailors in the navy. Also known as Snake Knot.
To tie two lines together using a Bloody Knot, follow these steps:
- Place two lines parallel to each other
- Wrap one end of the line around the other line 2-3 times
- Wrap the end of the fishing line back and pass between the two fishing lines until the turns
- Make 2-3 turns around the first line with the end of the other line.
- Pass the end of the fishing line through the middle loop, in the opposite direction from the end of the singing line
- Wet both lines, tighten the knot, cut off the excess ends of the line
When tying two monofilaments, the number of turns should be doubled, to 4-6.
BLOODY KNOT - 3
The overcasting method of tying a bloody knot, discussed in the last issue of RR, is good enough only on relatively thick and hard ends. But the need to tie such a knot also arises when working with thin and soft ends: for example, when marking the depth gauge cord with marks made of thin colored nylon, tying locking knots, etc. In this case, the simplest solution is to use a needle with a fairly wide eye or a wire folded in half. The technique of tying an overcast bloody knot with a needle is used, in particular, in order to obtain a very reliable straight continuation of the fly fishing line with a monofilament leash.
The needle technique of knitting an overlocked bloody knot is essentially no different from knitting on a warp using a rod or tube. A needle or a wire folded in half (the eyelet is directed towards the root end) together with part of the running end are laid along the base, after which the required number of overcasting hoses are made with the running end in the direction of the root end. Now, in order to pass the running end under the hoses, all that remains is to thread it into the eye of a needle or into a wire loop and pull it through.
When connecting a fly cord and a leash from a fishing line with a serpentine knot, the needle is used twice. First, with a needle inserted into the end of the cord and brought out through the side surface, the tied monofilament is pulled inside the cord, leaving a sufficient length of its running end at the exit. Then place the needle on the cord with the eye towards the end, and then do everything in the same way as described above.
Bloody reverse knot
The bloody reverse knot is used only for tying together two monofilaments with a diameter of no more than 0.4 mm. In terms of tensile strength, the Bloody Reverse Knot is superior to the regular Bloody Knot; it retains up to 90-95% of the strength of the fishing line.
To tie two fishing lines together using a Bloody Reverse Knot, follow these steps:
- Place two lines parallel to each other
- Wrap one end of the line around the other line 4-8 times, depending on the thickness of the lines being tied, the thinner the line, the more turns you need to make
- Holding the turns with your fingers, make the same number of turns in the opposite direction with the end of the fishing line
- Pass the end of the line between two lines
- Do the same with the end of the other line.
- Pass the end of the fishing line through the middle loop, in the opposite direction from the end of the first fishing line
- Wet both fishing lines, carefully tighten the knot, cut off the excess ends of the fishing line
fishing knots - how to tie a hook. "Lindemann"
Lindemann fishing knot
The Lindemann fishing knot is one of the best ways to tie a hook or lure to braid or monofilament. Best suited for small to medium diameter lines. Thicker lines will be difficult to tie with this fishing knot. The ring of the hook should allow you to pass the fishing line through it twice. The Lindemann fishing knot has great strength, retaining up to 95% of the strength of the fishing line.
| fishing knot "Lindemann" - characteristics | |
| The Lindemann fishing knot is suitable for firmly tying a hook, sinker, feeder, spoon to thin and medium fishing line. | |
| Types of fishing line | monofilament, braided. |
| Knot tensile strength | up to 95% |
| Node purpose | Securely attach the hook and sinker. |
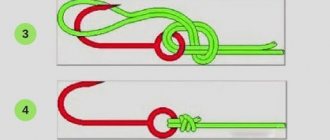
fishing knots - how to tie a hook. "Lindemann" picture 1
Pass the line through the ring of the hook or spoon. Make a large loop towards the main line. Thread the line through the ring again.
fishing knots - how to tie a hook. "Lindemann" picture 2
Inside the loop, wrap the end of the main fishing line and the fishing line forming a loop 3-5 times. The thinner the line, the more turns.
Double Uni Knot
The Double Uni Knot is used to tie together two monofilament lines of the same diameter. The Double Uni knot retains up to 80% of the strength of the fishing line.
You may be interested in: Polarized glasses
To tie two fishing lines together using the Double Uni Knot, follow these steps:
- Place two lines parallel to each other
- We pull one end of the fishing line back to form a loop.
- We make 5-8 turns with the end of the line around both lines inside the loop, the thinner the line, the more turns you need to make
- Pull the two ends of one line and tighten the first knot
- Repeat the same with the second line
- We pull the knots together by pulling the long ends
- Trim off the excess short ends of the fishing lines
Knot Nail
The Nail knot is used to tie two braided lines together. The Nail knot retains up to 85-90% of the strength of the fishing line. The knot got its name because previously a simple nail was used to tie it; today, fishermen use a small tube to tie a knot, which can be a ballpoint pen refill or a straw.
To tie two fishing lines together using a Nail Knot, follow these steps:
- Make a stop knot on one of the lines
- Place two lines parallel to each other
- Place a straw on them
- Make 4-8 turns with the free end of the line around both lines and the tube
- Pass the end of the fishing line through the tube
- Take out the straw
- Wet the lines and tighten the knot
Water node
A water knot can be used to tie two braided lines together. The water knot was invented by European sailors in the 12th century and got its name from the similarity of its knitting with a sea wave. The water knot retains up to 65% of the strength of the fishing line.
To tie two fishing lines together using a Water Knot, follow these steps:
- Place two lines together
- Form a loop with the double end
- Pass the double ends of the fishing lines into the resulting loop twice.
- Wet the lines and tighten the knot
Surgical knot
A surgical knot can be used to tie together any type of fishing line: braided, monofilament, fluorocarbon, of both the same and different diameters. The surgical knot is considered one of the simplest and strongest among fishing knots.
To tie two fishing lines together using a Surgical Knot, follow these steps:
- Fold two fishing lines crosswise and wrap them around each other
- Cross the free ends of the lines and tie them with a half knot
- Wet the fishing lines and tighten the resulting knot.
Untied knot
Sometimes it is necessary to tie a loop that will not come undone under any circumstances. As a rule, these are tightening knots. Weaving is considered one of these. So, how to tie a strong knot on a rope that will definitely not come undone at the most inopportune moment? First of all, you need to understand that it is a combination of two knots, which are tied with running ends around the base:
- lay two ropes with ends facing each other;
- make a simple knot at one end;
- pass the end of the other through the loop made on the first, make a turn around its base;
- tie the same simple knot with the second rope;
- move both loops towards each other until they come together;
- Tighten the knot properly.
This is a very strong knot; for all its apparent simplicity, when pulled, it becomes so strong that it seems unlikely to untie it.
Node Centaurus
The Centaur knot can be used to tie together two braids or monofilaments. The tensile strength of the Centaur knot is 85% of the strength of the fishing line.
To tie two fishing lines together using the Centaurus Knot, follow these steps:
- Make 3-4 turns around the other line with the end of one line
- Pass the free end of the fishing line through the resulting loops
- Wet the line and tighten the knot
- Using the other free end of the fishing line, also make 3-4 turns around the other fishing line.
- Pass the free end through the resulting loops as well.
- Wet the line and tighten the knot
- Pull the long ends of the lines to pull both knots into one
- Trim the excess ends of the lines
Straight knot
A straight knot can be used to tie two lines of the same material and the same diameter together. The straight knot is one of the oldest knots; it has been known to mankind since the times of Ancient Egypt. In Ancient Greece, this knot was called the “Hercules Knot”; it was believed that it was with the help of this knot that Hercules tied the skin of the Nemean lion he defeated on his torso.
You may be interested in: Trolling fishing
To tie two fishing lines together using a straight knot, follow these steps:
- We braid one end of the fishing line to the other
- Make an open loop with one end of the fishing line
- Pass the end of the other line through the hole in the loop
- Tighten the knot at all four ends
Which sea knot is the strongest?
Every real sailor is pleased to know that the most durable and reliable sea knots . Not long ago, the Yachting monthly magazine conducted its research into which of the sea knots studied under the RAY program is the strongest.
The types of rope used for testing were: 12mm Marlowbraid polyester braided rope
10mm synthetic Kevlar Dyneema rope,
14 mm three strand polyester rope
Testing was carried out on a special Marlow Ropes' 30-tonne strain facility.
For testing, the selected knots were divided into 2 categories: loops and knots for tying ends (bands)
The following nodes were included in the loop category:
- Arbor knot or bowline (Bowline)
- Flemish loop
- Fishing bayonet (Anchor bend)
- Round turn and two half-hitches
- Double fisherman's loop, sometimes called a halyard knot
The second group consisted of knots for tying ropes together. This included:
- Reef knot
- Sheet bend
- Double sheet bend
- Fisherman's knot, also called the “knot of tying with other people's ends”
- Double fisherman's knot
Also participating in the loop tests were:
- Fire made from 10 mm synthetic Kevlar Dyneema rope
- 12mm Marlowbraid Polyester Braided Rope Ogon
- Three strand polyester end ogon
During the tests, the following results were obtained:
So, let's comment on the results. First the loops.
Wicker ogons turned out to be the most durable. First place!
Second place goes to the Double fisherman's loop.
Third place - Fisherman's bayonet (Anchor bend)
Fourth place – Flemish loop
Fifth place - the king of all knots - the bower knot (Bowline)
There is a Splicing nut on the graph - this is a fire obtained using a special latch. We don't use it.
Among the knots to tie the ends
First place at Double fisherman's knot
Second place went to Double sheet bend
Third place - Fisherman's knot, another name - knot tying with other ends
Fourth place – Sheet bend
Fifth place - the most common straight knot (Reef knot)
After conducting all the necessary tests, the researchers came to the following conclusions:
1. For mooring to a bollard or biting, the most reliable way is to use a cord braided using a long (sometimes called an accelerating) braid. If there is no such cable, or it is not possible to braid a fire, then the best knot for mooring would be a bayonet with a hose (Round turn and two half-hitches). This knot is stronger than a traditional bowline and will not come undone under load.
2. For attaching the sheets to the sails, according to the data obtained, a double fisherman's loop is best suited, however, this is true provided that you do not mind cutting off the sheets along with the clew angle of the sail at the end of the season. The whole point is that this knot is tightened. Therefore, for these purposes, most people prefer to use a bowline that is less durable, but does not tighten. At the same time, for attaching halyards, a tightening loop is no longer a problem, so even manufacturers, such as Bavaria, recommend a double fishing loop
3. To tie two ends of the same diameter, a double fisherman's knot is most preferable. For cables of different diameters, a double sheet bend is better suited as it is the safest and easiest to tie.
You can read more about this topic on the magazine’s website in the article “What is the strongest sailing knot?”
weaver's knot
The weaver's knot is considered one of the oldest knots invented by man; archaeologists have found a 9,000-year-old fishing net tied with this particular knot. The weaver's knot is easy to tie and provides good strength between the two lines. There are several ways to tie this knot.
To tie two fishing lines together using a weaver's knot, follow these steps:
- Make a loop from the end of one line
- We pass the other end of the fishing line through this loop
- We wrap around the base of the loop and thread it through the loop again
- Tighten the knot
- Trim off the excess ends of the lines
The free ends of the lines should be both above or both below the knot; if they are located on different sides of the knot, then the knot is tied incorrectly.
Fisherman's Knot
A fisherman's knot is used to connect two fishing lines of the same diameter. The fisherman's knot is easy to tie. The tensile strength of the Fisherman's Knot is about 60% of the strength of the fishing line.
To tie two fishing lines together using a Fisherman's Knot, follow these steps:
- Place the two ends of the lines parallel to each other
- Tie a simple knot towards you with the right end of the fishing line
- Tie a simple knot away from you with the left end of the fishing line
- By pulling the long ends of the lines, pull both knots into one, the knots will press into each other and finally tighten
- Trim the excess ends of the lines
Knots must be tied in different directions; if the knots are tied in the same direction, then this is a gross mistake, leading to a significant loss of strength in the knot.
Loop in loop
A loop-to-loop connection is not a knot in the usual sense; at its core, it is a method of connecting two lines together. The loop-to-loop connection is based on two loops tied on two different fishing lines. When connected, the two loops pass through each other and form a strong, collapsible joint. The loop-to-loop connection is most often used to attach leashes or rigs with the main line. The loop-to-loop connection is easily disassembled and one leash or equipment can be quickly replaced with others.
In order to connect two fishing lines to each other using the loop-to-loop method, you need to tie loops at the end of both fishing lines using a figure eight knot.
To connect fishing lines with already tied loops, follow these steps:
- Insert the loop of the main line inside the loop of the leash or equipment
- Pass the end of the fishing line of the leash or rig inside the loop of the main fishing line
- Tighten the connection
When connected correctly, the loops should seem to cover each other.
For fluorocarbon
Thin and flexible fluorocarbon tackle requires special handling. Otherwise, the plexus may simply come apart under insufficient loads or, on the contrary, burst.
Double: loop to loop
At first, lovers of active fishing and big catches always wonder how to insert a feeder loop into a fishing loop of a leash using a knotless method? A knotless connection saves a lot of time because you don't have to re-weave all the gear.