Winter fishing is a passionate hobby that captivates you immediately and forever. Once they fall in love with this type of leisure, fishermen remain faithful to it, despite the cold and the dangers that lie in wait for this difficult activity.
Experienced fishermen experience incomparable pleasure from winter fishing, receiving, in addition to the excitement of hunting and the joy of catch, quiet unity with nature and relaxation in the fresh air.
It is a mistake to think that these “unfortunate” people, when exposed to cold, windswept ice for a long time, freeze “to the bone.”
Nowadays, a huge number of ways have been invented to keep warm even in conditions of complete immobility. These are thermal underwear, special shoes and overalls with special impregnation that do not give the slightest chance to cold air, and in case of very severe frosts and bad weather, fishing enthusiasts set up tents for winter fishing, many of which are made with their own hands.
What should a tent be like?
Making such a shelter yourself does not require effort, although it protects from adverse weather conditions no worse, and sometimes better than a purchased one, while saving money.
Taking these conditions into account, a homemade tent for winter fishing should:In the manufacture of such structures, the craftsman’s own requirements for the size and weight of the product, the speed of its assembly, the ability to protect from cold, the possibility of insulation and the installation of additional equipment are taken into account.
To retain heat, therefore, to cover it, use a material that has good strength, thermal insulation, moisture resistance, but at the same time has breathable properties.
Be lightweight, mobile, compactly folded, and quickly installed. Frames made of aluminum or composite materials meet these requirements.
What requirements must a homemade tent for winter fishing meet?
A winter tent should create the most favorable conditions on cold, windy, winter days. In addition, it should serve as a place where you can cook a meal, drink hot tea and just warm up.
Nowadays the market is full of all possible types of tents, but it is still nice to make one yourself. If you are sewing a tent yourself, you must meet certain requirements:
- It should be light and compact.
- Since it is portable, the tent must be mobile.
- Select fabrics that are dense.
- It should be assembled and unpacked conveniently and quickly.
- When making it, it is better to give preference to stronger and more reliable materials. The heat in the middle of the structure should be maintained for as long as possible.
Types of shelters
Depending on the methods of ice fishing, structures are divided into:
For mobile devices. They are extremely light and quick to install, they are useful when changing holes frequently and protect more from wind than from frost. These include:
A cape tent in the form of an isosceles triangle, which is easily made from transparent polyethylene film, which gives a good overview.
An appropriately elongated ice screw can be used as a support in such a structure, and pins or screws can be used for fastening. Among the disadvantages of such a shelter, the fragility of the material and cramped living conditions are noted.
A dome tent with a central support in the form of a metal pole driven directly into the ice. For ease of transportation, the pole can be collapsible. The same plastic film or a denser synthetic material is attached to it, which adheres to the ice using pins.
Stationary (frame). They are used for fishing at a fixed location. They can serve as a permanent place of residence or as a temporary shelter.
The functional characteristics of such a building can be improved by installing a warm floor and a heating system.
This category may include the following types of structures:
Umbrella - a frame made of strong rods and duralumin tubes is covered with a tarpaulin or synthetic awning according to the principle of an umbrella.
Note!
Balancer for perch: fishing technique and basic tactics for using the balancer (90 photos)- How to choose bed linen - instructions for beginners
- Ulyanka spinner: 120 photos, drawings, instructions and video master class on creating an effective spinner
Automatic - The protective material of the shelter is immediately attached to the frame, which, when unfolded, takes the desired shape. The advantage of such a product is the speed and ease of assembly, the disadvantage is its fragility and instability in strong winds.
Frame. A base is constructed from several duralumin tubes, bent in an arc, fastened together and covered with an awning. The shape and size of the base determines the dimensions of the tent.
Types of winter fishing tents
Winter tents are divided into types, which determine their design, installation and assembly.
- Umbrella. This type is considered the simplest in its design. It has an umbrella design, making it easy to install and assemble. To make the frame, duralumin rods are used, which increase the reliability and strength of the tent. The awning can be made of synthetic fabrics or a combination with tarpaulin.
- Machine. The scheme of their construction is that a tent is sewn to the frame. When assembling, it is enough to twist it into a circle, and it unfolds instantly due to the action of the frame, which works like a spring. Such tents are becoming increasingly popular among fishermen because they have a low price and light weight. But along with this, it has many disadvantages: poor resistance to wind, the frame easily breaks if the tent is not set up correctly.
- Frame. Its design resembles the usual summer version. It folds out of several folding arches and an awning. She sorts it out in about 10 minutes, or even more. The tent is not particularly reliable. It is rare for fishermen to purchase this type of winter tent.
Making your own tent
When deciding how to make a tent with your own hands, there is no need to be afraid that special knowledge or skills will be required.
The entire work process is divided into several stages, the sequential implementation of which makes it easy for even a beginner to complete their plans.Frame assembly
To make the frame, metal tubes or even ski poles are used as supports. They are connected using fastening hinges and installed directly on skis or other available materials.
Note!
- Winter spinners for perch: techniques and tactics for catching fish with winter variants of spinners (85 photos)
- A nod for do-it-yourself winter fishing - how and what to make good gear from. 115 photos and video tips from the pros!
Do-it-yourself spinners - types, features of homemade spinners and their assembly (100 photos and videos)
Step-by-step instructions for making a winter fishing tent
•Since the ski poles will serve as a frame, we install them vertically. The tubes that we will place vertically should be thinner. At the corners, the frame is secured with tees - their diameter must correspond to the diameter of the vertical and horizontal tubes.
•The next step is to attach the vertical tubes to the skis. We attach a metal plate to the ski and insert a T-shaped tongue into it - it is attached to the lower end of the tube. To fix the stick, just turn it 90 degrees.
•Take an old cot, prepare two sticks - they will serve as a connection between the frame and the box. We take a bent tube, at the end of which there is a docking unit. At the other end of the tube there is a latch - this is the fastening element for the docking unit.
•We make a spring from a copper strip that connects the box and the tubes. The last step is tensioning the awning. At the bottom of the awning we attach metal strips with holes. You need to insert brackets into these holes, which are secured to the ends of the skis. We connect the awning to the brackets using ropes. To make the tent stable on ice, we equip it with two anchors.
Manufacturing of coating
In order not to make a mistake with the size of the awning, a drawing with preliminary calculations is first made. On its basis, a pattern is created from the desired fabric.
Be sure to add at least two centimeters for seam allowance. To avoid sagging, the dome is secured with eyelets, reinforced if necessary with reinforced tape.
How to fold a travel tent?
Everyone loves hiking and spending the night on the shore of a reservoir. But, unfortunately, the weekend ends quickly and you need to pack up the tent before your next vacation. This question sometimes arises, but still, many people do not know how to properly fold a camping tent into a ring.
This is an ordinary two-layer awning with a frame made of durable fiberglass, with spacers for pegs. We were able to assemble it, but sometimes it’s simply not possible to disassemble it so that the entire structure fits into the case. Tents with internal and external frames are folded according to the same principle.
Standard diagram for assembling a tourist tent:
First of all, we go around the building in a circle and remove all the pegs.
- We check the inside of the tent to make sure nothing is left. We take out the frame arches, disassemble them on the ground and put them in a special case (if it was included).
- We place the inside of the tent on the awning and roll it up into a tube.
- First, put the rolled up tent in the cover, and then the arcs and pegs.
- Tighten the cover with a cord.
Creating Fasteners
To fix the shelter on the ice, screws are usually used, which you can make yourself using metal rods and self-tapping screws.
The rod, performing the function of a handle, is welded to a large self-tapping screw. For convenience, it is covered with protection made of rubber or silicone tubes.Using hooks or pegs driven into the ice as fasteners is also acceptable, but not very convenient.
Tent mounts
Fishing tents are often made from lightweight materials. Therefore, when installed on ice under the influence of wind, they can move. To prevent this from happening, the protective cover must be securely fixed. To do this, use purchased or homemade screws, which are elements with a thread at the end.
To make such pegs, you will need strong self-tapping screws of sufficient length, the top of which is bent in the form of a hook.
Floor construction
To create more comfortable conditions, you can build a floor for a winter tent with your own hands. This simple work will ultimately help reduce heat loss and, as a result, save on heating the structure.
Note!
- How to minimize fishing costs? Useful tips from experienced fishermen and an overview of current solutions (65 photos)
Do-it-yourself boat motor - tips for beginners, projects, drawings and step-by-step description of the construction of the main components and elements (video + 120 photos)
- Feeder for winter fishing - secrets of use and techniques for feeding fish in winter (115 photos)
The material for making the floor can be any thick insulation, for example, isolon. When using foil insulation, it is folded in half with the foil facing out, which allows you to retain heat for a longer time and avoid melting ice when using heating appliances.
You can pre-cut openings in the insulation for future holes.Setting up a winter tent on ice
It takes very little time to assemble a homemade ski tent:
•We connect the skis with attached tongues to the halves of the tubes, which are located parallel to the skis. We direct them inside the tent.
•Each pair of bent tubes must be threaded through special holes located on the ski racks.
•We connect the skis to each other so that a triangle is formed.
•A fishing box must be installed on the structure obtained in this way.
•Vertical stands are installed at the ends of each ski - 4 pieces.
•Using tees we form the roof. We install them on each of the vertical posts.
•Take horizontal tubes and finish forming the frame.
•We throw fabric over the frame - it must be secured using short ropes.
To disassemble such a tent, we do all the steps, only in reverse order. To make it easier to assemble and disassemble the tent, number each of the structural elements. This way you will save valuable time.
Tent heating
The main requirement for heating devices is low fire hazard and no waste.
In this case, you can use special industrial devices: gas burners or mobile mini-ovens, or you can heat a winter tent with your own hands using scrap materials.
This is done using:
Hot water in a large closed container, covered with a thick cloth to enhance the effect. Its action lasts for several hours.
Tourist candles. With low heating efficiency, even one candle can increase the temperature inside a small shelter by several degrees.
However, fire safety is required here; for this, candles are placed inside cans or other objects that insulate from fire.
Hot stones or hot sand. To reduce the rate of heat loss, a large stone is wrapped in foil and placed on an insulating base. For the same purposes, but without foil, small stones or sand are used.
The considered methods heat the tent in mild frosts and for a short time.
In conditions of severe frosts and many days of staying on ice for a winter tent, it is better to build a stove with your own hands, which will provide long-term heating of the structure and prevent freezing of the holes located inside.
Tent drawing
To simplify the manufacture of a tent, you should use the drawing. In accordance with the diagram, the product is installed on skis, which simplifies the fixation of the structure on the ice. This version of the protective shelter allows you to move it around the reservoir without much difficulty, i.e. Wherever the hole is made, you can set up a tent in that place.
If a strong wind blows while moving the product, then to reduce windage it is necessary to remove the awning.
Furnace for winter shelter
Any beginner can create homemade stoves with a wide variety of shapes and sizes.
The most primitive and popular design is made from an ordinary tin can and is not inferior in functionality to industrially produced models.
To make it, in addition to the jar, you will need:
- a metal mug, the diameter of which is 1 cm less than the diameter of the jar;
- spare parts from an old TV antenna;
- fastening material;
- a piece of tin sheet.
Having collected the necessary parts, you can begin assembly:
A circle with a diameter of 3 cm is cut out of a tin sheet. It is divided into three segments, bent at an angle of 90 degrees, forming petals.
Regarding the position of the petals, three holes are made in the bottom of the jar, matching in size with the tips of the petals.
The circle is fixed on the bottom of the jar due to the petals that fall into the corresponding grooves. Its surface is intended for fuel.
At a distance of 2-2.5 cm from the top edge of the jar, three holes are drilled for the nuts on which the mug is secured.
Slots are made in the bottom of the structure for legs made from parts of an old antenna; their size should not exceed the diameter of the mug.
For the lid of the structure, you can use another tin can, cut appropriately and tightly fitting to the top of the stove.
Several more holes are scrolled along the entire bottom of the product, located at an equal distance from each other.
Such a device, despite its unpresentable appearance, does an excellent job of heating a tent, and with a little improvement, heating food.
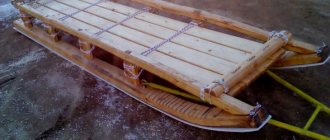
Due to numerous requests due to lack of free time, for now I’m only posting photos about the design and assembly process. Further detailed explanations will be added for each of the design stages. And so: First I made this box in a plastic fisherman’s sleigh... The report is here...
Then I felt that sitting was a little uncomfortable, my back was getting tired, so I attached a backrest... The report is here:
And then I came across information that you can also attach a tent to a sled... And so I did it, and on a “small fishing sled”... Video here:
Further process of creativity in photographs, see below. If you have questions, ask in the comments to the topic.
So, I’ll start explaining the assembly: I have a small sled: 800 mm long, 400 mm wide. When designing, I relied on these parameters. The maximum height of the box from the ground level is 300 mm, and the height of the tent for comfortable sitting should be 1500 mm, from the ground surface with a width of 800-900 mm. From these data I began to move on. Since the main vertical rack should be 1500 mm, and the box 300 mm high, then by using extenders and attaching them to the edge of the box (300 mm above the ground), you can reduce the height of the rack to 1200 mm. The length of the closing stand for ease of assembly should also be 1200 mm. Therefore, in order for the folded tent to rest on the beginning of the tent, the center of the structure, where the vertical post is attached and the covering one, should be 1200 mm from the beginning of the sled. As a result, we need to make the expansion racks 400 mm long. Remembering the basics of 9th grade geometry, and using a scale grid on which I drew a sketch, comparing, I calculated the length of the transverse arcs of the remaining struts (see figure).
After weighing all the pros and cons of assembling a tent on my own, I finally decided... I do...
First, the transverse expander... Aluminum angle 50X50. Based on calculations, the width is 800 mm. (minimum), length 400 mm.
I fastened the parts to each other, drilling holes with a 4 mm screwdriver, and fastening them with a hand riveter.
The fastening to the expander box is removable, with five M6 bolts.
Fixed with lambs...
For ease of carrying and fixing to the sled, install two window handles on the box using rivets. The sled is fastened to the box using household rubber bands.
Now about the spacers... I opted for aluminum corners 25X25... It’s just that there were no other materials and sizes in the nearest store... Now I recommend that if anyone repeats my design, use an aluminum profile (square) 25X25 for the frame. The weight will not increase by much, but the rigidity of the structure will increase. As a result, when using a 25X25 corner, due to the lack of a profile for the vertical posts, I had to use two corners, fastening them together in the form of a profile (square) to increase rigidity.
The vertical and longitudinal spacers are attached to the expander with M6 bolts.
At different levels, so that when folded they fold into one plane.
On the nose of the sled, under a rubber band, I installed a stop made of a 900 mm long PVC pipe to hold the structure on the body when folded.
Next, on the vertical stand, according to the scale of the sketch, I attached the transverse struts with M6 bolts.
Fastening of aluminum structural parts: These are mainly rivets. This is how the connection of the expansion U-shaped rail will be smoothed:
So, fastening the horizontal upper frame jumpers:
Here is a photo of the expander assembly with vertical and longitudinal posts attached to it. Plus support...
I will separately describe the support (support) in detail... During the design process, it turned out that the span of the expander is 400 mm long and mounted on the box does not even hold the weight of the spacers in a horizontal position, therefore it was necessary to make additional supporting supports. Using a level, I adjusted the height of the stand, securing it to the bolt holding the vertical stand.
For fixation during operation (when the tent is deployed, and so that the stand does not fold when the fisherman “moves” during the fishing process), I came up with clamps to hold the stands in a vertical position... It is inserted into a drilled hole and fixes the stand in a vertical position.
In transport mode, the stop folds and is held by a latch, the latch is inserted into a special technological hole.
The stage of manufacturing and fitting the frame is completed, as it seemed to me, the most difficult moment is completed... But this is not so...
The next stage is marking the patterns and sewing the tent itself... This turned out to be the most “hemorrhoids”... It seems that according to the sketch, all the parameters are known, but the longitudinal posts can be located higher or lower than the calculated ones (the rope connecting the cross members can stretch), so the pattern will not be accurate... We need to figure out how to take exact measurements locally...
This is what the frame looks like when removed from the box in the transport version.
I thought and thought and... I remembered that I had solved the same problem before when I was building a boat... For more details on making the design patterns, see here: Do-it-yourself PVC boat...
I bought three rolls of 200 meter tape and began wrapping the frame...
Here's what happened...
And this is a prototype in a transport version...
Next, the adhesive tape structure was cut along the guides (posts)…
As a result, I was faced with the problem of minimizing the purchase of covering material for a tent... Or rather, the optimal arrangement of patterns on the material (Oxford fabric) with minimizing the remainder of the cuts.
I had to return to the sketch and geometry again. Based on the calculated data, I drew patterns to scale and attached them to a large-scale fabric design, choosing the correct locations to save material (in my version, 16 linear meters). (If you repeat this, then calculate the required amount of covering material for your project (sleigh size).
The patterns around the perimeter are highlighted in color for a reason... Plus on each there are numbers that correspond to the other side to which this edge will be later sewn...
Because The covering material is long, and I don’t have much space in my apartment, so I cut it according to patterns in the hallway.
Considering the connection numbers...
A special BIG thank you to my mother-in-law, Galina Vasilyevna, for sewing the tent with a hemming stitch exactly to the required dimensions, relying only on the control markings of the edges of the patterns.
Plus, on her old Zinger, she sewed linden on the windows of the tent.
Next are the windows... I came across a thick A4 multifora, and decided to make transparent windows from it...
I cut it to the size of the windows, sprayed it with a degreaser, glued the linden onto Moment glue... During operation, I still had to sew the linden on a typewriter...
In the end it all worked out... Sled, box, chair, table, tent: mobile fisherman - five in one, with your own hands in camping mode...
Open drawer containers...
This is how the whole set is transferred..
The following is a photo of it in working order while fishing...
And here's the video:
PS Now I’m working on mechanization, or rather mobility of my design... I’m adjusting the motor...
A tent is an indispensable thing for winter fishing
When planning winter fishing, it is necessary to provide for many situations in which lovers of this extreme recreation may find themselves.
A self-made tent, as well as equipping it with necessary household items, will take into account all the individual needs of the creator, and thereby not only preserve his health, but also provide the necessary comfort and safety in difficult weather conditions.
Self-propelled fishing house for winter fishing
- Review
- Characteristics
- Reviews
You can make a cozy and warm mobile fishing house for winter fishing on caterpillar tracks with your own hands, you can rent it for a day or rent it for a few days, or you can buy it if it’s mobile, inexpensive and always “at hand.” I loaded it onto a car passenger trailer, into which, moreover, it could drive under its own power, and went to the winter fishing spot on a river or lake.
Making a homemade fishing house with your own hands is a troublesome and unprofitable task, unless, of course, we are talking about savings, but about the immediate pleasure of the creation process. Buying a fisherman's house ready-made is much easier and cheaper, especially when it is insulated, neatly finished, equipped with an internal combustion engine and is able to move independently to the fishing spot.
A self-propelled fishing house for winter fishing is the dream of any avid fisherman. You can live in it autonomously and fish for several days in a row, without leaving the hole. In addition, at any time, having “reeled in your fishing rods”, you can move to any other winter fishing spot located several kilometers away. The Egoza caterpillar drive will ensure good maneuverability of the structure on snow and ice.
Small external dimensions do not mean that the internal space is not enough for comfortable living. The portable version is inferior to the mobile one, if only because the self-propelled version on tracks will itself deliver the fisherman, equipment and tackle to the fishing spot, and back, if he’s lucky, the fisherman will bring his catch in it across the snow cover and icy surface of the reservoir.
A mobile fishing house for winter fishing is the best option for a fisherman. The self-propelled house on Egoza tracks has an impressive ground clearance (30 cm), 4 forward and 1 reverse speeds, a Chinese 15 hp gasoline engine, with which it moves at speeds of up to 15 km/h. Thanks to two 380 mm wide tracks, it creates minimal (0.11 kgf/cm²) movement on the surface.
Read: What signs can you distinguish between bream and silver bream?
Every fisherman who cannot imagine his life without fishing in the winter will want to buy a comfortable, mobile, self-propelled fishing house. In Russian frosts, the caterpillar house will become a real mansion on the ice, which you will never want to part with. In this case, price does not play any role, especially for those who live nearby or on the shore of a reservoir.
In the standard version of "Emelya", the mobile fisherman's house is made of metal. The structure has windows and a door, an exhaust hood and two hatches in the floor for fishing directly from the inside. One hatch is used for winter fishing, the second is for a hole intended for feeding fish. To prevent the flow of cold air from flowing inside and cooling the room, each hatch is equipped with a canvas “skirt”.
By default, the self-propelled fishing house is insulated with 30 mm thick foam plastic. The total thickness of each of the four walls, the gable roof and the sandwich-type metal floor is 42 mm. The interior finishing is made of fiberboard. An exhaust hood is provided. The interior consists of two benches and a stand with two control levers, inside of which there is a four-stroke engine with a volume of 420 cm³.
Outside (to the left and right of the front door) there are two stands that can be used to secure gas cylinders, a locker for storing and transporting useful items, or a box that serves as an outdoor refrigerator. To heat the interior space, the Emelya fisherman's house can be equipped with a potbelly stove or a gas stove, as well as a gas stove.
You can buy a mobile fishing house either in a basic version or with individual wishes, which include: wall thickness, type of insulation, interior decoration and interior layout, as well as any other possible design changes previously agreed upon with the manufacturer. However, it is worth considering that the price in this case will increase more.
A standard winter fisherman's house on caterpillar tracks, with external dimensions of 2500×1500×2200 mm (L×W×H), weighs 320 kg. The production of mobile structures for winter fishing is carried out exclusively to order, only after making an advance payment of 50% or 100% to the company’s account. Delivery is carried out by our own delivery service, or with the help of commercial transport companies.
DIY winter tent photo
Read here Do-it-yourself bloodworm - how to make it at home and strengthen it for winter and summer fishing (115 photos + video)
Help the project, share on social networks
0