You can hear different opinions about the bow tent, from what a useful thing it is to the fact that it will only get in the way. How to objectively understand this issue?
It is logical to start the research from the fact, a priori, so to speak. And the facts inexorably indicate that the topic of bow awnings is gaining popularity, and more and more proposals are appearing on the market. All this indicates a growing demand, which means that more and more fishermen and tourists are finding a rational grain in this.
Advantages:
- Protects against strong headwinds and splashes when driving.
- In the bow of the boat it will serve as a reliable shelter from the rain for things that could be damaged by moisture.
Flaws:
- Interferes with casting fishing gear from the bow of the boat.
- Creates inconvenience when attaching the bow anchor.
In principle, all inconveniences can be solved with the help of a mobile folding awning structure.
How to choose
If the decision to install a bow awning on a boat has been made, then what criteria should be followed:
- The awning should fit tightly to the inflatable cylinders of the bow of the boat. This condition implies individual production for specific brands and modifications.
- The transparent part will significantly increase visibility. However, manufacturing companies also produce completely deaf models - this is not for everybody.
- It is necessary to pay attention to the method of fastening the frame. It must be quickly and securely mounted on the boat. The most convenient frame is the one that folds forward. This design allows you to easily attach a bow anchor and place fishing rods and spinning rods on top of the folded awning.
- The material is of great importance. The most suitable is high-quality lightweight fabric with waterproofing impregnation.
- You also need to pay attention to the quality of the fittings with which the awning is attached to the boat. The method of fastening also matters; strong wind loads plus windage can easily cope with low-quality fasteners.
- The awning should not cover the boat number ; a special transparent window is provided for this.
INSTALLING A BOW COVER ON A BOAT.
Position the awning as shown in the figure, secure the hooks in the bow and fix the supporting arc in the side supports. Fasten the straps with hooks to fix the position of the arc. Determine the longitudinal axis of the boat; this can be done by connecting the middle lines of the bow and stern (transom) parts of the boat using a cord or crepe (without sagging).
1. To maintain alignment in the movable hinges, it is recommended to assemble the awning frame and lay it on the bow of the boat (see Installation section), secure the tips of the main arc in the supports with screws. From the “cup” of the boat’s cover, towards the bow, measure a distance of 64 cm (we remind you that the dimensions should be taken according to the instructions of your awning) and make a mark with a pencil.
2.Repeat the operation on the second cylinder and attach supports to the points.
3. Set aside a distance of 88 cm along the transverse axis so that the middle of this distance is at the point of intersection with the longitudinal axis.
4.Adjust the supports in accordance with the markings.
5.Attach the side supports to the marked points.
Outline the places where the supports on the cylinders are fastened in this way along the contour with a pencil and make marks on the sides and supports to prevent the parts from turning around during gluing.
GLUEING SIDE SUPPORTS TO THE BOAT.
Before gluing the supports, you need to disconnect them from the arc.
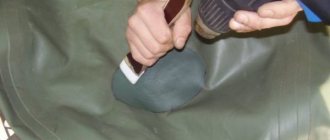
1. Degrease the circled area on the cylinder and the lower part of the side support with acetone.
2.Apply a uniform thin layer of glue from the kit (included with the awning) to the gluing areas.
3.Wait 2 to 5 minutes until the glue begins to dry.
4. Exactly along the marked contours on the bolt and in accordance with the marks on the supports, press firmly one by one in one correct movement. (Once the support is connected to the cylinders, adjustment is not possible).
ATTENTION!!! Further operations on stretching and installing the awning should be carried out no less than 3 hours later. Complete polymerization of the glue occurs after 12-15 hours.
The awning in the transport position is a curved envelope with a zipper, repeating the contours of the bow of the boat, inside which there are arches of the frame and the main awning. To properly install the awning on a boat in stowed form, it is necessary to position the envelope on the bow (of the inflated boat) so that the straps with fixing buckles came out from under the envelope, the same straps can be used to secure the awning on the bow by pulling it to the bow handle or to the eyelet. When assembling the awning, the supporting arc (longer) lies on top.
Popular models
Awning for boat BADGER 370C – 4600 RUR
The model is designed exclusively for this brand of boat. It is cut in such a way that it fits tightly to the contours of the boat. This is important for maintaining aerodynamics when driving on a motor. The awning is made of high-quality PVC material 470 g/mkv produced in South Korea. There is a transparent insert to improve visibility.
Bow awning for Flink boats – 3900 RUR
Made from PVC fabric from Scantarp. Large transparent soft window made of VENTANA SC film. The perfect fit is ensured by an elastic cord sewn along the edge. Fastening by means of hooks connecting to the water breaker. The frame is made of aluminum pipe 1.5×22mm. To attach the arc, you need to glue the eyelet included in the kit.
Admiral 3900 – up to 4700 RUR
A Russian company that produces high-quality awnings according to its own patterns. The customer’s wishes are taken into account, for example, a transparent window with a number, additional pockets, etc.
Two captains 3950 – 5400 RUR
The company from St. Petersburg offers models in the classic version (solid sides, transparent front). But the model of increased transparency is especially interesting, almost entirely consisting of transparent PVC film “Crystal” 0.5mm of high quality. The arcs are made of anodized aluminum pipe, mounted on glued brackets, which are included in the kit + glue. There is a possibility of attachment to the fender beam. If this is not available, then the kit includes mushrooms that are also glued to the boat. An interesting modification with a trolling tube. The wide selection covers the most popular boat models.
HunterBoat 3650 – 3900 RUR
Manufacturer of PVC boats that produces bow covers as an additional branded accessory. The transparent frontal insert significantly expands viewing. It is attached to the fender beam or to the glued brackets that come with the kit. Equipped with a transparent window for the number.
Globe 3650 – 5000 RUR
Another large company from St. Petersburg producing a wide selection of PVC products, including boats and bow covers. The company works to order, so the personal wishes of clients are taken into account.
Do it yourself
The vast majority of boat owners are fishermen. As a rule, amateur fishermen are inventive people and what they can buy in a store does not always satisfy them. They are constantly coming up with something new, improving, making things. Bow awnings for boats are no exception. On reservoirs you can find a wide variety of hand-made structures.
What is required for production
- To begin with, it is important to adequately determine your own capabilities and skills. In the process you will need to design, sew, glue, bend tubes, drill and much more. If you understand that you can handle some tasks and not others, then think about who can help you.
- You must clearly understand what tools will be needed at all stages of production
- Next you will need a workplace. It is advisable to place an inflated boat nearby so that one does not interfere with the other. This is convenient in the sense that you will have to constantly take measurements, double-check, and do fittings while working. If, for example, the boat is in the garage, and the work is being done in the apartment, you will have to run around. And just one thing can ruin the whole job.
- Before you begin, you need to develop a clear vision of what exactly you will do. Don't be lazy to sketch. Many options allow you to take into account aspects you never thought about. Specialists sometimes do not limit themselves to sketches and drawings, but embody their projects in three-dimensional models.
- Next, decide on the materials and where you can get them or purchase them. You will need tubes for the frame, material for the awning, related accessories, high-quality glue and other little things.
This approach will save you time and avoid unnecessary movements. Someone, having weighed all the pros and cons, may come to the decision that it is easier to buy a ready-made option.
Step-by-step manufacturing instructions
- You need to start from the frame arc. Take a piece of wire or Æ15 metal-plastic pipe and bend the preliminary template.
- The arc should be located in front of the front can (the place for the seat) so as not to interfere with the oars.
- It should slope towards the stern.
- Next, sitting down at the tiller, adjust the height of the arc so that it does not interfere with your view. Consider the position of the boat when planing. This operation is much more convenient to carry out together.
When making the arc, take into account the lateral wind load (gulfwind) to avoid excessive drift (the boat drifting to the side). Smooth rounded corners will significantly reduce drag:
- To make a frame arch , as a rule, a thick-walled aluminum pipe Æ18 - 20 mm is used. The optimal wall thickness is at least 3 mm.
- Bending a pipe symmetrically without special tools is a very difficult task ; for this purpose it is better to make a bending template.
- Using a wire fitting template , make an accurate, life-size drawing of the arc.
- According to the working drawing , transfer the bend radii onto thick plywood along the internal contour.
- Use a jigsaw to cut out the template. The thickness of the workpiece must be no less than the diameter of the pipe. If the plywood is not thick enough, use several layers.
- Use screws to attach the workpiece to a flat surface. It is also necessary to provide a stop block to secure the pipe when bending.
- Based on the working drawing, calculate the required pipe length. The workpiece must be cut with a margin of at least 100 mm on each side.
- Mark the middle on the pipe , and from it measure the distance to the beginning of the bend.
- Align the starting point of the bend with the template , and transfer the center point of the pipe to the work surface.
- Bend the pipe and attach it to the working drawing for fitting.
- If the bend is satisfactory , unfold the pipe, align the center points and repeat the operation.
- The next step is to make mounting cups for the arc. Since the arc is a protruding element on the boat, it is necessary to take into account all kinds of loads to which it will be subjected during operation. The fastening must be strong and reliable, but the design must not damage the cylinders.
There are several fastening options:
- Use power elements already available on the boat , for example, rail holders.
- Select fittings from specialized stores that will meet the design requirements.
- With proper qualifications , make it yourself.
The arc should be installed and removed without problems. Fixation is not necessary; this function will be performed by the stretched awning.
After the frame fittings are secured and the arc is inserted into the glasses, you can begin making the awning. This stage also requires special attention; the main thing here is not to rush. But first, a few words about the choice of material. Most often, thin, durable, rubberized fabric is used. It is recommended to buy with some reserve.
Sequence of actions during manufacturing:
- You need to start with a pattern; for this you need to measure the length of the arc and the distance from the arc to the nose. Make all sizes taking into account the overlaps and turns of the fabric.
- It is better not to immediately apply pattern markings to the material. It is better to use old, unnecessary fabric, if you make a mistake in cutting, it will save your money. The pattern can be made from a single piece, or with subsequent stitching of parts.
- After cutting, and if necessary, stitching, we try on the experimental model on the boat. We make full adjustments directly on site.
- Only after this can you start cutting the main material according to the finished fabric template.
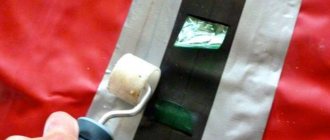
- We sew the seams on a sewing machine. To protect against moisture, we seal all the lines with strips of rubberized fabric.
- If transparent sections of PVC film are provided , then we also sew them in and glue them.
- We wrap the edge of the awning and stitch it so that the arc pipe fits freely. The arc, inclined backwards, and the balloon, when viewed from the side, form an acute angle. This corner must be covered with fabric, therefore, the pipe will pass through the awning itself only in the horizontal part of the arc.
- At this stage, you need to install the awning on the boat to accurately mark the fastening elements. These can be plastic hooks, eyelets, half rings. It is advisable to install fasteners in places where the fabric forms two layers.
- The punch for the holes for the eyelets can be made from a piece of sharpened metal pipe of a suitable size.
- In places where the awning will come into contact with the cylinders, you need to sew in a rubber cord, or better yet, tape. This will press the material tightly against the boat and will not allow strong winds to form cracks and prevent moisture from entering.
- After the final fitting, you can begin sewing on pockets , flaps, zippers and other additional accessories.
- The result should be a structure that is securely attached to the nose and sides. The rearmost fastenings should be located behind the cut of the frame - this will allow you to securely hold the arc in the mounting cups. The awning fabric should have uniform tension everywhere.
Buttons
A slightly less convenient, but more reliable method of fastening. Buttons are useful not only in places where there is no load, but are also quite capable of holding the entire awning on your boat under gusts of wind - for this you will need to install the “reciprocal” part of the button on the boat itself.
Snaps are also more practical than zippers. They are durable, and even if they break, it is not difficult to replace a separate element (especially if you take care of purchasing the necessary tools in advance).
Blitz tips
- Awnings made of transparent PVC film do not fade in the sun over time;
- Avoid friction of frame parts with boat cylinders;
- Equip the awning with waterproof, internal pockets, and this will be the ideal place in the boat to store the most water-hating things;
- It is better to transport and store the awning in a case;
- An awning in combination with a railing and trolling tubes is much more practical;
- If you are not yet the owner of a PVC boat, but are just planning to become one, when choosing, consider the possibility of installing a bow awning.
How to choose a bow awning for a PVC boat?
The passion for PVC inflatable boats does not just go away. Very quickly the boat ceases to satisfy the owner in terms of its characteristics and level of comfort. This means that it’s time to tune the boat. One of the useful elements that should be installed on a boat is a bow awning.
If you use the boat in the summer on quiet lakes and don’t go far, then most likely you will hardly need a running awning. A Panama hat is enough to protect you from the sun. But on large bodies of water in windy, inclement weather, the wave can be quite high. It will rush over the side, the spray will start to hurt your face, and the wind will howl in your ears. In addition to these troubles, water will, one way or another, flood the cockpit.