DIY PVC boat floor
(05/05/2017, author Ilyin Vladimir)
Your dream has come true, and the treasured inflatable boat has taken pride of place in the corner of the room or garage. Alas, the joy of the purchase spoiled literally the first time I went out onto the pond. What comfort is there without a hard bottom? One awkward step and you lose your balance. You will need to lay hard flooring on the bottom. We will look at how and what to make a wooden accordion pad with your own hands in this article.
What materials will you need?
Want to make your homemade deck better than factory flooring? You will need:
- Moisture-resistant plywood with an optimal thickness of 1 cm and the area of the boat;
- Small door hinges, at least 3 for each connection;
- Bolts, washers and nuts for fastening (self-tapping screws will not work);
- Antiseptic and yacht varnish.
To make it more convenient to transport the sheet from the store, you can cut it right on the spot, having previously taken measurements of the future components of the hard bottom).
What tools will you need?
If you prepare the right set, that is, you have everything you need from the tools, it will take much less time to create a homemade hard floor for a PVC boat. And the build quality will be much higher. So, if you have already stocked up on the necessary materials, then prepare for work:
- Wood saw or jigsaw;
- Sandpaper;
- Bolt diameter drills;
- Metal file;
- Paint brushes;
- Measuring tape.
We take measurements and cut out the stencil
First you need to measure the bottom of the boat: width and length. After this, you will already know the sizes of plywood that you need to buy.
Then a stencil is made. It is much easier to work with a stencil than with dimensions. After all, the bottom has a complex shape, so it’s easier to lean the stencil against the plywood, trace it with a marker and cut along the contour.
There are many options for what to make a stencil from. The cheapest and easiest way is to use newspaper by gluing several sheets of paper together with tape. After this, you can mark the width of the accordions.
To make the pattern symmetrical, fold it in half lengthwise and carefully trim it.
Payol processing
In principle, you can do without impregnating plywood with an antiseptic, because yacht varnish will make the wood waterproof. But applying the varnish itself or similar enamel is necessary; even moisture-proof plywood swells over time from the ingress of water.
If the wood swells, the accordion will no longer fold, will take up a lot of space and may not fit into the boat.
As an antiseptic, choose a universal remedy for all types of fungus, mold and rot. Treat plywood with yacht varnish outdoors or in a well-ventilated area that you are not going to enter for several days.
Sealing punctures
- a set of patches from a repair kit for a boat or a piece of rubber from OZK (old thick oilcloths from the USSR era are also suitable);
- fine-grained sandpaper;
- rubber glue brand 4508 - a universal means for gluing or polychloroprene glue;
- acetone, alcohol - for degreasing the surface;
- marker, pencil or chalk;
- scissors;
- hair dryer for construction or household use;
- soap solution;
- roller or bottle for rolling.
We identify areas that require repairs.
We inflate the boat and use a sprayed soap solution to identify the damaged areas - they will foam. We mark the puncture sites with a marker or pencil and deflate the boat.
Its size should be at least 2 cm larger than the surface of the damage. After cutting out the patch, apply it to the area to be repaired and outline it with a marker.
Surface cleaning and degreasing.
Using sandpaper, we carefully but carefully clean the marked areas and the patch itself. We remove all debris formed during cleaning and degrease the surface.
The cold method is similar to the hot method, but during operation the bonded surfaces do not warm up. They use it in camping conditions when urgent boat repairs are needed. At home, it is advisable to re-glue the patch using a hot method.
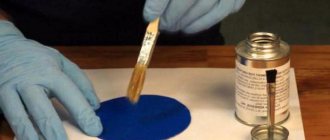
- 1.Using a brush, apply glue to the patch and to the puncture site. It is advisable to place cardboard or any other hard paper under the patch and apply glue, going beyond the edges of the patch - then it will not curl.
- 2.Wait 10–15 minutes and apply a second layer of glue.
- 3. Let the glue sit for the required time (usually from 10 to 20 minutes - see instructions) and use a hairdryer to heat the surface of the boat with the glue applied and the patch to 50-60 degrees Celsius.
- 4. Connect the surfaces to be glued together, pressing them hard for a few seconds, and roll them on top with a roller.
- 5.Wait until the glue crystallizes. The required holding time is indicated on the packaging and usually ranges from 3 hours to 3 days, depending on the brand of glue.
READ How to make a painting on the wall with your own hands
Characteristics
- Type: Glue
- Works: External, Internal
- Scope of application: Universal, For wood, For furniture, For windows, For floors
- Country of origin: Russia
- Packing: Box
How to assemble a payol accordion for an inflatable boat
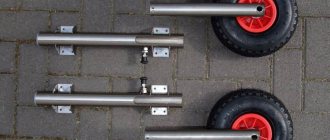
All that remains is to fasten all the components with door hinges to form an accordion (book). To do this, mark the hinge holes along the joints and drill them. Place the loops 3-5 cm from the edge. Each connection will require a minimum of 3 loops.
Then screw the hinges using bolts and nuts. Be sure to space the washers to prevent the nuts from sinking into the wood.
Take a file and file off any excess bolts so they don't stick out. Use a file to round off the metal protrusions of the bolts and nuts.
By the way, if you don't want to use loops, try lacing the pieces together. This method is simpler, but connecting with loops is more reliable, because the cord can fray or rot over time.
How to make an overhead floor for a rubber boat
Many fishermen use flat-bottomed rubber boats, which have a bottom made of a layer of rubber and no decking (slane) included, which gives it minimal rigidity. The absence of the latter leads to the bottom sagging at the slightest movement, which is very inconvenient and tiring due to the need to constantly maintain balance in an unstable boat.
The problem can be solved by installing an overhead floor. To do this you need to purchase: plywood; carpet covering; plastic tie; board; geotextile; pipe insulation; wooden block; spray glue; loops; fastener
The tools used in the work are: drill; ruler; scissors; pencil; hacksaw; square
They start by inflating the boat. Then measure the dimensions between the internal seams that secure the bottom to the cylinders.
Using the obtained dimensions, mark the floor on a sheet of plywood and cut it out. Cut the resulting element crosswise into two parts. They adjust the bow to the shape of the boat, trimming the corners.
Aerosol glue is applied to the lower surfaces of the workpieces. Geotextile is applied, pressed down, smoothed, squeezing air out from under it. After gluing, the material protruding beyond the boundaries of the plywood parts of the floor is cut off.
The flooring blanks are turned over and, using spray adhesive, the carpet is glued to their upper surfaces. After the glue has dried, use scissors to cut the material around the perimeter of the sling.
A tubular insulation is secured along the outer edge of the decking, which will protect the boat material from contact with the plywood. The insulation is fixed with plastic ties through holes that are drilled in advance near the perimeter of the slate.
To make the flooring more rigid, wooden beams are placed near its sides. The connection is made dismountable using bolts and wing nuts. The beams are pre-protected from moisture by being painted with water-repellent paint. Rings and reels for tying cords are installed on them.
The craft can be supplemented with a box that is installed at the stern of the boat. You can store things, spare fishing parts, accessories inside it, and sit on top. The box can be equipped as a rod rest.
The box is made of boards, OSB, plywood. Cover it with carpet. Mounts for fishing rods are installed on the lid. If it will be used as a seat, then arrange a foam rubber cushion.
Liquid rubber coating
Liquid rubber coating is also called “self-leveling flooring”. This material is resistant to moisture, and therefore can be used both indoors and outdoors. The coating is porous, so the coloring pigment adheres well to it; for example, the colors of a playground and markings on a sports field where liquid rubber was used will retain its color for a long time.
The composition of liquid rubber coatings includes the following components:
- Rubber crumbs of different fractions are the basis of the material.
How to make a floor in a boat with your own hands
Epoxy or polyurethane glue is a binding element that, when hardened, ensures the integrity of the layer.
Coloring pigments are added to the mixture in production or directly during the process of mixing the solution at home.
- Modifiers can be introduced to achieve specific physical characteristics of the material.
The liquid rubber coating is soft and elastic. These qualities allow it to be installed in gyms and playgrounds. In addition, such a floor can be found in underground parking lots or on sections of stairs as anti-slip inserts. On sports grounds, liquid rubber is laid in a thin layer, which provides elasticity and a non-slip surface; on children's playgrounds, a thick coating is made to soften the impact of falls.
READ How to make a fence at your dacha on a budget
Rules for laying rubber tiles on the floor
The base for rubber tiles can be almost anything: screed, sand, plywood. The main thing is that before making a rubber floor, make sure that the surface is relatively flat so that the lining of the modules does not look sloppy.
We carefully prepare the subfloor: we level out large differences in height, and fill the recesses with cement mortar.
We join the tiles starting from the corner. We fix the locking connections of adjacent modules to each other.
If you think that this fixation is not enough and the tiles may move, secure individual areas with neoprene adhesive.
Homemade payol for an inflatable boat
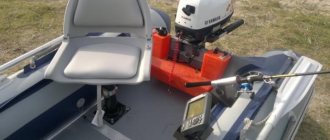
I have a small single-seat PVC rowing boat that I often take fishing. In float fishing, it helps to more accurately determine the fishing spot using an echo sounder, set a buoy, and go fishing at dawn, guiding on a river or on a crucian carp pond. In a spinning rod, it is quite good for fishing the surrounding area, helps with rafting on the river, and is also good for small bodies of water.
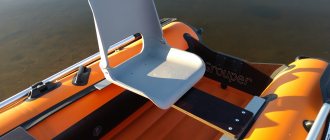
But, like most single-person boats, it does not have a deck. On the one hand, this significantly reduces the weight and dimensions of the packaging during transportation, but on the other hand, you are left without the advantages of hard flooring. And they are significant. First of all, it makes fishing much more convenient: it becomes possible to move in a boat; In addition, for me, as a floater, an important factor is the stability of the bucket with bait - it is important that it does not tip over with any movement. A boat with a hard bottom moves easier under the oars, allowing you to expend less effort for rowing. Since it is impossible to buy a factory-made cover for this model of boat, I had to make it myself.
Payola - what is it?
By floor we mean a partially or completely removable bottom, which is placed on the bottom of a river or sea vessel. In small vessels, this type of floorboard is necessary to create a flat bottom so that you can move freely around the vehicle without getting your feet wet. In this case, water collects under the floor. The material used in most cases is special marine plywood. It is produced using sophisticated technology and is reliably protected from getting wet.
What is it needed for
Before you buy a folding floorboard or a solid structure coated with several layers of varnish, find out for what purposes this flooring can be used. Payol on the hold deck of a cargo ship and in other ship premises is used to ensure that the transported cargo is not spoiled by various liquids that collect under the decking and flow freely into the hold bilges. It is also used on watercraft intended for sea fishing. You can even see payol on the deck of a ship - on old ships they were used until the 1970s. In addition, removable bottoms are used for:
- leveling the plane along which people move in a watercraft;
- ensuring proper operation of the inflatable keel;
- ensuring rigidity of the floor in order to stand and walk in a PVC boat;
- protecting the bottom from gusts in places where the cargo is located.
Materials
I immediately refused waterproof (bakelite) plywood - it is too heavy, the advantage of the light weight of the kit is immediately lost, and, as it turned out, it is not so easy to buy. I decided to use regular plywood 6 mm thick, treated against moisture. A standard sheet of plywood was cut exactly to size at the Leroy Merlin store, and it became convenient to transport. At first I doubted the strength and rigidity of 6 mm plywood, but a small square (a blank for the floor) turned out to be quite rigid, and taking into account the fact that it would rest on the bottom and water, and even being connected to other pieces, it turned out that the strength quite enough. It probably won’t allow you to jump in a boat, but it’s quite possible to move comfortably and place all your equipment. I didn’t intend to fish standing up - the small boat itself is unstable, and falling overboard is hardly part of anyone’s fishing plans. But such a floor turned out to be the lightest of all possible options.
Plywood, of course, must be protected from water. Modern varnishes and impregnations do an excellent job of this. I already had some experience in making floorboards: then I impregnated the plywood with ordinary decorative impregnation, which protects it from moisture. Several years of use did not reveal any particular problems, except that signs of destruction began to appear in the corners. This time I decided to make the protection more thorough and bought a small jar of inexpensive yacht varnish. We also needed several brushes: one or two for applying varnish in two layers and a small one (one inch) for glue, as well as a roller or spatula for smoothing the fabric.
Separate sheets of plywood needed to be joined together into a floor. I did not consider the option of a rigid connection; for a rowing boat this would be extra weight and additional operations during assembly and disassembly. The optimal option turned out to be gluing sheets of plywood with strips of PVC fabric; However, there were doubts about the strength of the bond between the glue and varnish on the plywood. I had the fabric; however, it is not difficult to acquire. I needed a few more tubes of PVC glue (I used about 150 ml). The cost of materials amounted to no more than 1000 rubles.
Communities › DIY › Blog › hard bottom (payol) of PVC boats
I cut out segments of a hard bottom from plywood-12 into a PVC SKIF 260 boat. I haven’t processed it yet. I laid it on the bottom and tried it on. QUESTION - does it make sense to fasten them together - they are pressed with bolts.
Comments 40
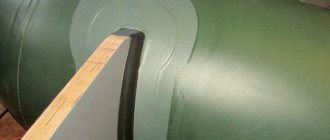
I did this for myself: I treated the plywood, impregnated the ends with epoxy, impregnated the surface with yacht varnish, connected it with an aluminum profile (there is a photo of it above), it just fits tightly and that’s it. I assemble the bottom, inflate the boat - it holds like a monolith. 5 years - normal flight), and with it the speed is much easier, exactly 1.5 times.
For such boats I use a bottom made of foamed polyurethane 50 mm thick, you cut out three pieces and “woo a la” and the bottom on which you can stand, it’s light, the water is not scary, the element of buoyancy is welcome. A boat of this size with such a bottom can be carried by one person and loaded onto the roof of the boat without any problems.
Why put such small towns on such a boat? It won’t bring comfort, but it will cause a lot of hassle. Yes, “marine” plywood is in short supply and requires careful processing.
what's the trouble? and why won't there be comfort?
It’s a hassle in laying a hard bottom, and even during fishing, in rough weather, especially when sand and a little water gets in, the abrasive is excellent. When I bought my moray eel from the manufacturer, I was immediately told that it was a hard shell for a pond, and a slang for our “stormy” seas.
It makes sense, i.e. necessary! Believe my experience, it can roll on smooth water, but you will walk on waves and the plates will begin to shift, they will climb on top of each other. On my boat I made a floor in the front (there was a floor without a bow) and didn’t fasten it to the middle... I had to go back through the waves several times... I thought all the seams on the boat would tear...
I have the original sheets glued together and folded like an accordion
Father's plywood has rubbed holes on the sides, judging by the photo the boat is exactly like this. I think the plywood needs to be wrapped around the edges, and it can be fastened with three or four longitudinal blocks on top. . And saturate it with Cardon anti-gravel, it is absorbed perfectly, and the plywood will not be afraid of water at all, you just have to soak it for a long time, and then dry it thoroughly, so that what was destroyed by Cardon will erode.
Soak several layers of drying oil and varnish on top, and for convenience, cover with something like a piece of tarpaulin and it will be beautiful, and it is better to use one large piece in the center (easier and more practical)
pnd 8-10 mm t you will be happy)
In general, there is no need for a bottom all over the bottom. Only in the center is a square.
I support, this is only an inconvenience in assembly and no functionality (from personal experience).
Look for Finnish plywood, this plywood will swell.
nothing will swell if handled correctly. boats are made from simple plywood
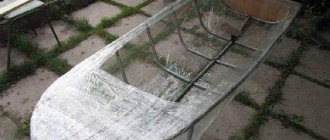
Manufacturing
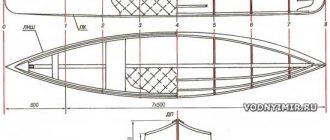
The most difficult thing was to figure out with what gap the floor should be inserted into the bottom of the boat. I was able to talk to boat manufacturers who said that the gap should be about 5 mm. Having done just this, I still missed the mark somewhat, since this gap is designed for thicker bottom plywood; for mine it was possible to do it almost by surprise. On an inflated boat, you need to stretch the bottom fabric across the sides and measure the resulting distance. For convenience, all this can be done from the outside of the craft. Subtracting 2-3 mm, we get the required width of the plywood sheet.
The length of the payol is measured along the length of the bottom of the boat. To accurately repeat the contours of the bottom in the bow and stern parts, I made a template from cardboard. I had a fairly significant limitation on the length and width of the folded floorboard, since I wanted to fit it into the table platform, which is almost always with me when fishing. Because of this, I sacrificed the length of the floorboard and made it slightly shorter than the bottom of the boat, moving back a little from the bow. The advantage in this case was that the bend line of the bottom (I have a boat with a slightly raised bow) lay exactly where the sheets meet. This does not at all affect the ease of use of the boat, but the assembled floorboard fits perfectly into the car with the table. My payol came out of four parts.
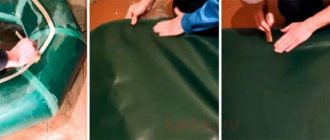
I cut the plywood exactly to size in the store, all that remains is to process the corners and side joints. All the ends (which are adjacent to the boat and will be joined and then glued together with PVC fabric) were rounded, all the corners were made along a radius, a “grinder” with a petal circle helped me with this. There should not be any sharp corners or edges that could damage the fabric. Finally, I sanded the edges on all sides with fine sandpaper on a fabric base. The dirtiest part of the job is varnishing. Plywood must be processed on all sides without gaps. The drying time of the varnish is several days; after the first exposure, I cleaned it again on all sides for better adhesion, and also removed imperfections, smudges and varnished it completely. As practice has shown, two layers of varnish are quite enough. I didn’t additionally color the pyol - the light one heats up less in the sun. A few days later, when the varnish had completely polymerized, I began the most difficult task - gluing the sheets with PVC tape.
For high-quality gluing with PVC glue, it is advisable to use an industrial hair dryer, which heats the adhesive seam and removes the solvent from it. Glue should be strictly according to the instructions. Sheets of plywood must be glued together with tape so that it allows the sheets to be folded like an accordion. To do this, I glued one side by laying the plywood on the floor on newspaper, and the other side in a folded state. It should be taken into account that PVC glue, which can be bought in a store, does not involve correction of parts during gluing, which means that all parts must be accurately positioned immediately. Preliminary marking with a pencil helps with this. After joining the parts, I rolled the fabric with a narrow plastic spatula to remove air bubbles. I glued the bow part so that it curves slightly upward, following the contour of the bottom. After gluing, a period of several days is required, after which the long-awaited tests on water can be carried out.
The weight of the payol for my boat was approximately 3.5 kg, which did not add much to the weight of the kit. By the way, if necessary, the payol can be left at home. During use during the fishing season, the gluing of the plywood and PVC tape did not come apart, and the varnish reliably protected the payol from water and dirt. I must say that this is my first experience in making a “book” type payol, and it turned out to be successful. I am sure that any angler will also succeed.
Rubber floor installation technology
The installation procedure for rubber floors is quite simple if you strictly follow the technology. For various modifications of rubber floor coverings, installation instructions differ in the use of specific tools and devices.
Features of laying rolled rubber flooring
The process of laying rubber roll flooring consists of several stages: surface preparation, material adaptation, gluing.
We spread the rolls of rubber material on a rough base and leave them to rest for several days.
After the waves and unevenness on the coating disappear and it is completely straightened, we begin its installation.
We treat the entire surface of the rubber coating with polyurethane glue. We “go through” the joints especially carefully.
Press it to the floor and smooth it out. You can use a spatula for convenience.
If you need to trim the material, use a sharp knife.
Let the rubber floor dry for several days. After this you can use it.
Sources:
https://izdoski.com/kak-sdelat-nakladnoj-pol-u-rezinovoj-lodki.html https://tutknow.ru/building/pol/5966-rezinovyy-pol-svoimi-rukami.html
Homemade hard floor for an inflatable boat
To make a hard bottom we purchased:
- Plywood sheet 10 mm. 1525*1525 mm;
- Loops 15 pieces;
- Bolts, nuts, washers;
- Impregnation, yacht varnish.
I made a pattern from linoleum to fit the bottom. The width of the rectangular part of the bottom was made 2 cm larger than standard slats, because when installing the latter, the gaps to the cylinders remained unreasonably large. The gaps of the rest of the perimeter are made in accordance with the gaps of the rectangular part.
The cut linoleum will be used to mark the hard floor, and it will also be laid between the standard PVC floor and the hard floor to prevent damage to the PVC floor by hard floor fittings. I folded the pattern in half lengthwise and made it symmetrical by trimming it a little.
From a sheet of plywood I cut out 6 pieces 80 cm wide.
And there was still a square with a side of 725 mm. From this square, if desired, you can make a foot rest or use it for other purposes on the farm.
The long sides of the floorboards were rounded with a file. Impregnated with protective impregnation. I assembled an “accordion” on hinges for the bottom from the floorboards.
The two bow floors are slightly smaller in width than the others, because the size of the plywood sheet does not allow making another row of 80 cm. The length of the resulting floor with gaps between the floors is 5-6 mm. It turns out to be equal to the length of the cut linoleum, as a result of which there is no need to purchase a second sheet of plywood.
The bolt on the hinge side must have a countersunk head, otherwise the floor will not fold. On the reverse side, I cut off the excess part of the bolts with a grinder and ground the nuts with it. Later, a less time-consuming method came to mind: cut off the excess part of the bolts, grabbing part of the nut, and replace the nuts with new ones. To ensure structural rigidity, there must be at least three loops per connection.
Next, I placed the cut linoleum on the resulting structure, outlined it with a pencil, cut off the excess with a jigsaw, rounded the edges around the perimeter with a file, sanded the surfaces with sandpaper, covered it with three layers of yacht varnish and...
A homemade hard floor for an inflatable boat is ready.
A hard floor with cans wrapped in linoleum form a separate transport unit, making it easier to carry and place in the trunk of a car.
The boat was not equipped with a hard floor. The kit included a so-called “rack slant”. The rigidity of the rack slate leaves much to be desired.
My design is installed faster and more conveniently than standard prefabricated flooring; there is enough rigidity for a rowing boat.
The floor is placed inside the boat immediately before pumping, then the “accordion” is unfolded.
Advice:
It is advisable to place a polypropylene or fluoroplastic sticker on the end of the plywood along the edges of the plywood, otherwise constant friction of the floor with the rubber of the boat will lead to abrasion and destruction of the fabric of the boat. At the car market you can buy a polypropylene tube of the appropriate diameter, cut it to length and put it on and that’s it!
Video “Hard bottom for an inflatable boat and trolley”:
Hard floor materials
A hard floor can be made of various materials: plywood, aluminum or plastic.
Plywood
Until recently, plywood was the main material for flooring in inflatable boats. Moisture-resistant plywood is used to make floorboards.
One of the benefits of plywood flooring is that it doesn't feel like a slippery floor when it's wet.
In case of poor installation or poor-quality gluing, if storage rules are violated, the plywood becomes much more than the permissible weight. This may cause holes or scratches in the bottom of the PVC.
Usually plywood with a thickness of 9 - 12 mm is used.
Plastic
Plastic payol is most often used for small-sized PVC boats. The lack of structural strength does not allow such flooring to be installed on large boats.
Due to its light weight, the flooring can be disassembled and assembled in the form of a book.
Such a bottom does not need to be removed from the boat; after deflation, the boat can be hidden with a cover.
Plastic, unlike other materials, will not damage the boat.
It is more convenient to use; the boat can be assembled and disassembled in 20 minutes.
A characteristic advantage of plastic bottoms is the absence of sound produced by metal bottoms, which is important when fishing when silence is needed.
Aluminum
On boats longer than three meters, exclusively aluminum decking is used. This bottom, unlike others, completely covers the bottom of the PVC boat, guaranteeing the reliability and strength of the mechanism.
Boats with an inflatable keel require a hard floor that will rest against the edges. Generally, 12mm is the optimal thickness for a rigid sheet.
Special puzzles serve as a fastening element and do not allow backlash and involuntary chipping and breakage during loads.
As a result, the floor becomes a single whole, in combination with stringers.
A continuous layer of aluminum covers the entire boat from bow to transom and distributes the weight of the human body as much as possible without damaging the bottom when exposed to excess weight.
Features of aluminum floor
All materials have pros and cons. Unlike plastic, aluminum does not deteriorate or be damaged by water. But if this type of floorboard has been deformed, replacing it will be much more expensive than the plastic version.
Thanks to the additional edges, the aluminum floorboard does not require further edging.
Of course, aluminum heats up in the sun in the summer and cools down quickly in the winter, like any metal. But this statement is irrelevant, since in winter they don’t sail on boats, and in extreme heat you can lay a rubber mat on the bottom.
Making a homemade hard floor for an inflatable boat
To make a hard bottom we purchased:
- Plywood sheet 10 mm. 1525*1525 mm;
- Loops 15 pieces;
- Bolts, nuts, washers;
- Impregnation, yacht varnish.
I made a pattern from linoleum to fit the bottom. The width of the rectangular part of the bottom was made 2 cm larger than standard slats, because when installing the latter, the gaps to the cylinders remained unreasonably large. The gaps of the rest of the perimeter are made in accordance with the gaps of the rectangular part.
The cut linoleum will be used to mark the hard floor, and it will also be laid between the standard PVC floor and the hard floor to prevent damage to the PVC floor by hard floor fittings. I folded the pattern in half lengthwise and made it symmetrical by trimming it a little.
From a sheet of plywood I cut out 6 pieces 80 cm wide.
And there was still a square with a side of 725 mm. From this square, if desired, you can make a foot rest or use it for other purposes on the farm.
The long sides of the floorboards were rounded with a file. Impregnated with protective impregnation. I assembled an “accordion” on hinges for the bottom from the floorboards.
The two bow floors are slightly smaller in width than the others, because the size of the plywood sheet does not allow making another row of 80 cm. The length of the resulting floor with gaps between the floors is 5-6 mm. It turns out to be equal to the length of the cut linoleum, as a result of which there is no need to purchase a second sheet of plywood.
The bolt on the hinge side must have a countersunk head, otherwise the floor will not fold. On the reverse side, I cut off the excess part of the bolts with a grinder and ground the nuts with it. Later, a less time-consuming method came to mind: cut off the excess part of the bolts, grabbing part of the nut, and replace the nuts with new ones. To ensure structural rigidity, there must be at least three loops per connection.
Next, I placed the cut linoleum on the resulting structure, outlined it with a pencil, cut off the excess with a jigsaw, rounded the edges around the perimeter with a file, sanded the surfaces with sandpaper, covered it with three layers of yacht varnish and...
Types of hard floor
Boat decks vary in their design features.
By increasing the rigidity of the hull, boats begin to move much more slowly. It is impossible to install a one-piece floor in a floorboard boat, which is why it is necessary to break it into parts (floorboards).
The rigidity of the PVC boat skin will depend on the cylinder and the bottom.
In order to reduce the weight of the boat and its maneuverability, various design solutions have been invented.
Profile
The simplest type of floor, where two or more sheets of plywood are fastened together using an H-profile. Typically used in inexpensive boats.
Folding
Payol - the book is quickly installed in the boat, but does not provide sufficient rigidity due to its features. It will be inconvenient to plane with such a floor; even aluminum profiles will not provide rigidity to the book.
Payol with stringers
This type of bottom is the most popular among PVC boat owners. With the help of stringers, the floor becomes a very stable, rigid and integral structure.
Homemade hard floor for an inflatable boat is ready
A hard floor with cans wrapped in linoleum forms a separate transport unit, making it easier to carry and place in the trunk of a car
The boat was not equipped with a hard floor. The kit included a so-called “rack slant”. The rigidity of the rack slate leaves much to be desired.
My design is installed faster and more conveniently than standard prefabricated flooring; there is enough rigidity for a rowing boat.
The floor is placed inside the boat immediately before pumping, then the “accordion” is unfolded.