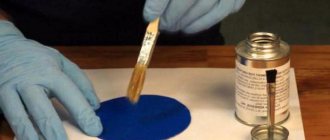
Application of glue
Before you begin repair work on your boat, you must carefully prepare the surface:
- a damaged inflatable boat must be deflated;
- Wash and dry the problem area well;
- in order to avoid the formation of subsequent folds in the work area, it is recommended to place a flat board under it and level the fabric shell;
- degrease the problem area using any solvent, acetone.
This concludes the preparatory work.
What materials will be needed for repairs?
Having carried out a thorough inspection of the PVC inflatable boat and identified the problem area, we proceed to preparing the necessary accessories for repair:
- repair kit, it is provided by the manufacturer and is included with the boat;
- construction knife, scissors;
- roller or metal plate;
- pencil, marker;
- small brush;
- water, soap, rags;
- any solvent, the use of alcohol is allowed;
- special glue for rubber products.
The above list of tools will be required when carrying out repair work at home or on the shore of a reservoir. If the damage needs to be repaired directly while fishing, it is more effective to use a repair kit and a lighter.
The standard repair kit includes materials that allow, under field conditions, to eliminate the cause of vessel depressurization in a short time. The set consists of a tube of special glue, a set of PVC fabrics, the diameter of which is 40 mm and 80 mm (6 pieces).
A special adhesive is used to lubricate the inside of the patch and the gluing area on the boat.
Instructions for use
- The problem area must be cleaned of various contaminants. The use of sandpaper is inappropriate here; there is a high probability of damaging the fabric. This option is more suitable for heavily ingrained dirt.
- Degrease the working surface with either solvent or acetone. The main thing is to observe moderation in everything, otherwise the rubber fabric may corrode.
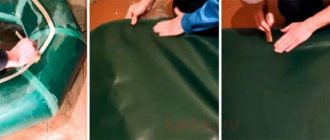
- Based on the size of the defect, a patch of the desired configuration is cut out. In size it should be several centimeters larger than the actual size of the hole. The cut patch is applied to the damaged area and the contours are outlined using a pencil.
- A special adhesive is used to lubricate the inside of the patch and the gluing area on the boat. Give the glue a little time to dry (10 minutes) and apply another layer of glue to the working surfaces. Wait a couple of minutes.
- Bonding surfaces. Using a hair dryer, you need to slightly heat the problem area and apply the prepared patch to it. The main condition is to check the area for the presence of an air gap. In order for the glued area to “grab” better, it needs to be rolled well with a roller. It is better to operate a repaired watercraft after 2–3 days.
For minor damage (scratches), filling them with glue will be enough, but it is better to apply a patch.
To eliminate holes with a diameter greater than 5 cm, it is recommended to use two patches: both on the inside and on the outside. The inner patch should be glued first, followed by the second one.
Repair tips from experienced fishermen
How to find the puncture site? Sometimes this task is not easy. Experienced fishermen advise two simple and always working methods
Submerge the boat in the water and pay attention to the bubbles. The escaping air will create a hole
The second option is to rub the sides and bottom with thick soapy foam. The formation of bubbles will also indicate a puncture.
In everyday life, you often have to deal with the problem of poor adhesive properties of glue. Most of the cheap copies under the loud name “Super” are not able to properly glue even paper. And when we are talking about a watercraft that is constantly either in water or in air and is operated at different temperatures, then the fish are advised to use Desmokol adhesives, specially designed for gluing PVC materials, and also add stabilizing additives to it, for example, “Polyisocyanate (PIC) grade B” or “Desmodur” in a proportion of 95% glue 5% additive.
Repairing a PVC boat is not a complicated process, but it requires a lot of attention and responsibility. If the restoration technology is violated, the amateur fisherman’s vessel will not only fail to float, but may also cause a tragedy. Therefore, if there is any doubt that you cannot cope with boat repairs on your own, then it is better to entrust this delicate matter to professionals.
Another type of repair of PVC boats is repair of the transom on a PVC boat. Unfortunately, this type of repair is 90% also associated with improper operation and storage conditions of PVC boats. The fact is that the water discharge valve (drain valve) installed in the transom of the boat is always is in the water, and no matter how you dry your boat before folding it and packing it for storage, the moisture that has penetrated between the plastic parts of the drain valve body has already been absorbed into the plywood and during long-term storage of the boat in the folded state, the transom board simply begins to rot . According to statistics, we replace the transom on PVC boats after 4 - 5 years of operation. Also, one of the types of repair of transoms on PVC boats is gluing the transom holder; over time, it can come off both from the PVC fabric itself and from the transom board. This The defect is also directly related to violation of the rules of operating conditions of the PVC boat, since in hot weather, under direct sunlight, excessive pressure is formed in the boat cylinders, excessive tension is created in the places where the transom holder and PVC fabric are glued together, critical heating occurs at the points of contact of the glued materials, which entails self-peeling of the transom holder from the PVC material, respectively. Such defects are less often observed on boats where an excess air pressure relief valve is installed as standard, so we recommend that all owners of PVC boats install this valve on their boat. More information about the air release valve can be found here. In addition, for owners of new boats, we offer a service - strengthening the transom on a PVC boat, which will also minimize self-peel defects of the transom holder. You can repair or replace the transom on your inflatable boat by contacting our boat repair shop.
DIY boat transom repair
Unfortunately, this type of repair is directly related to improper operation of the boat.
When carrying out repairs yourself you need to:
- deflate the boat;
- place it on a flat surface;
- clean the junction of the bottom and transom from dirt and degrease it;
- remove remaining silicone from the drain valve seat;
- apply the first layer of glue to the transom and bottom;
- After about 20-25 minutes, reapply the glue again;
- after waiting about 20 minutes, attach the transom to the bottom;
- warm up the gluing area well with a hair dryer and roll it into place;
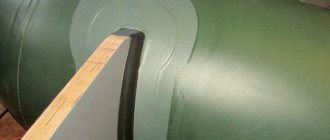
- a reinforcement with a diameter of 16 cm and a cut along the radius should be glued to the junction of the transom, bottom and cylinder;
- the drain valve is put in place;
- the junction of the edge of the bottom on the trans is covered with a strip of plastic.
After 24 hours, the boat can be used again.
Manufacturing
As already mentioned, the board is made of plywood or plastic.
For this:
- a rectangle or rectangles of the required size are cut out;
- gluing is performed;
- after drying, the corners are processed - cleaned of chips and burrs, rubbed with sandpaper, and impregnated with water-repellent varnish;
- joints with arcs are marked, holes are drilled;
- additional processing of the internal surfaces of the holes is carried out - the holes are ground and impregnated with varnish;
- Final painting with varnish or paint is carried out and dried until completely dry.
The production of arcs is carried out as follows:
- cut to size of the workpiece;
- the arcs are welded together to obtain a rigid structure;
- plates with holes for fastening bolts or rivets are welded;
- ends are processed, welding seams are processed, metal is cleaned for painting;
- priming and final painting are carried out.
Advice: it is recommended to prime the metal frame with red lead and paint it with hammer enamel. Gluing the rails or eyelets is done at pre-marked places in accordance with the technology for repairing PVC boats:
- the attachment points on the boat are marked;
- the surfaces to be bonded are degreased;
- a small layer of glue is applied to both surfaces, and after a short drying time, the glued surfaces are pressed against each other;
- the resulting compound is placed under a press and kept until completely dry.
Features of seam repair
Repairing a boat along a seam is slightly different from repairing a puncture or cut:
- Dry and degrease the seam of the boat and the area around it on both sides.
- A patch is cut out with a size slightly larger than the length of the damaged seam.
- A thin layer of glue is applied to the patch.
- The patch is glued and immediately rolled with a roller.
- Excess glue that appears is removed with a cloth moistened with solvent.
- After the glue dries on the first patch, another one is cut out (its dimensions are larger than the first one, taking into account that it can be folded onto the reverse side).
- After gluing it, you also need to roll the damaged area.
To prevent the boat from gnawing on top of the outer patch, it is better to additionally glue a larger one.
Practice shows that the considered methods of attaching a rigid element work well when the motor is running at half power.
In most cases, strengthening the rigid element allows you to get rid of this problem. The essence of the procedure is the correct distribution of the load from the motor over the surface of the boat. Making it yourself is also quite simple.
An acceptable option is to install additional “braces” made from a metal rod.
Instead of the sides, to add additional rigidity, you can consider the option of attaching a hinged transom, where additional “braces” are attached to the bottom or bench (bank) of the boat.
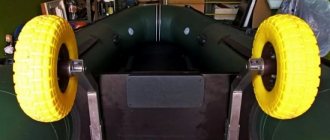
Experienced fishermen have noticed that in order to make a PVC boat move normally using a motor, it is better to use not a bottom flooring made in the form of slats from separate elements, but one that is a solid structure.
No matter how good homemade products are, it is still better to use devices manufactured on an industrial scale using factory equipment.
Moreover, modern industry offers ready-made kits for PVC boats, the price of which is quite reasonable.
Do not forget that even after strengthening, such rigid mounts cannot be used with motors whose power exceeds 3.5-5 hp.
We make a transom for a PVC boat
The way you install the transom depends on the shape of the boat.
Possible options:
- fastening to molded elements fixed on the vessel in pairs - two on top (for fastening) and two on the bottom (focus on the side);
- installation to the sides using special pins;
- increasing the supporting area by installing brackets in the form of curved tubular frames;
- fastening or lacing a rigid element to the side of the stern of an inflatable boat.
One of the most accessible and less expensive methods is to install a transom attached to a metal frame through standard elements for inflatable boats.
To work you will need:
- locksmith tools;
- welding machine;
- solvent, PVC boat glue, sandpaper;
- thick moisture-resistant plywood 15-17 mm;
- frame made of metal rods or strips;
- boat rails and oar latches.
First of all, it is better to make a metal frame, manufacture, assemble and attach a homemade hinged transom to the frame.
Then (depending on the size of the resulting structure) glue additional fasteners.
The frame is made of metal rod with a cross-section of 10 mm.
To increase the service life, it is advisable to immediately select a suitable material – stainless steel.
Next, in accordance with the dimensions, we bend the elements in the right places, and then fasten them together by welding.
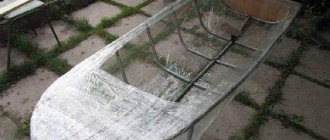
Let's start making the transom. It consists of two boards made of moisture-resistant bakelite plywood (you can use regular plywood - you will need appropriate processing).
We cut out the necessary fragments, process the edges, mark the locations for the holes and make them according to the dimensions.
If you don’t have waterproof plywood on hand, we use regular plywood.
Appropriate treatment with water-repellent compounds is required, after which the fragment is coated with yacht varnish.
We pay special attention to the processing of holes and edges. True, the service life of such a rigid element will be much shorter.
We assemble the entire structure in accordance with the picture. The stops for the metal frame are washers that are previously placed on the rod from the stern side and spot welded.
The final operation is marking the places for gluing the frame holders (4 boat rails).
Sequence of operations:
- Fully inflate the boat.
- We attach the hinged transom so that it fits snugly to the stern.
- We mark with a marker the places for attaching the rails in the upper and lower parts of the cylinder.
- We release the air from the cylinders and straighten the aft part.
- We carefully remove dirt from the surface and lightly clean the marked areas for gluing the handrails with a zero.
- We degrease the area of the upcoming gluing using solvent 646.
- Cover the perimeter of the marked area with paper tape.
- Carefully apply PVC boat glue (preferably from a repair kit) in a thin layer onto the surfaces to be glued, wait 10-15 minutes and re-apply a layer of glue.
- After 5 minutes, we join the surfaces to be glued and carefully “roll” the gluing area with a rubber roller, avoiding any remaining air.
- Press the parts to be glued with a heavy object (if possible, tighten them with a clamp through a thin board) and leave to dry for a day.
This method of attaching a rigid element for installing a low-power motor is suitable for boats that have an O-shaped or similar shape.
For the same types of inflatable boats, you can use a simpler motor mount option - lace-up. The advantage of this method is a reduction in point pressure on the board, the disadvantage is a longer installation time.
For fastening, the lower part of the rigid element is inserted into the “handle” fixed at the bottom of the stern cylinder, after which one glued part with holes for lacing is inserted through a special slot, aligned with the second and secured through the holes with a nylon cord.
Repairing a cut, puncture or other damage
Any type of boat repair should begin with preparation:
- the damaged boat is deflated;
- for ease of repair, a board is placed under it;
- the damaged area must be washed and dried;
- Having laid it out on a level place, degrease the damage using solvent or acetone. If these products are not at hand, they can be replaced with gasoline, kerosene or regular alcohol.
After carrying out this work, you can begin the main damage repair: eliminating a cut or puncture:
- From a piece of PVC material from the repair kit, a patch of the desired shape is cut out. Its size should exceed the damaged area by 4-5 cm. If there is no patch from the repair kit, a piece of thin rubber or an old oilcloth can easily replace it.
- The prepared patch is degreased.
- Glue is applied to the damaged area and patch.
- After 3-4 minutes, connect them to each other.
- Roll the damaged area with something heavy.
- Inflate the boat only until it acquires its shape. Leave it in this form for 2-3 hours. If it is not possible to inflate the boat, then, without bending the material at the point of damage, fold it and leave it to dry.
This method is bad because it is suitable for making repairs while fishing and is short-lived. If possible, it is best to then replace the supplied patch with a new one.
Let's use a different method to repair the house. It is more optimal and of higher quality, but takes more time:
- The glue is applied to the surfaces to be glued.
- After the first application, approximately 8-10 minutes later, apply a second layer.
- Place the patch over the puncture and roll it with a heavy object, squeezing out the air.
- Dry the second adhesive layer until it completely loses its stickiness.
- Apply a patch to the damage. To start the action of the glue, it should be heated to 60-80C (a household hair dryer is used for heating). When heating, do not use open fire, as the material can easily deteriorate or ignite.
- The patch is rolled in.
This gluing method can be used in a different sequence: the patch and the cut site are heated with a hairdryer, applied to each other and rolled.
If depressurization of the boat is discovered, you should immediately conduct a thorough inspection of it:
- Check the bottom of the boat to ensure it is not leaking. To do this, water is poured inside the boat.
- Inspect the inside of the cylinder. Foamy water is used during inspection. It is applied to the inner surface of the cylinders and inspected for the appearance of bubbles.
- You can detect the location of damage by hearing. It is enough to pump the boat more than required and listen to the hissing in silence. By this sound you can accurately determine the damaged area.
When repairing such extensive damage, there is a slight difference in the process:
- the damaged area is washed and dried;
- laid out on a flat surface and degreased;
- Before gluing the damaged edges, it is better to sew them together, and only then proceed to the main gluing stage.
To make it easier to glue the patch inside the boat, you can use a special hook. Having completely unscrewed the valve, glue the first patch through the hole using a hook, and then only glue the outer patch.
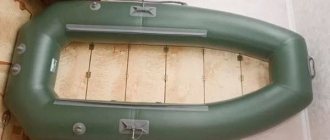
Bottom cut repair
Damage to the bottom of a boat is quite specific. The main culprits are snags, large tree branches, and rebar rods found in reservoirs. Such cuts are classified as torn and have a complex configuration.
When performing their repairs you should:
- install internal and external patches;
- Sew damaged edges with thread for precise connection.
The procedure for carrying out the work is the same as for repairing regular punctures.
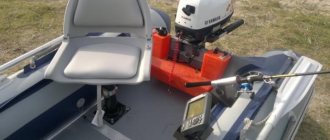
Replacing the transom of a PVC boat
At the end of last year, my friend and I sold an old Ufa that had served us faithfully for 2 years (I must say that 2 years of owning the boat cost 1 thousand rubles - very profitable!) and began to think about what to buy this year.
In general, we were counting on an entry-level PVC boat with a transom, in order to be able to sail with a small (up to 5 hp) motor. Once again looking through avito.ru we came across this copy:
… nissamaran 290! The boat is from 2007, very thick PVC (1100 g/m2), not torn, not wrinkled, everything is excellent, almost a complete set (no bag under the seat). The only problem was that the transom (plywood) was “slightly” rotten, so we got the boat at a quarter of the price of a new one.
Initially, there was an option to simply patch it up, for example, filling it with epoxy, but after peeling off the PVC from the transom, it became clear that this would not help. The plywood at the bottom was rotten through and through, and how it has held up until now is unclear.
After reading a couple of articles from the Internet, we decided that everything is quite simple: peel off the old transom, change the plywood and seal it again. Well, let's get started!
Types of glue used, features, advantages and disadvantages
Based on numerous observations of experienced fishermen, the following types of adhesive compositions have proven themselves well:
PK-2 adhesive is ideal for gluing most types of rubber, in particular for repairing products made of polyvinyl chloride. Advantages: high degree of resistance to water, atmospheric changes, forms a reliable elastic seam.
Make it a rule, on every fishing trip, the first thing you do is...
Adhesive for PVC fabrics “Master” from a German manufacturer, made on the basis of Desmocoll rubbers, is positioned as a professional universal and waterproof product. “Master” is intended for gluing products made of leather, plexiglass, rubber, PVC, paper, cardboard, and fibrous fabrics.
“UR – mono” is from the category of one-component compositions, is used without additional hardeners, is characterized by a high degree of water resistance, has good resistance to ultraviolet rays, and is low-toxic. Most often, it is used to repair PVC coatings.
"Vinicol - 1520" from a series of polyurethane compounds, the main purpose is gluing surfaces made of synthetic materials, including PVC boats. The product has a fairly high resistance to hydrolysis.
“From polyvinyl chloride 900I” is a polyurethane adhesive, its scope of application is wide: balls, plastic awnings, air mattresses, swimming pools, rubber soles, polyvinyl chloride fabrics. The composition has good resistance to various oils, gasoline, water and acids.
"Penosil Fix Go" is positioned as a cold welding based on two epoxy substances. Advantages: hardens instantly, does not cause difficulties during processing, ideal as an emergency aid when gluing PVC surfaces. "Penosil Fix Go" has a very strong binding ability.
“Kernil” is very popular among consumers; the positive qualities of the glue include: ultra-strength, reusable, can withstand loads of up to 250 kg/cm2, firmly glues dissimilar surfaces.
Variety of adhesive mixtures
The consumer market today is filled with an abundance of different products. The table below will help you decide on the glue that is most suitable for repair.
| Brand | Application area | Time until complete hardening, hours. | Packing volume, ml | price, rub. | Notes |
| "Uranus" | For polyurethane and PVC products | 4-24 depending on method (hot/cold) | 45 | 150 | A good effect is achieved only with heat treatment |
| Stamp 4508 “Eurobank” “Wave” “Three Whales” “Monument” | for rubber and rubberized fabrics | 10-12 | 200 50 45 30 | 70 50 50 35 | Does not require vulcanization |
| Poligrip M328 | PVC | 24 | 100 | 100 | Designed for urgent repairs |
| "Three whales" | For products made from PVC fabrics | 24 | 50 | 38 | |
| Rubber glue "Mark A" | universal | 24 | 45 | 100 |
There are also ready-made repair kits available for sale, which include a tube of glue and material for patches.
Which glue to choose
The modern market for repair kits, accessories and substances spoils inflatable boat owners with a rich abundance. Almost every tube is equipped with detailed instructions for self-repairing a PVC boat. However, not all manufacturers write about the advantages and disadvantages of glue. Let's look at the most popular and popular brands and tell you which glue to choose.
Moment
This well-known brand has long established itself as a handy tool for reliable gluing of various materials.
Kleyberg
Domestic professional glue for repairing PVC boats. The polyurethane composition, coupled with organic solvents and stabilizing additives, gives Kleyberg adhesive not only beneficial advantages, but also disadvantages.
Texacol (Texacol)
This brand is widely used not only for repairs, but also for the production of PVC boats. The adhesive composition is designed for high tenacity of polyurethane materials and reinforced polyvinyl chloride.
Bostik (Bostik)
Polyurethane, two-component adhesive Bostik Vinycol 1520 (Bostik Vinikol) is produced on the basis of rubber and organic solvent. The two-component composition of Bostik is an adhesive and a hardener.
Sintacoll (Sintacol)
Sintacoll one-component polyurethane adhesive has proven itself as an assistant in the repair of PVC boats.
Master
Master glue, popular among owners of PVC inflatable boats, is memorable for its compact tube and black packaging. It is convenient to keep such an assistant in a repair kit in case of repairing a boat in the wild. The composition of the Master adhesive is a one-component, polyurethane waterproof consistency based on DESMOCOLL rubbers.
Liquid patch
A modern development that has saved numerous inflatable boats from scrap and saved the time of hundreds of fishermen. Liquid patch is a suspension of polyvinyl chloride with strong solvents. Operating principle: solvents corrode the PVC base of the boat, and active reagents restore the viscous structure of the fabric. When the patch dries, it creates the impression of a monolithic repair layer.
Transom for PVC boats - types and designs
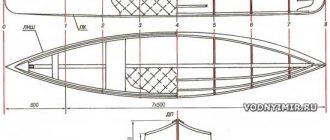
Just as watercraft come in a variety of modifications, boat transoms differ in size, materials and design features. Therefore, before you buy a transom for a boat, you need to decide on exactly the right characteristics. Otherwise, the transom on the inflatable boat may not fit or, even worse, fly off the vessel while it is moving, which will lead to very sad consequences. Therefore, let’s take a closer look at the characteristics of a boat transom.
Transom size and design
Let's start with the dimensions, since for PVC boats they can be said to be almost standard. The width of a suspended transom for a PVC boat is usually 300-400 mm, and the mounting height depends on the height of the sides, but in any case does not exceed 380 mm. In general, the world standard classifies transoms by height into models S (381 mm), L (508 mm) and XL (635 mm), but for small vessels their PVC fabric can only be used in small sizes, i.e. "eSki". And “El” and “Ixel” are already the prerogative of large boats and yachts.
Also, two more parameters are important in dimensions: thickness and angle of inclination. The thickness of the transom depends on the maximum permissible engine power (indicated in the vehicle passport). General recommendations are as follows: for engines up to 15 hp. 2.5 cm thick is enough, but when using more powerful units it is necessary to buy transoms with a thickness of 3.5 cm or more. As for the angle of inclination, it should not go beyond the established limit of 4-6 degrees. This is a standard that improves the performance of the propeller, and therefore ensures high boat speed and economical fuel consumption.
By design, a transom for a rubber boat is a simple device that can consist of the following elements:
- Plywood plate with water-repellent coating;
- Metal frame;
- Mounting arches;
- Eye or Boss - staples with a flat base.
In this case, some models use two plywood sheets connected at right angles. This hinged transom for a boat is attached with a cord. However, the types of fastenings are worth mentioning separately.
Transom Mount
Depending on the design, the transom can be attached to a PVC boat or to a rubber boat using one of the methods presented below.
Lugs - two small lugs are glued to the boat hull, which later secure the hook and the large lug. The metal bracket is then connected to the plywood part of the transom using nuts and washers
It is important to note that the strength of the adhesive joint is ensured by the thermal effect of a hair dryer. Lacing - in this case, a special overlay with an adhesive base and rings is used through which the cord is passed. It is believed that lacing better secures the suspended transom to the PVC boat, because
The entire width of the transom is used. In this case, the load is distributed evenly and the engine receives a stable position. But we can’t keep silent about a noticeable drawback - lacing takes a lot of time.
It should also be mentioned that, based on the presented methods, craftsmen independently come up with ways to secure a hinged transom for a PVC boat. For example, adhesive plates are connected to a metal frame on which the motor itself is already installed. This method is reliable, but very labor-intensive and takes up a lot of cockpit space.
In addition, we note that transoms can be stationary or suspended. In the first case, the device is mounted once and for all, and in the second, the transoms can be removed and reinstalled if necessary.
Materials for production
As already noted, the factory transom for an inflatable boat is made of moisture-resistant plywood (transom board), plastic (bosses) and galvanized stainless steel (fastenings). Thus, the board and fastenings are reliably protected from the destructive effects of the aquatic environment, and the plastic bosses are provided with good adhesive adhesion to the PVC fabric.
But other materials are also used, especially if the shipowner assembled the transom on the PVC boat with his own hands. In this case, metal, plastic and simple wood treated with protective impregnation can be used for the board. The fastenings are made from metal profiles, rods and pipes, and they also take care of anti-corrosion protection.
Thus, when choosing a transom for a boat, you should pay attention to each of the listed parameters. And to get a more complete idea of what a good transom should be like, let’s look at the characteristics of the most popular models
Plastic hinged transom for PVC boat
Final works
Now we glue the rubber base onto the transom. This is the simplest stage of work and does not take much time. You need to heat the rubber using mounting glue, lubricate it with glue and stick it on the transom.
The rubber is glued to the transom using mounting adhesive.
The same needs to be done with the bottom of the boat. If any seam has become unstuck, then the procedure should be repeated in that exact place.
II.Choice of glue. What glue is best for gluing a PVC boat?
The best glue for PVC boats is the glue that comes in the repair kit. It is designed specifically for PVC boats and should not present any unpleasant surprises. Usually it is "Uranus" or "Desmacol". True, “Uranium” tends to soften when heated, and then the patch may peel off.
If you have to choose glue separately, then you should purchase only one that is intended specifically for PVC.
Polychloroprene adhesive
– a one-component composition that is created for gluing inflatable boats, wetsuits and rubberized materials. Not particularly suitable for PVC, but in the absence of fish, as they say...
- Water resistant
- · Elastic
- · High strength
- · Sets quickly
- Ensures seam durability
- Durable
- Heat resistant
Polyurethane glue
for boats, PVC has the same qualities as polychloroprene, differing only in transparency and the fact that it does not turn yellow.
When repairing a PVC boat, you should not use “Moment” and similar adhesives, despite the fact that many advise using them. The tightness and strength of such glue in this situation is questionable. And durability too. But cleaning it off from the place where it was glued in order to apply a new adhesive composition will be more than problematic. Most likely you will have to glue it over it, and this reduces the quality of the patch.
Two-component adhesive for PVC boats Bostik Vinycol 1520 (Bostik Vinykol 1520) is based on polyurethane (with the addition of wax) in an organic solvent.
This PVC adhesive can be applied by brush and dries quickly. Vulcanized glue Bostik for PVC boats has high resistance to water and humidity. It is precisely intended for the production of inflatable boats.
How to strengthen a hinged transom on a PVC boat
In the basic configuration, the transom, as a rule, has only one layer of PVC. However, it is very easy to enhance it with a low profile. This will protect the belongings and passengers of the boat from water splashes, and will also allow you to install a more powerful motor. This will also reduce drag when planing.
Transom strengthening is a procedure that should entail strengthening along the boat's stringers along the entire length of the cylinder. Despite the fact that many boat owners consider this procedure useless, its use will increase the life of the boat.