DIY bait boat - drawing, assembly steps
To make bait boats you will need to spend a lot of money, the size of which will depend on the equipment of the device.
In addition to the fact that the boat requires a good source of energy, it can additionally be equipped with a navigator, backlight and echo sounder. To make a carp boat with your own hands, you will need:
- two motors (gearbox and drive), which can be taken from an old cassette recorder;
- epoxy resin;
- reinforced fiberglass;
- gearbox for a children's car (reduction ratio about 1:75);
- stainless wire for antenna;
- mounting rails for engines;
- housing from the control panel for the PU boat;
- four-blade propeller 500 mm made of stainless steel;
- screw shaft 2.5 mm stainless steel;
- two drums for discharging bait and sinkers.
You can buy all the parts in stores or online. The operating voltage of the motor and battery must be the same.
Stages of assembling a radio-controlled boat:
- A drawing of the future boat is made on thick paper.
- The sketch is cut along the cut lines and folded along the fold lines. The shape of the future boat has been set.
- Thick paper is glued together, and excess edges are cut off from the sides.
- To impart hardness, the inside of the paper mold is filled with clay, paraffin or plasticine.
- The body is turned upside down and the required size of fiberglass is cut out.
- The fabric is applied to the hull, and then starting from the bottom, epoxy resin is applied to it. The entire fabric is coated up to the sides.
- After the resin has dried (after 3-4 hours), you need to look at the thickness of the body. If it is thin, then you will need to apply another layer of fiberglass and coat it with epoxy. As soon as the resin dries well, flaws are removed from the body.
- Wooden slats are installed at the stern, to which the engines, electronics and antenna are attached. The engine should form an angle of approximately 10 degrees with the bottom of the boat.
- In accordance with the sketch of the boat, the drums are located and mounted.
- The engine casing is half filled with lithol, after which the propeller shaft is installed into it.
- A propeller is installed on the shaft.
- An electrical circuit is drawn up for the receiver and transmitter of the device, on the basis of which a board is soldered, providing future communication between the transmitter and the receiver.
You can install LEDs on it
An important point in the manufacturing process of the device is the calculation of its displacement. It depends on the following indicators:
- range of the boat;
- expected volume of imported bait;
- additional equipment that the boat will be equipped with.
The displacement can vary from 2.5 to 12 liters.
Echo sounder equipment
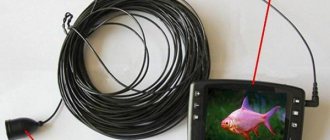
When fishing, it is useful to see the bottom topography and the concentration of fish. A wireless echo sounder will help with this, the operating depths of which should be from 0.6 to 30 meters. The signal from the echo sounder can be transmitted to an additional screen or to the control panel.
Fish bait boat with navigator
Using the GPS option, during fishing, the feeding point is programmed with specified coordinates, where the boat ends up. The entered coordinates will be stored in memory until they are changed on the next fishing trip.
Making a radio-controlled bait boat with your own hands is not at all difficult if you have some experience and knowledge. It will be not only much cheaper than ready-made models, but also better than the Chinese devices offered in stores.
https://fisher-book.ru/137-korablik-dlya-rybalkihttps://intellifishing.ru/snaryazhenie/prikormochnye-korablikihttps://arm-fishing.ru/?page_id=1232https://primanki.com/equipment /korabliki/dlya-zavoza-prikormki.htmlhttps://34fish.ru/snasti/korablik-dlya-zavoza-prikormki-svoimi-rukami
Frame
Initially, I planned to use the body from an old toy. The son (he had his share, so to speak) easily presented an old pirate frigate on wheels. But upon preliminary weighing of the proposed equipment (battery, motor, electronics, etc.), it turned out that the frigate did not have enough carrying capacity.
Unfortunately, I could not find a toy of a suitable shape at an adequate price in stores. And I decided to make the hull for my fishing boat myself. Again, after looking through many forums and articles, I decided that the material would be fiberglass and epoxy resin.
I started making the hull for the boat by building a blank, onto which I then planned to apply materials. I made the blank like this: I made a frame from fiberboard and cardboard. I simply attached it with hot glue to a sheet of fiberboard.
Then the compartments of the frame began to be filled with plaster (alabaster). A little life hack: add a little vinegar to the alabaster, and it will harden more slowly, but at the same time there will be intense release of gases, so do not forget to ventilate the room.
When the blank was dry, I corrected it a little and covered it with paper sketch, so that later it would be easier to separate it from the body.
The fiberglass I used is also called glass mat. The seller said that for curved shapes it is better to use it. Epoxy is the simplest.
And again a minute TB: You need to work in WELL ventilated areas. I'm not kidding. It’s not for you to mix a couple of drops in a matchbox. I bent over the hull of a fishing boat a couple of times while applying a layer of epoxy, and then for three days I couldn’t catch my breath and my head hurt.
I applied 2-3-4 layers of these. Previously, I was surprised by home-made workers: is it really impossible to count the two or three layers you applied. It turns out that while working, sometimes you have to overlap the layers, and sometimes you have to apply patches. Therefore, it is better to simply focus on the thickness of the case walls. On average, the hull walls of my fishing boat are about 3 mm thick. At this stage, the boat for delivering bait to the fishing point was called the “Pasta Monster”, because fiberglass fibers stuck out in all directions.
Next is the most tedious task - putty. I used this universal putty with fiberglass.
And also a lot of coarse sandpaper. Then the process is clear: rub, putty, rub, putty. And so on until you understand that this is the best thing you can do with your own hands.
See about copters: DIY Arduino radio-controlled boat model
When I removed the body from the blank, its weight was 1 kg 200 g. Which is pretty good for such rigidity and such load capacity.
I painted it when the water cannon was already in place (described in the next section). Painting was carried out in three stages: primer and two layers of “Yacht enamel PF-167” paint.
Baits for fishing
For boat fishing you need bait. You can make the bait yourself, using the bulk, which includes boiled grains, odor enhancers from certain products or store-bought ones. The bait includes porridge made from millet, pearl barley, oatmeal and other grains. You can use boiled peas, pickled corn, as well as sunflower seeds and sunflower seeds. Fried bread crumbs and bran are added to the mixture for density. Among the animal elements used are maggots, worms from a dung heap, earthworms, and bloodworms. For flavor, add sunflower, anise, garlic oil, as well as ground cinnamon and vanillin. The Mega mix bite activator is sold in the store, which is used with great success by fishermen to prepare bait with their own hands. It has a liquid consistency, which allows it to be added to boiled groups. Artificial flavors are also sold in specialized stores, but the price is steep, and the fish still prefer natural baits.
Overture
Three years ago, under the influence of friends, I became interested in carp fishing.
They taught me how to catch and told me all the secrets. The first carp have arrived. And then, one day while fishing, with an envious eye I saw a fisherman with a carp boat. I really liked this ship. I asked how much it cost - I really didn’t like it ($1000 “for a minute”). The first decision was made: to make a boat for delivering bait with your own hands. I looked through the forums on RC modeling, estimated the estimate - scratched my turnip. It came out to about $150 for components. Yes, and the task seemed too easy to me (woe to me, naive one).
https://www.youtube.com/watch?v=wgsQfYQ8zac
The second decision was made: to make the most budget boat possible with your own hands, and ideally for free. Honestly, friends, not out of greed, but out of sporting interest.
So, a concept was developed: I decided to make a boat with DTMF control. This is when you call from one mobile phone (transmitter) to another (receiver), and when you press the keys, a “beep” of a different tone is heard. On the second phone (receiver), all that remains is to program the transformation of this “beeping” into different control commands depending on the received tone (one signal starts the motor, another stops it, the third turns it).
See how simple it is? I decided to convert the signal using the Arduino Uno board. We will consider this issue in detail in the Electronics section. Let's start with the body.
How to make a fishing boat
This fishing device has several names, but mainly it is called a “water kite”, and also traditionally a “boat” and this name is much more suitable. Tackle is made from any material that has positive buoyancy. Basically, it is wood or foam. It is desirable that the structure have a certain weight, otherwise it will not be stable on the water, especially in the presence of wind and waves. Drawings of such gear can be easily found on the Internet. At the same time, you should not try to repeat the first drawing you come across. It's better to start by reading the reviews.
The simplest "ship"
To make a simple tackle, you need to have:
- A couple of planks of arbitrary length, up to 15 mm thick.
- Drying oil.
- Waterproof paint (oil-based), soft shade.
- A couple of M6 threaded studs and four nuts for these studs.
- A regular bracket with an M4 nut and a screw to secure the structure and the main line.
- Lead weight.
- Nails or screws for fastening.
- Glue (waterproof).
- Drills of the appropriate diameter.
If all the components are prepared, then you can begin assembling the structure itself.
The order is as follows:
- The finished boards are covered with drying oil, dried and covered with soft oil paint. The tackle should remain visible from a distance, but not scare away the fish.
- Elements similar to trapezoids are cut out of wooden planks. There should be oblique cuts on the side faces. In this case, it is better to first prepare the boards of the desired shape, and then open them with drying oil and paint.
- Holes are drilled in wooden blanks for their fastening.
- The two workpieces are connected using studs and nuts.
- After this, the bracket is attached. Holes for attaching it should be made on both sides so that the bracket can be rearranged if necessary, since you have to fish both on the left and on the right. The bracket is attached to the side where the water flows. This allows you to launch the “boat” in any direction of the current.
- Finally, a lead weight is attached to the bottom of the structure using glue. The load will make the structure more stable.
The ship is ready for use; you just need to attach the equipment elements to it.
fishing boat from Pal Palych April 2015
Watch this video on YouTube
DIY reversible boat
In the process of using the “boat”, experienced fishermen had an interesting idea, which led to an improvement in the design of the gear. The improved boat consists of:
- From the lead board.
- From the main float.
- Made from leaf springs.
- From a special switching device and a limiting element.
- From the towing line.
- From flies.
The springs included in the design serve as a kind of shock absorber that smoothes out strong jerks of the fish during bites. The float is included in the design of the reverse mechanism, and also gives the entire structure more stability. The safety bracket prevents the line from tangling with the controls. The switching device is designed to change the direction of movement of the “ship”.
Manufacturing stages
- For the construction of fishing gear, you should take well-dried wood. To give the structure a small lifting force, it is given the desired shape.
- To prevent the structure from floating to the surface of the water, a redan is attached to the lower end of the board.
- The wooden base is impregnated with drying oil and painted with waterproof oil paint. The underwater part is painted blue, and the surface part is painted white.
- A hole with a diameter of 8 mm is drilled in the middle of the board to attach a lead weight.
- At the upper end of the board, between the springs, a strip of cork is attached, where the flies are supposed to be stored.
- The spring is made of stainless steel strips, 0.8 mm thick, 10 mm wide and 320 mm long.
- The float is made of polystyrene foam. It, along with the switch and springs, is attached to a wooden base.
- A strip of stainless steel is taken and a switch is made from it. Strip thickness 1 mm.
- The safety bracket is made of copper wire, 2 mm thick.
Springs made of stainless steel plates are bent so that the switch rises above the waterline to the height of the underwater part of the float.
Such gear is capable of moving both in the direction from the shore and vice versa. This allows you to control the movements of the tackle. As a rule, a simple structure is always located at one point.
reversible boat Sankey
Watch this video on YouTube
Water jet and turning mechanism
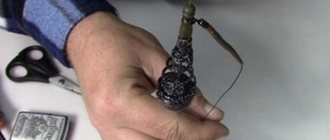
When designing my bait boat, I simultaneously correlated the size of the propeller, water jet cylinder and turning mechanism. After searching through many options, I decided on a deodorant bottle. The outer diameter of the balloon is about 42 mm, which is 4 mm larger than the circumference of the screw, and 3 mm. less than the diameter of the rotating mechanism, which will be described below.
After 153 measurements, with trembling hands, I cut a hole in the newly completed hull of my boat.
The water cannon was glued with hot glue. I made a hole to collect water. I decided to add a piece of aluminum perforation for additional rigidity of the cylinder, since the metal in it was very thin and easily bent with little effort.
Next, I attached the motor mount to the body of the bait boat. I did it this way: I attached a screw and a rigid coupling to the deadwood. To the coupling there is a motor fixed in the mount. After that, I set the boat in such a position that the sternwood took the most vertical position, while the motor was in free suspension.
It remains to apply a little glue to fix the correct position of the fastening, and after it cools, apply the amount of glue necessary for reliable fixation.
See about copters: How the word “quadcopter” is translated
For the “rudder” in my fishing boat, I used a plastic jar of aquarium fish food. This jar, by the way, turned out to be divided into four parts by jumpers. All I have to do is carefully cut and mark everything for connection to the water cannon cylinder.
The turning lever is made of fiberglass 3 mm thick. I cut out an approximate shape, and then used a file and sandpaper to cut out a recess in the shape of a food can.
I took a knitting needle from an umbrella (2 mm thick) and threaded it into a waterproof boot for rods (33x12mm).
The end of the spoke was bent at an angle of 90 degrees and inserted into the SG-90 servo drive.
Varieties
This fishing tackle can be primarily classified by its bottom profile.
Catamaran/trimaran
Catamarans are good on currents and rifts, as they have higher stability. They are especially convenient in windy weather - when the fish are well saturated with oxygen and, accordingly, behave more actively and are better caught.
Flat bottom (boat)
The main advantage of a flat bottom is its high speed of movement, this applies to radio-controlled models, they cut through waves better.
Also, the feeding “boat” differs in the way it is controlled. Could be a reversible or radio controlled ship. This is if you do not take into account the ancestor of this gear in the form of a primitive sled.
Reversible ship
Reverse is a device with which you can control and change the direction of a ship's movement manually. The essence of maneuvers with a reversible “ship” is that it allows you, standing in one place on the shore, to cover more than 80% of the surface of the reservoir in the nearest access. This technique has its own name - “pendulum”.
rc ship
This model is similar to any other radio-controlled toy and is set in motion remotely thanks to a mechanism installed on it with a control panel. It usually works on the FM wave, although this is not a very convenient option, since there may be another fisherman on the shore with the same gadget, and then the signals will be confused with each other, which will lead to trouble. I'm glad that models are already being produced that eliminate background noise.
The power of the transmitting signal of such a radio-controlled remote control, as a rule, allows you to remotely control the “ship” at a distance of up to one kilometer. Radio-controlled devices operate on batteries and must include at least one spare one.
Further, complementary feeding ships can be distinguished by additional technical capabilities. These are auxiliary gadgets such as an echo sounder and a GPS navigator with autopilot.
With echo sounder
This model is easy to use, as it will immediately indicate to the fisherman where the main fish camp is located in the reservoir. Usually, when purchasing any radio-controlled bait “boat,” an echo sounder is included in the package, but this position is variable.
The display of the echo sounder indicates the distance from your location to the device, but you need to keep in mind that even the latest devices may have an error in the indicated data. For example, if a certain sector of a reservoir measuring 2 by 2 meters was chosen for fishing, then the error may be about a meter.
Among other things, the equipment with an echo sounder allows you, in principle, to explore the entire reservoir, understand the topography of its bottom, depth, and thoroughly prepare for successful fishing after analyzing all the indicators on the control panel.
With GPS navigator
Just as in the case of an echo sounder, a GPS navigator can either be installed directly on a radio-controlled model, or not, but still have the ability to install it if necessary.
The carp “boat”, also known as bait, can be used with flies. Typically sold are sets of classic flies, floating (dry) and sinking. Also, when fishing with a “boat”, various spinners and wobblers can be used.
Criterias of choice
When purchasing or manufacturing such a ship, you need to focus on the following parameters:
- Control radius.
- Range.
- Loaded feed weight.
- Body shape. A ship with a flat bottom clings less to obstacles, and catamarans are more stable.
- Movement speed.
- Operating time without recharging or changing batteries.
- Screw protection.
- Radio control frequency. There may be interference on the FM band.
- Availability of additional equipment - echo sounder, navigator.
When choosing operating parameters, you should not set maximum values. In rare cases, boats are needed to deliver bait over a distance of up to 700 meters, and speed is not so critical. What is more important is cross-country ability, ease of boat control combined with carrying capacity.
But the price of a purchased ship can be frightening. Therefore, skilled fishermen continue to independently make fishing boats for delivering food.
Sled for rivers with current
A homemade unit for catching grayling in the current is also called a fishing boat. The principle of operation is the same as that of the gear described above. The only difference is that the boat, due to its special shape, has the ability to move freely against the current. This function is achieved through asymmetrical runners, a lever and other elements.
A reversible boat is made according to the same principle as a regular sled: runners are cut from non-sinking material. The runners should be different in size, as can be seen in the picture below.
It is to this bow that the main line is tied so that it can move freely. On the main line, leashes are already made, to which the baits are tied directly.
All. The boat is ready, you can put it on the water and fish.
The loop will slide along the bow to the opposite side, and the boat will go in a different direction.
If you get puzzled and make a support float and a second runner using the same scheme, you can build an even easier-to-control model. It is equipped with a special lever.
Its base is fixed with an elastic band to the body, and a fishing line is tied to the end. When the line is tensioned, the lever will rotate in the direction in which the tension occurs.
If you release the line, the rubber band will return the lever to its original position, and a sharp jerk will allow the lever to turn in the other direction.
Lures and methods of fishing on a boat
The design can be used in three different fishing options.
Fishing on medium-flow rivers
This fishing method is used where the depth under the shore is about a meter, and on the shore itself there are trees and bushes, the branches of which hang above the surface of the reservoir. Usually in such places, clinging to the shore, there is an ide.
Fishing gear:
- boat;
- spinning rod with a dough of 40–60 grams and a length of 3.3 meters;
- two-meter leash;
- hooks in the form of small tees;
- butterflies, grasshoppers, dragonflies and other large insects as bait.
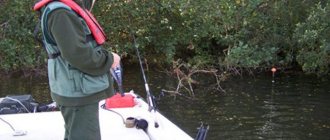
The fish standing near the shore are quite shy, so it is recommended to use camouflage clothing to catch them.
Free swimming of the bait through the water and tapping it on the surface of the reservoir are used as wiring. After a snowstorm appears in the area of the boat, that is, after a bite, the spinning rod must be sharply tilted towards the water and a smooth hook should be made. In this case, the fish will not immediately feel the resistance of the fishing line.
Fishing for fish on wide rapids
Where it is not possible to go far into the water, a boat will help out. To fish, you will need to use three or four leaders with sinking fly flies and double or triple hooks. Such hooks will help the bait to sink and will reduce the number of shipwrecks.
Fishing technique.
- With a sharp upward movement of the spinning rod, the leashes are thrown above the main line, which must be kept closer to the water.
- The spinning rod tilts in the direction of the flow.
- Using this technique, the flies will make a three-meter free swim above the surface of the reservoir. During the life of insects, this method helps to deceive the fish and catch it.
The fish is caught by winding the fishing line to the first leash, and then by hand.
Fishing on rivers with slow currents and dense vegetation
Pike like to live in a small current in dense thickets of underwater grass. You can’t catch it from the shore, but it’s quite difficult to do it from a boat. This is where the boat will help out.
Preparing gear.
- Experienced fishermen advise using a frog or fish as bait. A frog is best because it will remain alive until the bite occurs. Live bait with this method of fishing will die instantly.
- It is better to make two leashes one meter long from braided wire. If ordinary fishing line is used, it should have a diameter of 0.4–0.5 mm.
- The leashes are equipped with double or triple hooks, onto which the frog is attached by the front legs. The hook points should remain slightly open.
- After the homemade structure moves a sufficient distance from the shore, you will need to fasten the leashes. They are attached to the main fishing line using a loop-to-loop method or using a carabiner.
- The distance between leashes can be from two to ten meters. In strong currents or thick grass, it is recommended to use one leash, since it is difficult to control a large number of them.
Having prepared the tackle and ascended or descended from the riffle to a patch of grass, you can begin fishing its windows and edges. Any wiring can be done. The frog can be lowered into the water for a couple of minutes or simply tapped slowly on the surface of the pond. If the grass is not very thick, then the frog can simply be dragged along the surface. At this time, you need to walk along the far edge of the grass with the distant leash. The closest leash should crawl through the grass, sometimes getting into its windows.
The bite can start anywhere. It all depends on the specific reservoir and fishing location. It's most likely to be found on the far edge of the grass.
With the help of a boat you can successfully deceive and catch even the most cautious predatory fish. You just need to determine where the fish is staying, give it the right bait, and the trophy bite won’t take long.
Motor. coupling deadwood. screw
In this chapter, I’ll talk about what is most intimidating in boatbuilding for beginners - about the homemade deadwood (waterproofed shaft) and what is located on both sides of it: the propeller and the motor. Well, how to connect all this with your own hands so that it works reliably and flawlessly on a bait boat.
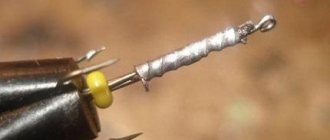
A homemade deadwood for a boat consists of the following components:
- The body is a thin-walled tube from an old refrigerator. External diameter 5mm, internal – 4.5mm. The edges had to be rolled out manually so that bearings with an outer diameter of 6 mm would fit on both sides.
- The shaft is a stainless steel rod with a diameter of 3 mm. On one side I cut an M3 thread for attaching the propeller.
- Bearings 3*6*2 mm. I ordered the bearings from the Chinese. In the photo there were bearings with boots, but upon arrival it turned out that instead of a boot there was only some kind of wire. The Chinese returned the money, but I decided to bet what I had.
- Oil seals. Their role is played by TO-220 insulating bushings (radio components, if anything).
The photo above and the video below show how the deadwood is assembled.
During operation, the oil near the bearings can heat up and become more liquid, so I decided to add more seals from simple 3/5 mm rubber rings. They are inserted directly in front of the bearing.
I used LITOL-24 as a thick lubricant. There are several nuances in filling the deadwood. You need to fill the deadwood housing with grease so that there is only grease inside, and not half grease, half water. To do this, the tip of the syringe is cut off to create a straight tube.
As for the clutch, I consider it my duty to inform you that you need to use the factory clutch. I checked many homemade rubber and metal options, but until I bought a normal coupling and aligned the motor in a plumb line, there were constant problems with reliability and runout.
When choosing a motor, I was dumbfounded by the prices, so I started looking for alternatives. I found the most powerful of the cheap ones - this is the 540-4065 electric motor.
I think that it was even possible to use a slightly weaker motor, but I can’t say so, since I haven’t tested my bait boat with weaker motors yet. Perhaps someday it will come to this, in order to increase the power reserve from a single battery charge.
See about copters: Repair of DJI quadcopters in an hour - diagnostics for free!
I made the propeller myself from 1 mm thick brass. I cut out three identical blades in the shape of a pig's ear. And I soldered them to a bronze stand with an M3 thread. It turned out well, but I advise you to buy it, or you will have to make a device for proportional soldering of the blades.
After the first tests, it became clear that everything works well, but under one condition: if the sternwood has a fulcrum not far from the propeller. In my case, the screw is located at a considerable distance from the deadwood exit from the body. I decided to fix it relative to the body of the water cannon by soldering three MZ nuts to the deadwood and connecting the water cannon and the deadwood with screws.
How does a boat work when catching fish?
Such gear must be buoyant
It is important that the material for its manufacture is light and waterproof. Also, the structure needs to be given such geometric parameters so that during the current it does not turn from the specified direction.
The boat operates on the principle of a kite, only the sail is controlled by a moving boat. This way, hooks and baits will only be delivered to their destination.
The boat is effective when lowered into water with a current, also when the waves are strong. The gear drawing is simple. It is enough to know the elementary rules and basics of physics. The buoyancy of this gear is increased by making it from lightweight foam or wood.
For the fact that the boat floats, we can thank the basics of geometry, namely its corners or sides, which can create pressure on the water and push off from the shore. When you turn it 180 degrees, the move will begin in the opposite direction.
Reversible boat - what is it?
So that the movement of the gear could be carried out in any direction, they came up with a device with the help of which an ordinary fishing boat becomes reversible. In order for the boat to be directed in any direction, a special device is attached to it or to the float - a reversing mechanism.
The reversing switch must consist of several parts. Usually this:
- the base on which the mechanism is attached (for example, a metal plate into which a bolt is screwed, serving as the axis of the lever);
- a lever on the axis to change direction, which must be movable. This part can be made from a small strip of metal;
- a bracket that serves as protection against fishing line entanglement. It is done above the lever. You can use a regular piece of wire;
- a stop designed to tighten the elastic. They can serve as a hook that is attached to the plane of the base;
- rubber band securing the lever.
This design functions in such a way that the operating cord must be attached to the arm that is movable. When the cord begins to stretch, the lever is pressed to one side. The elastic band begins to pull it in the opposite direction.
When the tension in the cord becomes weaker, the elastic returns the lever to a position perpendicular to the base.
A sharp jerk made with the help of a cord allows you to throw the lever in the opposite direction, and the direction in which the boat is moving will change its movement.
The design must be obedient and to achieve this, it is necessary to carefully select the elastic band and adjust its tension in accordance with the resistance of the water surface. This is done to ensure that the reverse mechanism does not operate spontaneously.
Let's make a boat!
- Pine planks, 15 mm thick.
- Steel rods, diameter 6 mm.
- Steel wire, diameter 4-5 mm.
- Nuts, with an internal diameter of 6 mm.
Diagram of the design and dimensions of the “ship”
The “buoys” of the boat can be made from any wood, but it is better if it is linden or pine. Linden is more preferable because it is easier to process, has a uniform structure and low specific gravity. But getting linden is now problematic, so it’s better to cut buoys from pine boards. Before starting sawing work, you need to decide on the design of the boat. Buoys can be the same or different sizes.
Experienced fishermen prefer sleds with buoys of different sizes, because... they are easier to manage. The shape of the buoys should be trapezoidal. The optimal length and width of a large buoy are 340 and 120 mm, respectively. Small - 300 and 95 mm. We draw an outline on pine boards and cut it out using a hacksaw or jigsaw.
After you receive two blanks, you need to give them a streamlined shape. This operation can be performed using a plane. After rough processing, it is tedious to remove burrs using sandpaper or a grinder.
We put the wooden blanks aside and take a steel bar with a diameter of 6 mm. Using a grinder or a metal saw, cut two pieces 18 cm long. We clamp the rods in a vice, and using a die, cut threads at the ends, 3 cm long.
Next, we make two holes in the wooden blanks, at a distance of 13 cm from each other. We screw the nuts onto the metal rods (all the way), put the buoys on them, and fix them with nuts.
Now you need to reverse it. The simplest reverse is a long metal bracket along which a ring slides. To move the reverse from one position to another, you need to slightly loosen the line and make a sharp jerk. The bracket must be made of wire with a diameter of 4 mm. You can secure it in the board with nuts, just like the mounting spacers. A metal ring can be made from a washer.
After you assemble the boat, you need to open the boards with varnish or automotive enamel. This will help protect the wood from absorbing moisture.
Ready “ship”
Sled for rivers with current
A homemade unit for catching grayling in the current is also called a fishing boat. The principle of operation is the same as that of the gear described above. The only difference is that the boat, due to its special shape, has the ability to move freely against the current. This function is achieved through asymmetrical runners, a lever and other elements.
A reversible boat is made according to the same principle as a regular sled: runners are cut from non-sinking material. The runners should be different in size, as can be seen in the picture below. Connecting pins are made from equal pieces of metal. A bracket is installed on the runner that is the supporting one (smaller in size), as shown in the drawing. It is to this bow that the main line is tied so that it can move freely. On the main line, leashes are already made, to which the baits are tied directly. All. The boat is ready, you can put it on the water and fish. He will swim against the current. If you need to change the course of its movement, then just loosen the line in your hand and move it in the other direction. The loop will slide along the bow to the opposite side, and the boat will go in a different direction.
Reversible sleds are best made from lighter, more buoyant material.
Reversible ship assembly diagram
If you get puzzled and make a support float and a second runner using the same scheme, you can build an even easier-to-control model. It is equipped with a special lever. Its base is fixed with an elastic band to the body, and a fishing line is tied to the end. When the line is tensioned, the lever will rotate in the direction in which the tension occurs. If you release the line, the rubber band will return the lever to its original position, and a sharp jerk will allow the lever to turn in the other direction.
When creating a boat, you can equip a large float with an additional metal strip. It will cut through waves well when moving.