The method of catching fish with a plastic bottle will not require a lot of effort and time from you to make simple fishing equipment. With such a trap you can catch fish in almost all regions and in all continents where there is a river with fish. All you need is a plastic bottle, hot glue gun, soldering iron, knife, fishing line or rope. Take a five liter plastic bottle.
Cut off the top part.
Turn the top over and insert the other side into the same base. Fix with hot glue. You can take a stapler and fasten the parts together, but I was afraid that the staples might scare away the fish. Next, using a heated soldering iron, we make holes 1-0.5 cm in diameter on all sides. 6-8 pieces on each side. We need another bottle, from which we need to cut off the neck and cap. We lean this neck against the bottom of our trap and outline it with a marker. Cut a hole. Insert the neck with the lid. Fix with hot glue. Through this neck with a lid we will take the catch and throw in the complementary food.
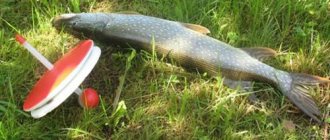
We tie a fishing line, or if not, a rope. It’s better, of course, to use fishing line, since it’s not visible. That's all. Let's start testing. First of all, we throw the bait inside. This could be crushed bread, or some other tasty fish bait. Carefully throw the trap. We are waiting for her to dive under water. And we wait about 15 minutes, it all depends on your area. We take out the trap and wait until all the water drains out through the side holes. Then we unscrew the side cap and pour out the catch with the remaining water. Of course, you won’t be able to catch big fish with such a trap, but you can still use it for various needs. Although, if you take a larger bottle, like a 50-liter cooler, it can turn out to be a trap for big fish.
Small bottle fish trap for fry
Another trap.
We take two bottles (I took them with a volume of 0.6 liters). And we repeat with them everything the same as in the first case with a large bottle. With the exception of the side hole for the cap, we will cut off the bottom, not the top, of the first bottle. A homemade fish trap, the article briefly describes how to make a fishing “face” from paste material. You'll definitely catch it by ear.
There is a category of people who are ready to live in a natural environment with a minimum of means for survival. There is some extreme in this. And until you try this lifestyle (or game, whichever is more convenient for you), you will not understand all the charm of this way of existence. For example, in our team there are a variety of people: from very young people (18-19 years old) to adults under 60 years old, who occupy almost all social niches in “city” life (students, managers, directors, etc.). But what united us was that several times a year we get together, plan a common route for several days, and hit the road. The main rule that everyone in our group follows is that we get our own food. We take practically nothing with us, only the essentials, since situations are different. So, the ability to get food in the forest or on a pond is the key to survival in a difficult situation. Many people who in ordinary life did not believe in themselves, after such hikes acquire some confidence in their abilities, which as a result affects their future lives.
There are many ways to get food in nature. I will try to tell you a simple method of extraction (capture), provided that you only have a great desire to stay with food, a desire to live, and trees growing nearby (ideally, spruce, pine, etc.). If there are trees nearby, you can build several devices with which you can actually catch fish. I’ll tell you only about one thing - about the muzzle. A snout is a fishing trap that is basically a cylindrical lattice structure with the neck pointing inward. The neck gradually narrows towards the base, not reaching the last by 20-30 centimeters. The fish swims into the neck, gradually moves towards the bottom of the structure, passes through the narrow part, and is no longer able to get out. All a person can do is pull his muzzle out of the water and collect his catch. Under normal conditions, the bottom of the muzzle opens to make it easier to reach the fish, but we will make the muzzle of a more primitive type.
Making a homemade fish trap
So, the first thing you need to do is cut down several young branches that bend well and twist them into a circle. The ends can be tied with thinner branches and pinched into a split. Then, from thinner branches, freeing them from needles or leaves, you need to connect the finished circles to each other so that the distance between them is about 30-40 cm. To give density to the structure, you can use several thick branches, which are secured with thin along round branches . The result should be something like a mesh cylinder, the bottom of which is also covered with thin branches.
Now let's make the neck. To do this, you need to stick several dense sticks into the ground so that near the ground they form a circle with a diameter of about 10 cm, and their top forms a circle comparable to the diameter of our cylinder. After this, thin branches need to be tied around the sticks to form a mesh structure. Special care is not required here, the main thing is that the structure has some strength. When the neck is ready, it is tied with thin branches to the upper part of the cylinder, not forgetting to secure the lower part of the neck to the middle circles of the cylinder. That's it, the homemade fish trap for fishing is ready. Ideally, the muzzle is tied with a rope and thrown into the water. But you can do without a rope, but in this case you will have to climb into the water behind the muzzle to get it. Sometimes we use a pole to get the structure out of the water, it all depends on the situation. Practice shows that such a homemade fish trap catches fish quite well; it only needs to stay in the water for about 3-10 hours. For those who are interested in the topic of survival, this skill will be interesting and useful; the diagrams for making a trap are just below.
All the best to you.
The best survival experts can make the most of all the resources at their disposal. These include a variety of human waste that you can likely find in almost any part of the planet.
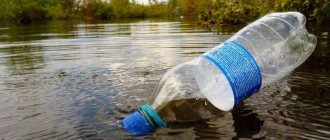
This morning, while exploring the river bed, I came across a pile of garbage in the coastal thickets. Among other garbage, there were also quite useful things that immediately attracted my attention and will be discussed in detail in this article. We will talk about plastic bottles and how to use them.
WHAT ONE IS TRASH, OTHER IS WEALTH
Unfortunately, life in the modern world is literally shrouded in a layer of plastic. There are no places left on Earth that are guaranteed to be free from such garbage. Some parts of the ocean have been found to contain thousands of plastic debris per square mile, and I suspect the same is true on land.
Our rivers and lakes, roadsides, even dense forests and deserts are filled with an absurd amount of polymer waste, which indicates the urgent need to take global measures to protect the environment on a planet-wide scale - this is the only way humanity can survive.
But for the seasoned prepper, plastic trash has a wide range of uses and could very well save a life. As you can see in the picture, I found a couple of empty two-liter bottles that, following downstream, became entangled in the alder thickets. In a real survival situation, such a find is worth its weight in gold!
But what to do with them?
PRACTICAL APPLICATION IN EXTREME SURVIVAL SITUATIONS
Surely you already know that water is one of the most important resources during survival. You can live without food for more than two weeks, and without water for several days. Even a daily lack of water in the body can lead to very serious consequences. Considering the above, using plastic bottles as water storage containers may be the smartest solution.
In addition (especially in southern latitudes), plastic bottles can be used to purify water from pathogens using sunlight (Solar Water Disinfection, abbreviated SODIS - in English terminology). This may come in handy if it is not possible to boil water over a fire.
To make water drinkable you only need two readily available materials - a clear plastic PET bottle (green and brown bottles will not be effective) and sunlight. Try to find a bottle with as few scratches as possible. this can make it difficult for the sun's rays to penetrate, and disease-causing organisms can find shelter there. Rinse the bottle thoroughly and remove any dirt or chemical residue. Fill the bottle with water and leave it in the sun. The procedure can last from six hours to two days. During this time, ultraviolet radiation and rising water temperatures will destroy almost all bacteria. If the water temperature exceeds 50 degrees Celsius, disinfection will occur three times faster.
However, I plan to stay at this place for a while. There is a large amount of fresh water from the stream and, in addition, such wetlands with beaver lodges are excellent sources of a variety of food for survival.
With a fire, shelter and water provided, I could focus my efforts on foraging for food from the abundance of local plants and animals, and plastic bottles can be a huge help in achieving this goal.
TRAPS SAVE TIME AND EFFORT
The superiority of traps over active hunting or fishing is that once set, the trap will operate twenty-four hours a day, seven days a week; even when you are sleeping. This saving of time and effort is an obvious advantage in an extreme survival situation. Properly placed traps can protect you from hunger in case of unsuccessful hunting or fishing, and even become a constant source of food for a long time.
The process of making a good trap takes some time and requires quite a lot of effort. For example, to make one of the most common fish traps using only natural materials, you need to find and collect suitable rods, weave rope and have the appropriate skills to implement a smart trap from all this material.
Thanks to plastic bottles, most of the work of making traps is already done for you!
HOW TO MAKE A TRAP FOR SMALL FISH FROM PLASTIC BOTTLES
Although I used both bottles to make the trap, you can make a working trap using just one of them. Several bottles allow you to conveniently remove caught fish. Soon you will understand everything...
First, peel off the top of the bottle where it meets the cone and remove the cap. I used the scissors of the Leatherman Wave multitool, but any suitable tool on hand will do: yours, a sharp stone, glass shards, etc. Similarly, separate the lower part (bottom) of the other bottle.
Then, neck down, place the smaller section into the larger section of another bottle with a cap. Using an awl, make holes along the outer edge at intervals of 2-3 cm, as shown in the figure. Instead of an awl, you can use a hard, sharp stick or a piece of heated metal to melt the plastic.
Now you need a way to securely join two pieces of plastic bottles together. For this I decided to use 550 paracord, which is always present in my emergency kit. Instead, you can use natural fibers, fishing line, shoelaces or part of your clothing.
Paracord
, parachute line, cord (English paracord or 550 cord) is a lightweight nylon braided (English kernmantle rope) rope, which was originally used as lines for American parachutes during the Second World War. However, in the field, paratroopers found many useful uses for such a rope. Currently, paracord is used as a universal device by both military personnel and civilians. This universal cord was even used by astronauts during the second Space Shuttle mission to repair the Hubble Space Telescope.
Kernmantle rope
- a modern rope with a load-bearing core of bundles of continuous nylon fibers surrounded by a woven protective layer.
550 paracord consists of 7 strong strands in a protective sheath. This is such a versatile tool that I highly recommend carrying at least a 50-foot skein with you at all times. To easily remove one strand, simply tie it to a tree branch and pull it towards you, as shown in the picture.
Pass the string through the holes made in the plastic bottles so that both parts of the bottle fit securely against each other. Leave the end of the paracord long enough to tie the trap to brush or rock along the shoreline.
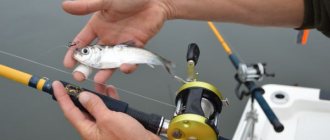
With a little effort, you will have a compact plastic device for effectively catching small fish (up to 7-8 cm in length). Try to place the device in narrow areas of the river flow - on the natural path of fish movement. If the entrance to the trap is properly surrounded with natural materials (stones, branches, sand, algae), then the fish will get inside faster and more willingly.
In the picture (below) you can see a couple of sad fish caught after just a few hours of waiting. If you slightly increase the number of traps (up to 3-5 pieces or more) and leave them for the whole day, then you can quite count on an additional source of energy (rich in proteins and amino acids) to maintain strength and morale for a long period of time.
To remove fish from the trap, just unscrew the lid of the main section so that the catch can easily fall out. Replace the lid and the trap is ready to use again! That's what two bottles were for!
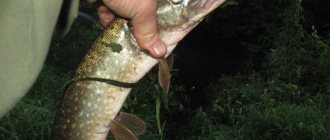
The caught fish can be used to hunt larger ones or as bait for scavengers such as raccoons. And of course, even small fish will be excellent food for survival. In any case, I am of the opinion that one fish in hand is better than two in the river.
APPRECIATE NATURE'S GENEROSITY
- Check traps at least once a day
- If the trap is no longer needed, be sure to remove it from the river so as not to pollute the environment or harm its inhabitants.
- If you are just practicing survival skills, then always release the fish into the wild.
Anyone can make a trap out of plastic bottles. And who knows, maybe someday it will save your life...
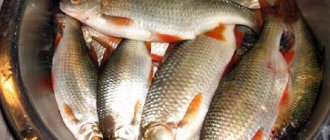
PS For 13 days, two men ate almost nothing but fry, which they caught, among other things, using similar small fish from plastic bottles.
You can find a plastic bottle in every home. For some it is nothing more than trash, but for others it is a useful item. Everyone can find a special use for it. Various fakes are made from them for children: bird feeders and flower stands. You can make a lot of useful little things from a plastic bottle; it just takes a little time, patience and creativity.
Even fishermen have found a use for it. Some designs that have been tested in practice are readily shared in this article.
Homemade trap for catching live bait in the water column
It happens that you come fishing and nothing bites, but you often watch how a perch or other predator chases the fry along the top. This is where the question arises, where to get live bait, because it is quite problematic to take a spider with you every time. So one fisherman came up with the idea of how to make a compact trap for catching fry from scrap materials. For these purposes you will need a minimum of materials; all of them can be found at home without any problems.
Video on how to make a bottle trap with your own hands
The main feature of such a trap is that it does not sink to the bottom, but floats in the water column. With this approach, you can catch much more fry, since they are concentrated in the upper layers. In addition, the trap can be adjusted in depth. The author used ordinary plastic bottles as the main material.
Materials and tools: - two plastic bottles (the larger they are, the larger the trap will be); - scissors; - an awl or a large needle; - a piece of foam plastic; - any metal object for a sinker; - scissors and knife; - rope and two carabiners.
Manufacturing process
Step one. Manufacturing of blanks
The blanks will be created from plastic bottles. Take the first bottle and cut off its neck, that is, the narrow part. Next you need to cut the bottle at the widest part. You can see exactly how in the photo.
After this, take the second bottle and cut it at the widest part. As a result, you will get two elements, this is part of the bottle in the form of a watering can and part in the form of a vase or cylinder.
The main point here is that the watering can part of the bottle fits tightly into the second part of the bottle. As a result, an almost finished trap comes out.
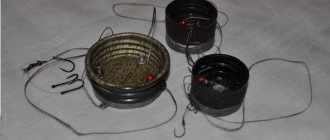
Step two.
Loading the trap A weight is necessary so that the trap can be immersed without problems when lowered into the water, since the plastic itself is practically weightless in water. The weight should be small; it can be almost any object. For these purposes, the author turned to the child and he found him a wheel on a metal bracket, which was used as a sinker. You can use bolts, nuts, lead, etc.
Step three.
Creation of floats and complete assembly of tackle Floats are needed so that the tackle does not sink to the bottom, but is located in the water column. Foam can be used as floats. To do this, holes are made in two pieces of foam plastic and a rope is inserted. Bottle caps can be used as a stopper. You need to make holes in them, insert a rope, and then form knots. The length of the ropes is selected depending on the depth at which the fry need to be caught. At the same time, their length must be strictly the same, so the trap will be in a horizontal position. The other ends of the ropes are attached to the trap. For these purposes, you need to make several holes in the bottle and install wire loops. The loops should be on the opposite side of the side where the sinker is installed. At the final stage, the main rope is tied to the load of the trap or any other place, by which the trap will be removed.
How the trap works
First, you need to put a piece of bread or flour in the trap. Then this entire system is sent into the reservoir. This can be done not only from a boat, but also from a steep bank, a bridge, or even simply by throwing a trap into the water from the shore.
The whitebait begins to gather around the bottle at the smell of the bait and gets inside through a narrow hole. After this, it becomes difficult for the fish to find a way out of the bottle.
After some time, the trap is pulled out of the water by the rope, and the fisherman receives live bait to catch the predator.
In order for the fry to be removed, you need to remove the insert part from the bottle.
Now the fry can be removed and moved to a larger container where it can live longer. In this simple way you can always catch live bait.
Source
Become the author of the site, publish your own articles, descriptions of homemade products and pay for the text. Read more here.
Plastic bottle while fishing
Fishing requires a huge number of special devices, which, by the way, are quite expensive. Therefore, a 1.5 - 2 liter bottle will help you save significantly.
Bottle - anchor
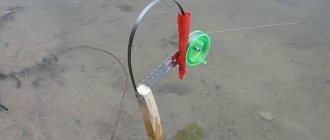
If you plan to go fishing on a boat, you will definitely need an anchor, and sometimes two, to keep the boat stationary. In such cases, one anchor is installed on the bow of the boat and, accordingly, the second is installed on the opposite one. If there is a problem with the anchors, then a plastic bottle will come to the rescue. In a few minutes you can make a fake from it that will serve as an anchor.
To do this: we make two holes in the lid, thread a thick rope or thick wire, make a loop, and fasten it with a knot from the outside. Fill the bottle with sand, small pebbles, and you can add water. Screw the cap onto the bottle. We tie a rope of the required length to the loop. ready.
Tackle - trap
The next invention is a fish trap. Fishermen have been using this kind of gear since ancient times. You can lure small fish into such a device, which are useful when catching larger specimens with live bait. It’s easy to make: cut off the neck approximately half the length of the bottle, get a funnel, turn it over and install it in the body so that the neck coincides with the middle of the bottom of the bottle. We tightly connect the resulting parts. To do this, you can use a soldering iron or, if you are already outdoors, carefully walk along the edge with a hot coal.
You need to pierce small holes along the entire length of the bottle to allow water to drain. We make 2 holes along the edges to fix the handle; it can be made from any available rope. We pass it through the holes and secure it with knots. Inside we place some sand for weight and bait. Having noticed the delicacy, the fry will penetrate inside through the neck.
Feeder made from a plastic bottle for fishing
It’s not a fancy fishing exhibit, but it’s a very necessary one – a feeder. There are several ways to make it from a plastic bottle.
First: “The lid is a feeder.” You will need a lid, a lead washer for the sinker, a carabiner, several hooks and fishing line. We make a hole in the center of the lid and thread the fishing line, tightening the loop on both sides, put a sinker on the outer one, and hooks on the inner one. We fix the weight at the bottom of the lid. This device will serve as a weighting agent and a feeder at the same time. We lay out the bait on the inside, under which the hooks are hidden. We cast and wait for a bite. Such a feeder will be useful when fishing for bream, carp, and roach. Corn, dough, pasta or maggots are perfect for bait.
The second manufacturing method is as follows: cut off the bottom and neck of the bottle. We cut the resulting cylinder crosswise and mark the location of the feeders with a marker. Cut holes according to the marks. We fold the cylinder, secure the edges, you can use a soldering iron for this. According to the dimensions of the resulting structure, we bend the lead plate at the bend and tighten the fastening unit. The feeder is ready.
An excellent and non-standard version of the top, muzzle, hem (as they call it) - a do-it-yourself fish trap.
It seems to be the simplest, but with some changes from those made from plastic bottles.
You will always catch live bait with such a homemade fishing device.
Fishing with a bottle from the shore
Making bottle tackle for shore fishing is quite easy. You need to firmly tie the bottle with a rope, it will serve as a connection to the shore.
Read here Types of floats: classification, selection features and step-by-step instructions for using various types of floats (75 photos)«>
Next, you should wind 5 to 9 m of fishing line around the bottle. The sinker must be tied to the edge of the base. A metal leash should be tied over the load.
The bottle makes it possible to throw about 4 tackles to different places. They can be tied to a bush or tree and left for a certain amount of time. If you do everything correctly, the catch will please you.
Making your own muzzle trap from PVC bottles for catching fish (live bait)
You will need a couple of 5 liter plastic bottles. They also sell water in the store.
Cut off 1/4 of the distance from the neck of the first bottle. It turns out 2 parts. We cut off the neck of the short part completely (this will allow larger bait fish to pass through).
We cut off the bottom of the second bottle completely, leaving the neck with a lid - we get a through plastic tunnel with a lid.
Now let's connect the long part of the first one to the tunnel. We make it in a circle, where the bottles are connected by holes with a soldering iron. And then we tie and stitch with fishing line.
We turn the short part of the first bottle down with its bottleneck and insert it into our resulting structure.
Using a soldering iron, we make holes in the connection of the funnel and the tunnel next to each other and tighten them with fishing line.
We repeat (making holes and pulling the fishing line together) on all four sides.
We make a lot of holes throughout the form so that water can pass through and tie a good handle to the beginning of the funnel.
Here you have a homemade fish trap with your own hands using available materials.
The video is below to make it clearer.