Properties of the Clinch knot, advantages and disadvantages, scope
The Clinch, also called the Clinch Knot, and its slightly more complex version, the Improved Clinch, are often used by anglers. If you look at how the knot is knitted, you will notice that it is half of the Snake Knot (which is used to tie two lines together).
The main area of application of the Clinch is tying hooks, baits and other elements to monofilament, fluorocarbon or braid. You can mount all parts of the equipment with rings or ears:
- regular single hooks;
- doubles and tees;
- offset workers;
- spoons, spinnerbaits, wobblers and other spinning baits;
- flies;
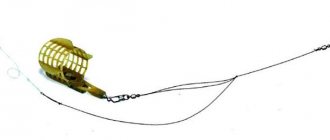
- sinkers with ears;
- feeder feeders and so on.
But there are other options for its use. For example, it is often used to securely mount an anchor. Another use is to tie a boat to a dock. And an option such as the Locking Clinch is suitable for fixing the float during its sliding installation and for other similar cases.
Clinch has quite a lot of advantages:
- It is easy to knit, so even a child can master it and use it. This is one of the easiest ways to attach a hook, bait, swivel or carabiner to a fishing line.
- This is a reliable knot that provides strength of about 70-95% of the original strength of the thread.
- The clinch doesn't stretch.
- It is equally suitable for monofilament, fluorocarbon, and braid.
There are also disadvantages:
- The clinch is quite large, which will interfere in some situations. For example, the connection connected with it will be more difficult to pass through the passage rings on a Bolognese or match float fishing rod, donke or spinning rod, especially through a tulip.
- This knot cannot be called the simplest, especially if we talk about the Improved Clinch; there are alternative options that are knitted a little easier and faster.
But, despite some disadvantages, it is worth learning how to knit this knot in order to use it in your fishing practice. By using it, you can always be sure that you will not lose an expensive bait or a large trophy caught on a hook due to a poor-quality knot.
This video shows how to tie a hook using a Clinch knot:
Properties and characteristics of the clinch knot
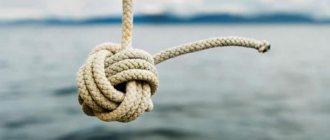
Using a spinning rod involves winding and rewinding the attachments on the tackle. A fish can break loose and take with it not only a good mood, but also a hook along with bait, or even a good half of the fishing line. Due to its features, it is excellent for tying on spinning gear; it has earned such qualities for its relative versatility and efficiency (Figure 1).
Please note that this is not an ideal option, it will not work 100% of the time, and sometimes you will have to select a completely different type of structure to fasten the installation.
The most optimal for this knot is a fishing line with a peak load of up to six kilograms; if the cable is thicker, then difficulties may arise with braiding such a bundle on it. It is not recommended to use it on excessively thick fishing line, as it may perform poorly.
Figure 1. External connection features
By its origin, this ligature is a simplified version of the snake knot. Its progenitor is used to fasten two different threads into one. The main way this ligament works is by internal tension of the threads one on one and repeated fixation of the tension inside. How does simplification manifest itself? Quite simple: a typical clinch is half of a snake knot, in which there is no second running cord.
Advantages and disadvantages of the node
Among the distinctive qualities, one should highlight the variety of methods and patterns of knitting a clinch knot. Depending on your needs, you can always choose a specific method for tightening the fasteners. The clinch knot has relatively acceptable strength, which is suitable for use on simple connections (Figure 2). But what properties of a fishing knot are best demonstrated?
How to knit Clinch
There are many variations of this knot, but it is enough to learn Single, Single Improved, Double, Reinforced, Reinforced and Locking Clinches.
Single Clinch
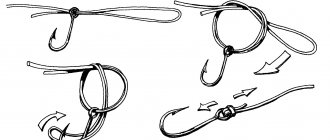
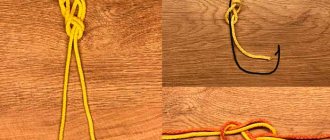
To tie a simple Single Clinch, you need:
- thread the fishing line into a ring or eyelet;
- make a few turns with the free end;
- thread the end into the loop formed near the ring;
- wet and tighten the connection.
Important! As with any other knot, the line must be wetted before tightening the Clinch. If this is not done, it will “burn out” and the strength of the connection will greatly decrease. To moisten the thread, you can use water from the tap or from a reservoir, but in practice it is more often placed in the mouth and soaked in saliva - this option is much simpler and more convenient.
At the second step of knitting a knot, you need to make at least 6-7 turns. As their number increases, the strength of the connection increases. If you make less than 6 turns, the knot will turn out to be unreliable, and there will be a risk that it will unravel under heavy load.
The single clinch is quite reliable, but instead it is better to use the single improved version as a basic one. It is not much more difficult to knit, but it is noticeably stronger.
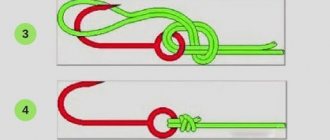
Single improved clinch
The improved clinch is a variation of the regular clinch, the knitting of which is slightly different in the final stage. It is well suited for use as the main one.
To connect a Single Improved Clinch, you need to:
- thread the fishing line into a ring or eyelet;
- make several turns with the free end;
- pass this end into the loop near the ring;
- then thread it through another loop that was formed in the previous step.
The single improved clinch is very strong and easy to knit. Compared to regular single knitting, its knitting is only 1 step more difficult.
Double clinch
The peculiarity of this option is that the fishing line must be folded in half before threading it into the eye of a hook, bait or other element of equipment.
How to link it:
- thread the double-folded fishing line into the eyelet;
- give it a few turns;
- thread the free end into the loop;
- wet and tighten the connection.
There is another variation of the Double Clinch .
This knot turns out to be very durable, so it can be used in the most extreme situations. For example, it is well suited for rigging large fish using strong, thick fishing lines. Using a high-quality double clinch, you can pull a real crocodile out of the water with minimal risk of breaking the equipment during fishing.
This video explains the Double Clinch knot:
Hardened
The reinforced or reinforced clinch is similar to the previous version, but knits a little easier.
To do it, you need:
- thread the fishing line through the eye or ring;
- make several turns;
- pass the end into the loop formed at the ring;
- then pull into the far loop;
- wet and tighten the connection.
It works well for knitting fluorocarbon and braid.
How to knit a Reinforced Clinch is shown in this video:
Stop Clinch
This option is used to create a stopper on the main line. Most often this is a stopper for a sliding float. This equipment is used when fishing with a float rod, when the depth at the fishing spot exceeds the length of the rod.
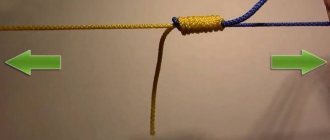
To make a Stop Clinch, you need to take a small piece of the second thread, attach it to the main fishing line and tie a knot. It is necessary to tighten it with such force that the resulting stopper can be moved up and down.
This is a very simple and inexpensive way to create a reliable stopper that is guaranteed to cope with its functions.
For tying a Stop Clinch, a fishing line of the same diameter as the main one is best suited. But it is preferable that it be of a different color - then the knot will be clearly visible. As you move up and down the line, the knot loosens a little. Therefore, when cutting off excess fishing line, it is better to leave the ends longer so that it can be pulled up.
Varieties
There are several varieties of the Clinch knot. It can be simple, improved, strengthened, single and double.
Single improved
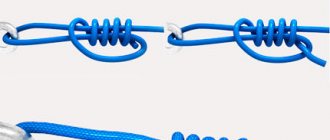
This is the simplest knot to tie, although it can easily come undone, which is bad. Weaving pattern:
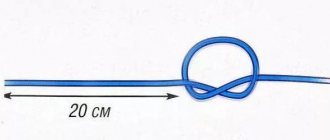
- The end of the fishing line is threaded into the eye of the hook. The tip is pulled out 10-15 cm.
- The main line is wound around the tip in a spiral. In this case, make from 4 to 6 revolutions.
- The running end is pulled into the resulting loop (at the bend).
- With one hand, hold the formed spiral, and with the other, pull up the tip of the fishing line. The coils should lie flat, without creeping on each other.
- Then the tip is threaded into the new resulting loop.
- The knot is moistened with water and carefully tightened. The remaining tip should not exceed 5 mm. Therefore, its excess is cut off.
Unlike a simple node, this one is 97% more reliable. A clinch is often used to tie anchors. This type of knot cannot be made from braided cord.
Double
If we compare the double clinch with the single one, it is much stronger, although it has a complex knitting. It is used for tying sinkers to the main fishing line and various baits, carabiners, hooks that are subject to heavy loads. A double clinch knot is woven from monofilament or braided thread using the same method as a single one. The only difference is that the thread is folded in half.
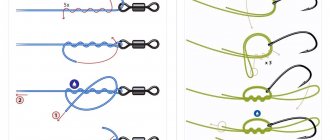
Weaving process:
- Thread the working edge of the thread into the eye of the hook and pull it through again to form a double loop.
- The thread is wrapped 5 times with the working end and pulled through a double loop.
- The clinch is moistened and tightened by pulling the ends.
Advantages: does not stretch due to high density.
Stopper
A locking clinch is a simple type of knot that is knitted from simple wool or cotton thread, as well as from thin braid. Monofilament fishing line is not suitable for it. They mark the area on the fishing line along which the float moves. According to the weaving method, the locking clinch resembles a knot for tying a hook.
- To make it, you need to fold a piece of braid or thread in half on the main fishing line. In this case, the braid should be located in the middle.
- Holding the top and line, make 4 windings.
- Then thread the end of the fishing line into the loop.
- The clinch is moistened with water and carefully tightened.
- The ends are trimmed, leaving about 2 mm.
Improved
To create an improved clinch, you will need to double-fold the line. It is pulled through the eye of the hook. The running end is wrapped around the root part of the fishing line. In this case, from 5 to 7 turns are made. The tip is pulled through the starting loop. The finished clinch is slightly moistened with water and tightened. The excess tail of the fishing line is cut off.
Reinforced
Reinforced - designed for fixing hooks when increased connection strength is required. On hooks, which often occur in fast underwater currents, the reinforced clinch does not come loose. Thanks to this, gear is not lost. Its strength is 95%. But you need to take into account that if the level of breaking load is higher than normal, the fishing line can break anywhere. For production, fluorocarbon thread or braided fishing line is used.
- To make it, a piece of fishing line is bent in half and the top is threaded through the eye of the hook.
- When the line passes through the eye, it is folded in the opposite direction so that the formed loop lies on the main line.
- The resulting tail is wrapped 5-7 times with the working end.
- The tail is then pulled through the loop.
The finished clinch is moistened and slowly tightened. To do this, the tip of the thread (fishing line) and the hook are pulled in different directions. The tip is cut off.
Recommendations, possible difficulties and their solutions
Different variations of the Clinch are similar to each other. The differences between them are that either single or double line can be used, as well as in the methods of forming the loop. Therefore, having mastered and remembered the basic method of knitting, it will be much easier to learn all the other variations.
It is best to learn a new way of knitting hooks, lures, fishing lines and other fishing accessories, for example Clinch, on a thick cord. In this case, it is easier to feel the nuances of knitting the optimal connection.
If the finished connection turns out to be fragile and the knot breaks easily, you need to pay attention to the knitting technique. Most likely it was not wetted before tightening.
Another important point is that you should not cut off the excess line after tightening it too close to the knot. You need to leave a free end about 1.5-2.5 mm long. Such a tip may interfere a little when fishing, but the connection will not unravel due to the fact that the line has slipped a little under a heavy load.
When not to use the Clinch knot
The clinch is quite versatile, but there are fishing situations in which it is impossible or undesirable to use it:
- If the diameter of the fishing line is more than 0.4 mm, it will not be reliable enough. Very thin threads can be knitted with Clinch, unless there are problems with vision and motor skills that will interfere with this.
- It is not advisable to use this knot for knitting hooks and other equipment with thick wire eyes. In the case of them, it will also not be able to provide a reliable connection.
- The clinch is not suitable for tying hooks without an eye (with a spatula). For such purposes, you can use Carrot or Albright.
Alternative nodes
A good alternative to the Clinch would be the Palomar and Uni knots (another name is Grinner).
Palomar
Palomar is the simplest and most reliable of the knots for attaching hooks, lures, swivels and other equipment to a fishing line. The strength of the connection associated with it can reach 94% of the original strength of the fishing line.
More about the Palomar node
Uni, or Grinner
Another reliable option for tying different equipment elements.
You can also use it to tie two fishing lines. The advantage of Uni is that they can be completely different in thickness - a fivefold difference in diameter is acceptable.
But the disadvantage of Uni is that it is more difficult to execute than Clinch and Palomar. It can be difficult for fishermen with thick fingers to tie it; they waste a lot of fishing line, which is undesirable in the case of braided line.
Grinner knot, or Uni
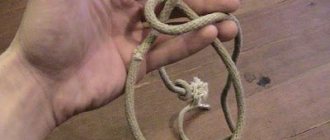
Double Clinch Knot (Advanced Clinch)
This knot differs from a regular clinch in that at the point of contact between the fishing line and the object to which it is tied, the fishing line will be folded in half, which increases the strength of the knot as a whole. Very strong and reliable unit. If this knot is tied correctly, the knot strength is more than 90%. This is his positive side, which is also his negative side. If a “dead” hook occurs, then the fishing line or braid may break not at the knot, but in a place where there are minor abrasions or “tears” on the fishing line or braid. In general, think for yourself, decide for yourself...