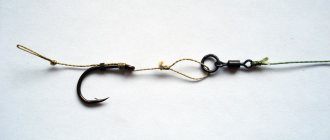
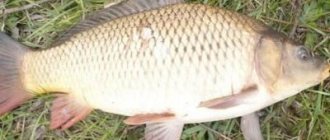
Equipment for inline feeder with outlets for feeder and leash
This type of installation is widely used on silt-covered reservoirs.
When we use a running rig without a feeder outlet, our feeder is located on the main line, near the feeder outlet, which is why a section of the main line, near the feeder, goes into the mud
This will negatively affect the quantity and quality of bites, especially for cautious fish. The presence of a branch will allow you to move the fishing line away from the feeder a little to the side and will not pull it along with you into the mud
Also, thanks to the presence of an outlet, the feeder first sinks to the bottom and then, with a slight delay, the nozzle itself, as a result of which we can use such equipment in cases where it is necessary to catch while falling. So this method of installing feeder equipment can be used for feeder fishing for roach, silver bream or chub.
The process of installing inline feeder equipment with an outlet for the feeder and habits is similar to the above-mentioned inline installation methods, but with some peculiarities.
- First, we need to make an outlet for the feeder, which should be at least 7 cm, for which we take a bead, but with a larger internal diameter, so that a double fishing line can be threaded into it, and insert a piece of fishing line or fluorocarbon with a diameter of 0. 33-0.35 mm, length 20 – 25 cm.
- We fold the fishing line in half so that the bead is in the middle.
- We pinch each edge with our fingers and begin to twist. The twist is made 9 cm long. Next, we put a crimp tube on the fishing line and bring it to our twist, at a distance of 7 cm from the bead, now we pass a carabiner with a clasp through the fishing line. We pass the remaining part of the fishing line folded in half through a crimping tube, so that a small loop is formed. Next, we bring the crimp tube as close as possible to the swivel and clamp it with pliers. We cut off the excess mustache and the outlet for the feeder is ready.
- Now, we put our bead on the main fishing line, followed by a smaller bead (stoppers) and continue making inline equipment for the feeder in a way already known to us. Only the allotment for the habit is made longer, about 12-15 cm.
- So, we retreat 30-35 cm from the edge of the fishing line, fold it in half and knit a loop 2 cm long with a figure eight knot.
- Next, we make a twist and secure it from unwinding with the help of a double knot, cut off the excess and our equipment is ready.
Features of feeding carp when fishing on a feeder
Privada
Ideally, bait the carp to the selected fishing point in advance. First, we determine future fishing locations. We choose them at a considerable distance from each other. If possible, then we attach the fish three days before the start of our fishing, if not, then at least a day before, feeding it in the morning and evening. The bait must be thrown at the same time, which should coincide with the time of your future fishing.
In warm water, the bait may include: boiled potatoes, dough, pasta, boiled beans, beans, bread crusts, porridge. Typically, fishermen mix 5-6 ingredients. In cold water, a worm, maggot, and bloodworm are added to the bait. You can also add flavors to the spice, such as garlic, strawberry, banana, anise. It is worth remembering that sweet smells go better in summer, spicy ones in early spring and late autumn. Privada is pre-mixed with soil in a 1:1 ratio.
Lure
Of course, most fishermen do not have free time to hook fish and they, taking their feeder equipment for carp, immediately go to the pond and try their luck, especially if it is a paid fish, it is not advisable to use bait here.
The stores offer a fairly wide range of specialized carp baits; preference should be given to sweet baits. It is difficult to overfeed carp, so you can safely take 4 or more kilograms of bait with you.
Carp need to be fed frequently. Starting feeding is 10-15 feeders, here a lot depends on the size of the reservoir and the presence of competitors nearby, for example, on a paysite, carp are accustomed to abundant feeding.
Then everything depends on the temperature; at the beginning of the carp season, the frequency of recasts is once every 10 minutes. The closer we get to summer, the more often we recast; usually it is done at intervals of 5 minutes, although many reduce it to 3. In the fall we increase the interval again. With gradual cooling, it is necessary to reduce the amount of bait and be careful with flavoring. Now, ideally, when catching carp on a feeder, it is better to start without flavoring, and only if the bite is unsatisfactory, add spicy flavorings.
After mixing bait on a pond, you should additionally add some large fractions to it, for example, one can of sweet corn or pellets in granules.
The following can be used as flavorings:
- Tutti Frutti;
- garlic;
- anise oil;
- fresh or dried finely ground dill;
- vanilla;
- strawberry;
- Peach;
- Banana;
It is better to add flavorings to a certain part of the bait, and not all at once, so in cases of weak bite, you can try a different flavor.
Homemade bait recipe No. 1
- Wheat, pea or pearl barley – 1000 grams;
- Corn grits – 600 grams;
- Semolina or millet – 400 grams;
The cereals are boiled and cooled, after which the following components are added.
- Dumplings or ground seeds – 200 grams;
- Finely ground nuts – 100 grams;
- Sugar – 2 tablespoons;
- Chicken egg - 4 pieces;
- Boiled potatoes – 300 grams;
Recipe for homemade bait for carp No. 2
- Pearl barley porridge – 1000 grams;
- Regular carp bait from the store – 1500 grams;
- Makha or ground roasted seeds – 500 grams;
- Sweet canned corn - 2 cans;
- Roasted hemp grains – 2 tablespoons;
- Chopped worm – 200 grams;
- Banana or strawberry flavor – 10 mg
Cook the barley for about 40 minutes until it is covered with mucus, then wait another 40 minutes until it cools down, drain the remaining water, and pour it into a bag. The remaining components are mixed in a pond.
Recipe No. 3
- Boiled millet – 2000 grams;
- Boiled peas – 2000 grams;
- Breadcrumbs – 2000 grams;
- Finely ground roasted sunflower seeds or makha – 1000 grams;
- Honey – 400 grams;
1rubalka.info
Equipment for carp fishing using the method
In continuation of my “lecture,” especially for beginners, I suggest that you familiarize yourself with a brief overview of fishing equipment for “method” carp fishing.
Rod
In the modern assortment of “everything for fishing” products you can easily find a wide variety of rod models designed specifically for method fishing
However, what would I advise you to pay special attention to, specifically for carp fishing? First of all, this is a rod test - it must be at least 4 ounces (113.4 g), i.e. capable of handling line 10 lbs (4.53 kg) breaking line or more
As well as leader materials from 4 (1.81 kg) to 8 (3.62 kg) pounds. The optimal length of a method (feeder) rod is 12 feet (3.66 meters). Build – “medium” or “slow”.
In my personal opinion, the classic version of a rod for catching carp on a “method” feeder is the “Zoo Creature Drayton Method” model from the “Leeda” brand. It consists of 4 sections with a total length of 13 feet (3.96 m). As standard, it has 2 replaceable quiver tips. Experience has shown that this rod can work well with lines in the 5-8 lb range, even despite the manufacturer's recommended breaking load of 4-7 lbs.
Stands
It is for carp fishing with a method feeder that special stands for them will be no less important than the rods themselves. Due to some similarity of this method of fishing with fishing with a “quiver tip” (shaking tip), immediately prepare yourself for the fact that the jerks will be quite powerful and completely unexpected. Thus, without using a normal stand, your rod will be in the middle of the pond in a matter of seconds.
Personally, my choice was on the Seymo adjustable carp rest, which perfectly withstands any carp attacks. You can purchase some other models, but be sure to have reliable butt holders. And don’t forget to adjust the clutch so that the fish can “take” your line.
Coil
When choosing a reel for carp fishing, ask the sellers - what kind of fishing line are they designed for? The best option is 150 yards (137 m) of branded line with a breaking strength of 10 pounds (4.53 kg). As is the case with fishing rods (as well as special stands for them), the choice of reels today is simply huge. Therefore, you don’t have to sell your last pants to purchase some “one-fits-all” reel option. Most modern models, as a rule, have a front clutch and the gear ratio we need is 5:1. Personally, strictly for method fishing, I actively use the ABU Garcia Cardinal Agenda AG4F reel.
Line and leash
As I mentioned a little above, the optimal line range for fishing using the method is 6-10 lb. In principle, you can also use braid, but I don’t see much need for this, since our fishing line will be constantly in a taut state, perfectly transmitting bites. As for the type of fishing line (for example, according to the material of manufacture or some other nuances), when fishing with a method feeder there are no hard and fast rules. The main thing is to correctly predict the weight of the future catch.
The thickness of the leash should be thinner than the thickness of the main line. However, not entirely subtle. The ideal choice is around 6 lb. The calculation of the leash length largely depends on the feeding behavior of the fish and varies from 3 inches (7.62 cm) to 10 inches (25.4 cm). In some cases, it is better to hide it in bait stuck to the “method” feeder. Since the priority requirements for leashes for any type of fishing are the minimum diameter and maximum camouflage.
Hooks
The most important rule in carp fishing is that hooks for catching carp using the method must be reliable and safe for fish (without barbs/barbs on the sting). I still use MUSTAD Carp Paste (Method) models in sizes 6 to 16
And finally, the “Method” feeder itself
At the moment, there are quite a large number of a wide variety of method feeders, differing from each other - in shape, size, weight, and other specific features. Choosing one of them (or several at once) is a matter of personal taste! Just don’t forget that for long-distance casting you need heavy feeders, and for short-distance casting you need lighter ones.
That's all I wanted to tell you. I sincerely hope that my “report” will bring you some benefit.
Peter Webber (translation from fishingmagic.com)
Feeder equipment for carp
Rod
When catching small carp (1-2 kg), when there is no need to throw the equipment far, it is better to use light picker rods 2-3 meters long, with a test weight of about 30-40 g. Especially if the depth at the fishing point is shallow. This way you won’t unnecessarily frighten the fish with the blows of heavy feeders, and your tackle will be as sensitive as possible.
More profitable rods for carp anglers are carbon fiber feeder blanks with a dough of 60-120 grams, 3.9-4.2 m long. The action of the rod is fast or medium.
When fishing at the longest distances with heavy method feeders, it is better to use more powerful forms with a dough of up to 150 grams.
Coil
Inertia-free power, with a spool size of 3000-4000, in order to fit at least 150 meters of fishing line on it, with a diameter of 0.25-0.3 mm. You will need such a large amount of fishing line on the spool when the hook swallows a large specimen. The carp will try to go as far as possible into the saving depths and will remove dozens of meters of fishing line from your spool.
The reel must be equipped with a friction clutch, preferably a rear one, as it is easier to adjust during fishing.
If when fishing, you are not always near the feeder, then it is better that your reel is equipped with a baitrunner system, this will protect the rod from falling into the water when a large carp bites.
fishing line
Monoline under tension tends to stretch and absorb sharp jerks of strong fish, so for carp equipment it will be a more reliable option than braided line. The diameter of the fishing line is 0.25 - 0.3 mm; only in cases where you hope to catch carp weighing over 10 kg, try using a fishing line with a thickness of 0.35 mm.
When fishing at a picker distance (15-20 m from the shore), the feeder equipment for carp can include braided fishing line, since the elasticity of the monofilament in this case will not be much higher than the braid.
Fishermen who use braid instead of monofilament line often use feeder rubber to dampen strong jerks.
When casting heavy feeders, we cannot do without a shock leader, otherwise shooting of the feeders cannot be avoided. The shock leader is made in two rod lengths.
The thickness of the leads is 0.04 mm less than the main line.
Hooks
Catching carp on a feeder requires the use of only high-quality hooks made of durable steel and having a well-sharpened tip. Poor quality hook, large carp can bend. Hooks depending on the size of the fish No. 14-10, according to the international classification.
Feeders
The flat-method feeder is an integral attribute of feeder rigs for carp. It is ideally suited for fishing in silty areas of the ground.
To catch carp at the longest distances, feeder feeders with forward-positioned “rocket” feeders or drop-shaped method feeders are used. They have the best flight characteristics.
If there is an abundant amount of aquatic vegetation at the fishing point, then it is worth using plastic feeders equipped with wings on the sides, which, when fishing, allow you to quickly bring the tackle up, reducing the likelihood of snagging.
Features of online installation
The inline equipment for the feeder, or “Running Feeder Rig”, came to us from our European colleagues. There it was invented for fishing on flat feeders and hunting for carp and crucian carp in closed reservoirs without a current. In our country, it is successfully used not only on ponds and lakes without a current, but also, after slightly modifying it, it is used in rivers with currents of varying strengths.
The essence of inline installation for a feeder is that the feeder is not fixed in any way to the fishing line or loop branch, but slides freely along it. Its movement is only limited by knots or stop beads located on the main cord, which determine its degree of movement.
About fishing stops
There are several types of sliding equipment. All of them are effective, but are designed for specific conditions. For a novice fisherman, it is still advisable to explore all the options in order to be able to adapt to the body of water and the potential type of fish. So,
- Equipment for a method or flat feeder, when the fishing line passes directly through it. The most popular for closed lakes, ponds and quarries when fishing for carp and crucian carp.
- Installation when the cord passes through the swivel ring to which the feeder is attached. The most versatile option and suitable for both lakes and moderate and medium currents.
- The feeder is tied to a branch, which is attached to a swivel. And that, in turn, is attached with one ring to the main fishing line. Suitable for current.
As you can see, the equipment options differ slightly, but the principle remains the same: the feeder is not fixed to the fishing line, but slides freely along it.
In every installation, the inline feeder does not slide along the entire line. Its movement is naturally limited with the help of special stop beads. The lower stopper, in addition to its main function, also protects the knot that connects the main cord to the leash from damage.
The inline feeder rig is very sensitive and the fish are not afraid of it. She calmly takes the bait without feeling any resistance, since the line slides freely through the feeder or swivel ring. At the same time, it usually self-locks due to the counteraction of the rod.
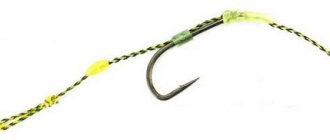
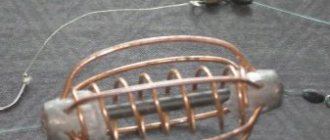
Photo 1. Equipment for the feeder method.
You can use inline rigs with both braided and nylon fishing lines. She shows her best qualities equally well in both cases. The nozzles used are also different. In other words, the installation is universal and suitable for almost any conditions.
Advantages and disadvantages
Inline equipment, like other feeder installations, has its advantages and disadvantages. The advantages should be noted as follows:
- It is a self-cutting rig, which makes fishing easier and increases the number of successful bites.
- High sensitivity, allowing you to catch passive fish that only slightly fiddle with the bait.
- Suitable for standing water. In fact, this is the best equipment for closed reservoirs without current.
- Used with flat feeders and is effective on muddy, sticky bottoms.
- Suitable for spot fishing when you need to carefully fish a specific promising area.
- It is considered more humane and does not seriously injure the fish. Relevant for those fishermen who profess the “Catch and Release” principle.
It should be noted that inline equipment is the only one allowed in professional sports competitions for bottom fishing, since it does not injure the fish and allows it to be released with relative ease in the event of the rig being torn off.
The disadvantages include the following:
- Relatively difficult to manufacture, so it requires some skills and experience.
- Its installation requires additional auxiliary elements, such as a bead or crimp tubes. Its production directly on the shore will take a lot of time.
- Prone to tangling the leash when casting and when fishing in the current. If it is wrapped around the main cord, then the equipment loses its sliding properties.
- When hooked directly by the feeder, all the equipment comes off and a new one has to be installed.
In general, the equipment is interesting and functional. It remains to consider installation options and the sequence of their manufacture.
Criteria for choosing leashes
The length of the leash and the material from which it is made depend on the fishing conditions and the preferences of the fisherman. Today, many specialized leash materials have appeared in addition to the usual braid and monofilament line. If we talk about material, leashes can be divided into four classes:
- Rigid leash made of fishing line. The advantage of this leash is that its very rigidity prevents the carp from spitting out the hook. Also, in places with a high probability of snagging, this option, which has a large margin of safety, reduces the likelihood of the gear breaking. It is better to attach a rigid leash to a loop, then it will have greater freedom of movement.
- Composite leash made of fishing line. The leash is made of two lines - thick and hard on one side, and soft on the other. Thanks to this, the bait becomes more attractive to carp, which can be scared away by a regular hard leash. On the other hand, a more rigid design than in the case of a soft leader reduces the likelihood of the tackle becoming tangled. The fishing lines are connected in this case using a swivel or an Albright knot.
- Soft leash. Made from wicker. It is highly durable, although it has a small diameter. The main advantage is that such material does not scare away fish when taking bait. The thinner the diameter of the leash, the greater the likelihood of entanglement. Therefore, very thin structures are recommended for use when catching shy fish and at short distances.
- Combined leash. Lately they have been gaining popularity. The principle of operation is the same as that of composite ones, only the manufacturers of these materials did most of the work for the fisherman. Such materials contain a soft braid inside and are coated with a special polymer on the outside, which can be easily removed if desired. Thanks to this design, you can very accurately measure the length of the soft part of the leash, without the need for any additional components in the equipment. One such material is Black Silt from Sufix
Traditional bottom installations
The simplest feeder installation is a blind equipment of a feeder and a diverter leash (paternoster). You can put another leash higher. However, experienced feeder operators argue that using more than one hook in a feeder is inappropriate. The feeder is used to fish pointwise at a thoroughly fed point. An additional leash can be used for catching carp when installing gear for a long time. When fishing in rivers at a fast pace, one more hook will only create additional hemorrhoids for the angler.
Spring
Installation of the spring feeder on the feeder is carried out according to the flat inline principle, as well as on the donk. Below, a leash is attached through a loop into a loop with a stopper or through a swivel. An equipment option with a metal rocker and two hooks is suitable. Amateurs who master the feeder after bottom fishing experience can install the feeder with their own hands based on experience, just like with bottom fishing. However, further, in the course of studying the feeder gear, the advantages of the thin and neat special equipment described at the beginning of the article will become clear.
Inline with spring
Nipples and crowns
In amateur fishing, girder rigs for swallowing hooks - nipples, plugs and top hooks - are widely used. In some reservoirs, only such methods allow you to successfully catch carp, carp and crucian carp. However, why master active and jewelry feeder tackle for this? An ordinary Chinese spinning rod will cope with such a setup no worse.
Nipples (plugs)
Harvesters
Equipment for mounting a feeder rod is also possible using combine methods - several springs with food and hooks on short leashes with foam. These are the so-called “crucian carp killers”. There are many configurations of such equipment, each angler adds something different. More information about this can be found on our website in articles and sections for donors.
crucian carp killer
Installation of equipment: step-by-step process
You can make many different rigs with your own hands: helicopter, clip, inline, sliding, crucian carp killer, Gardner paternoster, which do not require special equipment and are made right at the fishing spot.
Excellent for carp fishing and signals bites with inline equipment. To make such equipment you need to select:
- fishing line 1 meter long;
- a feeder in the form of a cage with a clasp in the form of a weight;
This is a simple and effective design. For installation:
- wind the fishing line onto the reel;
- bend the fishing line in half;
- make a knot at a distance of 0.5 m from the edge;
- attach the sinker to the feeder;
- attach a piece of fishing line for a leash 20-25 m long;
The feeder can be attached in several ways. This is an excellent rig option for muddy bottoms with the bite transferred to the tip of the rod. The leash will not go under the water with the feeder, which will ensure excellent performance of the tackle when fishing.
Hair rig
Without putting bait on the hook. The equipment includes hair, a strong hook, and a soft fishing line of large diameter. When making equipment, the bait is fixed at a distance of 20 cm from the end of the fishing line. Several turns of hair are made with the possibility of lengthening at any time.
Make it a rule, on every fishing trip, the first thing you do is...
Helicopter
Does not have a rigid connection between the sinker and the leash. Well suited for long casts. Depending on the application conditions, you can change the distance between the leader and the load.
For installation:
- tie a piece of fishing line;
- connect the lead core with the sinker;
- put in a ring;
- place two stoppers between the load and the leadcore;
- make a ring and connect it to the leash;
- tie the leash to the ring, then to the leadcore;
Clip
A favorite among carp gear, a safe rig with a tightly attached weight.
For installation you must have a sinker, a swivel, a tube for equipment, a cone, a coupling, a clip, a tube 20 cm long:
- put a clip on the fishing line;
- pass the fishing line through the cone coupling;
- attach the swivel;
- attach to leash;
Inline
Suitable for carp fishing in low currents in lakes and reservoirs for long casts. But the leashes often get tangled, and the sensitivity of the structure may decrease significantly.
Sliding equipment
With free movement along the line. It is quite sensitive and will not cause the tackle to tilt under the weight of the weight and it will not be difficult to make a timely hook.
To install the sliding equipment, you need to select a latch, a sinker, a silicone tube, a buffer sleeve, and a swivel with a ring:
- put the tube on the fishing line;
- connect the leadcore to the swivel;
- pull through the ring and buffer sleeve;
- attach the swivel to the latch and then to the silicone tube;
- mount the weight;
- last of all, connect the hooks to the leash;
carp killer
Reliable equipment; for installation you will need: hooks (3 pieces) No. 6, rubber stopper, weight, swivel and fishing line:
- put a sinker and a swivel on the fishing line with a latch;
- pass the fishing line through all the springs;
- fix;
- tie a weight with a leash;
- install the swivel and latch. At this point the equipment is ready;
Gardner's Paternoster
Does not require additional devices for installation. You can make it right at the fishing spot. The rig will always be above the surface of the water, regardless of whether the feeder is full or empty.
Features of fishing with a float rod
Fishing with a float rod is carried out in cases when spinning rods do not work. This can be in reservoirs that are overly covered with silt or when it is sultry and the carp prefers to be closer to the surface, as well as during the spawning of this fish, when it comes almost to the very shore, especially anticipating a delicious breakfast “under its nose.”
For a good catch, you need to stock up on bait, it should be at least 3-4 kg in dry form or 15 liters of wet mixture. Additionally, maggots or worms can be added to the float rod as bait.
A fishing rod for carp must be strong because, as already mentioned, this is a fairly strong and heavy fish. An unreliable and insufficiently strong rod will easily break under the weight of a large carp or under its pressure and powerful jerks that it produces when it tries to escape. The optimal length of such a fishing rod should be 4-6m, and the thickness of the line should be 0.4 mm. (you can take thinner ones), and it is better to choose forged hooks, No. 5, No. 7.
The float and rod for carp fishing should be neutral tones.
Experienced fishermen know that carp have excellent eyesight, in addition, they distinguish colors, so the fishing line and float should be chosen in a neutral light green or light brown shade. It is also better to choose an inconspicuous, discreet color for the rod itself. The bait should be thrown in as late as possible, preferably closer to the night, but if you catch it early in the morning, in this case there is no need to supplement it. When fishing, you should stay as quiet and careful as possible, at a sufficiently far distance from the water.
To fish out large specimens, you will need a powerful fishing rod equipped with a carp whale with a silicone shock absorber. The entire load will fall on the shock absorber. For soft fishing rods, rubber shock absorbers are suitable, where the rubber is lubricated before each fishing trip for the best glide.
Equipment of a float rod for carp.
The float rod is most preferred by anglers, but its use requires deep knowledge, experience and considerable dexterity, especially at the moment when the carp is hooked. This is where you will need to show real miracles of endurance and self-control, clarity and coherence of actions, because the fisherman will literally have a few seconds to catch the prey before the victim “realizes” what happened to him and begins to take active steps to free himself. This is the skill of a fisherman when catching carp with a float rod.
https://www.youtube.com/watch?v=BmLncp35IQM
Happy fishing!
Where to look for carp for feeder fishing
Carp chooses stagnant bodies of water or bodies of water with a weak current (ponds, river bays, creeks, rates, lakes, reservoirs, slow-flowing rivers). The bottom in such places should be soft (silty, clay), while carp can also be found in areas with a hard, non-rocky bottom. Carp is very fond of water areas densely covered with aquatic vegetation. As a rule, carp lead a school life, and only trophy specimens can keep to themselves.
When coming to a pond, pay attention to the areas where the carp jumps out of the water; in this place it feeds, and the probability of being caught here is quite high.
Promising fishing areas
driftwood
Carp loves places near flooded trees, stumps and snags, especially if the snag is located at the exit from the depths (hole) near the shore. Fishing in such areas is associated with a high degree of risk.
But if you throw the tackle near the snag and constantly monitor the feeder equipment for the carp, avoiding slack in the lines and immediately after the bite, make a hook, then you will not allow him to hide among them during fishing and break off the tackle.
Trees hanging over the water
Particularly promising are places where trees overhang a deep-water and steep bank or pools. Of course, such areas are better suited for floaters, although they will also be quite inconvenient for them. Alternatively, move a little to the side and throw the tackle at an angle or fish this area from the opposite bank.
Island
Often carp stand on the edges near the islands. If distance allows, probe the bottom on the approaches to the island and select a promising fishing point.
Aquatic vegetation
And finally, catching carp on a feeder at the edge of aquatic vegetation. In such areas it is also necessary to keep your eyes open and ensure that the carp on the hook does not go into the algae or reeds.
Studying the topography of the bottom of a reservoir
Of course, most feeder operators try not to catch carp in places that are inconvenient for feeder equipment, preferring long-distance casting.
In this case, we cannot do without a thorough study of the bottom topography. Our task is to find bottom areas with various differences and changes in depth (pit, slope, folds).
To study the bottom, fishermen use a marker float or a weight that is dragged along the bottom. If the weight falls or hangs, this indicates the presence of a hole here; if you feel that the weight is being pulled with resistance, it means that the rise has begun.
Also, with the help of a load, you can determine the type of soil when you feel a slight tension - this indicates the presence of a soft muddy bottom. If the load moves with a noticeable shaking, it means you have landed on a rocky bottom covered with shells. On hard and level ground, the load will move freely and evenly.
Studying the bottom topography is best done using a braided line, since it is more sensitive than monofilament.
Having identified a promising area, we fix the casting distance by applying a mark (about a meter long) to the fishing line with a marker or by throwing an elastic band on the spool in this place. You shouldn’t hook the fishing line to the clip, because in this case you won’t be able to use the clutch or baittrainer, and if you cast too hard, there is a possibility of the gear breaking.
Read more about how to measure the depth in the article Feeder for Beginners .
Loop accessories
Asymmetrical loop
- Create a twist using the previously doubled monofilament thread. Its length should be 15 cm.
- To secure the feeder in the future, insert the swivel and clasp through the long side.
- After measuring the required length of the asymmetrical loop, tighten the knot. The equipment is ready!
Advantages:
- ensures maximum casting, both in still water and in the current;
- such equipment practically minimized the possibility of the leash overlapping the braid;
- high level of sensitivity.
Flaws:
Since this type of feeder rig is knitted from thick monofilament, it will be noticeable to the fish and may scare it away.
Symmetrical loop
- Fold the main monofilament in half and twist it.
- After creating a 5-10 cm twist of varying density, make a knot.
- Place the swivel on one end of the line. It is on this that the feeder will be fixed in the future.
- Make a 20 cm indent from this place.
- Create a node.
- And then twist it back.
- A leash is attached to the last loop, and a hook is attached to its end.
- you can easily create equipment directly while fishing;
- there is no need to use additional elements for installing the feeder;
- the shortest loop 2-3 cm long will turn the feeder into a method structure;
- if you correctly install the equipment, the twist of the outlet will always be directed away from the feeder, minimizing the possibility of entanglement during the casting process;
- even when tangled, the feeder will transfer the bite to the rig’s whip;
- In the case of wrapping the leash around a loop, the feeder must retain its functionality.
- if the feeder is installed incorrectly, sensitivity will be lost and the bite will be inaudible;
- when the feeder catches tightly, it will be necessary to completely replace the equipment;
- If the main monofilament breaks, it will leave the hooked fish “on a leash.”
Equipment is the main component of feeder fishing
There are several types of equipment. Each has its own distinctive features and characteristics. But the general principle of the design of all equipment for feeder fishing is simple: a feeder and a leash with a hook. The significant difference lies in the attachment of the components to the base of the rod.
Paternoster
This type of equipment is the simplest and is well suited for beginners. It is recommended to be used by anglers who decide to start mastering the basics of feeder fishing. The equipment includes two loops. A leash with a hook and a feeder are attached to them. It is recommended to tie a rig exclusively before starting fishing.
The paternoster is considered a universal equipment that can be used on various bodies of water. But it performs best when hunting fish with excessive activity. The peculiarity of this type of equipment is self-hooking of fish.
The loop for the leash is made at the end of the fishing line. After that, the distance from the loop is measured, approximately 20-25 cm, and a second loop is made, into which the feeder with a swivel should go. The feeder is attached using the “loop-to-loop” method. The paternoster is often called Gardner's loop. The principle of both equipment is identical, but there is a significant difference.
Symmetrical loop
This type of equipment is also very simple, has high sensitivity, and its design does not cause any particular difficulties. A symmetrical loop is knitted on the main line. First you need to measure a fishing line 0.5 m long, then fold it in half. Then a small loop is knitted at the end, in the shape of a figure eight knot. The loop will be used for a leash, the length of which is no more than 3 cm. After this, a swivel with a carabiner is placed on the free end. In the process of preparing the equipment, a feeder is attached to the swivel.
When making equipment of the “symmetrical loop” type, one nuance should be taken into account. When using high-mass feeders, it is necessary to place a rubber bead under the swivel, which has shock-absorbing properties. To do this, you need to fold the end on which the swivel is placed with the fishing line, then make a knot. Next, the cormak is fastened to the carabiner, after which the leash is attached to the small loop.
Experienced fishermen recommend that beginners make such equipment from a rigid fishing line separately from the main one in order to avoid twisting when casting.
Asymmetrical loop
This species is used when hunting fish that are not particularly active. First, the fish tries the bait, and only then the tip of the rod receives a bite signal. Take the end of the fishing line to which the swivel is attached. After this, a loop is knitted, the length of which should be 50 cm. Then the feeder is fastened. The resulting structure is raised.
At a distance from the feeder, a smaller loop is made on the resulting loop. It must be knitted using the double knot principle. A leash with a hook is placed on the loop, after which a swivel with a carabiner is attached to the free end to attach it to the main fishing line.
To make this type of equipment, avid fishermen recommend using a stiff fishing line to avoid the leader crossing.
Equipment with anti-twist
Experienced fishermen use this equipment extremely rarely. This species is recommended for beginners in feeder fishing.
A swivel is attached to a 50 cm long fishing line, onto which a bead is attached for better fixation. Then the resulting section is passed into the anti-twist tube. A swivel with a carabiner is attached to the other end, onto which a leash is finally attached.
This type has several significant disadvantages. The anti-twist is unreliable and fragile, and often breaks during use. The second disadvantage is the excessive positioning of the leash in relation to the feeder - it is located too far away.
Equipment with sliding feeder
The device is simple and affordable. It is recommended to use it exclusively when hunting fish that are very active. In addition, the use of such equipment is only possible in still waters.
A loop is knitted on a piece of monofilament, on which a bead is placed. She is followed by a carbine. It is worth considering that for this type of equipment there is a special carbine that can be purchased in the store. Place the second bead behind the carabiner. Finally, we knit a loop. Stiff monofilament should be used.
What is inline equipment
Inline equipment for a feeder is translated from English as “in line”. The translation says that the sinker-feeder is not tightly attached to the fishing line, but easily moves along it between the stoppers.
Other fishermen divide inline rigs and sliding rigs. In their opinion, this division differs according to the type of feeder. Although everything is conditional, because the work of the gear with different types of feeders simply does not differ.
The inline feeder rig is not as common as the Gardner loop. But experienced fishermen successfully use it in various fishing conditions. Beginners should learn how to tie such equipment at home, then all this will be useful on the water when catching fish such as crucian carp, carp, and silver carp.
Inline feeder equipment is now beginning to be in increasing demand among fishermen. There are several modifications of it. Inline installation means that the feeder is not fixed to the fishing line or to the outlet. Stoppers are placed on the main line and it slides between them.
What is it like?
Types of inline equipment:
- the line is pulled through the flat feeder itself, which is very popular and is used for still water when fishing for crucian carp and crucian carp;
- the fishing line is threaded through the ring of the swivel to which the feeder is attached. Universal equipment, suitable for lakes and calm currents;
- the feeder is attached to the outlet, which in turn is attached to the swivel of the main fishing line. Suitable for fast flowing rivers.
The options vary, but the principle is the same: the feeder is not fixed and moves freely along the line, the fish does not feel the tension.
Advantages and disadvantages
Feeder tackle inline:
- quite catchable when spot fishing;
- in the event of a break, the fish will have to free itself only from the hook, and not from the entire tackle;
- inline is used in all reservoirs and at different flow speeds, you just have to select the composition of the feed in the feeder;
- The “Method” feeder is best suited, with a spiral on one side and lead on the other. You can buy one here.
It lies on the bottom with its heavy side, which increases its stability in the current;
inline equipment is self-hooking, because the fish does not hear the tension of the fishing line and, when twitching, is hooked due to the heavy feeder.
Among the shortcomings, it is only necessary to indicate the loss of gear due to a break.
To make the most of all the capabilities of such equipment, you need to perform all the steps sequentially while fishing:
- cast to a pre-designated location;
- Wait for the equipment to be completely submerged; it may take some time;
- place the rod on the stand so that the angle between the rod and the surface of the water is 45 degrees;
- make several turns of the reel to eliminate sagging line, but the load should lie in one place.
Such a set of operations, together with a high-quality fishing rod, will give the angler the opportunity to feel all the delights of inline feeder equipment.
inline equipment for feeder on braided line
Installation of equipment
In this installation method, the outlet is made from a monofilament line with a diameter of 0.3-0.35 mm and a length of 40 cm.
- We put a swivel with a clasp on the main cord, which is wound on a reel, then string a bead.
- We connect the cord and monofilament fishing line using a carrot knot.
- As you remember, the outlet should be 3-5 cm below the feeder, so we fold the fishing line in half, in such a way as to obtain an outlet 10-15 cm long.
- On the edge of the fishing line folded in half, we make a 2 cm long loop using a figure eight knot (we will later tie a habit to this loop).
- Next, in a well-known way, we make a twist, right up to the carrot knot.
- Now we need to fix our twist in order to protect it from untying, for which we knit a double loop, but in such a way that the resulting knot is transferred to the cord.
We snap the feeder onto the clasp and our equipment for the inline feeder is ready.
How to tie a carrot knot
- On a monofilament line we make a simple knot, but do not tighten it.
- We thread the tip of the braided fishing line into our knot.
- Using the threaded end of the braid, we make about 10 turns around the monk.
- Then, we go back, placing new turns on top of the ones already applied and returning the tip of the cord back into the loop;
- In order to properly tighten the knot, we take the monk in one hand, the cord in the other, wet the knot with our mouth and clamp one of the tails with our teeth. Slowly pull the ends of the braid and monk with your hands, tightening the knot.
You can also connect braided fishing line and cord using the Albright knot; more about this in the article on how to knit fishing knots.
On the donk
One of the old proven methods is donka fishing. It is especially often used in carp fishing. It is better to cast to the reeds, to places overgrown with grass, to the exits of pits. You can fish with donka in warm and cold seasons.
The fishing gear is equipped with:
- a rod with a dough of at least 100 grams, 2.7-3.0 meters long;
- a spinning reel with a spool of 3-4 thousand;
- monofilament fishing line 0.3-0.35 millimeters;
- braided cord with a diameter of 0.2-0.25 millimeters when fishing from a boat;
- leashes up to 5 pieces;
- hooks numbered 2-6, having a wide hook;
- streamlined shape with a weight of 40 grams
The sinker is combined with a feeder, which can have different shapes and methods of feeding complementary foods.
Pacifier and its benefits
The main advantage of the feeder is that the carp itself is hooked when it gets onto the hooks. After all, they stick out from the feeder on leashes 5-7 centimeters long. Sucking the viscous mass from the feeder, the fish does not notice the danger - and soon finds itself hooked. The likelihood of ingestion increases as the weight of the sinker increases. The popularity of the pacifier is that you can make it yourself using available material.
Makushatnik and its installation
Carp fishermen value the method of fishing with the macaque because it allows them to catch a large trophy. The classic device is based on a flat load. Leashes with hooks extend from the plate, which lead behind the bait.
As a topping, take a piece of pressed cake. It is secured with an elastic band and a bolt. The turbidity rising from the appetizing top attracts the voracious freshwater “pig”. At the same time, he does not notice leashes with hooks, sucking them in along with nutrient particles floating in the water.
Typically, the installation of a machushka is carried out on a bottom fishing rod, observing a number of requirements:
- The weight of the feeder should not be less than 30 grams. Sometimes the weight reaches 130 grams if caught in the current.
- Hooks on leashes are numbered 8-10. The length of the leashes can be up to 20 centimeters, then self-hooking is guaranteed. But it is more humane to impose short leashes of 8 centimeters. The number of leashes varies from 2 short ones in current to 4 in still water.
- The top of the head is attached to the main fishing line with a monofilament of 0.3-0.4 millimeters. The knitting method is either loop to loop, or through a swivel.
- The test rod is selected depending on the weight of the load. A powerful carp feeder would be ideal.
- You can’t do without a reel with a 3000-6000 class baitrunner.
- The fishing line is suitable with a high breaking load and a diameter of 0.4-0.5 millimeters.
- It is advisable to use a bite alarm.
- Tackle with a macaque is useless where many fry are found. The bait will be eaten by small things.
Spring
The feeder, made in the shape of a spiral from rigid wire, is used by amateurs when fishing for carp. The fish pays attention to the spring filled with a viscous nutrient mass, trying to suck on large pieces of food. This is where hook swallowing occurs.
There are several options for spring feeders. They differ in shape, size, and method of attachment to the fishing line. A “donut” is a spring coiled into a ring with a diameter of 6 centimeters. Leashes with hooks are tied around the circumference. Use gear in reservoirs with muddy bottoms.
A cone-shaped spring is called a "harvester". Leashes are tied to the top of the feeder. Anyone can make such a feeder. Here you don’t have to bother with knitting leashes to the main line. They are connected to the spring.
Overview of species
Leashes for carp come in different varieties. If different materials are taken, for example, when using hair equipment, then a combined block is made with a ring as an adapter. Simple leashes are most often made of fluorocarbon, which is most invisible in river and lake water. All options and types of leashes should be studied before the equipment is installed, then the fishing result will not be a reason for disappointment.
Neutral
According to the degree of buoyancy, all leashes are divided into several categories. The most natural-looking ones are neutral, not prone to sink or float. They occupy a stable position in the water column, so the fish remains calm. Neutral leaders are good for casting tackle into grass and weeds.
Pop-up
This type of carp leash, when immersed in water, is kept at a certain distance from the bottom layer. This is convenient if the fishing area has marshy, muddy soil. In this case, the bait is held above the layer of silt, is clearly visible and attractive to fish.
Drowning
This type of leashes is used with appropriate attachments that lie on the bottom. It is worth noting that they are good for use on flat, dense soil. The material for them is chosen to match the color of the bottom to ensure maximum camouflage. The main disadvantage of sinking leaders is the unnatural movement when moving - it can spook the carp intending to swallow the bait.
Invisible
This is what is usually called fluorocarbon leashes, which are almost invisible in the water. The choice of such material makes it possible to ensure the invisibility of the thread at depth. Monofilament and braided wire do not have such advantages, which reduces their value as a basis for leashes.
Durable
This category includes sections of fishing line that can withstand mechanical abrasion and contact with stones and shell rock. This option is used in cases where the reservoir has a complex bottom topography with significant features or there are thickets that prevent the study of the ground surface.
Hard
This type of leash is used on hard, dense ground. It ensures the fastest self-hooking of fish and makes it possible to avoid tangling of the fishing line during casting. Rigid carp leashes are made from monofilament or fluorocarbon material.
Carp bait
The only bait for the finished tackle is boilies. Some people use pellets or granules with elastic, but this will not be the same.
Boilies have many advantages over other baits:
- size, it immediately cuts off small fish;
- dark color, which is considered the most successful and attractive for large carp;
- variety of tastes, different types are selected for each season;
- different buoyancy, there are sinking, floating and dusting boilies, each of these types will work differently, which will attract more fish.
Advice! It is worth choosing boilies in a store or making them yourself, taking into account the gastronomic preferences of the carp. In the spring and autumn, their composition should include protein, but in the summer, fruit-flavored balls will work better.
A lot can be said regarding size, but each body of water is individual. Of course, you shouldn’t use very small ones, but a large boilie may not always work. It is best to choose a medium size, approximately 8-12 mm in diameter. Lures of this type in Deep get good reviews; they are more flavored.
Installation of gear depending on the feeding habits of carp
The installation of gear is based on the behavior of fish in a particular body of water. Carp are able to feed both from the bottom and in the water column, including from the surface, depending on weather conditions or time of day. The carp angler must know when and under what conditions carp choose the appropriate feeding method. Therefore, the installation option must correspond to the nature of the reservoir, time of year, time of day, etc.
If you choose the wrong installation, then it is unrealistic to expect to catch carp. In addition, carp fishing is fishing that is not designed for one day. Before you start fishing, you need to familiarize yourself with the bottom topography in order to identify promising places and only then start feeding a section of the water area.
Standard option
After the fish has discovered the bait and taken it into its mouth, it tries to move away. At this moment the leash is tightened. Due to the fact that the sinker has significant weight, the carp hooks itself and the hook sticks into its lip. This is the most common mounting option when fishing from the bottom. Under other fishing conditions, it is not possible to ensure self-hooking of fish.