Hair rig for carp fishing is a type of attaching a nozzle to a fishing hook while the hook remains independent. When the bait is in the mouth, the hook follows. Hooking occurs when the carp tries to cough up the bait or moves.
When you try to remove a foreign object from your mouth, the hook digs in even more. This method does not harm the fish and can be easily obtained. Now hair rigs are used in carp fishing.
Carp: description and behavioral characteristics
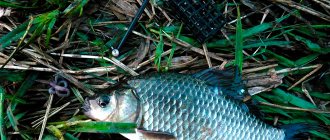
Carp and carp (a wild variety of carp) are one of the desired catches for fisherman. The fish has a strong and stubborn character; even fry can spoil a fisherman’s nerves. Carp can reach a respectable size and is also beautiful. For fishing, carp are finicky and difficult to catch.
It reacts to weather conditions. The carp is also sensitive to the phases of the moon, susceptible to temperature and atmospheric pressure. All these aspects influence the behavior of the carp. In central Russia, carp fishing begins in mid-spring and starts from small reservoirs.
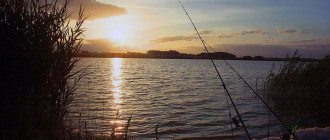
The best water temperature is from 10 to 25 degrees. As a result, optimal fishing is from the beginning to the end of summer. If the temperature outside is high, the carp reacts poorly to it. During this period of time, she hides between the reeds and vegetation of the reservoir. Comes out to feed at night.
Cold weather also negatively affects the behavior of the fish. There is no bite during this period. For the best catch, cloudy and windless days of summer are considered.
Some fishermen prefer to think that walleye fishing improves during the waxing phases of the moon. Fishing during this period is rich in prey during the day and night. With the onset of autumn, the fish begin to bite much less, and in winter it generally stops. In winter they don’t go fishing for carp, but there are exceptions: sometimes you can catch a fish with a regular jig.
Habitats
Carp is found mainly in fresh water. These can be various reservoirs, rivers or lakes. Fish farming in paid ponds has gained popularity.
You can also find carp in salt water, in the place where the reservoir flows into the sea. The fish prefers still waters or those with little current. She prefers to be in deep pits where the bottom is muddy and consists of clay. Algae and reeds should also be a necessary attribute of the reservoir.
The fish are constantly feeding, so for fishing it is necessary to select places where the fish can go out to eat. If there is no such condition, then you can’t count on a catch. According to this principle, when fishing you need to choose the lower reaches of rivers.
To determine the parking spot, you need to watch the spots. Early in the morning or late in the evening you can watch fish jumping out of the water. You should not get used to one place where fish feed. These locations may vary depending on the season.
At the beginning of spring, it is possible to catch carp in shallow water, because such areas heat up faster. When the temperature of the reservoir is comfortable, it is good to choose a place for fishing where spawning takes place. These are mainly reed thickets, small water meadows and various bodies of water.
What kind of gear is this anyway?
Before making hair accessories, you should understand what it is. England became the birthplace of carp fishing gear, and it is the use of hair that is considered the main distinguishing factor of such equipment. In simple terms, hair tackle is any piece of bait separated from the hook and held on a cord or fishing line. This is convenient not only for direct attachment of live bait with a feeder, but also as an alternative for mounting hair equipment together with a wobbler. Why bother planting food in such a sophisticated way? The fact is that when the carp begins to suck in the bait, it can feel the weight of the hook and get scared. To avoid this, jibbers and wobblers are used.
And when using hair rigs on carp:
- The fish begins to swallow live bait or other bait, without noticing a piece of metal glinting to the side.
- Thanks to the connecting cord, the hook also gets to it along with the food, but it clings not in the larynx, but at the lip, which makes it possible to harm the carp to a lesser extent.
- Having sensed a piece of food that is not passing through the tube, the predator begins to actively move and try to remove it, creating vibrations and notifying you of the catch, and the hook itself digs into the tissue more and more strongly.
This type of gear is suitable mainly for hunting donka, which uses feeding tubes. After all, for hunting pike, which feeds by crushing food with its teeth, such a trick will not work, and you will be left without bait.
Everything else here is similar to using other equipment - the more fish you want to catch, the larger the hook you should take. Using regular bait on this fish was always ineffective, because the carp began to spit it out, feeling the weight of the rod and hook, so the British had no choice but to tie the hair rig with their own hands.
What is hair rigging?
The hair rig was developed by fishing enthusiasts. Equipment using hair comes from England. The use of hair is considered a distinctive feature of such equipment.
This is a piece of fishing line or leash material where the bait and bait are located. The hook is placed in a free position; no bait is attached to it. Due to the fact that the hook and the nozzle are on the same straight line, and the connection is made using a leading material.
With this method, the carp cannot feel the weight of the hook. Consequently, the fish swallows the bait, and the hook follows behind. When swallowing this way, the carp is caught directly behind the lip.
Hair rigs provide greater efficiency for fishing for bottom fish. This is a fish that eats using a tube in its mouth. They feed only in this way, and not like other fish with fractional feeding.
If you need to catch a large fish, you need to use a larger hook. When swallowing simple bait on a hook, the carp spits it out. Notching occurs more efficiently when using hair equipment.
Introduction to hair equipment
Hair rig is a branch made of leader material on which the nozzle is placed separately from the open hook. Designed for catching fish that suck food and live in the bottom layer of a reservoir. Hair rigs are also successfully used when catching predatory fish.
The bottom layer contains large specimens of both peaceful and predatory fish. The fittest individuals – smart, cunning, active and cautious – grow to trophy size. It is not easy to deceive and catch such “smart guys”, and hair equipment helps with this.
A rig with a nozzle on the hair, separated from the hook, has a number of advantages over traditional rigging :
- more natural presentation of bait, not loaded with excess weight. The fish calmly sucks in the bait, and the hook that falls after the food is mistaken for a twig that must be spat out;
- increased chance of hooking and self-hooking the lower lip of the fish with minimal harm. When installed correctly, the hook unfolds in the fish’s mouth with the sting down, and when you try to spit out an extra object, the sharp hook pierces the fish’s lower lip;
- ease of installation. Only a short piece of leader material is needed and no additional fishing equipment is required to install the hairline;
- You can use a hard bait , which would otherwise be destroyed when put on the hook. The hard bait retains the smell for a long time, slowly soaks and remains in the water.
- reliable performance of long casts without the fear of dropping the bait from the hook.
Expert opinion
Knipovich Nikolai Mikhailovich
Zoologist, hydrobiologist. I am interested in fishing at a professional level.
Attention! The effectiveness of solid bait in the form of dog and cat food has been experimentally confirmed.
Minor inconveniences associated with the use of hair equipment do not in any way detract from the advantages of its use:
- an open hook catches on obstacles more often;
- There is a higher risk of the hair and the attachment intersecting with other installation elements.
Advantages and disadvantages of hair rigging
When using any hair equipment, there are positive and negative sides.
Advantages
- Easy to produce.
- Possibility to make it yourself.
- When fishing, it helps to achieve maximum catch.
- Available materials.
- To make the equipment, all the substances you need can be bought in the store.
- The equipment is a reliable design.
- Compared to other types, it is in a more advantageous place.
- This type of equipment is safe.
Flaws
- Prone to overlaps.
- If there is a large amount of algae in the reservoir, then the likelihood of snagging increases.
- Not a very big catch if everything is installed incorrectly.
The best carp rigs - carp rigs
Catching trophy specimens differs significantly from standard fishing using a fishing rod or spinning rod. To really achieve a decent result, it is recommended to know the best carp equipment and apply it in practice.
Installations with a feeder
The most popular installation using a feeder is the Gardner loop. This installation is created directly on the main monofilament thread. Particular attention should be paid to the presence of beads, which are used solely to prevent the feeder assembly from breaking.
Moreover, the rocker arm does not have to be purchased at a specialty store; it can easily be made by hand. But in this case there is one condition: it is necessary to prevent the crossing of the leashes in order to avoid their overlap.
Hair rig
In this case, it is not supposed to put bait on the hook. Because the bait will still be in the fish’s mouth after it swallows the bait. Self-cutting is relevant here.
The equipment consists of the following elements:
- a hook with good reliability;
- hair - soft monofilament of small thickness;
- mounting parts.
How to create a hair montage?
- First, you need to fix the bait with hair at a distance of 20 mm from the hook.
- Do not forget that at the final stage it is recommended to make several turns with the hair. This will allow you to lengthen the tackle if necessary. Ready!
Helicopter
This setup is perfect for fishing from a long distance. And even if you spend a lot of effort and patience on its creation, this equipment will justify itself in any case.
Prepare the following materials and tools:
- leadcore and its coupling;
- two rubber beads;
- sinker;
- swivels;
- thermal shrink pipe 40-60 mm long;
- leadcore igloo;
- PVA bag.
How to create a helicopter?
- To begin with, it is recommended to install the sinker on the shock leader.
- When using a needle, a coupling is put on the leadcore and swivel.
- The sinker is connected to a thermal shrink tube.
- The leader is connected to the swivel ring, while the shock leader is connected to the monofilament thread.
- In this case, it is necessary to ensure the free movement of the beads along the monofilament to the formed nodal connection.
- Pour the existing complementary food along with the sinker into a PVA bag. Ready!
Safety clip
This installation option is especially popular among other carp rigs. Since in this case the removal of the sinker is ensured with a dead hook.
To create a “safe clip” you will need the following materials:
- cone-shaped coupling;
- sinker;
- swivel;
- clip;
- cutting room for equipment.
Step-by-step instructions for creating a montage:
- Prepare a tube 300 mm long and insert a monofilament thread into it.
- Pass the end of the monofilament thread through the cone-like sleeve and squeeze it into a tube.
- Mount the swivel and the coupling itself on the clip.
- Connect the swivel to the second end of the monofilament thread.
- Slide the swivel into the clip.
- Already at the final stage, the leash and swivel are connected. Installation is ready!
Sliding equipment
The main distinguishing feature of this installation is the free sliding of the sinker along the main monofilament thread. Plus, in this case, excellent sensitivity of the equipment is ensured.
Moreover, a carp that has already grabbed the bait can calmly swim away, completely unaware of its mass. This will continue until the reel's braking system or swinger stops it, producing self-cutting.
Materials you will need:
- sinker;
- leadcore;
- swivel with a large ring;
- coupling;
- latches.
Step-by-step instructions for creating a sliding rig
- To begin with, it is recommended to thread the main monofilament into a tube.
- Put on the swivel.
- Next, you can begin to put on the buffer coupling and attach the second swivel.
- Carefully attach the latch to the latter. Moreover, after putting on a small piece of silicone tube.
- Having connected the sinker with the latch on the swivel itself, cover the place where they are attached with a silicone tube. Thanks to this, you can replace the sinker in the shortest possible time.
- The swivel that is connected to the sinker can be carefully bitten off with wire cutters.
- Installation is ready!
If the silicone does not completely cover the sinker attachment point, you can carefully cut it off and replace it with a piece of a suitable size. Only then can you start connecting the quick leash below.
Inline
This type of installation is considered one of the simplest, but at the same time effective ways of fishing. It is characterized by the presence of a sliding sinker, which can be easily dismantled and replaced with a feeder.
Basic materials for creating the installation:
- monofilament thread 0.3 mm thick;
- swivel;
- rubber stopper;
- feeder;
- hook with special hair equipment;
- monofilament leash.
In this case, the feeder is supposed to slide along the main monofilament thread thanks to a swivel and a carabiner. Stoppers act as limiters. And a leash is attached to the tip of the main monofilament thread.
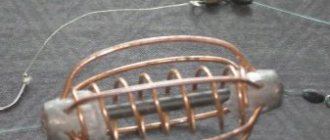
carp killer
This installation is considered a modernized version of the standard feeder load-feeder. Since there is a lot of such gear today, you need to know some nuances that will allow you to protect yourself from low-quality products. If you decide to create your own installation, then get ready to use a huge number of hooks and feeder weights.
What materials will be needed:
- hooks - 2-3 pcs;
- rubber stopper;
- feeder springs - 2-3 pcs;
- monofilament thread or braided thread - 1 m;
- swivel with special latch;
- sinker.
Step-by-step instructions for creating a “carp killer”
- Most fishermen initially recommend choosing springs with tubes already inside. It is through this tube that the main monofilament thread will be passed in the future.
- Each individual spring is additionally secured with rubber stoppers. Moreover, it is necessary to maintain a distance between the rubber bands of approximately 100-150 mm.
- It is recommended to select the correct weight for the fishing rod test. To do this, a weight is tied to the tip of the monofilament.
- A leash with a hook is attached to each individual spring. Moreover, the length of the latter should not exceed 50 mm. This will complicate the process of casting the tackle.
- At the final stage, a swivel with a special latch is attached to the other end of the main monofilament thread.
- "Carp Killer" is ready!
Blind equipment
The main distinguishing feature of this installation is the presence of floating boilies or a regular piece of foam designed to give the bait specific buoyancy.
How to create a blind rig:
- To begin with, it is recommended to connect the hook leader to the swivel.
- The main monofilament thread is inserted into a silicone tube and a clip.
- One of the ends of this tube is connected to the swivel of the leash.
- While the opposite tip is pulled through the swivel to the main monofilament thread or to the shock leader. Installation is ready!
Equipment with anti-twist
It is recommended to use such equipment on a body of water with a strong current. Because in this case the reel is held well and the bite is transmitted perfectly.
Stages of creating equipment with an anti-twist:
- Place the monofilament thread into an anti-twist threader that has stoppers at its ends.
- Fix the swivel located below, and only then the leash with the hook.
- Mount the feeder on the carabiner.
- Moreover, special attention should be paid to the direction of the long end of the fishing line. He should aim towards the leash.
Only this will eliminate the hook from getting tangled in the feeder. Installation is ready!
Necessary materials
Making your own hair accessories is quite easy. This will require certain materials:
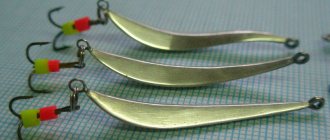
- Leash material . For production, you do not need to take hair from your head, but you need to select soft material so that the bait looks more natural in a pond. A fishing line made of thick material will not work. You need a soft braided line. Previously, the distance between the bend of the hook and the bait should have been no more than 4 cm. But the optimal distance should be 1 cm. It is necessary to focus on ensuring that the bait moves freely.
- Hook . The hook should be as open as possible and provide a reliable and safe hook. The size of the hook should not depend on the size of the fish, but rather depends on the bait used. The best design for the hook would be if the distance between the beginning and end is equal to half the width of the bait. Example: when using a 10mm boilie, the universal cut will be 4-6mm. Such a hook will not rest against the fish’s lips, but will slip into the mouth for the bait. If boilies of different sizes are used, then the calculation must be made based on the larger size.
- Silicone tube. Its use is not required quite often. On a hook with a small shank, the tube is not used because its ability is assigned to a unit made of a leading substance. Use on hooks with a large shank length is mandatory. The tube helps to correctly guide the hook into the oral cavity at the moment of suction of the nozzle. No tubing requirements apply. There are no leaders among manufacturers either. The tube should be flexible and last for many years.
- Glue . A special glue is used for the equipment. It must be moisture resistant.
- Needle for attachments. Using a needle-broach, the bait is placed on the equipment. This is considered one of the simplest ways. The needle is a "loop lifting needle". They used to be sold in craft stores, but now you can probably find them in the fishing department.
- Anti-twist. To ensure that the tackle does not get tangled when it is thrown, during installation it is necessary to use a leash made of elastic material. If you use a braided leash, you need to install an anti-twist. It is a tube made of plastic.
- Scissors.
- Rubber cone or stopper.
- Boyle is a type of bait. To catch cautious fish, it is necessary to use an attractant, but it quickly dissolves in the reservoir, which leads to the frequency of transfers. The best choice is a boilie with a dense structure. These include soy-based baits and decoys. They dissolve over several days.
Installation of hair equipment
Separate leash
Different attachments require different DIY installation. In this regard, it is convenient to use a separate leash secured above the hook using the loop-to-loop method. In the case of using a bunch of maggots, the second loop for bait is not immediately knitted.
With this installation, it is convenient to put on both baits with pulling the loop inside, and putting on the bait in the form of a bunch of maggots with the subsequent formation of a loop.
A separate leader can simply be fixed on the same axis with the hook and the main leader by tying the leader to the shank of the hook with regular thread.
By loosening the mounting loop, it is easy to remove the separate leash and use another one.
Schmidt method
By fixing the leash with the loop for the attachment with a sliding knot on the main leash, you can adjust the distance from the bend of the hook to the loop.
Hair as an extension of the leash
There are many ways to install hair accessories. This does not affect catchability; the choice of method is up to the fisherman.
Knotless installation
- On a piece of the leash, we make a loop for the nozzle on one side, and on the other end of the leash we put on a heat-shrinkable tube of a suitable diameter (the diameter should be such that the eye of the hook fits freely into the tube) or a piece of thin-walled silicone tube.
- Insert the hook into the tube with the eye facing away from the loop.
- We tighten the leash so that the loop knot is below the bend of the hook.
- We lower the tube down the forend.
- We thread the free end of the leash into the eye of the hook.
- We wrap the shank of the hook tightly, turn to turn, together with a piece of the leash with a loop stretched along the shank. It is enough to make 6-8 revolutions.
- Holding the turns with your fingers, make two or three turns in the opposite direction and pull the end of the leash into the eye of the hook.
- Tighten the knot.
- We put the tube on the knot. The silicone tube is placed on the assembly with an interference fit, and the heat-shrinkable tube, after being installed in place, is heated, tightly enveloping the assembly.
Installation is ready. You can do without a straw, but it is considered safer with one.
Expert opinion
Knipovich Nikolai Mikhailovich
Zoologist, hydrobiologist. I am interested in fishing at a professional level.
Important! In addition to the tube covering the knot, you can use short silicone tubes that fix the hair to the shank of the hook to give the required orientation of the nozzle.
Blowback rig mounting
In this option, instead of short silicone tubes that fix the hair with the fore-end, a ring is used that moves freely along the fore-end, which gives the nozzle more degrees of freedom and further reduces the suspiciousness of the fish.
Regular knot
The hook is tied to the leader in the usual traditional way, leaving the end of the leader long enough to form a loop for the bait.
Short tubes or a ring can also be used to secure the hair on the fore-end.
D-rig loop mounting
Mainly used for pop-up nozzles.
The loop formed by a fairly rigid fluorocarbon leader allows the bait to move in different planes, which allows the fish to calmly pull the bait into its mouth from any side.
Knitted from fluorocarbon leader material in several stages:
- A knotless knot is knitted.
- A small ring is put on the hair, the hair is inserted into the eye of the hook, the tip is melted until a ball is formed.
- The other end of the fluorocarbon leader is tied into a loop into which the swivel is threaded.
- We tie a boilie to the ring with a thin fishing line or thread a loop of thin fishing line attached to the ring with a needle through the boilie, thread the stopper into the loop and fix it by pulling the loop.
Rotating circular mounting
The swivel is put on a ring located on the shank of the hook, the hook is connected to the leader through another swivel.
This installation provides the ability to rotate the hook 360 degrees and complete freedom of movement of the nozzle, allowing the fish to approach the nozzle from any side and at any angle and pull it into the mouth.
Clip mounting
To form a voluminous bait that attracts especially large fish, instead of forming a loop at the end of the leash, you can tie a clip. The sharp end of the clip is inserted into the lock, forming an iron loop.
You can place animal, plant, or combined attachments on the clip.
Special tools
CarpZoom and Virux Hair Rigga , are widely used .
They allow you to precisely adjust the length of the leash with a loop.
Their cost in fishing stores is in the range of 600-800 rubles.
Step-by-step process of knitting rigs
We will make a leash without using heat shrink tubing. Some fish only with it, while others, on the contrary, are convinced that it is useless.
Let's consider the option of producing two types of leashes. They are basic and are used both on bottom and floating boilies.
We will use braided material. The production of a leash from wicker material is carried out in a similar way.
- Leash for bottom boilies. We take a certain amount of driving material and remove the braid from the required section. The distance can be from 9 to 14 cm, it depends on the dimensions of the hook. It also plays a role how much distance you want to leave as a free edge. Basically it is 3 cm, but you can do more if you wish. It is necessary for naturalness. In this case, use hook No. 6 and strip 11 cm of braid. It can be easily dismantled when using a tool.
- After dismantling part of the braid, you need to tie a small loop on it using a figure eight knot.
We install a stopper for the boilie in the resulting loop; it will not allow it to slide along the hair. Use a boilie needle to tighten the knot. Tightening must be done tightly, but force should not be used. - It is necessary to cut off a piece of silicone tube.
- We cut the required piece of leader material. We take an increase in size. If you need a piece of 15 cm, measure the distance from the leash, which is in the braid, to the free edge, then cut off 20 cm. An additional piece will be needed to tie a loop, to fasten the leash to the swivel. It is necessary to put the tube on the leash where the braid is located.
- We insert the hook through the silicone tube. We pass the hook through the tube so that it is on the hook. Then we pass the tip of the leash into the eye of the hook, from the outside to the sting.
- We put the boilie on the boilie needle.
- We use a needle to hook a loop on the leash and pull the boilie from the needle onto the hair.
- Using the stopper located in the loop, we fix the boilie.
- We estimate the required hair length. This length depends on the boilie, and there are no optimal options. The hair should not be short, otherwise it will be impossible to make a cut.
- It is possible to change the length of the hair if the serifs are incorrect.
- If the hair distance is selected, then the next step is to tie the hook.
- We check the leash for a notch. To do this, they need to swipe across the palm of their hand. If the leash is made, it’s true, then if the hand is uneven, it will turn over and get caught.
- At the end of the leash you need to tie a knot in the form of a double figure eight. You need to put a shank on top, it will cover the junction of the loop with the swivel.
The leash is ready.
Hair rig for carp
About forty years ago, English naturalists Middleton and Maddox, observing the behavior of carp living in an aquarium, discovered that these fish eat everything except the bait itself. They realized that the hook on the fishing line irritated the carp and scared it away. Middleton attached the bait to the hook not directly, but through his own hair. There was immediate success - the carp clung to the bait, ignoring the rest of the tackle. Then he tried to get rid of the foreign inclusion, as a result of which he himself drove the hook into his lip. Such a hook has proven to be almost harmless to the fish (does not spoil its health) and can be easily removed. No wonder it very soon became a favorite technique of sports catchers. The hook pointing downwards is set whenever the fish moves or tries to spit out the bait.
Installation of hair equipment on carp
The leash should only be elastic to prevent tangling. Chaotic weaving when casting means that you can expect a bite until Chinese Easter. Use, if not a special material, then at least an anti-torsion tube. The overall reliability of hair installation is second in importance. That is, solid materials must be used, and their fastening must be strong. Carp are strong and heavy, so expecting to catch them with flimsy equipment is, at the very least, a naive waste of time and money. Even if he gets a bite, it’s impossible to pull him out - what kind of fishing is this?
As already mentioned, the hook is directed downwards. But since it usually looks up, it should have the ability to quickly turn over. This is the only way to achieve adhesion between the hook blade and the fish lip during the first movement of the prey.
It is important that this hit is not just anywhere, but in the middle of the lower jaw, which is achieved by correct adjustment of the installation
The leader material from the store is quite suitable. There is no particular difference between using a shell leash or monofilament. The banana-shaped hook configuration is recognized by experts as the best.
The tip should be long for a strong hold, but not overly elongated (which can cause unnecessary injury to the fish, which is unacceptable in sport fishing and often leads to separation in normal fishing). You can even sometimes take a shorter forend by equipping it with heat-shrink tubing. The metal must be of high quality, sharpening - the sharper the better. The leader material will take from twenty to twenty-five centimeters, put another ten or fifteen on the shell. We put two millimeters of silicone tube on the cleaned end, insert a hook there (the tube should be opposite the sting). We guide the tip of the leash into the eye of the hook. We pull the boilie stretched over the needle onto the hair and fix it.
Watch a useful video: hair rig for carp fishing
We hope our article on the purpose of installing hair equipment was useful, you will find more different devices for fishing in the Do-It-Yourself Fishing section
Technique for catching carp with a hair rig
Fishing with a hair rig is one of the effective methods for catching carp.
But fishing should take place in a lake or pond where there is no current or it is very quiet. This method is more appropriate to use in the summer.
When using a hair rig, the fish only sees the appetizing food, but does not see the hook. When the fish tries the bait, it does not feel the hook. As soon as the carp swallows the bait in its mouth, the hook follows on its heels. The equipment is designed in such a way that when the leash is pulled, the hook becomes a sting in the downward direction. Thus, it penetrates the victim's lower lip.
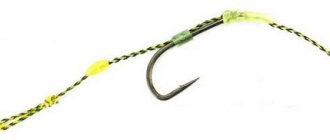
Hair equipment device
The structure of the hair rig is simple and can be easily understood by looking at the drawing. A prerequisite when attaching hair to a hook is that the hair is knitted in two places - to the eye of the hook and to the shank on the reverse side of the hook point. This method of attaching the hook and hair allows the hook to turn over when the leash is pulled with the tip down, which in turn gives a reliable hook to the lower lip of the bream during a bite.
What attachments can be used for hair accessories. Almost all baits known for catching bream are suitable for this fishing method. It could be steamed peas or pearl barley, oat grains. The grains are put on several pieces per hair using a thin needle-hook.
I use the thinnest hook for stitching shoes; they are easy to buy on the market in the appropriate departments. The attachments placed on the hair are prevented from falling off with a piece of a match inserted into the loop. The bait can be a bunch of red worms or maggots, or cubes of unsalted lard. Very good as an attachment are dumplings made from various types of flour on egg yolk, with the addition of various flavors.
samodelkifish.ru