For an inexperienced person who does not understand fishing, it seems that attaching a float to a fishing line is a fairly easy task. But those who are seriously involved in and love fishing know firsthand that in this matter it is imperative to know some features on which successful fishing will depend.
Due to inexperience, beginners are often faced with the question: “How to properly attach a float to a fishing line?” The answer to this question is described in detail in this article.
Float mounting options
Anglers have two options for attaching floats to the fishing line:
- fixed (or voiceless);
- movable (or sliding).
The fixed fastening of the float is based on the fact that the float is connected to the fishing line “tightly”, i.e. it cannot move along it and constantly remain in one place. The movable connection of the float to the fishing line allows it to move freely.
Float Requirements
When fishing, floats perform two main functions. The first is the signal component of a bite, when the device is a visual signal for the angler. The second function is to supply and hold the bait at a certain depth that is promising for fishing. Attaching the float to the fishing line is one of the components of installing equipment for fishing conditions, and for these manipulations a number of requirements are put forward to the device.
First of all, this accessory must have a main body with an antenna mounted in its upper part, and a keel in the lower part. The antenna is located above the water and shows the degree of immersion of the alarm, and is also a guide for determining, by its movements, the actions of the fish when it comes into contact with the bait. The body carries the bulk of the structure, helps it float on the water and withstand external factors, current, wind and waves.
The keel serves to balance the product and the correct location of its body in the water column. The antenna is painted in bright, visible colors, and the main body is painted in colors that are hardly noticeable in the water. Often the device is equipped with special elements that allow you to attach the float to the fishing line.
Basic requirements for attaching a float to a fishing line
Depending on the purpose of fishing for a certain type of fish, you need to know at what depth it swims. If you are going to catch catfish, then the bait should sink when throwing gear to the very bottom of the reservoir.
During spawning, schools of herring can float on the surface, or they can go under the water column without reaching the bottom. Sometimes it is quite difficult to determine at what distance from the bait the float should be.
Fishermen practice two methods of attaching a float: sliding and fixed.
Fishermen put forward the following requirements for attaching a float to a fishing line:
- The float must be able to “travel” along the line to allow the bait to be lowered sufficiently when fishing, or to adjust the length of the lowering.
- It is necessary to fix the float to the fishing line so that it remains in one place while casting fishing gear, hooking, and pulling out fish. This is necessary so that he cannot move during the next cast, and the bait does not end up below or above the location of the fish in the water layers. Sometimes shifting the depth of the bait can greatly affect the intensity of bites.
Materials and tools
To attach the float to the fishing line yourself, you will definitely need to have:
- sharp knife;
- rubber tube;
- insulated wire;
- the float itself;
- fishing line
The float can be attached by following the following step-by-step instructions:
- A float with sharp ends on both sides is attached to the fishing line, threading them into centimeter-long rubber pieces that were previously put on the fishing line. The diameter of the rubber pieces should be such that when attached, they firmly press the fishing line to the ends of the float. This mount freely allows you to change the location of the float on the fishing line.
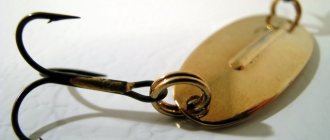
- The float has a metal ring and is attached through it with a loop of fishing line. It must be taken into account that the loop of a thin fishing line can become very tight and create a fixed fixation with the float.
- A float in the form of a goose feather must be inserted into a light tube of such diameter as to clamp the fishing line well.
- Pass the fishing line through a piece of insulation pulled from the wire. Attach a ring of flexible wire to the end of the float. Pass a piece of flexible wire through the ring and twist it so that you get two centimeter ends twisted into a single branching end. Insert these two ends into the insulation tube on the fishing line to fix the movement of the float. The ends of the wire must be blunted with needle files to avoid injury.
Number of points for attaching the float to the fishing line
Successful fishing depends on properly prepared gear. One of the most important factors is the location of the float on the line. The different positions of the float lie in the points at which the float is attached, of which there may be several.
Based on the number of fastenings, fly fishing rod floats are divided into three types:
- Sliding float, with two points of attachment to the fishing line;
- A blind float with two attachment points;
- Float with one fixed point of contact.
The line can be connected to the float by passing through its body, along the surface of the keel and through the tubes on the float.
Two-point mounting
A fixed or blind float mount, which has two attachment points to the fishing line, is used for the following types of float fishing rods:
- flywheel;
- Bolognese;
- trotting match.
The two attachment points of the float are called upper and lower. The lowest point is always on the keel of the float.
Fastening is carried out using cambrics strung on a fishing line, which can be made of PVC or silicone.
It should be noted that silicone cambrics last longer.
It is good to put three cambrics on the keel of the float. Place the first at the base of the keel, the second in the middle and the third at the bottom. This option provides a strong and reliable connection between the float and the fishing line and a spare middle cambric.
The lower one should protrude about 5 cm from the end of the keel.
The top mounting of the float can be done in two ways:
- by passing the fishing line through a passage ring made of stainless steel material;
- by pulling the fishing line into a metal spring mounted on the float antenna.
The conical float can be attached using one elongated cambric. The keel of this float is conical and therefore there is no need for a large number of cambrics. They will not be interchangeable.
How are these two line attachments different? The difference lies in the stability of the float and all fishing equipment. The sensitivity of the float increases when attached to a spring. When the line is pulled too hard, the ring breaks in and you have to insert it on the fly.
The sliding float can be attached to the fishing line in a two-point fashion by passing the fishing line through the rings on the antenna and keel.
Single point mounting
This is one of the ways to blindly attach to a fishing line.
Fishing in still water with a fishing rod allows you to use a single-point float attachment method. The shape of the float in this case resembles an “igloo”, i.e. it is very long with a specially weighted keel.
The method of attaching to one point is the same as for a fly fishing rod. This blind fastening method is widely known to every fisherman when a piece of copper wire and a cambric are used.
A small piece of wire is threaded through the bottom ring of the float and the ends are twisted. And then the twisted ends of the wire are inserted into the cambric, through which the fishing line is threaded.
This method has both advantages and disadvantages. The advantages are the quick, simple attachment of the float to the fishing line, and the easy ability to replace it with another one. A disadvantage may be that the twisted ends of the wire are not firmly secured in the cambric. In such a situation, the float may jump out when casting, especially if it is very heavy.
Installation for different types of fishing
Not so long ago, when talking about a float fishing rod, one immediately imagined a thin wooden twig, to which a rather thin fishing line was attached and at its end a float - a “goose feather”. Today, the range of fishing gear has become much richer; for different types of fishing there is its own device, each of which will be discussed further.
Flywheel
In this case, the fishing line is attached to the end of the rod, and the length of the main fishing line should be equal to the length of the blank itself. This kind of tackle is not designed for a very long distance; the fishing rod can only be cast over a distance equal to twice the length of the rod itself, however, for fishing from a small river this option is ideal; you can fish both from the shore and from a boat.
Plug
It is considered the newest type of all float gear known today. It is a long rod consisting of many legs, the length can sometimes reach 10-15 m.
Using such a fishing rod, the equipment can be delivered to the very point of fishing; to do this, it must be moved along the existing roller guides. Directly in the very last knee, the manufacturer installed an elastic band with great strength, which, when fishing for prey, softens its jerks, thereby making the fisherman’s task easier.
Bolognese tackle
If you add rings to a regular fly fishing rod and equip it with a reel, then it becomes possible to cast bait over longer distances from the shore. And if, in addition to all this, you also use special floats, you can easily get Bolognese tackle.
With its help, among other things, you can catch predatory fish.
Wiring
More and more fishermen today agree that fish notice moving bait more readily, it attracts it more. However, in order to create such a motor environment, you need to use a special device, which is wiring gear.
The rod of this tackle should not be very heavy, because otherwise the fisherman’s hand will get tired and he will not be able to control all the mobility of the aquatic reptile; for the same reason, the length of this part should not exceed 3 m.
The choice of float must be taken extremely seriously: it should immediately signal the fisherman about a bite, and at the same time should not strongly repel the fish that is hooked.
Zhivtsovaya
This fishing rod is often also called the sister of the spinning rod. This is not surprising, because, unlike its counterpart, the live bait fishing rod differs only in that instead of a spinner, in this case the bait is live fish.
The float for such a fishing rod can be made of foam plastic or other similar material; for easier recognition, its upper part is painted in a bright color. Using a thin wire, a swivel carbine is attached to the bottom.
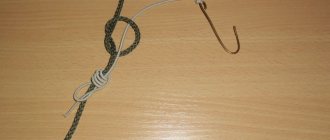
It is with the help of a carbine that the fishing line is connected to the float. To achieve this goal, you need to fold the fishing line in half, then thread it into the lower ring of the swivel, wrap it around and not tighten the loop very tightly. This scheme for attaching the float allows you to easily move it along the fishing line in the desired direction: up or down, or remove it from the tackle completely for more convenient transportation.
The very name of the fishing rod indicates that fishing is carried out with live bait, that is, the bait in this case should not hang easily, it should move, oscillate. Therefore, for these fishing rods you can use only 2 types of hooks:
- Single.
- Double with clasp.
The needle of these hooks is inserted into the mouth of the bait and then withdrawn through the gill cover. Thanks to this fastening, the fish on the hook remains alive and mobile for a long time, thereby attracting a predator.
Match
It is a lightweight float rod equipped with guide rings and a reel. It is intended more for catching fish from long distances, up to 17 m. Using match tackle, a fisherman has a much greater chance of getting a larger catch compared to fly and plug colleagues in the shop.
Equipping with a special reel with a friction brake makes it possible not only to catch fish from long distances, but also to control the strong jerks of predatory species when fishing.
Attaching the float to the Bolognese tackle
The Bolognese fishing rod has a very long rod with many guides, unlike others.
It is used most often when fishing in rivers.
Thanks to a large supply of fishing line, this fishing rod makes it possible to fish at a remote distance.
If you plan to fish at depth, then the float must be used with a sliding mount.
A float with two rings is very suitable for a Bolognese fishing rod.
It will allow the line to pass freely and the bait to reach the desired depth.
Using a silicone stopper, the sliding of the float is controlled.
If the depth at the fishing spot is not very great, then a blind method of fixing the float will be used. It is installed by the fisherman in the desired position, ensuring a good bite.
Why hang a float on a fishing line?
In addition to the obvious purpose of every float - to signal a bite, floats hold the bait at the desired depth or like a beacon, mark places for bait and casting other gear or bait.
Special underwater floats lift the bait above the bottom, and a live bait float keeps the fish at a certain depth.
A good product will not allow the bait to deviate too much from its place even in bad weather. The fisherman should take into account the fishing conditions, since each type of float has its own design, and there are its own methods of equipment, installation and fastening.
What clamps are used to secure the float
To secure the float, many additional materials are used, which should be on hand for every self-respecting fisherman:
- Wire clamp - needed to determine the boundary of the float with a sliding mount (see below). Silicone stopper is a piece of nipple tube through which the fishing line is passed.
- The thread stopper is a factory-installed knot on the tube. The fishing line is threaded into the tube and tied in a knot.
- A cambric is a simple tube made from scrap materials through which a fishing line passes. Can be made of plastic, rubber, or silicone.
- The beads are a rubber stopper whose task is to protect the units from mechanical damage.
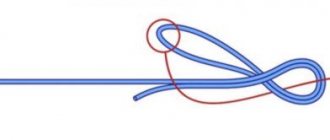
- Stopper knots are stops tied manually from fishing line or cord. They are made either on site, directly on the main fishing line, or at home, tied to the rod of a ballpoint pen, from which they can easily be transferred to the fishing line. To make it you need a wool thread 20 cm or more.
There are three different types:
- "Clinch". The thread is folded in half to create a loop at one end. One end of the loop should be two to three times longer than the other. The resulting loop is placed on the fishing line so that the ends of the loop are parallel to the fishing line. The long end is wrapped around the fishing line and the short end of the loop 5-6 times, then passed into the loop, wetted and tightened.
- "Duncan" (Duncan Loop). A slightly larger loop is applied to the fishing line and made 5-6 turns inside the loop , wetted and tightened.
- "Cremkus". If you need a large unit, then this is the best choice. The threads are folded in half, wrapped around the main line 4-5 times, the ends of the thread are intertwined another 4-5 times, moistened and pulled into a knot.
Varieties of installing floats on the main line
Floats are divided according to the type of fastening into conventional (with a “blind” fastening) and sliding. With a “blind” installation, the float is attached to one point, from which it cannot move without additional force.
Sliding floats can move freely along the fishing line - with it you can adjust the depth exceeding the length of the rod. They are used for long casts, because... the float moves closer to the sinker.
Sliding Mount Installation
To begin with, you should understand that not every float is designed for this method of attachment, so you should choose wisely. Products with a through hole along the entire body, or with a ring on the keel, are best suited here.
To secure the float in this way you need:
- Install the upper travel stop of the product on the fishing line at the point you need.
- Place the float on the fishing line through the hole in the body of the product.
- And finally, under the keel, at the desired point, install the lower travel stop.
The float must move freely along the line, from one stopper to another. And also the size of the stoppers should allow the fishing line to pass freely through the rings of the tackle when casting.
"Blind" fastening scheme
There are several effective methods for securing a float using this method. The product can be firmly attached at two points, or at one point. When installing, it is better to use nipples or silicone casings.
Mounting at one point is used more for fishing in still water. The easiest and fastest way to secure the line in the lower part of the body is to use a nipple, threading the line through the eye.
To secure the float at two points:
- Cut the nipple of the same diameter as the antenna and keel into pieces of 7-10 mm.
- The pieces are strung on a fishing line.
- We insert the antenna and keel into the pieces of the nipple - now the product will be tightly fixed to the fishing line due to the compression force of the nipple.
When threading nipple pieces, pay attention to the design of the float. If it has ears for fixing in the body, then you need to string the cambric sections in the order of the fastening points.
First of all, you need to thread the fishing line into a piece of cambric for the antenna, then you can thread it into the eye. Only after this we fix the keel using a cambric.
Float mounts with bottom eye
If the float has an eye for fixation, then fastening with a nipple is only necessary on the keel. If there is no eye on the float, then one piece of cambric should be put on the antenna, and two more pieces should be used to fix the keel.
With a ring at the top
There are several installation methods in this case:
- The fishing line should be threaded through the ring and secured on both sides with stoppers.
- If your ring is larger than your stoppers, you can attach a small carabiner with a swivel to it. Then pass the fishing line through the ring of the spinner.
- You can insert a metal bracket into the ring with the ends in pieces of cambric that are already attached to the fishing line.
- Or insert a wire into the ring and twist it. Then place the wire in a silicone tube, which is put on the fishing line.
Attach a float without a ring to the fishing line
If the float does not have a fastening ring, then you need to take two cambrics of the diameter you need, pass them through the fishing line, and put them on the two ends of the float - on the keel and on the antenna. In this case, the float can be easily replaced without disassembling the tackle. The disadvantage of this approach is that if the float gets caught on grass or reeds, it is easy to lose it.
With the line passing inside the float
This is a special type of float that is used for deep fishing. During installation, the fishing line is inserted into a tube that runs along the entire body of the float to the antenna. Then the keel is put on and secured with cambric.
Methods of attaching a float for different types of fishing
Fly fishing rod
The simplest and most common type of fishing gear. The fishing line is attached to the end of the rod, and the length of the main fishing line should be equal to the length of the blank. The float is attached in two places: a fishing line should be inserted into the ring on the body of the float, a cambric should be put on the fishing line, and the keel of the float is inserted into the cambric at the bottom.
Plug
The newest type of float tackle is a rod made of several legs up to 15 meters long. Installing a float is no different from a fly rod.
Bolognese fishing rod
It differs from a simple flywheel by the presence of rings, a coil and special floats. Fastenings in three places: at the top of the float or through a ring in the body and two cambrics at the bottom.
Fishing rod "In line"
Wiring tackle is specially designed to create moving bait and thereby attract fish. The float must be chosen wisely: it should immediately signal the fisherman about a bite, but at the same time it should not scare away the fish. Fixation at two points: the bottom of the keel and the mast.
Float live bait tackle
The peculiarity is that the bait is live fish. A swivel carabiner should be attached to the bottom of the float with a thin wire. Using this carabiner, the fishing line can be connected to the float.
To do this, you need to fold the fishing line in half, thread it through the lower ring of the swivel, wrap it around and tighten the loop.
If you have secured the float correctly, you can easily move it along the line, or remove it from the tackle altogether.
Match fishing rod
Lightweight float rod with rings and reel. This fishing rod is used to catch fish from long distances. The float is attached at one point, through a ring. Depending on the depth, you can choose either a blind type of fastening or a sliding one.
Float winter fishing rod
The float should be quite noticeable and sensitive in order to immediately signal a bite. A float for winter fishing should be loaded a little more than usual so that it can go under the water's edge, otherwise it may freeze in the cold. A blind fastening method is used with a stopper - an antenna, and the fishing line is passed through the body. Or the float is attached at one point to a ring or keel.
Tackle with underwater float
Unlike other floats that signal a bite, the underwater analogue ensures the mobility of bait or live bait. The fastening method is blind: the fishing line passes inside the body and is fixed with two rubber stoppers.
Fastening the floats “tightly”
The most popular among fishermen for use as fishing gear is the choice of float rods. Thanks to ease of use, adjustment of the float and the depth of lowering the bait, a float fishing rod allows many fishermen to get away from “zero”. The correct selection of fishing equipment plays a big role for success in this matter.
Fastening the float “tightly” plays a particularly important role when fishing quickly. At the moment when a school of fish swims to the location of your bait, it is very important that it drops to the same depth with frequent casts.
Schools of fish constantly move from the shore to the middle of the river. Fish can swim both on the surface and in the water column. A float attached “tightly” during such fishing is a very important point on which the success of the entire fishing depends.
The fisherman controls the required depth of placement of the equipment by firmly attaching the float to the fishing line.
Blind fastening methods
Solid fastening methods, as we have already mentioned, are used mainly for reservoirs where there is no water flow.
There are only two methods of blind fastening. We have already described one in the method of attaching a float at one point.
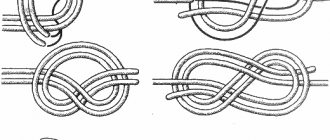
The second, two-point fastening method involves using another cambric and thicker wire.
First, the cambrics are strung on a fishing line. Then a loop in the form of “Ω” is made from the wire, and a float is put on it.
The ends of the loop, with the float on it, are inserted into the cambrics on the fishing line.
This method allows you to quickly remove and change the float.
To prevent the float from running around, three turns of fishing line are made around the loop.
The simplicity of such blind fastenings, which do not require any additional equipment, allows the fisherman to carry them out anywhere.
Blind mounts are used most often on fly rods.
Blind installation method
As a rule, the choice of float mount depends on the depth of the fishing spot. Let's consider the most common - blind installation.
The blind method is the simplest way to mount a float. It is performed using ordinary cambrics, which must be selected according to the size of the keel. It is best to use silicone cambrics. The following condition must be met: the line must pass inside the float with little effort.
When using the blind installation method, the float itself will not move along the fishing line. But at the same time, adjusting the depth is easy.
There are two types of blind fasteners:
- at one point;
- at two points.
Fastening at one point is used for fishing in still water: ponds, reservoirs. When choosing such a mount, the float will not cling. The attachment point is at the bottom.
Single point mounting
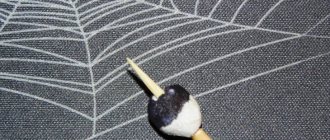
How to tie a float to a fishing line at one point? You will need a cambric and a small piece of wire. Insert the wire into the lower float ring. Twist both ends of it and insert it into a cambric in which either fishing line or monofilament is installed.
Fastening at two points is used in strong currents, for fishing “in the wire”.
A float bite alarm attached in this way is more reliable in operation. It maintains its position not only at the time of casting, but also during splashdown and playing with bait. Important! For this kind of fishing, a line that is softer is best suited than for fishing in still water.
Two-point fastening
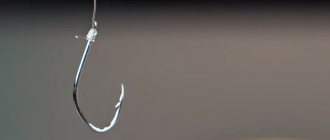
How to fix the float at two points? To do this, pass the fishing line from top to bottom through the float ring. Secure with two cambrics. The first cambric (about 5 mm long) is installed near the body of the float element, while retreating 10 mm. Place the second cambric (length 15 mm) on the tip of the keel. At the same time, leave part of the cambric free. This is necessary so that the fishing line does not get caught behind the keel when fishing.
Photo 1. Using cambrics for fastening.
Sliding mount
In cases where the depth of the fishing spot reaches the length of the rod, the use of blind float equipment is impossible. The use of sliding floats is more acceptable in these places. The sliding rig depends on the rod length of the fishing rod.
The sliding mount allows the bait to move freely to any depth, especially during long casts. The movement of the fishing line is stopped only by the presence of stupors at the top and bottom. When casting, the float is located at the lower stop, and then moves to the upper one as the sinker with bait sinks.
You don’t have to set the lower stop position, but there is a high probability that when casting, the float will hit the sinker and knock it down.
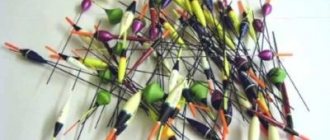
Types of sliding floats
Typically, the shape of sliding floats resembles an inverted drop. There are many types of sliding floats.
We will look at some of their types:
- “Calm” is a long float tapering towards the keel. Very sensitive. It can be used at a depth of up to 3 m in calm weather.
- "Grace" - similar to "Calm", but with a larger diameter. Less sensitive than the previous float. Used on waves and reacts to a bite while the bait is diving. Recommended for beginners.
- “Maestro” has a shape like a truncated cone. Greater stability and maneuverability compared to the previous two. Sensitivity is low. Used in places where the depth is no more than 1.5 m.
- It is recommended to use “favorite”, “channel” and “consul” floats in fast currents. They are not suitable for calm conditions due to their low sensitivity.
Attaching a float for long casting on a fishing line
Often when going fishing, fishing enthusiasts adjust their fishing rods in advance to the depth of the reservoir known to them. But there are times when gear needs to be prepared in a new unknown place.
A sliding float is a very good option for long casting to a depth of up to six meters. But with a shallow reservoir of up to 3 meters, it would be better to use a blind mount.
The universal weight of the float for long casting is 12 g. You can use the methods described above for attaching the floats.