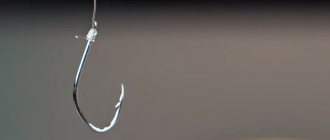
How to tie a loop on a fishing line
5 minutes Author: Irina Chernikova 11966
Throughout their lives, absolutely all people encounter one type of knot or another. And in fishing practice, the ability to make knots and loops is simply necessary. The inability to assemble equipment correctly can become a serious problem for a novice fisherman, because even such a small thing as the correct loop on the fishing line sometimes “makes” the whole fishing trip.
Before you begin to study the art of knitting loops, you should first understand in which fishing designs these elements are found. It’s worth noting right away that when starting to study the art of fishing, you should forget about the skills of tying fasteners that you used in everyday life.
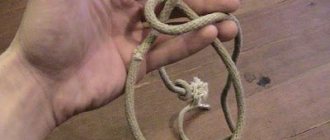
Tying a loop on a fishing line with a figure eight
The figure-eight knot is often used in fishing, as it is quite simple to perform and it ties the fishing line very tightly.
How to make a figure eight loop on a fishing line? To do this you need to follow the following instructions:
1. The fishing line needs to be folded in half and a medium-sized working loop should be made.
2. Thread a crochet hook into it and catch a small loop with it.
3. Thread it through the larger one and remove the hook.
4. After this, make another loop with a crochet hook (according to points 2 and 3).
5. Tighten the moistened fishing line tightly, and the figure-of-eight loop is ready.
Float fishing
It is not uncommon among floaters to become interested in fishing in tandem using different baits. To do this, the float is equipped with several hooks on a single main thread. There are two options for attaching an additional hook: it is fixed on the main fishing line, clamping it at the top and bottom with locking knots, or a leash with a hook is attached to a loop on the main fishing line. The latter option is considered more convenient, since in this case the second leash can be removed at any time if the angler decides to change fishing tactics. A loop is also made directly at the end of the leash itself, or the fishing line is simply tied to the loop.
Spinning
Non-tightening loops and an indispensable attribute of spinning fishing. Here rings of thread are used on leashes and for attaching them to the main line. If a fisherman uses special metal leashes, then most often he also attaches them through a loop to the main fishing line. To secure baits (wobblers, spinners), spinners knit self-tightening thread rings, better known as a “Clinch knot.”
Spinning fishing, which uses a retractable bait, also involves the use of loops. They can be replaced with swivels, but many use the old-fashioned connection through loops: one is made on the main line, the second on the end of the lead.
Most used
In fishing practice, non-tightening loops are mainly used. There are several ways to knit them and you will need to choose which one is suitable for this or that fishing line, especially you need to pay attention to knitting braid.
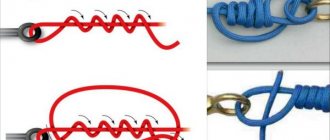
Perfect Loop - used for attaching leashes; such a knot can be tied even on a thin fishing line and it will not slip. Watch the video on how to tie it:
Dropper Loop is a good loop for various installations, in particular, it can be used to change baits. This knot is suitable for both braid and monofilament. If desired, the loop can be made in different sizes: larger or smaller. How to make it and tie it, watch the video:
Surgical (surgeon loop) - for a monofilament line it will be enough to make 2 turns, for a braided line 3-4 turns so that the knot is strong and does not slip.
In the video you can see how a surgical loop is tied on the main fishing line:
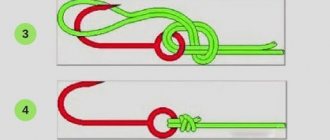
Figure Eight - you can place several hooks on the main line and for this you need to tie small loops. Not everyone can do fine work with their fingers, so you can use a crochet hook to pull out the fishing line. If you use such a loop to attach a leash, you must remember that although the figure-eight knot is very simple, it reduces the tensile strength of the fishing line. It is recommended to use it if the fishing line has sufficient strength. It is not suitable for fluoroarbon; it is better to knit with monofilament or braid.
Watch the video on how to do the Figure Eight:
These, of course, are not all the options, there are more of them, but there is no particular point in listing them all, because, as practice shows, the fisherman uses only a few knots, the ones he is used to.
How to knit loops?
In order to make a loop on the fishing line, you can use a special device - a looper. This is a hook with which you can make a simple loop for a leash in a few steps.
Without the use of special tools, a simple loop on a fishing line is made as follows:
- The fishing line is folded into two threads.
- The place of the bend in a particular case will be the end of the fishing line.
- We wind the double fishing line around our fingers and thread the free end into the resulting ring.
- Tighten and align.
An ordinary loop can also be knitted in another way. The fishing line is also split in half, the free double end with a bend is the working end. They need to make several turns around the main line and pass into a temporary ring. Before tightening, the diameter of such a loop can be adjusted.
The self-tightening loop requires special attention. It is created on the main line, and with its help you can quickly tie a lead or tandem leash. The tying scheme is as follows: a “ring” is formed on the main line. Then the fishing line is taken above the ring and passed into the loop in a loop. Then it slides along the main line and tightens spontaneously. Such a tightening loop is also called a sliding loop, or a noose. It is used not only in fishing practice, but also in everyday situations.
Remember that before tying a loop on the fishing line, you should prepare a small amount of liquid. Before tightening, any loop should be slightly moistened.
Features of tying loops
It is also important to note that, depending on the place where the fishing line will be tied and its type, you should pay attention to a number of points in order to avoid any mistakes during the tying process.
At the end of the line
Of course, a large number of fishermen have faced the question: “How to tie a loop at the end of a fishing line?” In order to make a high-quality loop in this place, you should use the surgical option, which is very durable.
It is quite easy to tie, use the following sequence of actions:
As you may have noticed, there are no particular difficulties in the knitting process. Just be careful and follow the steps outlined.
On the main line
A loop on the main line is required in order to attach a leash to it. Before starting to carry it out, the angler determines the length of the leash depending on the fish he wants to catch (for example, for bream they make longer leashes from 0.5 -1 m).
The required length is marked with a triple knot, only after this the leash is attached to the fishing line:
- in the place where the knot will be, another double one is made, which does not need to be tightened to the end, because an eight should appear;
- the end of the leash is passed into it from the first ring to the other;
- after this the figure eight is tightened.
The result is a great loop on the main line.
On fluorocarbon line
In order to make a strong knot on this type of fishing line, it is necessary to tie it in a special way. You need to do this as follows:
- Fold the ends of the fishing line in half (the double end should be at least 14 centimeters).
- Insert the tip into the ear.
- Fold the end that you threaded into the eye toward the fishing line.
- Then wet the line and tighten it well.
Now you have a strong and good loop that will not let you down when fishing.
In conclusion, I would like to note that many novice fishermen do not know how to tie good and strong knots, as a result of which fishing may be unsuccessful. However, thanks to the above-described methods of tying knots, you can independently and without any difficulties make a loop on the fishing line that will serve you for a long time.
Loop-to-loop leash attachment.
In order to make a loop on the fishing line, you can use a special device - a looper. This is a hook with which you can make a simple loop for a leash in a few steps.
Overview of the 'helicopter' feeder equipment
Without the use of special tools, a simple loop on a fishing line is made as follows:
- The fishing line is folded into two threads.
- The place of the bend in a particular case will be the end of the fishing line.
- We wind the double fishing line around our fingers and thread the free end into the resulting ring.
- Tighten and align.
An ordinary loop can also be knitted in another way. The fishing line is also split in half, the free double end with a bend is the working end. They need to make several turns around the main line and pass into a temporary ring. Before tightening, the diameter of such a loop can be adjusted.
The principle is the same as the “eight”
Remember that before tying a loop on the fishing line, you should prepare a small amount of liquid. Before tightening, any loop should be slightly moistened.
This is the so-called surgical loop . How to do:
Feeder "thing"
The Gardner loop is the know-how of feederists. This is not just a fixation option, but the name of one of the types of feeder installation itself. This is a rather complex knitting technique, several types of loops are used in it:
- First you need to make a loop at the end of the fishing line. To do this, you can use any of the instructions described above for tying a blind loop.
- Then step back 10-12 centimeters from the end loop and make a large diameter loop to which the feeder will be fixed.
The best loop
According to many fishermen, the loop connected with the figure eight is the strongest. To do this, you need to grab the fishing line with your fingers in the place where the equipment will be, and pull the large ring to the side, twisting it in the form of a figure eight. Then the upper crown of the figure eight must be bent and passed into the lower loop through the bottom, as shown in the picture. After this, the loop can be tightened. It is very durable and immovable.
Tying loops and various knots is an integral part of fishing. It is best to prepare the tackle at home, and tie all the fastening elements on the fishing line at home, without fuss. Storing finished leashes is easy using special containers that you can make yourself or buy in a special store. Boxes for leashes are equipped with fastening mechanisms on both sides, which allows you to always keep the finished equipment elements straightened.
Description of the sliding knot and its purpose
The slip knot is quite simple to make and is a self-tightening loop that is formed by a simple connection tied around the root end of the rope. Because the root end is free to move within the simple, the slip is used to tie rope around objects, another rope, support, or tie objects together and then wrap the root end around it.
Under load, the sliding assembly covers the object, held by the force of its friction. When you relax your efforts, it easily unravels.
Connections of this type are used for:
- Creating additional thickness from regular rope, which allows you to increase the strength of the connection.
- Attachments to rings and lugs.
- Tying around the support.
- Tying and transporting things.
- Easily and quickly lift heavy loads.
- Tying several ropes without problems with connection strength.
- Forming a separate loop on the rope.
- To be on the safe side.
Advantages and disadvantages of the node
The slip knot or noose is well known to sailors and fishermen. Its main advantage is that such a loop is easy to loosen and untie after use. However, it can crawl under variable loads or on slippery cables, which are among its disadvantages.
There are several types of this design:
- Direct (simple)
, which is the most durable type of connection. When wet, it only becomes stronger, which is its main advantage. Among the disadvantages are the need to control the correct tying (position of the free ends, correct overlap), as well as the need to tie two control knots or one double knot on the lace, which requires a lot of rope consumption. - Flat
– designed for connecting ropes and other durable materials. It is also a fairly reliable type of connecting several laces or leashes to each other. - Rybatsky
combines several elements.
This is interesting: Palomar knot: how to knit, diagram and explanation
Node diagram
To tie the simplest slip knot, follow the diagram below:
- Prepare ropes whose strength depends on the purpose of use.
- The rope (rope, cord) is folded in half so that one end is long and the other remains short.
- Form a small loop at the short end of the rope.
- The long end of the leash is completely threaded through the resulting loop.
- The size of the loop is adjusted by relaxing the connection.
- The noose is tightened by pulling the end of the rope.
Figure 1. Traditional connection diagram
By the way, this type of connection is often used in crocheting, when it is necessary to temporarily connect several elements (Figure 1).
Application area
The slip knot is widely used in everyday life. For example, for lifting various weights, transporting things tied together, when making jewelry, catching animals, in fishing and during tourist recreation.
It is widely used as a rescue vehicle, as well as for belaying and lifting people and equipment. The sliding type is widely used on small sailing ships and in theatre, surgery and construction. In addition, this type of connection has found wide application in the most unexpected areas: in crochet, macrame and even in the construction of sliding structures for gartering cucumbers.
How to make a strong loop on a fishing line
In ordinary life, a person can use a huge number of different knots, but only a few of them will be useful to him when fishing. It is quite natural that every fisherman who wants to get a rich catch tries to learn how to tie a loop on a fishing line and learn at least several ways of tying knots; the success of fishing often depends on this. In fact, coping with this task is not as difficult as it seems at first glance. Anyone can learn this with a minimum of effort.
Making a sliding loop
A sliding loop, as one of the connection options under the same name, is necessary for people of many professions. Thus, slingers and climbers use a set of loops on a rope for insurance, fishermen and hunters - for fastening hunting and fishing equipment and gear, for floats and baits, doctors - during surgical operations, handicraftsmen and jewelers - for making all kinds of jewelry, rescuers - for saving human lives.
And in everyday life we simply cannot do without this simple and reliable method of fastening - when lifting weights, carrying things, tying objects, etc. That is why it would not be superfluous to study the theory of how to make such a design and learn how to tie a sliding loop (Figure 6).
Figure 6. Sliding loop knitting options
Here is one simple method that includes the following sequence of actions to help you learn how to knit such a loop:
- A simple knot is made at one end of the rope, which is not tightened;
- Next, a loop is formed;
- The free edge of the rope is passed upward through the turns;
- The knot is pulled up while holding the bottom of the loop.
How to tie knots on fishing line
reliability is primarily important , since it is this that will determine how strong and durable the final structure will be. It’s impossible to make a truly reliable knot without proper practice, so most novice fishermen first practice tying knots at home, and only then go fishing. Therefore, you should not be upset if the loop does not work out the first time - persistent training will help you get better at making the knots reliable and correct.
When tying knots, it is better to take more - otherwise the design is unlikely to be of high quality. In addition, you should not limit yourself to studying one or two tying methods, since when catching a variety of fish in different conditions, different tying methods can be useful. Therefore, experienced fishermen understand a huge number of knots, using the most suitable one for a particular situation.
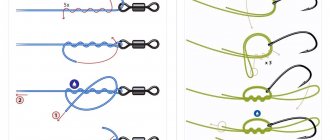
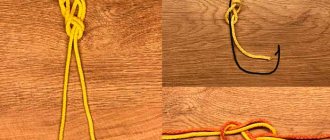
Figure Eight (Flemish Knot)
The figure eight method, otherwise called the Flemish knot, is performed with a regular crochet hook, and even a novice fisherman can easily handle it. Tie it as follows:
- A loop is made on a double fishing line (the working loop should be small).
- A hook is threaded through the large loop from below, which hooks onto the smaller one.
- The small loop is pulled through the large one and removed from the hook.
- The second and third points are repeated again.
The result of correctly carried out manipulations is a figure eight, which should be moistened and tightened tightly. If the structure is not moistened before tightening, there is a high probability that it will quickly fray and rupture.
Counter eight
As mentioned earlier, the figure eight is considered quite easy to perform, and at the same time a very reliable knot. However, experienced fishermen prefer to knit not the usual, but the so-called counter eight. To perform this knot, you will first need to tie an ordinary figure eight in the manner described above. Then you should do the same procedure with the other end of the fishing line, and tie the knots together (for this, the basic technology of knitting loops is used).
You should know that neither the Flemish knot nor the counter-eight are suitable for fluorocarbon fishing line .
Loop in loop
This method, otherwise called the perfect loop , is the most standard and common among fishermen. To make such a knot, you need to tie two loops: the first is made on the leading line, and the second on the main line. The construction of the first of them usually does not cause difficulties even for inexperienced fishermen, but to perform the second correctly, you will have to practice a little.
Slipknot. How to tie a slip knot? Knots for fishing line
Basic sliding knots and loops
The main sliding types include the following knots:
| A simple runner. This is one of the simplest ways to make a tightening loop. Knits on any part of the rope. | |
| Running Eight. Quite a reliable, strong option. It tightens evenly when force is applied to the root part of the cable. | |
| Running Bowline. It works reliably, according to the lasso principle. | |
| Scaffold knot or Lynch loop. | Selection of main line, leader and hooks |
| Silk loop. |
Using basic tying skills, you can easily move on to creating more complex knot and loop designs.
What to knit from
As for the material, ordinary fishing line is not the best choice here. Firstly, the friction force in this case will be minimal. This will cause the unit to move easily and no longer lock. And secondly, the line is quite transparent, and we need the upper limit of the float to be constantly visible.
Most often, a slip knot is knitted from a piece of backing cord for fly fishing, braided fishing line or regular thick thread (preferably wool). The last option is preferable, since it does not require any costs and works most effectively.
Slip knot for bracelet
When making a bracelet, you need to make a device that will record the length of the product. A sliding fastening instead of a fastener can help you increase or decrease the size.
Making it yourself is quite simple:
| Take the required length of cord. The desired decoration is put on. The end is folded into a loop. |
| The second part of the rope is attached. The first tip is wrapped around the loop and the second end. Several full revolutions are made. |
| The remaining tip is inserted into the loop from the wrong side. The resulting knot is tightened. |
| To adjust the length, you can use two knots. They are knitted on each side of the cord. |
Float stops
Various devices can be used as a stopper, such as rubber or silicone beads placed on the main fishing line. They are freely sold in fishing stores and markets, and they cost pennies.
But still, the most popular and widespread means of fixing a float remains the sliding knot, invented by savvy fishermen. Tying it, knowing at least one of the methods, is not difficult. Moreover, this can be done even at the fishing spot, having a piece of fishing line or even ordinary sewing thread on hand.
If you don’t want to knit a locking knot for a sliding float yourself, you can buy one. Yes, yes, fishing stores today even sell knots. Usually they are tied to a special tube, and the fisherman can only remove the knot, put it on the fishing line and tighten it.
But we will not be like lazy and inept fishermen, but will practice how to knit such knots ourselves.
Sliding fishing knots
Anglers use the technique of knitting slip knots to tie the two ends of a fishing line, secure the material to the reel spool, tie a weight (top), hook (bait), and leader.
Important features of winter jig fishing
Another common use for them is to create stoppers for sliding equipment.
There are a large number of different knitting techniques. The most famous and popular are:
- "clinch";
- "grinner";
- "carrot";
- "stepped";
- "grabbing";
- "eight".
Applying knowledge of these techniques will help when tying more complex knot configurations.
Why do you need a sliding float?
A sliding float is used mainly for fishing from the bottom, as well as at a long distance from the angler. Its difference from a conventional bite indicator is that it is not “tightly” attached to the main line, but with the ability to move freely along it within a certain range set by the fisherman.
When casting, such a float is in close proximity to the load, which allows you to “throw” the tackle over the greatest possible distance.
Once in the water, the weight with the hook is lowered to the bottom, and the bite indicator slides up the line until it is stopped by a locking sliding knot or other similar device.
At the same moment, under the influence of two forces, one of which pushes the float to the surface, and the other pulls it to the bottom, it will freeze and stand vertically.
Such a float does not lose its sensitivity at all, but, on the contrary, reacts to any vibration of the equipment.
How to make a sliding loop?
A person, in the course of his life, uses a diverse set of various knots and loops. Some of the most popular fasteners are simple sliding devices and various variations based on them.
There are many ways and options for knitting such designs. Sliding loops are used by sailors, they are necessary for slingers, climbers, they have found their application among fishermen and hunters, and are indispensable in handicrafts, medicine, and everyday life. These are convenient and very reliable devices. There are several of the simplest ways to tie a sliding loop:
| A simple knot is made at the end of the rope, not tightened. A loop is formed. The free edge is passed through the turns of the knot. The knot is pulled up, holding the bottom of the loop. |
In the second option there is a blind sliding loop:
This type of tying is very popular among fishermen.
How to properly tie a leash to the main line
Adjustable knot for bracelet. Slip knot: how to tie, step-by-step diagram
The easiest way to assemble a bracelet is to assemble it with an elastic band. Use a strong and reliable thread for this. If the thread is thin and stretches too much (and if you're just worried about it fraying), fold it several times. Usually two or three layers of thin thread easily fit into the hole of the beads.
For bracelets with an elastic band it is better NOT to use
heavy beads (large, made of glass or natural gems). For obvious reasons, beads with sharp edges of holes are also not suitable. For such bracelets, it is better to take a jewelry cable. No knots are tied on it, but working with it has its own specifics. Read a detailed master class on how to make bracelets on a jewelry cable
.
Let's return to elastic bracelets. Preferences in choosing beads have already been discussed. Now about the elastic band. I use a thick silicone thread 1.2 mm thick (code in our catalog 351-011). It is soft, so you will need another needle.
If your thread is thinner, use several plies of it. We select any suitable beads and decorative elements. I have metal cast caps and crystal translucent beads.
More polymer clay beads made using the mokume-gane technique.
I string beads onto a thread. To make it easier to thread the needle into the eye, I melt the edge of the thread a little; when melted, no solid drop remains on this thread, but the fibers become more ordered.
I tie the ends of the thread in a knot, the bracelet is ready. Read more about nodes below.
How to tie stopper knots
Material for making locking units:
- monofilament line;
- wool thread.
- The purpose of the stopper assembly is to set the bait or equipment elements to the required depth.
- Area of application : float fishing using a sliding float when fishing over long distances.
- Requirements for a sliding float stopper:
- must determine the required depth of descent of the float for fishing, and securely fixing it on the fishing line;
- the fastening of the locking unit must be movable, but without independent movement;
- the knot must pass freely through the gear rings;
- should not deform the main fishing line.
Stopping units are prepared immediately before the fishing process on site. Before you start tying a knot, you need to first moisten the fishing line (with water or saliva) so that it does not heat up during the process and thereby weaken the knot itself.
A detailed article about monofilament fishing line, its characteristics, features, and advantages is here
- “Single knot” For knitting you will need a 15 or 20 centimeter piece of monofilament (wool thread)
- Node linking scheme
- Knot “Double” or “kremkus” For this knot design, you need to fold the fishing line in half
- Knot “Stop Clinch” or “clinch knot”
- Knot “Bud” or “button knot” In order to learn how to correctly knit this type of locking knot, we suggest watching this video
Important! The diameter of the monofilament line should be slightly larger than or equal to the diameter of the main line.
Advice:
- In order not to waste precious time on tying knots when fishing, you can prepare several stoppers in advance by taking a plastic tube (for example, a cocktail tube) no more than 10 cm, put it on the main fishing line and tie several of your favorite stoppers onto the tube. Then pull the tube and tighten the knots on the fishing line.
- It is better to knit two knots at once, one of which is well tightened, this will help fix each other when landing fish.
- When tying a knot, you need to control the tension of the thread, since when it relaxes, it can become deformed, which will affect the quality of the structure.
- The remaining tips do not need to be cut too short, as they help the knot pass easily through the guides of the rod blank.
- We do not recommend hanging beads between the knot and the float.
How to tie a clinch slip knot
The clinch knot is the easiest to knit. Because of this, anglers most often use it. The Clinch is a single knot, but this does not mean that it is unreliable or ineffective. He copes with his duties very well.
To make it, we need a bright-colored woolen thread of the same cross-section as the fishing line. The algorithm for tying a knot is something like this:
- Fold a piece of thread 25-30 cm long in half and apply it to the main fishing line from below, pressing it with your fingers.
- We throw one end of the thread over the fishing line and the other end so that the main fishing line is inside the formed loop.
- Holding the loop with your fingers, we make 5-7 turns with the first end around the fishing line and the second end.
- We thread the first end into the loop, moisten the knot with water or saliva and tighten it.
- We cut off the remaining thread, leaving 2 cm on both sides.
Because of their “elegance,” locking knots for clinch-type fishing lines are mostly used specifically for match gear.
A fishing line knot that won't come undone: a proven tactic
Double greener knot. DOUBLE GRINNER KNOT, DOUBLE UNI-KNOT
Grinner knot, or Uni knot, is one of the best fishing knots that many people actively use. A lot depends on the strength of fishing equipment.
To reduce the number of breaks to a minimum, it is necessary to reliably connect different elements of the gear. Therefore, nodes must be selected carefully. The Grinner is a great option for a variety of fishing situations.
Let's consider its features, pros and cons, scope of application and knitting methods.
Content
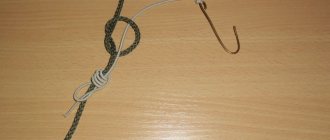
Loop on the fishing line for the leash
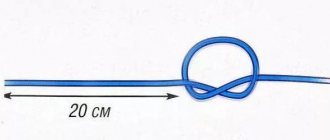
A loop is made on the main line in order to subsequently attach a leash to it. Before tying the knot, the fisherman must decide what kind of fish he is going to catch, since this will determine the length of the leader. The required length is marked with a triple knot , which will serve as a limiter. Then the leashes themselves are attached.
First of all, the lower leash is always strengthened , which is then pulled along the fishing line. In place of the limiter, make another double knot, without tightening it to the end (so that you get a figure eight). The remaining hooks are attached using the same pattern.
How to make a loop on the main line
This loop is needed to attach a leash to it. It is tied as follows:
1. To measure and mark the desired length, you can use a triple knot, which will act as a limiter. After this, the leashes are adjusted to the fishing line.
2. To the limiter knot you need to add another, double knot, which is not fully tightened. Thus, from a double knot, a figure eight is obtained.
3. The end of the leash is threaded into the resulting figure eight: first into one ring, then into the other. After this, the noose is tightened.
How to tie a slip stitch
This method will help you build a sliding (that is, adjustable in size) ring without much effort. There are several ways to knit this knot, but first of all it makes sense to focus on the simplest ones.
First way:
- The line is thrown over the index finger.
- Using a hook, a small section of it is grabbed and threaded from right to left.
- After turning the hook, the loop is tightened and returned back.
Second way:
- The line is passed first through the index finger and then through the thumb to form an unfinished figure eight.
- A hook is threaded through the loop and the fishing line is caught.
- Using a hook, the picked up area is pulled up and returned back.
There are quite a lot of various units designed to help the fisherman get a good catch and simplify the fishing process as much as possible. Therefore, it is worth learning to understand them and be able to associate the most suitable one for a particular case.
Instructions: how to tie a slip knot step by step
To learn how to properly tie a slip knot, we suggest using the following step-by-step diagram:
- Fold the free end of the rope into a coil;
- By passing the running end of the cord over the main one, create a loop;
- Place the running end of the rope around the main one, passing it under the loop and bypassing both ropes from below;
- Complete a simple connection by wrapping the running end around the cord and passing it into a small loop;
- Tighten the simple knot by pulling on the running end;
- Adjust the position of the simple joint at the main end, which will allow you to control the length of the sliding loop.
Figure 5. Step-by-step instructions for tying a slip knot
To avoid stretching a simple knot on the rope when the tension changes, it is recommended to tie the same one on the remainder of the running end (Figure 5). The latter will act as a brake and will not allow the running end to crawl through the downtime.
The process of tying loops and knots for leashes and lures
The installation of fishing equipment is constantly being improved, new elements and materials are being used. When connecting elements to each other, time-tested knots and loops are used. Any fisherman uses only a few proven and convenient loops, which can be successfully used when installing almost any equipment. Loops are often used to tie the main line and leader together.
To get started, you can familiarize yourself with the Figure Eight knot for tying hooks and organizing loops on a fishing line. Simple and reliable unit.
Leash loop on main line
When fishing with a float, sometimes you may want to organize a couple of side leads on the main line with additional hooks. This can be done by tying the leashes to the loops on the main line.
The video below clearly shows the process of organizing the connection of the leashes and the main line using loops.
You can also see the article about knots for tying hooks to fishing line. The manual contains instructions with the most reliable components for a given case.
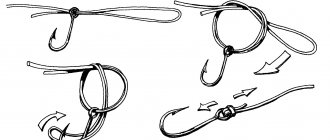
Fishing loop knot for a side leash on the main line
Fisherman's Loop Knot
Quite often it is necessary to tie a loop on the main line to which the leash will be attached.
There are many different ways to tie a leash to the main line, but the angler only needs to know a few basic options that will help him out in any situation. It is worth noting that fishing line in water loses about 1/4-1/6 of its strength. If the knots with which the equipment is connected are poorly chosen and tied incorrectly, the strength of the fishing line is reduced by another 25-75%. This can lead to the loss of precious baits and fishing trophies.
This loop is good because it allows you to attach all sorts of baits using the “loop to loop” method, without using a leash. In other words, the loop can be used both as a leash and as a lead for the leash.
Rice. 43-89
Rice. 43-90 How is it done? We take the main line and in the place where we want to make a branch for the leash, we form a loop (Fig. 43-89). After this, we take the right side of the loop and begin to wrap it around the branch of the fishing line (Fig. 43-90). We make 5-6 revolutions. The outer end of the loop remains motionless. The revolutions go into loops.
Rice. 43-91 Now we thread the huge loop into the small one, and we will have a side leash outlet (Fig. 43-91). We wet the loop and start dragging. We get a self-tightening knot, and the leash loop points to the side. This loop does not move and stays on the fishing line perfectly. Here we have a knot with a side branch (Fig. 43-87). It is now possible to attach a streamer, a twister to this outlet; using the “loop-to-loop” method it is possible to attach a leash with fishing line. The strength of this unit is quite high. Reliable, very comfortable. If we need a bend rigidly fixed to the fishing line, this is the best method to make it.
Finally, I would like to say that knots must be treated very carefully. And also if you understand the knot perfectly, but under no circumstances have you knitted it yourself, it may let you down. Based on this, before using the knot, be sure to practice it at home. Take a thicker fishing line, more noticeable, tie a knot, make sure it is reliable, look at its strengths and weaknesses. If you begin to knit knots with the utmost care and attention, then you will invariably, for any occasion, have your own knot, the best for a given method of fishing.
Temporary side leader on the main line (HD)
How to tie a permanent leash to the main line. Stationary loop.
Self-tightening loops
Self-tightening loops are very diverse in fishing rigs. Used when connecting fishing line with wobblers, spoons, swivels, hooks, carabiners and other equipment elements except soft elements (fishing lines, braided cords). Many self-tightening loops are known to anglers as Arbor knots, Clinch knots, etc.
The advantage of sliding loops is that they can be tightened and loosened, since the main line slides inside the knot. The simplest example of a self-tightening loop is a running simple knot. This loop can be tied on any part of the fishing line.
The process of knitting a self-tightening loop
- A loop is made on the fishing line by simply crossing the main fishing line.
- From the bottom of the formed loop, thread the main fishing line, which was located on top of the crosshairs.
- Pull the resulting loop, but do not tighten the knot. The result is a regular knot, inside the loop of which is another part of the main fishing line.
- Wet and tighten.
Self-tightening loop
This unit is recommended for use when installing fishing elements in non-critical areas where there are no significant loads (attaching the fishing line to the spool). An improved simple running knot with an additional knot at the end of the line is called an Arbor knot. For more critical knots, it is recommended to use the Clinch knot.
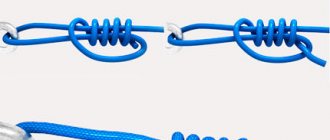
Clinch knot tying process
- The end of the fishing line is threaded into the eye of the required equipment element (swivel, hook). It will be enough to thread 10-15 cm of fishing line into the eyelet.
- Wrap the end of the fishing line around the main fishing line 5-6 times.
- Thread the end of the line through the first loop near the eye.
- Thread the end of the line through the large loop formed between the first and last turns.
- Wet the knot and tighten the loop.
How to increase your fish catch?
Over 7 years of active fishing, I have found dozens of ways to improve the bite. Here are the most effective ones:
- Bite activator . This pheromone additive attracts fish most strongly in cold and warm water. Discussion of the bite activator “Dry Blooder”.
- Increased gear sensitivity. Read the appropriate manuals for your specific type of gear.
- Pheromone -based lures .
Knot "Surgical loop"
The knot is easy to make and does not require complex manipulations with fishing line. When knitting a loop on thick fishing lines, there is a bend in the knot; the loop and the main fishing line do not lie on the same straight line.
Used for loop-to-loop connection when connecting the leash to the main line or to the swivel. The loop can be used when installing bottom gear. Not recommended for fly fishing equipment.
Knot tying process
- At a distance of 7-10 cm from the end of the fishing line, fold it in half.
- Use the double end of the fishing line to tie a regular knot, but do not tighten it.
- Thread the end of the double line through the loop of the regular knot again.
- Tighten the knot, forming the required loop size at the end of the double line.
- Wet the knot and tighten it.
- Remove the protruding end of the line near the knot.
Leash loop on main line
When fishing with a float, sometimes you may want to organize a couple of side leads on the main line with additional hooks. This can be done by tying the leashes to the loops on the main line.
- The video below clearly shows the process of organizing the connection of the leashes and the main line using loops.
You can also see the article about knots for tying hooks to fishing line. The manual contains instructions with the most reliable components for a given case.
Self-tightening loops
Self-tightening loops are very diverse in fishing rigs. Used when connecting fishing line with wobblers, spoons, swivels, hooks, carabiners and other equipment elements except soft elements (fishing lines, braided cords). Many self-tightening loops are known to anglers as Arbor knots, Clinch knots, etc.
The advantage of sliding loops is that they can be tightened and loosened, since the main line slides inside the knot. The simplest example of a self-tightening loop is a running simple knot. This loop can be tied on any part of the fishing line.
The process of knitting a self-tightening loop
- A loop is made on the fishing line by simply crossing the main fishing line.
- From the bottom of the formed loop, thread the main fishing line, which was located on top of the crosshairs.
- Pull the resulting loop, but do not tighten the knot.
The result is a regular knot, inside the loop of which is another part of the main fishing line. - Wet and tighten.
Self-tightening loop
This unit is recommended for use when installing fishing elements in non-critical areas where there are no significant loads (attaching the fishing line to the spool). An improved simple running knot with an additional knot at the end of the line is called an Arbor knot. For more critical knots, it is recommended to use the Clinch knot.
Clinch knot tying process
- The end of the fishing line is threaded into the eye of the required equipment element (swivel, hook). It will be enough to thread 10-15 cm of fishing line into the eyelet.
- Wrap the end of the fishing line around the main fishing line 5-6 times.
- Thread the end of the line through the first loop near the eye.
- Thread the end of the line through the large loop formed between the first and last turns.
- Wet the knot and tighten the loop.
Perfect loop
The loop is simple and reliable, but requires some manipulations with the fishing line, which at first glance seem complicated. Ideal for connecting a leash to a shock leader that lies in one line and does not bend at the knot.
Used in fly fishing gear, when connecting a conical leader and a leash. It is also successfully used in any other installation of equipment when connecting the leash and the main fishing line, loop to loop or fishing line to the swivel.
Knitting process
- At a distance of 10-15 cm from the end of the fishing line, form a loop without a knot (overlap) so that the main fishing line lies on top of the end part.
Form another loop on top of the first loop so that the end of the line passes under the main line. Pass the ends of the fishing line between two loops: upper and lower. - Pass the top loop into the bottom one and pull it while holding the end of the fishing line.
- Moisten and tighten the loop.
- Remove the end of the line after the knot.
We hope our instructions and recommendations for tying knots. Good luck with your fishing!
Perfect loop
The loop is simple and reliable, but requires some manipulations with the fishing line, which at first glance seem complicated. Ideal for connecting a leash to a shock leader that lies in one line and does not bend at the knot.
Used in fly fishing gear, when connecting a conical leader and a leash. It is also successfully used in any other installation of equipment when connecting the leash and the main fishing line, loop to loop or fishing line to the swivel.
Basic types of sliding knots
There are several types of connections that form a tightening loop. They all differ in the degree of complexity and application features. For example, the simplest is the running simple, and the most reliable is the sliding eight.
In everyday life, a sliding blind loop will be useful, which is used to tighten various packages when packaging. The running bowline is well known to sailors, and the snare bowline is well known to bird catchers. But the names “scaffold” and “shackled” speak for themselves. In addition, sliding models are used in handicrafts, hunting and fishing, as well as in many other branches of human activity.
For bracelet
The sliding knot is widely used in the manufacture of jewelry items, for example, for bracelets or beads to regulate the length of the product. This sliding fastening acts as a fastener that allows you to change the size (Figure 2).
Figure 2. Sliding connection of the cord in the bracelet
The end of the cord (fishing line) on which the product is strung is folded into a loop, after which the second part of the rope is applied to it. The first tip is wrapped completely around the loop and the second end several times. The remaining piece of cord is inserted into the loop from the wrong side and the resulting connection is tightened. You can also use two knots that are tied on both sides of the bracelets.
Fishing knots
In fishing, the sliding knot is used for various purposes:
- For tying the ends of fishing lines in marine or fishing;
- To secure material to the reel spool;
- For tying a load, hook, bait or leash;
- To create stoppers for sliding equipment.
Figure 2. Sliding joint options
Among the most popular knitting techniques are: “Clinch”, “Grinner”, “Stepped”, “Gripper”, “Eight”. Having mastered the listed techniques, you can begin tying more complex patterns (Figure 3).
Chinese
A Chinese knot is a plexus of threads that was previously used to record events. Nowadays it is used for talismans and amulets. It supposedly protects against negative energy and helps the owner find peace and good luck (Figure 4).
To weave Chinese joints, threads of bright, cheerful colors are used - red, yellow, green, brown. Moreover, most of them can be tied with either one or two threads. And yet, double weaving looks much more impressive.
Figure 4. Stages of tying a Chinese knot
There are about 20 weaving techniques in total. We present to your attention one of the simplest diagrams that will tell you how to tie ropes quickly and efficiently.
It consists of the following sequence of actions:
- Creating a basic knot, the ends of which cross at the bottom.
- Creating a pattern on the left, through the eyelet. To do this, place a new loop under the loop, bringing the end down.
- Repeat the steps for the right side of the product, which must be turned over so that the sides switch places.
This is interesting: How to knit a straight knot: diagram
Knitting process
- At a distance of 10-15 cm from the end of the fishing line, form a loop without a knot (overlap) so that the main fishing line lies on top of the end part. Form another loop on top of the first loop so that the end of the line passes under the main line. Pass the ends of the fishing line between two loops: upper and lower.
- Pass the top loop into the bottom one and pull it while holding the end of the fishing line.
- Moisten and tighten the loop.
- Remove the end of the line after the knot.
We hope our instructions and recommendations for tying knots. Good luck with your fishing!
A group of fishermen revealed the name of the secret bait during interrogation.