Incorrect tying of the leash in the main line reduces the strength of the tackle many times over. It is generally accepted that a knot that is in water is a quarter less strong than usual. When tying, at the moment of tightening, it is subjected to strong frictional forces. In this case, the lines may be burned.
To ensure that the use of knots when knitting tackle does not reduce its strength to an unacceptable level, it is necessary to use those knots that are best suited for a particular situation.
A high-quality node connection should provide the following:
- The knot must be secure so that the fish cannot untie it with its jerks. So that it does not unravel under load.
- It is made compact . This is necessary so that it can easily pass through the rings of the spinning rod, donkey, and feeder. If the knot is voluminous, then in some cases it will be able to catch water debris.
- If the leash is attached at a 90 degree angle, it should maintain its position underwater . This is important to prevent tangling of the fishing line or leash.
When tying knots in specific situations there may be some subtleties. We can say that a good knot is one that helps make a good catch.
How to tie a leash to the main line on a spinning rod:
How to tie a thin leader to a thick main line
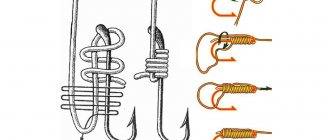
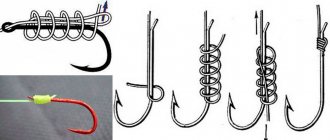
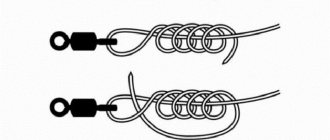
To connect lines of different diameters, it is convenient to use a bloody knot. To tie the leash to the main line so that it does not get tangled, you need to perform the following operations:
- You need to position the fishing line and leash so that their ends are located next to each other.
- Each end makes 4-5 turns around another part of the fishing line. Turns for each of them are made from the tip towards the main part.
- It is necessary that each of them has a tip of sufficient length. The wound parts are slightly separated, moving deeper. Both ends are inserted between them towards each other.
- The knot is moistened and tightened evenly.
All stages of tying are shown in the diagram.
Bloody Knot
The excess fishing line that sticks out from the knot needs to be trimmed, leaving a few millimeters.
To tie fishing lines of different diameters, you can also use the following knot:
- The ends of the fishing line and leash are placed next to each other.
- The leash needs to be wrapped around the fishing line. Then it is passed from below and the leash and fishing line are grasped at the same time. After this, they lead from above, then pass under the main line, over the leash and under the outer part of the leash.
- Then the tip of the leash is threaded into the loop made.
- The knot on the leash is tightened.
- A similar one is tied around a leash. It also needs to be tightened.
- Now you need to grab the threads and pull. The nodes will move closer to each other.
Knot for fishing lines of different diameters
This knot is relatively simple and reliable. It is suitable for study not only by experienced fishermen, but also by beginners.
Perfect loop
The perfect loop is one of the most well-known loops, which is tied using the classic “loop-to-loop” knitting method.
It is very convenient to tie such a knot on your hand:
- The first loop must be held with your thumb and index finger. You need to make a turn around the index finger and thumb, and then make the same turn through two loops.
- After this, you need to pull the second turn through the first so that the loop crosses it and captures the tip of the fishing line.
Tying the Perfect Loop
A perfect loop is knitted according to this principle:
- The first loop is made to fix it on the leader line. There shouldn't be any problems tying it.
- The second loop is tied on top of the first loop.
In order to correctly tie loop number two, you need to follow these recommendations:
- Make a loop in the fishing line and, holding it in your hand, make another loop on the fishing line itself and the place where the leash will be attached in the future.
- With your other hand, grab the loop from the reverse side and make a small turn along the main line.
- Such revolutions need to be made from five to eight so that the overall loop is stronger. You need to wrap the fishing line inside the loop.
- After completing all the revolutions, you should end up with a large loop. It should be folded in half so that another loop comes out. On the side there will be a connector for the side leash.
- If everything worked out, then it was time to tighten the loops. To keep the knot tighter and not fray over time, you need to moisten it with water and only then pull both loops tightly together.
Advantages
A perfect loop has the following advantages:
- it is more functional than conventional hinges because it can be used in different areas:
- it is one of the most reliable and durable, since it is knitted on the same plane with the root end;
- a perfect loop is very reliable, as fishermen have repeatedly verified from their own experience.
Application
The perfect loop is used by fishermen to secure hooks to fishing lines and to secure rubber ropes. Under a heavy load, such a loop is tightened very tightly and is difficult to untie.
Alternative uses
The perfect knot can also be tied on a fly or spinner. To do this, the unused end of the fishing line must be threaded inside the loop. This alternative method of application is no less reliable than the classic one.
How to tie a leash - fishing line to the main braid
Choosing the best knot for a braid depends on its type. The cord can be made in two ways:
- Several fibers are intertwined.
- The fibers that make up the braid are glued together.
The way in which a particular cord is made can be determined visually. Depending on it, you should select the best node for it. If the structure of the fishing line is woven, then such cords are highly resistant to deformation. They are not suitable for knots where the tightening is too tight.
Cords created by gluing should be used in those knots where the number of pulls is small. Fishermen often use the “Loop to Loop” knot. It is made in this way:
- The fishing line is folded in half to the desired length.
- They wrap the fishing line 2-3 times.
- The double thread is inserted into the formed loop.
- Now the knot needs to be tightened well. Now the double tip forms a non-tightening loop.
- This loop is made again on a leash.
- To tie them, the loop on the main line is inserted into the leash loop. After this, the leash from the other end is threaded into a loop made on the main fishing line. Then the resulting knot is tightened.
Loop to loop
The resulting connection is known for its reliability and is often used to tie a monofilament leash to the main cord. It has high strength.
If the base of the tackle consists of braid, the leash is tied using a Double Uni knot:
- The two threads are placed parallel to each other at the required length.
- Folding the tip of one in half, it is carried over both threads.
- This tip is wrapped around both threads three times so that it passes inside the loop made.
- The knot needs to be tightened.
- The same operations are performed for the tip of the other thread.
- After the second knot is tightened, they are moved in the opposite direction.
Double Uni
It can be used for leashes made of monofilament or fluorocarbon.
Pike leash
To catch pike with this type of leash, leashes made of durable material, such as copper wire, are used, since the predator, like pike perch, has pointed teeth that can easily bite through a leash made from ordinary fishing line. In the winter season, when fishing for pike on girders, it is better to take a thick monofilament line as the central line and a copper wire leash, since the bait in this case is active live bait, which, with the lightness of the main line and the outlet leash, can make a false bite.
- Monofilament for leash 0.2;
- Main line 0.25;
- Sinker from 20 grams, depending on the current. On a strong one, it makes sense to use weights of 50 grams or more.
- The length of the leash to the wobbler is 40-150 cm.
How to tie fluorocarbon leaders to the main line
You can tie a fluorocarbon leader to the fishing line using an Albright knot. It is knitted as follows:
- The fishing line and leash are positioned in such a way that their ends are parallel to each other.
- The tip of the main line is folded in half. The leash is threaded inside the fold.
- It is wound repeatedly around the double part of the fishing line, moving from the main part to the end.
- When they reach the edge of the loop, the tip of the leash is threaded inside the fold.
- Now the knot needs to be tightened, after wetting it.
The details of the node creation procedure can be clarified using the following diagram.
Albright
Most popular types
Lesochnye
Types of forest knots:
- Eight, the peculiarity of which is that it can be easily untied even despite prolonged loads. It is mainly used for tying hooks, spinners, and wobblers. Step-by-step instruction:
- pass the thread through the ring on the hook;
- wrap around the forend;
- insert through the ring in the hook;
- a closed loop has formed;
- enclose around the main end;
- stretch the running edge into the circle of the hook;
- carry it into the loop that has formed around the forend.
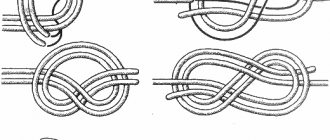
- Loop in loop – an incredibly tight connection that can be easily disassembled to replace one leash with another. Suitable for all types of leashes: from fishing line to metal. Step-by-step instruction:
- retreat 32 - 36 cm from the edge of the main line;
- lay this part in half;
- tie a regular knot from the folded thread;
- insert the joined part twice into the skein;
- a surgical node has formed;
- Once wet, pull off the binding;
- form a surgical knot on the leash;
- place the driving loop on the main one;
- insert the remaining tip of the leash through the gap on the main part;
- pull the two parts in different directions - trim the ends, leaving 1 mm.
- Bloody loop perfectly suited for threads with a difference in diameter of 40%, while, very importantly, maintaining 91% of the load capacity. Step-by-step instruction:
- lay two fishing lines overlapping, clamp with your finger, leaving 22 cm edges for work;
- wrap the working part of the first thread around the second 6 times;
- stretch the working edge to the beginning of the winding, insert it between two fishing lines, and pinch it with your finger;
- Using the working edge of the other thread, carry out the same procedure, insert it into the hole that formed between the two cords;
- tighten first the first knot, then the second;
- pull the threads in opposite directions, cut off the ends.
- Running - the simplest knot that forms a tightening loop. If you pull the root end, it will tighten; if you pull the running end, the loop will increase. Knotted in any part of the thread. Step-by-step instruction:
- fold the working end into a loop;
- pass the root edge through the gap from above;
- tighten.
Running
Bloody loop
Loop in loop
Eight
On a braided cord
Types of knots on a braided cord:
- Double palomar used to attach fishing line to a fly, hook, or wobbler. The main advantage of the unit is that the hook in it can rotate freely, while withstanding a load of up to 9 kg and a strength of 85 - 90%. There is one drawback - it is not used for small rings. Step-by-step instruction:
- bend a piece of fishing line in half;
- pull them through the eye in the hook;
- twist a regular knot on a thread;
- pass the curved part of the fishing line over the hook, above the knot, into its circumference;
- pull up the ends, fix, trim the edges.
- Uni (Duncan) – a multifunctional method, used to connect two fishing lines, while being fixed around one of them; if it is necessary to secure the hook, then around the shank of the hook itself. It is an adjustable loop. It retains strength better if tied around the eyelet. Reliability is lower when tying two lines (75%). Step-by-step instruction:
- pull the end of the thread into the eye or forend;
- twist a whole loop on the short end of the fishing line;
- wrap the part of the thread that remains five times around both ends, passing the line through the resulting gap;
- tighten until the loop forms a spiral;
- form the required size of the loop by tightening the threads;
- trim the end that remains.
- Albright – a knot used to tie two lines whose diameter differs by more than 1/3. The most common application is to combine a fly line with a backing line (extension line). Step-by-step instruction:
- cross two ropes to form a loop;
- pass the end of the thread through the gap and wrap it around itself and around the loop ten times;
- pull the end of the cord through the loop lying nearby;
- tighten the knot;
- cut off the ends.
- Stren – combines a universal simple knot and an improved clinch. Step-by-step instruction:
- fold the ends of the two threads together so that they touch each other for 26 cm;
- make the end of the leash the first loop of the universal knot;
- wrap the leading edge 3-6 times around the cord (remember that the thinner the thread, the more turns you should make);
- secure the knot by pulling the ends in different directions;
- tie an improved clinch on the main part of the leash, near the universal knot;
- Use the running edge of the cord to tighten the clinch, making sure that the turns lie parallel to each other;
- tighten and trim the ends.
Palamar
Uni (Duncan)
Albright
Stren
How to knit flurry and braid
When considering knots in which braiding is involved, it is necessary to take into account the peculiarities of its structure. If we are talking about thick braids, then most fishing knots are suitable for them.
It is necessary to take into account the cross-sectional shape of the fibers of which it consists. It can be round or square. In the latter case, there is a high risk of twisting, which reduces the strength of the connection.
In order to tie fluorocarbon and braid, you can use a triple knot. Its knitting is carried out as follows:
- The fishing line and the leash are placed parallel to each other so that the ends of the threads point in the same direction.
- Keeping both threads together, make a simple loop without tightening it.
- The double edge is carried inside 5-6 times.
- Take the double tip with one hand, the main part of the fishing line with the other and tighten the knot. To correctly form the knot, you must pull each thread separately when finishing tightening. The protruding ends need to be cut off.
This diagram shows each step of creating a node:
We tie the leash to the braided line with a triple knot
To tie braid and flurry, you can use the Nail knot. It is done as follows:
- Both ends of the fishing line are held parallel to each other.
- One of the lines is overlapped around the other, placing a nail or straw. It is not necessary to use them, but it makes the procedure more convenient.
- Make six turns around the fishing line with the straw, gradually moving in the opposite direction.
- Then the tip is threaded inside the loops made. It is convenient to do this through a straw.
The operation diagram is shown in the figure:
Knot Nail
We tie the leash to the main line correctly - video instructions:
Basic options for tying a leash to a fishing line
So, you need to start with the fact that each fishing knot is necessarily characterized by tensile strength . For example, you can take monofilament, which provides a strength of 5 kg, but in water it can withstand a fish resistance of no more than 2.5 kg.
There are several basic methods of attaching a leash to the main line that are the most reliable. Some are relatively simple, others are more difficult to master, but with a little practice, they can all be learned.
Loop in loop
The most common and simplest method is the “loop-to-loop” . Despite the fact that this fishing knot is very easy to learn, it cannot be said that it has a high level of reliability.
The dressing is carried out as follows:
- At the ends of the main fishing line and the desired leash, 2 elongated loops are knitted.
- The end of the fishing line with the loop must be folded in half and wrapped twice around its axis.
- The loop of fishing line that was originally tied is threaded through the ring that is formed at the end of the entire structure, and then tightened.
- To complete the fastening, you need to fasten the loops of the leash and fishing line together.
Improved fishing knot
The next type of assembly is also quite simple, and most importantly, it can be made right on the spot, without additional equipment.
The dressing is carried out as follows:
- The leash and the main line are applied to each other.
- Now you need to wrap part of the fishing line around the leash and then pull its end to the top.
- This end of the fishing line must be pulled into the resulting loop, but do not tighten it.
- The end of the leash needs to be wrapped around the loop once.
- The knot is tightened.
- Now you need to do the same with the end of the main fishing line and tie it to the leash.
"Nail"
The knot, which is referred to as “Nail” , has a high level of strength, but also great difficulty in mastering it.
You can tie it up as follows:
- You need to tie a stop knot on the main line.
- The leash and cord are parallel to each other.
- The leash line must be threaded under the main line.
- A turn is made around the main line.
- Thread a through object, such as a fountain pen, into the resulting loop.
- Now make several skeins around the main line and pen.
- Now you need to thread the end of the leash through the handle and carefully tighten the knot, while making sure that the turns do not get tangled or overlap each other.
- The remaining part of the leash must be removed.
"Eight"
Another fairly common knot is called “Eight” . In essence, it is quite simple, but at the same time, it confidently attaches the leash and the main fishing line.
The dressing is carried out as follows:
- The leash and cord are laid parallel to each other.
- Now you need to knit a loop that will look like a figure eight, like a “Flemish loop”.
- Now it's time to tighten the knot.
Knot-free fastening
The knotless type of fastening, as is clear from the name itself, does not imply a connection between the leash and the main line using knots . Such a connection requires less time to bind and does not involve any difficulties. It’s worth noting right away that large gear is best secured with knots, and for small baits, this type is most optimal.
A knotless fastener has its undeniable advantages, including saving time and a high level of strength, but there are also disadvantages: it adds extra weight to the tackle, and is often used only for braided lines.
To fix such a fastener, first of all, it must be selected correctly based on the thickness of the fishing line and the dimensions of the bait. The fastener should be a little thinner than the fishing line. To secure it, you need to take a few simple steps:
- Place the eye of the tackle into the eye of the fastener.
- Now the fishing line needs to be thrown onto the hook of the connector, which protrudes to make a double fishing line.
- You need to wind the fishing line onto the connector several turns 3-5 times.
- Now the fishing line needs to be inserted into the second eye and tightened.
- Excess line must be removed.
How to tie a leash to the main line at 90 degrees - a simple way
In order to tie the leash to the straight part of the main line, you can use a running knot. To do this, perform the following actions:
- A simple loop is made on the main line.
- The tip of the leash is threaded through it in a special way. To do this, it is passed under the outer edge of the loop and over the other two threads. In the opposite direction, it is moved under the outer, over the central and under the outer edge of the node.
- It is important that after tightening, the tip of the leash cannot slip out. Therefore, they make a simple knot on it and tighten it. This can be done in advance.
- Now the knot is tightened.
The tying process can be clarified by viewing the following diagram:
Running knot
Another way to tie a side leash to the main line at a right angle:
- A loop is made on the main line using a figure eight knot. To do this, it is first folded in half in this place.
- The double part is folded, and the tip is wrapped around the main part, then it is threaded through the loop and tightened.
- You need to prepare a leash. To do this, make a figure eight at its end. To do this, the thread is bent, wrapped around the main part and threaded into a loop. After this, the knot is tightened.
- The tip of the leash with a knot is pulled through the loop onto the main fishing line. Then they bring it back through the loop. The knot can now be tightened.
The details of the procedure can be understood from the figure:
During fishing, the leash will be positioned at an angle of 90 degrees to the main line.
How to tie a leash to the main fishing line, loop to loop:
Attaching leashes without knots
Fishermen tie leashes to the main line without using knots. This method does not involve binding materials, but requires the use of several special devices, such as a metal fastener. You can make it yourself or buy it in a store. Knotless fastening is characterized by ease of manufacture and a fairly large margin of safety.
The technique is especially popular for use on braided cord. The size of the fastener is selected taking into account the diameter of the equipment and the size of the bait.
Tips and secrets
It is important not only to choose the right knot, but also to adhere to the general rules of knitting. When tightened, the fishing line experiences strong frictional forces. Overburning can reduce the strength of the knot to a critical level. To prevent this from happening, it is necessary to lubricate it before tightening, or at least simply wet it. In order for the nodes to be more durable, it is necessary to adhere to the following rules:
- If you have to wind on a reel, you need to do it with an even and constant tension in order to prevent unraveling.
- When tying, you need to act evenly, without over-tightening or leaving voids.
- When knitting, you need to pay attention to the ends. It is advisable to melt them a little in order to prevent the threads from shifting during use of the tackle.
- The choice of a suitable leash is made taking into account the fish that you plan to catch and the gear that will need to be used.
- Some fishermen use quick-setting glue to ensure a strong joint.
- The strongest knot is obtained in cases where both lines are approximately equal in diameter.
- Wetting the fishing line when tying a knot has a positive effect on its strength.
How to tie a metal leash to the main line:
Another secret on how to tie two leashes to the main line so as not to get tangled:
And a photo of how to tie two leashes so that they don’t get tangled or stick together:
If you need to choose from several knots, you should prefer those in which the influence of friction and compression on the fishing line is minimal. You need to make sure that there are no kinks in the line.
Blitz tips
To get the maximum catch, it is important to keep a few tips in mind:
- The most popular method for tying a leash to the main line is “loop to loop”.
- Swivels with carabiners are the best option to prevent the fishing line from tangling with the leash.
- A swivel with a carabiner is best knitted with a “fixed” knot.
- The main line can support 3 leashes.
- For three leashes, the “snake” knot is considered optimal.
- The “snake” knot should leave long ends of lines and leashes for further attachment of additional leashes.
- It is important to consider the strength of the knot.
- You can tie any knot yourself. Practice is important.
- The correct knot is very important when catching.
Considering the strength of the knot and the entire equipment in general, you can easily catch even the largest fish. Each knot is capable of being swayed even by an inexperienced fisherman. It is very important to be diligent and attentive, then patience will pay off in full.
klevyj.com