To secure fishing equipment, a wide variety of fishing line knots are used. With the improvement of materials used for fishing, the techniques for tying fishing knots are also being improved. If previously only monofilament fishing line was used, now braided fishing line is more often used, as it is the most durable. Those knots that are used for regular fishing line may not be suitable for braided fishing line. This is due to the fact that it has a different structure. Braiding is made by weaving several threads into one cord or by gluing them together. If you bind the material in the same way, it will cause different deformations. On spools of fishing line there is usually information about which knots are best to weave from it. If this information is not available, then you will have to determine the method yourself. If the structures are smooth and welded, then knots are made in which there are fewer loops to be tightened. Cords that are made of braided cord are more resistant to deformation. However, it is better not to tighten the knots too tightly on them, as this may cause the fibers to fray. The fisherman should also take into account that knots on braided fishing line negatively affect the breaking load parameter.
Palomar knot
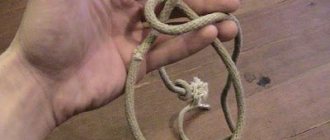
This is one of the simplest but also most durable ways to tie a knot. It is popular in use among fishermen. The Palomar knot is a universal knot as it can be used for a variety of materials. Strength is 80%.
To perform this type of node, you must complete the following steps:
- fold a fishing line measuring 40-50 cm in half;
- thread the bent line into the eye of the hook;
- make a regular knot, but do not tighten it. The eye of the hook should be located in the center of the loop;
- insert the hook into the resulting loop;
- moisten the knot with water and tighten it;
- cut off excess with scissors.
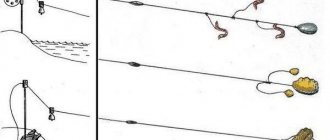
Step-by-step instruction
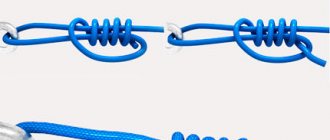
Use the following step-by-step diagrams to quickly tie the Grinner knot.
Step 1. Thread the tip of the fishing line into the eye of the hook from the inside.
Step 2: Pull the line out and then thread the eyelet again in the same direction as in the first step.
Step 3. Pull the line out again and create a large loop at the top of the future knot.
Step 4. Wrap the end of the line around the 2 main lines coming out of the eye 5 times.
Step 5. Bring the tip out and tighten the knot by slowly pulling both ends of the line and the hook. Before final tightening, be sure to wet the loose knot.
Step 6. Cut off the excess line with scissors or tweezers. Do not cut too close to the knot, so that if you pull too hard, the knot will not come undone. Well, try to cut only after the knot has been tightened very tightly.
Uni node
The uni knot is used in situations where the fishing line does not fit into the eye. This may be due to the fact that the eye is very small or the line is too thick. The uni knot is not easy to perform, so you need to train your hand.
To complete it you will need:
- the fishing line is pulled through the eye of the hook and a loop is formed:
- the tip of the fishing line is wrapped around the main fishing line several times;
- form another loop:
- the tip of the fishing line is pushed through the first loop;
- make 5-7 turns around the fishing line;
- wet the line and tighten;
- cut off excess.
The most reliable knots for braiding
Research has shown that each type of cord requires a specific (its own) version of the knot. From the total number of nodes, several main ones can be distinguished:
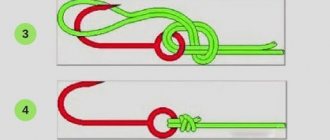
Palomar knot
The Palomar knot is one of the simplest and, at the same time, the most effective knitting methods. To attach one of the fishing accessories to the fishing line, you need to make a few simple movements.
- The piece of fishing line must be folded in half.
- The fishing line, bent in half, needs to be threaded into the eye of the hook.
- After this, you should tie a regular knot without tightening it. The eye of the hook should be in the center of the loop.
- A hook is pulled into the resulting loop.
- At the site of the knot, the braid should be moistened and the knot should be carefully tightened. Excess line is trimmed using scissors.
The length of a piece of fishing line depends on the length of the leash, and can be in the range of 20-50cm.
Uni (Uni knot, Grinner knot)
This knot is used in cases where it is impossible to stretch a double line into the eye of the hook: the eye is either very small, or a very thick line. Power Pro recommends using this type of knot for tying their products. It is more complex, and to learn how to knit it, you will have to practice:
- Tying a knot begins by pulling braided line through the eye of the hook, after which a loop is made.
- Then the end of the fishing line is wrapped several times around the main fishing line and after that a second loop is made.
- The end of the fishing line is passed through the second loop (the first), and 5-7 turns should be made around the double fishing line.
- After this, the line is wetted and the knot is tightened. If there is excess fishing line, cut it off using scissors.
It is recommended to master the technique of knitting a Uni knot by using, to begin with, long pieces of fishing line, about 60cm.
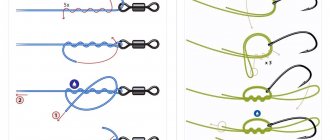
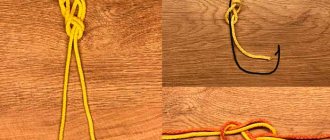
Clinch knot
The clinch knot is a simple type. Even a beginner can master the technique of knitting.
To make this type you need:
- insert the fishing line into the eye of the hook to a length of 10-15 cm;
- use the tip of the fishing line to wrap the rest of the fishing line with the shank. Make 5-6 skeins;
- As a result of the actions taken, small and large loops are formed. You need to insert the free tip of the fishing line through them;
- moisten the knot formed with water and tighten as tightly as possible;
- Trim off the remaining ends.
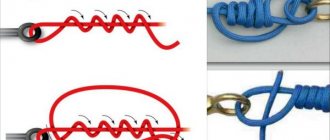
Bloody Knot
A blood knot is used to connect two pieces of cord. It is possible to connect laces that have different thicknesses. However, the difference in diameter between them should be no more than 2 times. Using it, you can attach a piece of monofilament fishing line.
To run this type of node you will need:
- position the two ends of the fishing line so that they are directed in different directions;
- take one tip and wrap it around the other end of the fishing line 5-6 times;
- the taken end is turned back and then it must be inserted between the turns in the opposite direction;
- take the second end of the fishing line and do the same actions with it as the first time;
- as a result, in the center of the two turns, two ends of the fishing line should protrude, which are directed in different directions;
- completely wet the knot;
- Pull the fishing line in both directions with both hands;
- remove excess fishing line.
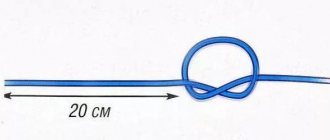
Slip double knot
The sliding double knot is strong and reliable. The difference in diameter between the lines being fastened should be no more than 1.5 times. It can be used for monofilament lines, for braided lines, and also for attaching a fluorocarbon leash to a line. Let's look at step-by-step instructions on how to tie fishing line to fishing line.
To make it you need:
- fold two fishing lines overlapping them;
- pinch the ends with your fingers. Each fishing line should have an end of 15-20 cm;
- wrap the ends of the fishing line around each other 5-7 times;
- Return one of the ends to the beginning of the winding place and pass the end between the two fishing lines. Press this place with your fingers;
- Make the same winding with the end of the other line. Return this end back. Then the same end is threaded into the resulting gap between the two fishing lines. This end should be positioned towards the other end of the fishing line;
- moisten the knot with water, and then carefully pull first one, then the second knot;
- when tightened correctly, the ends should be directed in different directions;
- Excess fishing line is removed with scissors.
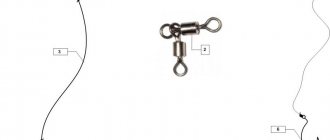
The best knots for connecting the hook and swivels
Before considering the most reliable fishing knots in this category, we note that we do not recommend tying fishing line to hooks, swivels or rings made of thinner material (wire) than the fishing line itself; this will negatively affect the quality and reliability of the knot.
Knot "Palomar" or "palomar" Area of application:
- a bunch of main fishing thread with a swivel;
- for tying fishing line and hook;
- for attaching a weight, swivel, carabiner, etc.;
- for attaching silicone baits to a leash or fishing line.
The disadvantage is that you need to fold the line in half, which increases the volume of the knot and shortens the leash.
Node advantage:
- a bunch of not only monofilament fishing lines, but also braided cord and baits used both in spinning fishing and fishing with feeder gear;
- the ability to attach many equipment elements (swivels, hooks, flies, etc.);
- easy to knit.
Classic Palomar
“Double Palomar” is knitted like this
The “Triple Palomar” knot provides for the installation of fishing accessories and lures with a large eyelet to a braided fishing line. This is how the knot is tied
Palomar drop shot knot
Knot “Clinch” or “improved clinch knot” Let’s consider two types of this knot:
- normal clinch;
- clinch reinforced.
This knot is widely used, but has proven itself especially well in spinning fishing. The first version of the knot is used mainly for mounting sinkers, since it is inferior in strength to the “reinforced” knot, which cannot handle even the most complex hooks.
Scope of application: artificial baits, jig heads, weights, hooks, swivels, sinkers, feeders, carbines.
Where such a node is not used:
- for mounting sinkers with a transverse or longitudinal hole;
- for mounting tubes and factory rings.
Important! The size of the ear of the above accessories should not be more than 1.2 mm, since at diameters above the specified indicator the knot does not hold securely. Learning to knit an improved knot model
Learning to knit an improved knot model
Homer knot or homer knot
The knot tying pattern is shown in detail in this video.
Grinner knot or universal Uni knot This knot is also known as the Uni knot or ukni not. Uni means universal.
What is knitted with a universal knot:
- hooks (for example, offset), fasteners, baits;
- braided line to the spool;
- lines between each other.
For which lines is it applicable:
- monofilament;
- network.
This is how the universal Uni knot, aka Grinner, is knitted
The double universal Uni knot is knitted like this
Figure Eight Knot This fishing knot is designed for attaching both hooks with and without an eye. It is also suitable for making mobile loops, tying feeders, sinkers, and leashes. In a word, it has wide application and can be used anywhere.
It is not complicated in execution and is suitable for beginner fishermen.
This knot can have several weaving options, for example, by folding the fishing line in two you will get a double figure eight.