Which node should you prefer?
Fishing line is divided into two types: braided (also known as cord or braid) and monofilament. The latter is considered less durable compared to the cord. The indicator is also reduced by unnecessary elements (knots, intersections, bends), so the process of attaching the carabiner clasp must be approached responsibly.
The table shows the characteristics of popular knots in terms of strength and application with the type of fishing line.
| Name | Strength (%) | Application |
| Executioner | 98,4 | universal for any type |
| Palomar | 91,5 | thin and medium lines |
| Offshore Swivel Knot | 97 | monofilament line |
| Clinch reinforced | 94 | braided cord |
| Homer | 89 | station wagon |
| Grinner | 85 | thick line |
| Double clinch | 90 | station wagon |
Nuances of knot connections made of braided cord
Any knot reduces the breaking load of the monofilament due to friction of its parts against each other under load.
The monofilament in the nodes is oriented in different directions, so it experiences, in addition to longitudinal, harmful transverse loads.
The fewer bends, the smaller part of the monofilament experiences lateral loads, and the less friction the parts of the monofilament have against each other under loads.
A logical conclusion can be drawn from the above: the simpler the nodal connection in design, the less the loss of the breaking load value. But at the same time there is a danger of loosening and untying a simple knot during fishing.
Self-tightening fishing knots are designed to minimize the loss of breaking load and at the same time ensure a reliable connection.
However, this statement is true for the new braided cord. With age, the braid gradually loses its strength characteristics, since the outer shell in which the braid fibers are collected wears out.
The internal threads, the number of which in modern braided cords reaches up to 16, are directly exposed to environmental influences and begin to thin and tear. The braid frays, losing its high breaking load. Particularly rapid negative changes occur in nodal connections.
Firstly, the zero elongation of the braid does not allow for at least partial compensation of the jerk load on the nodes. The braid in the knots under jerking loads experiences great stress. The fewer sharp bends and knots, the better for braided cord.
We invite you to familiarize yourself with: Fluorocarbon Line for Pike Leashes
Secondly, due to its unique flexibility, the braid provides a reliable connection even in simple knotted connections.
The only thing we can recommend is to periodically, at least two or three times a season, pass the braided line through a tampon with any vegetable oil. The wicker will quickly absorb the oil, and it will protect even the new wicker from the negative influences of the environment. If you need to preserve the knot joints made of braid, it is advisable to drip them with oil or lubricate them with Vaseline.
Seven easy-to-learn but strong fishing knots will allow you to connect carabiners, swivels, winding rings, hooks with an eye, etc. with monofilament fishing lines and braided cords. These nodes are a compromise verified by experience between the desire to increase the reliability of the node and reduce the loss of breaking load on it.
How to tie a carabiner to a fishing line
In this article, I would like to answer a common question from anglers: “How to tie a carabiner to a fishing line?”
For some, this is not at all difficult, but if you found my website and this particular article, it means you still do not know how to tie a carabiner to the main fishing line and my work is not in vain. So it’s not in vain that I’m now trying to convey to you all the subtleties of this fishing technique as clearly and usefully as possible. The carabiner is a very important part of fishing equipment and helps prevent the line from twisting. Below we will look at the best ways to tie a carabiner to a fishing line, cord or braid and how to tie a carabiner to a fishing line for a spinning rod, although, in essence, there is no difference - whether you tie a carabiner to a fishing line for a spinning rod, or to a fishing line for a donkey or a float fishing rod
Well, since you don’t yet know how to tie a carabiner to a fishing line, it will probably be useful for you to learn about other fishing knots and tying fishing elements. Take a look, perhaps some article will be of interest to you:
Well, now let’s move on directly to tying the carabiner to the fishing line and consider all the options.
Knot Explorer: what tourist doesn’t know it?
A simple knot tied with a rope folded in half forms a non-tightening loop. Different professional and ethnic groups at different times had different names for this knot, the origin of which is not easy to determine. It was called the Clover Leaf, Generous Knot, Noble Knot, Oak Loop, Loop Knot, etc.
For use in the Russian-speaking environment, we recommend either the name common in the tourist environment - “Conductor’s Knot” (abbr. Conductor), or proposed by L.N. Skryagin’s name is “Oak Loop”. The time of the invention of the knot is lost in centuries.
In Ashley's book, the node is recorded under the numbers ABOK
#290, 518, 1009, 1046.
How to tie a carabiner to a fishing line: method No. 2
The next method is even easier than the previous one, but this does not make it any less reliable. I myself often use just such a knot for tying a carabiner or swivel to a fishing line, and this knot has never let me down. In addition, it knits very quickly.
The technique is simple. It is necessary to thread the tip of the fishing line into the eye of the carabiner about 6 cm, more is possible, the main thing is that this section is not too short, because then it will be inconvenient to control it in order to complete the knot. It will be convenient to manage the long section, and the excess will then simply be cut off.
How to tie a carabiner to a fishing line: a few more ways
To consolidate your knowledge, I recommend that you watch another video that shows 6 more reliable ways to tie a carabiner to the main fishing line. Do not forget that before tightening the knot, it must be wetted so that the fishing line retains its strength properties and do not tighten the knot too quickly to prevent the fishing line from heating up.
I hope my article helped you and you can now tie the carabiner to the fishing line yourself without any problems. I wish you that your gear never lets you down. Return to our website and find out even more useful information. We will be happy to answer your comments and will be grateful if you share the site on social networks.
How to properly tie a carabiner on a belay?
Every person using a belay device should know how to tie a carabiner. After all, the life of a worker depends on the skill of tying. Beginners are given various instructions, shown how to operate the carbine correctly, and introduced to safety precautions. In a safety device, the carabiner serves as an element that is capable of self-fixation. The product belongs to personal protection, so you should not neglect its use.
The quality of the carbine must be confirmed by a certificate and it must bear the “EAC” marking. This confirms that the manufacturer has carried out all the necessary testing procedures within the framework of EN 362 and TR CU 019/2011.
How to tie a carabiner correctly?
The belay parts are attached to the belay loop using a carabiner coupling. This type of fastening is an innovation. This is done so that: firstly, the carabiner is not in one position, and secondly, with such fastening, the correctness and safety of the belay position is ensured. Thirdly, the comfort of working at height is improved and the load on the carabiner is reduced, which ensures safety. Now, to secure the halyard, you need to lower your hand down. Previously, she had to be taken aside.
There are four types of knots with which the carabiner is attached to the loop:
- Loopbacks.
- Grasping.
- Binding.
- Special.
Only a professional with special knowledge and experience can master each of these nodes, since all nodes have their own characteristics.
Errors when attaching a carabiner
Over time, the attachment of belays has improved. It has become more secure. Previously, carabiners were attached to two loops. If one of the loops cannot withstand the load, then the second becomes insurance. This fastening was officially recognized as incorrect, since the carbine was inactive, and the load on the carbine increased during jerking. This led to the latch being pulled out, which led to the death of a person. If the attachment method was incorrect, the person would hang in the air in an unnatural position.
Knots were sometimes used to attach the carbine:
- "Eight". This type of knot could easily break the latch, which led to a person falling from a height.
- "Gri-gri." This type allowed installation only in a vertical position. When changing position, he simply snapped the clutch.
Simply put, it is important not only to know the types of knots, but also to be able to correctly select the right knot in a specific situation when working at height. Inexperience and ignorance can apparently lead to serious injury and even death to a worker.
Share this article with your friends: Facebook
VK
How to tie a carabiner to a fishing line
In the provided article, I would like to consider the question of how to tie a carabiner to a fishing line, which anglers have been asking themselves for many years. Some fishermen will find this something trivial, but some will find useful information for themselves.
A carabiner is one of the most important elements of equipment, which allows you to quickly change gear and avoid twisting the fishing line. Below are the main ways to properly tie a carabiner to a fishing line, cord or braid. After all, 80% of the success of fishing depends on this, and on whether you can prepare a bite activator with your own hands. I think it’s time to look at the main knots that allow you to tie a carabiner to a regular fishing line.
To monofilament line
Very often, anglers are interested in the question of how to tie a carabiner to the main fishing line of a spinning rod, fishing rod or feeder equipment, because this small accessory allows you to completely avoid twisting of the fishing line and significantly increases its strength. And replacing equipment equipped with a carabiner is much faster and more convenient.
Tying a carabiner is done in a variety of ways, some are very simple and others are complex, some are strong and others can be easily undone. To avoid troubles while fishing, you need to know the main points and answers to the question of how to tie a carabiner to a fishing line. Among the many knot options, there are 4 main ones that allow you to tie a carabiner to a monofilament fishing line.
250 kg of fish for 1 fishing trip
The detained poachers told the secret of their success for a good bite. The fisheries inspectors were so surprised by their lack of poaching equipment.
You can reliably and correctly tie a carabiner to the main fishing line using four connections that are known to all anglers, these are:
These are the four simplest and most reliable ways that allow beginners and experienced fishermen to understand how to tie a carabiner to a fishing line correctly and so that it does not come undone at the most inopportune moment. Let's take a closer look at the knitting pattern for each of them.
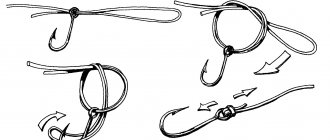
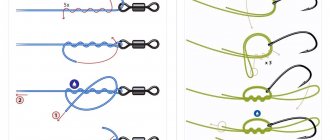
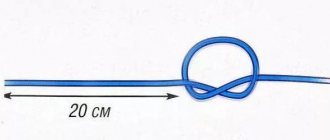
Hangman's Knot
The hangman's knot is one of the simplest attachment methods
, let's take a closer look at the step-by-step instructions for tying it:
- The first thing to do is thread the fishing line through the eye of the carabiner;
- Next, you need to bend the working end of the fishing line and tie it around the fishing line that secures the carabiner, pass the end of the fishing line through the loops formed as a result of the previous bend, as shown in the video;
- After you have used all the free line, you need to pull the knot to the carabiner, wet it and tighten it;
- Excess fishing line must be removed with scissors.
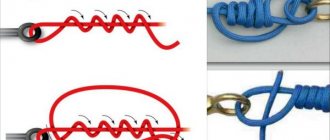
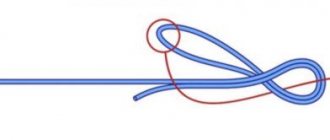
Offshore swivel-knot
Offshore swivel-knot is a very interesting knot that came to us from abroad, where fishermen tie various accessories to the fishing line in exactly this way. Let's take a closer look at how this knot is tied:
- Through the eye of the carbine, you need to pass a loop tied at the working end of the fishing line (the diameter of the loop should be approximately 10 centimeters). In this case, it is necessary to hold the loop with your fingers so that the carabiner hangs down and the loop sticks up;
- Now you need to wrap the carabiner around its axis several times to form a semicircle of fishing line;
- Then all that remains is to generously moisten and tighten the knot.
I think no photo, pictures or diagram will illustrate the binding sequence better than the video provided below.
Double clinch
The double clinch knot is very popular among fishermen. Very often, when I ask novice fishermen how to tie a carabiner to a fishing line, they answer - with a double clinch. Although the knot is not one of the main ones, it is considered very reliable and is used quite often.
Knots for tying ribbons and ropes
Used for tying ribbons and ropes, both of the same diameter and of different diameters.
In the first case, the following is most often used:
- direct (sea);
- grapevine;
- clew;
- weaving.
In the second:
- counter;
- bramshkot;
- academic.
Straight knot
The straight knot is very simple to perform: both ends of the rope are parallel on one side.
Its main disadvantage is spontaneous “sliding”, i.e. tendency to unravel on its own.
In this regard, for additional strength, its ends are strengthened with control safety knots (“controls”), although in everyday life this is most often not necessary. These “controls”, under extreme loads on the rope, will prevent it from slipping and untying the main knot.
Step-by-step instructions on how to tie a straight knot
Grapevine
The grapevine knot is considered reliable and beautiful. It is used not only for tying ribbons and ropes, but also for knitting loops for bookmarks and pull loops.
It is extremely practical when tying a lanyard loop.
The advantage of this unit is the ability to adjust the length of the loop.
Under the influence of load, it can tighten greatly.
This knot is even used for tying fishing line.
Step-by-step instructions for tying a grapevine knot
Counter knot
The counter knot is ideal if you need to tie completely different materials, for example, a ribbon with a rope, a rope with a cord, etc.
Not only does it hold well and does not crawl, but it also unties easily after removing the load. At the same time, it tightens perfectly under load.
The counter knot has a second name - loop knot. In the practice of mountaineering, loops made of braid of different widths are often used. To tie them, only a counter knot is used. This is where the second name comes from.
Step-by-step instructions for knitting a counter knot
Clew knot
The clew creeps only under variable loads, but at the same time does not tighten.
This knot belongs to the category of reliable and easy to knit.
Tying “controls” is mandatory.
Step-by-step instructions for knitting a clew knot
weaving knot
The weaving knot is very simple to make, but it can tighten strongly under heavy loads and creep under variable loads.
Often used during rescue operations in the mountains while providing assistance to victims.
Step-by-step instructions for knitting a weaving knot
Windlass knot
The bramline knot can be single or double.
Excellent for tying ropes of different diameters. When performing, you need to ensure the parallel arrangement of the strands and the correctness of the knot pattern.
It is recommended to tie “controls”.
Academic node
The academic node is a relative of the direct node.
Ideal for tying ropes of different diameters.
A thick rope is used to make a loop, and a thin rope is used to wrap it around. Be sure to tie control knots for safety.
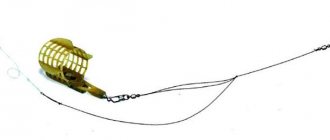
To the braid
Quite often, fishermen need to mount various fishing accessories on a braided cord. Most often this is required when installing a carbine to a spinning rod or making various equipment for a feeder and float rod.
The question of how to properly tie a carabiner to the main braided fishing line is mainly of interest to spinners, since they use a braided cord as the main fishing line; this is extremely rare among float fishing enthusiasts.
Basically, two nodes are used for such connections: a universal one and a free hinge node. Let's take a closer look at each of them and understand the installation and tying schemes for these connections.
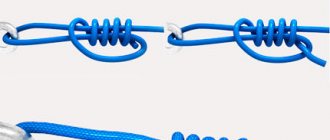
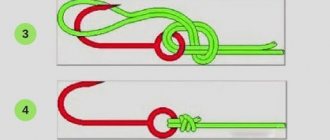
Universal knot
One of the most reliable knots is considered to be the “universal fishing knot.” I don’t know why they call it that, but I didn’t notice any versatility in it; you can’t tie anything to a fluorocarbon fishing line with such a knot, you have to look for alternative options.
It is tied as follows:
- It is necessary to thread the fishing line through the carabiner and tie a loop at its end;
- Through this loop it is necessary to stretch the free end of the fishing line, and move the other towards it;
- Wrap the resulting loop 4-6 times with the free end of the fishing line;
- Then you need to make another turn around the main line and pull the working end into the main loop, as shown in the video;
- Now all that remains is to wet and tighten the knot;
- Remove excess line.
Free hinge assembly
Very popular among fishermen is the free hinge knot, which allows you to tie a carabiner to a braided line. I don’t use it, but many friends prefer this connection. It is knitted as follows:
- The fishing line must be bent in half and twisted;
- The twisted line must be threaded through the eye of the carbine;
- Now you need to fix the end of the fishing line and twist the carabiner towards it;
- The line must be twisted;
- In this way, it is necessary to make up to 7 revolutions;
- Now all that remains is to moisten and tighten the knot
There is no excess fishing line left when installing such a knot; you can tie it very quickly and it is quite strong and reliable.
I think now all fishermen understand how to tie a carabiner to fishing line and braid. Don’t forget to leave comments, share the article with friends and acquaintances on social networks, and visit our website daily.
250 kg of fish for 1 fishing trip
The detained poachers told the secret of their success for a good bite. The fisheries inspectors were so surprised by their lack of poaching equipment.
Basic rules for tying climbing knots
You need to learn and practice tying knots in advance so that you can work confidently in the mountains and not have to ask your partner at the other end of the rope what to do. Here are simple rules that will help you master the art of tying knots.
- Observe the correct knot pattern. This will help you quickly identify an error if you tied a knot incorrectly.
- Straighten and tighten the knot. If there are overlaps in the knot and gaps in the body of the knot, it will not tighten correctly under load. Such a knot will be very difficult to untie.
- Leave a free end of the required length. For most knots it should be at least 10 rope diameters. But there are exceptions: for the “Oak” knot - at least 30 centimeters.
- If you doubt whether the knot is tied correctly, do not use it. Tie one that you know well.
The knots you use should be simple and easy to remember. On the route, you need to think about the route itself, and not remember the tricky node.
Figure Eight knot in mountaineering
The Figure Eight knot is one of the most popular, simple and reliable knots in mountaineering. This is the first knot taught to beginners. It’s hard to make a mistake: the design is recognizable and understandable.
The G8 has several options that can be used for different purposes. In mountaineering, this knot is used to tie a rope to a harness, tie the ropes together and make auxiliary loops.
How to properly tie a Figure Eight knot:
- All strands of the knot should run parallel, without overlap, and not pinch each other.
- Tighten each strand separately, otherwise, under load, the figure eight will tighten incorrectly or even come undone.
- Leave a small figure eight eyelet. If the knot is used with a carabiner, the loop should be such that the carabiner fits freely; if without a carabiner, it should fit along the length of the safety ring on the harness. An eyelet that is too large creates a mess on the belt and is also a waste of rope.
- Leave a free end of at least 10 rope diameters. If the end is smaller, then there is a possibility that on a poorly tightened knot it will crawl into the body of the knot, and the knot itself will unravel; if it is longer, it will interfere with working with the rope.
Diagram of the “Figure Eight-Conductor” node
Scheme of the “Counter Eight” knot for tying into the system
Important
It is not necessary to knit a control knot on the figure eight. The knot will not come undone under load if it is well and correctly tightened. But if you have just started using a new slippery and stiff rope and do not know how the knots on it behave, knit a control one.
Grapevine knot in mountaineering
Grapevine has a distinctive pattern and is easy to control. Using this knot in mountaineering, a rope cord is tied for a station or ropes are connected when one long thread is needed. You can tie a cord or ropes of the same or different diameters. The Grapevine knot reduces the strength of the rope less than other knots. The only downside of the knot is that it tightens a lot under load.
How to tie a Grapevine knot correctly:
- You need to knit the “crosses” of the knot in different directions, then the two halves rest against each other, and the pattern of the knot turns out to be correct - similar to XX.
"Oak" knot in mountaineering
A simple knot in mountaineering, quickly tied and untied, but its main advantage is that the knot easily bypasses all obstacles.
Therefore, it is used when you need to tie two ropes to go down, and then pull the rope through. The smaller the knot, the more likely it is that it won't get stuck.
You can tie ropes with “grapevine”, but “oak” is more compact and quicker to tie.
Compared to other knots, the “oak” knot eats up a larger percentage of the rope’s strength, but when you descend, there is no load on it other than the climber’s weight, so the safety margin is more than enough.
To appreciate the ease of tying knots, try tying grapevine and oak knots with a stopwatch. It took me 33 seconds for the “grapevine”, 14 for the “oak”. In thick mittens, I spent 48 seconds on the “grapevine”, and 13 on the “oak”.
How to knit an Oak knot correctly:
- Leave the free ends long - from 30 to 60 centimeters, because a poorly tightened knot can “go.”
- If you doubt the reliability of the knot, tie another “oak” at the ends coming out of the knot.
For those who are just going on their first route or preparing to go to a mountain camp, we have prepared an instructional video on how to tie an “oak” knot.
The UIAA knot, also known as the fireman's knot or the Munter knot.
UIAA creates strong friction between the rope and the carabiner, it is easy to control, so you can use it to belay the leader, the second participant, descend yourself if there is no basket or gris-gris, or lower the victim.
The knot works both ways: when you pull the working end of the rope, it will unfold into the one you need.
When descending the victim with an accompanying person or on thin ropes, a double UIAA or super UIAA is tied with an additional carabiner. They create more friction than a single, so it is easier to control the speed of descent, you can lower a heavy load or work with a thin rope.
The UIAA knot turns the rope, be prepared for the fact that there will be “lambs” left on it.
How to tie a UIAA knot correctly:
- To work with the UIAA knot, it is better to use pear-shaped coupling carabiners (HMS).
- Make sure that the moving part of the rope is on the opposite side of the carabiner coupling and does not untwist it.
- If a control knot is needed, tie it as close to the UIAA as possible.
Diagram of the UIAA unit on the carbine
We recommend watching several videos from the special project “Video tutorial on mountaineering”, where this node is actively used.
Prusik knot in mountaineering
The Prusik knot is a grasping knot. The principle of operation of such knots is that in an unloaded state they can be freely moved along the rope, and under load, due to the high friction force, they “grab” the rope.
The Prusik knot is the most popular and most used knot of this type. It is needed for safety when descending, climbing a rope or for rescue work. It is knitted on the main rope with a separate piece of cord.
There are other gripping knots that are a little more convenient in one situation or another, but this one works well enough in any situation.
How to tie a Prusik knot correctly:
- Use a cord with a diameter of 6 or 7 millimeters, it holds well on a main rope with a thickness of 9-11 millimeters.
- Make three turns around the main rope if its diameter is between 9 and 11 millimeters. In general, the larger the diameter of the rope, the fewer turns are required. The thicker the cord, the more revolutions.
- Straighten out all overlaps so that the knot “grabs” effectively.