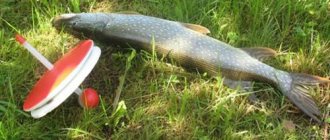
stoppers, shaped to imitate corn kernels with hooks that are mounted in the boilie.
maybe a stopper of this shape.
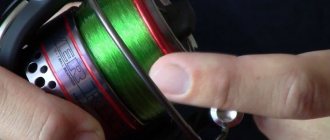
All stoppers have different shapes and bright colors that match the color palette of the boilies and serve as an appetizing beacon for fish. The size range is also varied. Manufacturing material – plastic.
Every fisherman can make a stopper for boilies with his own hands using a small piece of plastic tube. An empty ballpoint pen, a piece of rubber, or even a thin elastic band, which is used for tying money, can also serve as a stopper.
It is also worth mentioning the role of the stopper in other aspects of carp fishing. These small accessories can also serve well in attaching a leash to a carp hook, where corn grains are strung onto the left leash tail, which are secured with the same silicone stoppers: at the bottom with special carp ones, and at the top with rubber ones.
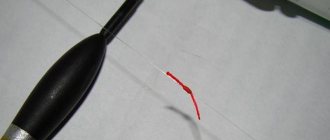
Color of fishing stops
Now in stores you can see a variety of color solutions for stoppers. Most fixing elements are black, light coffee or transparent. Such colors are considered the most acceptable, since they do not attract prey in the water and thus do not distract prey from the bait used.
The use of colorful brakes must be justified. For example, red color can be used when fishing on a reservoir with a clay bottom, green - in a reservoir rich in vegetation, yellow color - in a reservoir with a poor sandy bottom.
How to install a stopper on a fishing line for a float
When installing a bottom fishing rod, you should always have a small but very important element of gear at hand - a stopper for the float. The purpose of this mechanism is to limit the movement of such equipment elements as sinkers, floats or leaders along the fishing line.
The depth of the reservoir, casting over long distances or fishing from a boat require convenient and effective equipment. On the advice of experienced fishermen, using gear with a sliding float attachment is the most effective option for catching prey.
Whether it's still water, weak currents or open water without a stopper or sliding rig, you won't be able to enjoy fishing with a float rod.
What is a sliding float
The floats have different designs, but the principle of operation is the same. The sliding float moves freely along the line until it reaches a special stopper. If you change the position of the stopper, the immersion depth of the tackle will change.
Any sliding float has the following elements:
- antenna - this element makes the float visible in any situation that arises while fishing: wind, rain, waves. It is subject to requirements for good sensitivity and low windage;
- body - the effectiveness of the equipment is related to this element. In any conditions, the fish must control the bait, and the fisherman must see the bite. To do this, select the shape of the body and its color. The most versatile teardrop shape;
- The keel is the lower, invisible part of the float. It comes in different sizes. With a short keel, the float quickly restores its position on the water. When the keel is long, the float is more stable at great depths and in strong currents.
Types of stoppers
Float fishing is the most common and popular method of fishing.
Traditionally, a fishing rod with a float can be used to catch predatory and peaceful fish. It all depends on the place of hunting, the practice of the fisherman and, most importantly, on the correctly assembled equipment.
Stoppers on the fishing rod help to hold the buoy during casting and at the same time limit the immersion of the equipment to depth. When securing the buoy to the fishing line, fasteners are attached to allow it to slide. The stopper on the fishing line must correctly set the fishing depth, not come loose and sit securely.
The most common types of limiters among float fishing enthusiasts are:
- silicone stopper – perfect for match fishing, bright colors and various shapes, has good elasticity and density. The clamps can be double or triple. This type of limiter is easy to use and can be easily mounted on a fishing line. Disadvantage: frequent slippage;
- cambrics are rubber or silicone tubes with which the fishing line is attached to the keel of the float. The bright acid colors of the cambrics serve as artificial bait and provide additional fixation of the knots that hold the hooks. The rubber clamp secures the float well to the fishing line and is convenient when fishing from a boat.
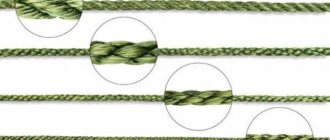
- Stopper knots are limiters knitted according to the principle of line to line. The best material for knitting them is wool or monofilament thread. According to the advice of professionals, knots should be knitted in double quantities, this way the resulting mechanism is better fixed;
- bead – a limiter made of rubber. Its task is to protect components from mechanical influences. The retainer is easy to put on, is clearly visible, and glides perfectly. This durable and reliable piece of gear is worn, especially for carp hunting. The regularity of its tightening depends on how the bead is installed.
thread clamp – made of wound thread, easy to install, secured with grooves. The industrial version consists of a set of pins and beads that inhibit slipping. The disadvantage of this type is the frequent tightening of knots;
It is important for anglers to choose the upper braking mechanism wisely. It is he who records the depth of fishing. Large sizes can limit its passage through the fishing rod ring, and small ones slip through the holes of the fasteners.
Three types of locking units that are simple and reliable
The stopper on the fishing line can be installed in different ways, and each angler has the right to independently make a decision on the method of forming a knot or installing a retainer based on his experience and practical skills. We would like to offer optimal options for locking units, which are characterized by ease of formation, but at the same time, reliable clamping and high performance. The practice of using these particular technologies has already proven the low influence of knots on the ability of lines to deform, and the miniature nature of the knitting has a small effect on the range of even light rigs.
After a couple of simple training sessions, the tying pattern is quickly memorized and the formation of a knot can be carried out not only at home, but also directly during fishing trips without much time. If the clinch knot is widespread among fishermen, and many know how to knit using this technique, then the Kremkus and Dunken knots are less known to fishing enthusiasts. Next, we will present to the reader’s attention easy-to-understand algorithms for forming the stopper nodes presented above.
Clinch
The clinch is the most popular and easiest to produce locking knot. To knit it, you will need a piece of wool thread 30 cm long. We fold a thirty-centimeter piece in such a way that one end of the thread is 5-7 cm longer than the other. We apply the folded piece to the main fishing line, where you need to form a stopper. We make 5-7 turns with the long end of the thread, going around the piece of fishing line and the thread attached to it in a spiral. After winding the spiral, we pull the tip of the thread into the formed loop and begin to tighten the winding. Before tightening, we wet the materials, preventing burnout and minimizing the resulting friction. We perform self-tightening with uniform efforts, not allowing the coils to overlap each other.
Important! The final clamping force should allow the twist to move along the line with little effort.
We cut the remaining ends of the thread to a length of at least 2 cm. Shorter tendrils make the knot rigid, hitting the rings hard when casting. The 2 cm tips increase the elasticity of the knot, and when it relaxes, they allow the stopper to be tightened to the optimal density for moving along the fishing line.
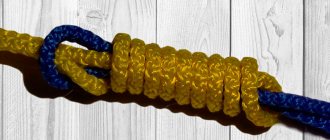
Kremkus
Tying a kremkus locking knot is even easier than tying a clinch knot. But it is worth noting that the volume of kremkus is much larger than other types of locking knots, since it is knitted from double wool thread. The knitting algorithm begins with preparing a piece of woolen thread suitable for the retainer, 35 cm long.
The segment is folded exactly in half, after which, stepping back 6-7 cm from the forked end of the folded material, they begin to wrap the main fishing line with woolen thread. Wrapping is done in wide turns, making 3-4 full turns. After turns, the thread wound at both ends onto the warp should leave 6-7 cm of free, double-folded wool. We twist the remaining ends together 3-4 times and pull them into a regular knot. After wetting the twist, gently pinch the knot and trim off the excess material, leaving the ends of the thread at 2 cm.
Duncan
Duncan is a practical knot that is distinguished by a high degree of reliability of tightening and is almost never subject to loosening. To tie a danken knot you only need 20 cm of wool thread. The method of tying a knot is not particularly sophisticated. We apply a woolen piece of thread to a nylon fishing line, holding the point of contact with our fingers, leaving a free tail of 4-5 cm in length. Next, from the long tail, bringing it behind the fishing line, we make a large loop. Press the resulting loop tightly with your fingers to the main fishing line. We wrap the fishing line with the long tip of a woolen thread, pulling the tip into the loop. Before tightening the twist, you will need to make 4-5 such turns, forming the body of the knot. Before final tightening, we wet both threads and apply a clamping force that allows the knot to slide along the line under tension. We cut off the excess ends, as in previous cases, to 2 cm. A miniature and soft knot is suitable both for fixing the movement of a sliding float and as a limiter for the movement of loads spread along the fishing line.
Homemade limiters
When retrofitting a bottom fishing rod, the frequency of brake replacement is quite high. The reasons for replacement can be very different: installation of a new float, mechanical damage to the fishing line, entanglement of equipment elements, displacement when pulled through aquatic vegetation.
The consumption of clamps for using a sliding float is noticeable. You can update your supplies without any difficulties by making a line stopper with your own hands. Moreover, the quantity and quality are not at all inferior to industrial forks. The advantage is that the brakes can be made right on the shore.
There are many designs of homemade clamps. How to attach them to the tackle: there are enough methods and devices.
The following improvised materials can be used as homemade limiters without any problems:
- Plastic tubes.
- Nipple rubber bands.
- Cork plugs.
- Beads quietly taken from the beloved female half.
- Styrofoam.
- Threads.
Each angler makes his own contribution: how to make a stopper, how to attach it to the fishing line and what size to give preference to. When installing stoppers for sliding tackle, we pay attention to the ratio of the length of the rod and fishing line, since the nature of the hook depends on this. The fishing location and type of prey will tell you how to attach a limiter to your hunting device.
After fishing, you should always inspect the gear, replace damaged elements, and adhere to the rules for storing them.
Stopper knot on the line
Often you have to fish at a considerable distance from the shore.
Throwing conventional float rods (match gear) over a long distance is quite problematic. Simple equipment is not suitable for this. Another disadvantage of a fixed float is the difficulty of fishing at great depths or from a boat (throwing into windows between the grass). In cases where the depth of the proposed fishing exceeds the length of the existing fishing rod.
In such situations, a sliding float helps out. This type of equipment allows the float to slide freely along the cord, stopping at the place where the stoppers are installed.
When casting, the load and leash sink freely. The float moves up to the set depth limit along the fishing line of the fishing rod.
Features of installing a locking unit for a sliding float
If the depth of the reservoir is shallow, then you can secure the float in the tackle of a regular float or match fishing rod using one of the blind fastening options. But what to do when the fishing depth is greater than the length of the fishing rod, if you need to make very long casts or fish from a boat in open windows of vegetation?
In these cases, the most effective is a sliding float equipment. How to make a sliding tackle and a locking unit for a sliding float, as well as installation features, is the topic of this article.
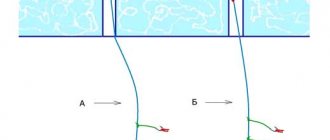
The sliding fastener of the float is that it moves freely between two stops. The float moves to the lower stop when casting, the upper one is necessary to limit the descent of the tackle to a certain depth.
There are a great many options for sliding fasteners and the choice is determined by what fishing rod and at what depth the fishing takes place.
Sliding floats are divided into three main types:
- Waggler floats with one ring for fastening are excellent floats for fishing in reservoirs without current and for long casts with a match rod. Using the adapter, it is quite easy to remove and replace the float. The two lower float options can be changed only by disassembling the tackle;
- floats with two rings on the body for the passage of fishing line - have excellent sensitivity and stability in the current. The downside is that the ring on the floats is of poor quality and is often pulled out of the body of the float or bent during hooking;
- floats with a central hole for the passage of fishing line - have a voluminous body and have a high load capacity. The advantages include ease of installation and excellent casting.
The main task of a stopper in a sliding tackle is to fix the float when the specified descent of the tackle is reached. Therefore, the stopper must meet the following requirements:
- hold firmly on the fishing line without unraveling or slipping;
- reliably fix the depth of descent of the tackle, but at the same time not be fixed tightly, but move along the fishing line if you need to change the descent;
- slide freely through the rod's rings.
The simplest stop is a piece of rubber nipple through which the fishing line passes twice; it holds quite firmly, but is a little rough and does not slip through the fishing rod’s rings well. Today, manufacturers of fishing gear make special rubber stoppers of cylindrical or oval shape , which are quite simply put on the fishing line, but, alas, sometimes they slide along it just as easily. In this case, a double stop helps.
Ready-made thread stops are tied onto pins or tubes with a groove and come complete with beads that prevent the knot from cutting into the float ring or sliding through it. Installation is quite simple: put a fishing line through the tube, pull a stopper onto it and tighten it and cut off the ends of the fishing line, but not right near the knot, but leaving some part of 12-18 mm. The downside is that the knot needs to be constantly tightened so that it does not slip. There is no need to tighten it, because when the stopper moves along the line, it will begin to spiral.
The stop knot is not put on the fishing line, but is tied during the installation of the gear. You can knit from either monofilament or cord. The cord fits well through the rings of the fishing rod and is better visible than a monofilament rod, but the knot on it slides easier. A monofilament, when tied very tightly, can deform the main line. The stopper knot must move along the line , but not slide on its own. All presented knots meet these requirements, and they are very easy to tie.
To tie a single stop knot you need:
- Make a loop from the fishing line for the stopper and place the loop on the main fishing line;
- insert the locking line into the loop, wrap it around the two lines a couple of times and tie a knot, after wetting it;
- cut off the ponytails, but not very short.
Double stopper Kremkus:
- lay the stop line in half and wrap it through the main line;
- make a loop around which to wrap the ends of the fishing line a couple of times;
- moisten the knot, tighten it and cut off the excess ends. This knot is thicker than a single knot and holds much more securely.
There is one rule for any locking knots: do not cut the ends of the knots very short. Long ends pass through the rod's rings more easily than short "barbs".
To make a sliding float with an axial hole or with two rings for passing the fishing line, you need to put the upper stopper on the fishing line, followed by the float and the lower stopper. Well, then the rest of the gear is assembled (shipping, leash, etc.). To fix the Waggler, special adapters are used that fit between the stops.
The most popular option for adapters for sliding fastening of floats are adapters with an installed sleeve through which the fishing line is passed. A swivel with a carabiner or a tightly fitted rubber tube is attached to the bushing for fastening the float. The bushing comes with a ceramic liner or all-metal. The most successful option is if the sleeve is made entirely of Teflon and is equipped with a swivel with a carabiner. This adapter glides perfectly and does not deform even thin-section fishing line.
If the depth of the reservoir is greater than the length of the fishing rod, then great attention must be paid to the choice of the upper stop, which limits the descent of the tackle. A large stopper, which easily passes through the tulip when winding freely, can rest against it during the load when catching a large fish and the working depth is lost. This is especially true in the tackle of a match fishing rod, which has a tulip and small rings.
Another problem appears if the fishing depth is such that the top stop hits the reel during reeling when casting. In this case , it interferes with the free passage of the fishing line and normal casting will not work. Therefore, it is better to use a non-rubber stopper and a small knot with a bead in front of the float to prevent the knot from slipping through the adapter. A plastic bead with melted edges would be the best option because it glides well and does not deform the fishing line.
The lower stopper in the sliding tackle of the float does not need to be installed; in this case, its role is played by the upper weight. But it’s still better when it is there, so that during casting the float does not hit the weight. To do this, the stoppers are installed above the top weight at a distance slightly greater than the length of the float to prevent the equipment from overlapping.
Please note that even very high-quality stops can slip, so get a waterproof markerto record the length of the descent.
The knots do not cut into the float rig, so there is little chance of slipping. The big advantage of knots is that they can be tied when assembling the tackle without prior preparation. Every angler must have the technique of tying stopper knots. The ability to correctly tie a stopper knot for a sliding float is needed not only by professional fishermen, but also by ordinary amateurs for whom fishing is only a hobby.
Stopper: necessary requirements
The stopper is a rather small but very important piece of equipment for the fishing rod. With its help, the desired depth of the bait is established.
The main requirements for such a device are:
- confidently and reliably stop the float at the desired point;
- do not have a dead fixation, the ability (if necessary) to change the depth of the depth;
- should not slip through the eyelet connecting the float to the fishing line;
- move freely, without snags, through the guide rings of the fishing rod when casting.
For these purposes, you can use self-made knots or ready-made stoppers purchased at the store.
Basic requirements for attaching a float to a fishing line
Decide on the type of fish you are aiming to catch and find out the depth level where they are most often found. If the fish is deep-sea, the float should have a power reserve almost to the very bottom.
Advice: with the data you read on the Internet, you cannot have a guaranteed bite; do not be afraid to use trial and error to find the optimal depth parameters for your pond.
In practice, two types of float mounting are used: sliding (moving) and fixed (dead).
Unconditional requirements for attaching a float to a fishing line:
- The float must be carefully fixed to avoid unwanted movement along the line when hooking or casting. (for blind mounting)
- Allow the float to move freely along the line for easy adjustment of the lowering length. (for sliding type of fastening)
- Number of points for attaching the float to the fishing line
The location of the float on the fishing line is determined at the float attachment points, the number of which varies.
What to make a stopper assembly for a float from?
You can make locking units yourself from the following materials:
- cord used in fly fishing;
- wicker materials;
- monofilament fishing line;
- ordinary textile threads.
Cord, braid - passing well through the rings, visible on the main line. Monofilament, less noticeable. If the knot is tightly tightened, deformation of the main material of the tackle will occur. Therefore, making knots out of it is not recommended.
The most suitable stopper for a float is a thick thread. It does not come undone when wet, and has excellent adhesion to the main line.
The thread is chosen to be of equal diameter to the warp. Any color can be used. Bright colors will always help you easily find the place to install the stopper.
Why is a stopper needed?
A stopper is a restriction on the movement of a leash, sinker or float along the line. Since the depth of reservoirs is different, to fish in a certain place, the fisherman needs to set the casting depth using a locking unit for the float.
Types of stoppers
The following types of stoppers are distinguished:
- Silicone. At the factory they are given the shape of an ellipse or a ball; for ease of use, they have a loop that allows you to put it on the main fishing line. They are produced in different sizes, depending on the thickness of the fishing line.
- Cambric.
There are two options here: either factory plastic from the store, or a piece of simple nipple rubber. Such spots are rarely used, as they often slip off the fishing line. As practice shows, the use of silicone or lead stops is very difficult when casting. They cling to the fishing rod guides and interfere with the passage of the fishing line. - Thread. This stopper is factory made from thread and comes with beads. You can fix it on the fishing line using a thin tube as follows:
- the fishing line is wound through it;
- the knot is removed and tightened;
- the ends of the thread are cut with a margin of 2-3 cm so that the knot passes well through the guide rings on the rod.
When tightening, it is necessary to wet the thread to avoid deformation of the main line.
The stopper knot passes through the guides much easier and does not interfere with casting. To make it you need only 15 cm of fishing line.
How to put ready-made stoppers on a fishing line?
In fishing stores you can purchase already tied knots.
They are sold with a set of beads that protect the locking unit from impacts. Installed as follows:
- The line is threaded through the tube.
- The knot is tightened.
- Pulls up.
The disadvantages of this type include the possibility of slipping and self-dissolution. You have to tighten it periodically.
There are also special stoppers made of silicone and rubber. Such models are located on a thin metal wire with a loop.
- The scaffolding is thrown into a loop.
- The stopper is pulled off.
These are quite practical and convenient devices. For reliable fixation (to avoid slipping), it is recommended to wear a couple of pieces.
How to tie a stop knot?
When fishing with match and Bolognese fishing rods from long distances, anglers usually use sliding floats. The fact is that the depth at the fishing spot often exceeds the length of the rod, so casting a blind rig (with a fixed float) is not possible.
The sliding float slides down the line, resting against the weight, and the length of the overhang becomes comfortable for casting.
In the water, the leash and weights begin to sink, while the float remains on the surface. And they sink until the float mount hits the stopper.
The stopper is the smallest, but extremely important part of the equipment, so it’s worth talking about it in more detail.
How to attach a float to a fishing line?
To properly secure our gear, you must follow these recommendations:
the fishing line is attached to our equipment solely thanks to its sharp ends; Be sure to put pieces of rubber on the ends of the thread. The diameter of the latter should ensure that the monofilament is pressed tightly against the float. It is this condition that will allow the position of the float itself to be changed in the future if the fisherman wishes; it is best secured to a monofilament thread through a special metal loop
Moreover, it is worth paying attention that a fishing line of small diameter can spontaneously tighten, making the float motionless; The quill-shaped rig is inserted into a rubber tube. Moreover, the diameter of the latter should ensure good clamping
Then you can begin to thread the monofilament through a small piece of insulating material, which is pulled directly from the wire. And attach a ring to the insulation. Its tip is inserted inside the latter and twisted until it has two ends. It is they who will be inserted into the rubber tube on the monofilament thread itself to fix the location of the float with further processing with a needle file to avoid unwanted injury.
Two-point mounting
This method is the most reliable and safe. Since only in this case the working position is preserved, not only at the moment of splashdown, but also during casting and playing with bait.
If you are interested in the method of attaching the float at two points, then:
- Prepare two cambrics in advance. The diameter of the latter must correspond to the thickness of the keel.
- Insert the free end of the thread in turn into both cambrics, making sure to fix the first at the bottom and the second at the top of the keel. Ready!
Single point mounting
This fastening option is considered the most popular today. This is because the equipment’s good sensitivity and maneuverability are maintained. The consumables you will need are wire and a standard cambric.
A small piece of wire is inserted into the lower ring of the float. Then both ends are twisted and inserted into the cambric, where the monofilament thread was previously inserted.
Sliding float mount
This fastening method is perfect for hunting predators, for example, pike. In this case, it is recommended to use exclusively large-sized gear. After all, it is necessary to ensure that the bait is picked up in the form of live bait.
In what case should you give preference to this type of fastener?
- if you decide to fish in a deep reservoir;
- if you are hunting for fish in local difficult terrain, for example, in “windows” between algae and other thickets. Since in this case you can only use the vertical option of feeding bait;
- if it is necessary to carry out the most accurate casting of bait;
- when you went hunting for a predator using live bait;
- in the case when lowering the bait is done exclusively in jerks. After all, practice shows that fish often do not allow the bait to sink to the surface of the bottom of the reservoir, snatching it on the move.
The main feature of this type of fastener is its free movement between two stoppers. At the moment of casting the bait, the float moves closer to the lower stopper, while the upper element is considered the limiting part of this equipment.
As a stopper you can use:
- rubber or silicone stoppers;
- thread stoppers;
- locking nodes.
The main stages of installing a sliding type of equipment to a monofilament:
- First of all, the upper stopper is threaded through the monofilament thread.
- Next, the float is fixed.
- Only then is the lower stopper threaded through.
- After assembling other equipment, for example, a leash and loading a float, the equipment can be considered ready.
Float mounting is blind
Step-by-step instructions for blind fastening:
- To begin, you should prepare a small piece of wire and a casing.
- The wire is inserted into the float ring, and, bent in a loop, is twisted into a pigtail. Moreover, you must exclude the possibility of pinching the float, ensuring the free movement of its ring.
- The ends of the resulting braid are carefully processed with a needle file to avoid damage to the monofilament.
- Bring the free end of the thread from the rod side through the cambric and insert the wire through it. How movable the structure will be depends directly on the thickness of the resulting braid. If you are not satisfied with its looseness, it is recommended to choose a wire of a larger diameter.
- And only then can you begin to easily move the fixed type of equipment along the monofilament.
Requirements for the stopper
There are several important requirements for a float tackle stopper. First of all, it must cope well with its main function, namely, reliably fix the location of the float at a given depth.
Therefore, it should not slip through the hole in the sliding float attachment, nor should it slide down or up the line.
It is also important that the stopper passes freely through the guide rings; there should be no elements on it that could get caught on the tulip clip during casting.
Which stopper is better?
At the moment, fishing stores sell special silicone stoppers for equipping float gear. For ease of installation, they are strung on a loop of thin wire.
The main line is threaded through this loop, and the stopper is simply pulled onto it. This kind of stopper is very convenient and practical.
They do not slip on the fishing line, are easy and quick to install, and are affordable for everyone. But they have one drawback. They are too bulky.
They slip through the large rings of Bolognese fishing rods without any problems, but through the miniature rings of match fishing rods the silicone stoppers fit end to end, which is fraught with shooting off the rigs and even breaking the fishing rod...
To equip match fishing rods, it is best to use stopper knots. They are very compact, so they easily fit through even the smallest rings.
As for their reliability, they are not much inferior to silicone stoppers. They hold the line tightly, do not slip along it, and do not cling to anything during casting. The most important thing is to tie such a knot correctly. Let's look at this in more detail.
How they work
As a rule, rigs with sliding floats include a pair of stoppers. The first of them is installed on the main line in front of the float. The second clamp is mounted behind the signaling device, almost right next to the sinker. It prevents the heavy float from coming into contact with the load, which occurs as a result of casting the rig on the backswing and during the flight of the equipment. When casting, the float moves toward the end of installation, and the stopper prevents tangling of equipment elements, stabilizing the position of the alarm, thereby increasing the aerodynamics and flight qualities of the equipment.
The upper stopper comes into operation after splashdown of the installation, which entails immediate, under its own weight, deepening of the load with bait. The stopper on the fishing line will stop the float rising upward along the thread at the mark required by the fishing conditions and will reliably hold the installation in the required water horizon. To change the horizon of setting the equipment or the depth of the bait, the angler needs to move the limiter along the line in one direction or another and calmly continue fishing.
What to knit from?
The locking knot for the sliding float can be knitted from ordinary monofilament, braided line, or even from ordinary cotton sewing thread. The last option is the most preferable.
Unlike fishing line, cotton thread has better grip on the fishing line and is not prone to unraveling when wet.
The diameter of the thread should be comparable to the diameter of the fishing line on which you are tying the knot. The thread color can be any.
Personally, I prefer to knit stoppers from bright threads. This does not affect the catchability of the tackle in any way, but the knot becomes much more noticeable; it can be easily and quickly found with the eyes on the fishing line even from a great distance.