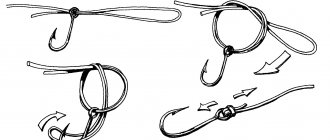
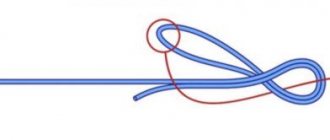
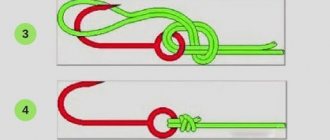
How to tie a fishing line on a hook: Palomar knot diagram
Indeed, the outcome of the fishing depends on the correct choice of option and method of tying the fishing line on the hook. When choosing the wrong knot, very often the fish can break off or this leads to the loss of the hook itself. Therefore, a correctly chosen knot is the key to a large amount of catch. In order to choose the right knot, it is necessary to characterize the fish being hunted, the thickness of the fishing line, and the width of the eye. All these components must be taken into account when choosing a node. There are options that are absolutely not suitable for thin fishing line, but are ideal for thick braid.
The simplest option is the Palomar knot. This is an option that is often recommended by manufacturers of thin monofilament lines. That is, it is made with individual hairs, without the use of weaving. The main advantage is that even an inexperienced fisherman who has just begun to advance in this matter can tie this kind of knot. Disadvantage - absolutely not suitable for braided and thick thread. But this is an ideal option for catching small inhabitants of lakes and rivers that a thin fishing line can support.
Scheme
How to tie a fishing line on a hook, Palomar knot diagram:
- In order to make such a knot, you need to fold regular sewing thread in half so that you get a small loop.
- Now this thread, folded in half, must be passed through the hole in the hook and tied with a regular knot on the fishing line, just like laces are tied.
- After this, the edge with the fishing line, which resembles a loop, is threaded through the arc of the hook itself and tightened. Now you need to cut off the excess end of the fishing line.
Simple Palomar
How to tie a hook to a fishing line video
How to properly tie a hook to a fishing line video
How to tie a hook, easy and quick video
The standard knot is the most popular knot among anglers for tying spatula hooks. Almost all fishermen began their fishing journey from this node, so this video will be most useful to novice fishermen. The main advantages of this knot are its ease of knitting and strength of more than 90%.
How to properly tie a hook to a fishing line video
Source: fish-haus.ru
HOOKS AND YARN
Crochet hooks vary in size and the materials from which they are made. If you use different types of threads in one work, then for each type you need a separate hook. There is a rule: the thicker the thread, the larger the hook should be.
Hooks
Usually the hook size is indicated in millimeters or as a letter designation. In stores you can find good quality steel hooks, the largest ones are often made of aluminum or plastic, there are also wooden ones, which are also quite popular. But still, steel and aluminum differ in the maximum variety of sizes. Avoid cheap plastic alternatives, which often have a rough surface. The Tunisian knitting technique requires very long hooks with caps at the ends. Sometimes the required hook size is indicated on the yarn label. I advise you, especially at the beginning of your practice, to adhere to these recommendations.
Yarn
Threads vary in thickness and density. There are generally accepted designations for thread thickness. Yarn can also be twisted from several, usually two, three or four, threads. For beginners, I would advise using soft and dense threads that will not unravel while working. A thin single or double thread is usually used to knit lace or decorate the edge of a product. It is approximately twice as thin as a triple one. Triple thread is recommended for knitting children's items and thin summer clothes. A thread consisting of four single threads is used for light sweaters, cardigans and shawls - this is a thread of medium thickness. If you want to knit a warm sweater or jacket, then you need a thread folded in half. Thread folded in three is suitable for jackets and woolen scarves. Clothing that you are going to wear outside in cold weather should be knitted from thick yarn. It can be imagined as consisting of four parts, each of which is the original thread folded four times.
LET'S START KNITTING
You start with a loose starting stitch and continue to knit one after the other. You will get a chain. This will be the first row of your product. I recommend that you first practice holding a hook and thread in your hands a little. It is important that you are comfortable. In general, there are no strict rules on this matter. The hook should move freely. The following are the two most popular ways to hold a hook, but you can create your own unique method. There are also several ways to hold the thread. This is very important, because its tension, and therefore the quality of work, depends on it. Over time, you will be able to constantly maintain the desired tension, make the same loops and even rows, without thinking about it at all. Try different methods to find the one that works best for you.
HOW TO HOLD THE HOOK
Both methods are convenient - use the one you like best.
Method 1: Hold the hook between your thumb and index finger as if you were holding a pen or pencil.
Method 2: Grasp the hook on one side with your thumb and on the other with your other fingers, so that its long part is in contact with your palm the way you usually hold a knife.
Making a knot
You have started knitting. First you need to make a knot. Step back about 15 cm from the end of the thread and make a loop. Hook the thread through it and pull it through the loop. Pull the ends of the thread, thus tightening the knot. The hook will be inside it.
Hold the thread
The working thread must have a certain tension and at the same time be in a sufficiently free state. This can be done in two ways. You can wrap the thread around your little finger, stretch it in front of your ring and middle fingers and pinch it with your index finger, then the tension will be created by the middle finger. Or wrap the thread around the little finger and pull it behind the next three fingers, and then the index will provide tension. If the thread is thin, then you can hold it with your ring finger and little finger. In general, choose the method that is most convenient for you.
Method 1: Wrap the thread around your little finger, extend it in front of your middle and ring fingers and behind your index finger. Keeping your hook threaded through the starting loop and pinching the first knot between your thumb and middle finger, prepare to make a loop by lifting your index finger slightly.
Method 2: Wrap the thread around your little finger and pull it behind your middle and ring fingers. Keeping your hook threaded through the starting loop and pinching the first knot between your thumb and forefinger, prepare to make a loop by lifting your middle finger.
FIRST LOOPS
The first connected row is called the main chain, and the loops of this chain are called air loops. The chain can be short - two or three loops, or it can be long. The chain is the basis of the product, so it must be done carefully. So, you have already learned how to hold the thread and hook correctly, perform the first knot and are ready to knit your first chain of air loops. To do this, you simply need to thread the thread through the initial loop, then pull a new one from the resulting loop, and so on. Air loops are also used as a separate knitting element, for example, in lace and openwork products. The size of the main chain is usually indicated in the knitting instructions for each item. A simple loop, or the so-called half-column, is the simplest type of loop. The first crocheted products consisted only of them. Nowadays, the half-column is used mainly for connecting a chain into a circle, and also if you need to reduce the number of loops in a row or tie two parts of a product together, you will come across this type of loop more than once.
Counting loops
To count the number of stitches correctly, make sure that the chain is not twisted and that the front side is facing you. The loop through which the hook is threaded (the so-called “working loop”) does not count. The first knot at the beginning of the chain is also not considered a loop.
Making air loops
1. Take the hook in your right hand. While holding the thread, pinch the first knot between the thumb and middle finger of your left hand. Pass the hook through the starting loop and hook the thread with it, as if turning it counterclockwise. Now the thread seems to wrap around the hook. 2. Thread the hook and thread back into the starting loop. You have completed your first air loop. 3. Repeat the previous two steps. Having made several air loops in this way, raise your left hand a little so that the hook is perpendicular to the chain - this will be more convenient, and continue.
We knit a half-column
1. Tie the main chain. 2. Pull the hook out of the last loop in this row and insert it back, but on the other side. Then insert it into the second loop from the end (not counting the loop on the hook). Next, hook the working thread so that it wraps around it, throw the thread over the hook. 3. Pass the hook with the thread through two loops at once. You now have your first half-column. Keep knitting. Insert the hook into the next loop and repeat the steps described in the previous two steps.
Single crochet
1. Tie a chain. Turn the hook and insert it into the third loop from the end. 2. Hook the working yarn with the head of the hook and pull it back through only one loop. 3. You now have two loops on your hook. Hook the thread again and pull it through both loops. So you have knitted your first single crochet. 4. Knit the row to the end in this way. 5. To move to the next row, turn your product to the opposite side and knit one air loop. This stitch counts as the first stitch of the next row. Then make a single crochet by inserting the hook into the second stitch of the previous row. Knit further in the same way.
Half double crochet
1. Tie a chain. Turn the hook. Yarn over and insert the hook into the third loop from the end. Hook the thread. 2. You now have 3 loops on your hook, counting the yarn over. Pull the working thread through one of them. Hook the thread again. 3. Next, pull the hook and thread through all 3 loops. You have just worked a half double crochet stitch. Continue knitting until the end of the row. 4. To move to the next row, turn your product with the opposite side facing you and knit two air loops. They count as the first half double crochet of the next row. Then work a half double crochet by inserting the hook into the second stitch of the previous row. Continue in the same way.
Double crochet
1. Tie a chain. Turn the hook. Then throw the working yarn over the hook and insert it into the 4th loop from the end. That is, you need to skip 3 loops of the first row. Hook the thread. 2. You have 3 loops on your hook. Pull the crochet thread through only one of them. Hook the thread again. 3. Now pull the yarn through the 2 loops on the hook. Hook the thread again. Pull the working yarn through the 2 remaining loops. You have knitted your first double crochet. Continue to double crochet until the end of the row. To move to the next row, turn your project over and work 3 chain stitches. The loop you currently have on your hook is the first stitch of the next row. Make 1 double crochet by inserting the hook into the 2nd stitch of the previous row. Continue knitting longer in the same way.
Double crochet stitch
1. Tie a chain. Yarn over 2 times and, skipping 4 loops of the previous row, insert the hook into the 5th row. Hook the thread and pull through 1 loop on the hook, 2. Pull the hook and thread through 2 of the 3 loops and hook the thread. Pull it through 2 loops. Hook the thread and pull through the remaining loops. When you reach the end, turn the product and make 4 air loops. You will receive the first stitch of the new row. Tie a double stitch to the idas and, inserting the hook into the second stitch of the previous row, continue in the same way.
Double crochet stitch
1. Tie a chain. Turn the hook, make 3 yarn overs and, skipping 5 loops of the previous row, insert the hook into the 6th. Hook yarn and pull through 1 loop on hook. 2. Hook the thread and pull through 2 loops - these steps must be repeated 3 times. Knit a row in this way, turn the product and make 5 chain stitches. Work a double crochet stitch by inserting the hook into the second stitch of the previous row.
Susie Jones
Source: vrukodelii.com
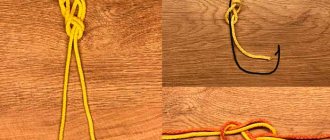
How to tie a fishing line on a hook with a bloody knot?
One of the universal options is the bloody knot. Based on this method, other options have been developed that can be used with both thin threads and braids. This knot is not suitable for use on braid, but is ideal for using thick and thin threads. It can be called universal, the strength is quite good and is 70% tensile strength.
How to properly tie a fishing line on a hook with a bloody knot:
- In order to make such a fastening, you need to pull the short tip of the fishing line into the eye of the hook.
- Next, you need to rotate the metal product around its axis until you get turns.
- It is necessary to get about five to six turns.
- Now you need to lower the fishing line down, and then pull it out at the very top, through the loop formed after bending the fishing line.
- Next, the knot is tightened and the excess line is cut off.
Bloody Knot
Clinch Knot
In many ways it is similar to the universal one, but it requires fewer actions to form. Limitation: Suitable for ring hooks only. Characterized by ease of formation and reliability. Difficult to use for lines with a high roughness coefficient.
Technique for forming a Clinch knot:
- The working end of the fishing line is threaded into the ring.
- Clamping both ends, make up to 7 turns to form a twist.
- The ring should have a small loop through which the free end of the fishing line is threaded.
- Moisturizing and tightening.
The average strength is up to 75%. For this type of knot it is preferable to use monofilament. In addition to the hook, you can use it to tie feeders or similar fishing gear.
For the ring hook, only thin fishing thread is used. Otherwise, it is impossible to make a truly reliable unit.
Method of tying fishing line on a hook using a step knot
It is mainly suitable for use in hooks that are used to catch predatory fish. Most often, they are not equipped with an eye, and the tip is a thickened spatula. That is why other options for fastening the fishing line are not suitable.
Method for tying fishing line on a hook with a step knot:
- The stepped knot allows you to very tightly and reliably fix the fishing line on the hook so that it does not slip through the thickening. Most often, this option is used when fishing for catfish and pike, which are large in size and often break off during fishing.
- Such a node will not allow this to happen. Knitting is quite simple, despite the complex description. It is necessary to fold the thread in half and lay it along the hook, in the direction of the head.
- Next, you need to wind the short tip around the blade, and then fold it up and wrap the turns. Next, the tip of the thread must be drawn upward on the lower turn. It is necessary to tighten the resulting knot and cut off the excess.
Scheme
Universal nodes
Continuing the topic, we will consider the technology of tying universal knots, which help to tie a hook, swivel with a clasp and any other artificial bait used by the fisherman in the fishing process. These types of connection technologies are especially popular in the fishing community due to their versatility and relative ease of implementation, which can be seen by studying their implementation patterns in more detail.
Palomar
The palomar knot can rightfully be called the most popular and easiest to perform. They are used to knit hooks and spoons, and mount elements of various fishing equipment. Among the disadvantages, it is worth noting only the inconvenience when using fastening elements in the form of rings with small diameters. Monofilament fishing lines are the most suitable option for the technology, retaining the final 90% of the original strength.
Having collected the material twice, they pierce the fastening ring and form a classical knot, winding not one, but two or three twists. The shank of the hook is threaded into the resulting loop and the resulting twist is pulled together.
Rib
The method is suitable for both the eye and the blade of a fishing accessory. Despite the low breaking load after tightening, only 70%, anglers respect this technique for its versatility and simplicity when installing with braided lines. A thread folded in half is applied to the fore-end, wrapping the tip of the line 4-5 times around the pin and the attached cord itself. At the last turn, the tail is inserted into the loop formed during the initial formation of the installation and the knot is finally tightened.
cat's paw
A good knot for a hook when connecting to any diameter of braided line. The final breaking load remains between 80–85%.
The wattle fence is folded in half and threaded into the fastening ring of the hook. The resulting loop is placed on the shank of the hook being tied and wrapped three or five times clockwise around the hook. The remaining tail is threaded into the loop obtained by folding the thread in half, and after wetting the twist, tighten it until it stops.
Canoe man
Universal knitting for all types of cords. But it is more effective for monofilament line with 95% of the remaining strength, which for braid and fluorocarbon rarely reaches 80%. You can only tie a hook correctly if you follow the correct tightening of the knot, otherwise it will unravel on its own.
Two half-loops are made on the cord, passing one into the other. The remaining tail of the thread is passed into the fastening ring of the accessory. Next, the tip of the thread is inserted into the half-loop that was previously passed through the other. As a result, the entire plexus is pulled together into a compact and dense knot.
Snell
Tensile strength remains within 90%. You can connect different materials with small diameters in assemblies. With a slight modification of the knitting technique, it is possible to knit a hook without an eye.
A 10 cm long tail threaded through the mounting hole is bent into a loop and returned back, again pulled through the eye hole. Subsequently, 5–7 turns are made clockwise around the forend with the thread and the twist is tightened by bending the rest of the thread over the bend of the hook.
Orvis knot
Strong knitting with 95% initial breaking load, with which you can connect absolutely any type of fishing line to hooks. With a small supply of material, the tail of the thread is inserted into the fastener hole, twisting the end once around the main line. The remaining tail is inserted into the loop obtained as a result of this manipulation, which is wrapped three times around the newly created bend and tightened evenly.
Duncan loop
The presented technology is used for attaching hooks with soft lines, where the tensile strength of the nylon material as a result of the connection reaches the level of 85–90%.
A 15 cm piece of fishing line is inserted into the hole in the fastener and four or five turns are made around the folded fishing line above the fore-end. After this manipulation, the end of the thread is inserted into the loop obtained as a result of folding the warp and the knot formed on the cord is tightened.
Eugene
This type of connection is considered to be a fairly reliable method, which is confirmed by the high percentage of residual breaking load at the connection point, determined in the range of 95-97%. Also, this type of connection is considered universal, because both monofilament and wattle are tied with equal reliability. We tie the hook to the fishing line by threading a 10-12 cm piece of cord into the fastener. We form a loop from the stock and wrap the main fishing line three times. We insert the remaining free tail into the loop and tighten it evenly, not forgetting to wet the twist first.
Rapala knot
Initially, the method was developed for mounting spinning baits, such as wobblers and spinners, but over time, fishermen successfully transformed the technique to suit the needs of other connections, which is successfully used in practice and allows you to reliably tie a hook. Ninety percent breaking load on any material adds versatility to the technique.
Initially, a regular, so-called lace knot is formed, the end of which is inserted into the eye of the hook. Next, the tip is inserted into the loop obtained from the base and wound onto the base. After this manipulation, the free end is returned to the hook and threaded into the loop that has not yet been tightened. Now the twist is ready to be pulled together, which should be done with a smooth movement.
Tie a fishing line on a hook: a simple tag knot
This knot is mainly used not for tying a hook, but for attaching a spoon or sinker. But this option is also quite popular, as it is the easiest to knit.
Tie a fishing line on a hook, a simple tag knot:
- It is necessary to fold the regular thread twice and thread it through the hole of the hook.
- Next, you need to insert the resulting 2 protruding threads into the loop and tighten. This will create one of the simplest knots.
- The main advantage is that it can be simply untied without cutting the line.
- The main disadvantage is that it has a very weak load, so it is not used for fishing.
Scheme
Knots for connecting lines
It is known that one of the disadvantages of braided fishing line is its ability to become flat after several times of use. Therefore, when forming a node, you need to take this into account. You should also know that the strength of the knot is also affected by the thickness of the cord; the thicker it is, the weaker the knot is.
“Shock Leader knot” The knot is not large and can easily slide through the rod’s rings, which gives it an advantage in use in many types of fishing.
This video clearly shows the order of execution of the node
The “Mahin leader knot” or “carrot” knot is a reliable and compact knot suitable for spinning rods, feeders and carp rods. Excellent connection between braid and monofilament or fluorocarbon leash. When fishing for carp, it is perfect for tying on a shock leader.
Albright knot When it comes to quality, we mean a universal knot for fishing with various gear. If you are exclusively engaged in spinning fishing and you need to tie a thin fishing line and braided cord or fasten a leash, then by all means use this tying method. But do not neglect the main rule of tying fishing lines - the fishing lines should not have a strong difference in diameter!
For float fishing, the knot is used instead of a swivel, when its presence is not appropriate, since particularly delicate elements of equipment are used and the swivel spoils everything with its bulkiness.
Before considering the most reliable fishing knots in this category, we note that we do not recommend tying fishing line to hooks, swivels or rings made of thinner material (wire) than the fishing line itself; this will negatively affect the quality and reliability of the knot.
The disadvantage is that you need to fold the line in half, which increases the volume of the knot and shortens the leash.
Node advantage:
- a bunch of not only monofilament fishing lines, but also braided cord and baits used both in spinning fishing and fishing with feeder gear;
- the ability to attach many equipment elements (swivels, hooks, flies, etc.);
- easy to knit.
“Double Palomar” is knitted like this
The “Triple Palomar” knot provides for the installation of fishing accessories and lures with a large eyelet to a braided fishing line. This is how the knot is tied
Palomar drop shot knot
Knot “Clinch” or “improved clinch knot” Let’s consider two types of this knot:
- normal clinch;
- clinch reinforced.
This knot is widely used, but has proven itself especially well in spinning fishing. The first version of the knot is used mainly for mounting sinkers, since it is inferior in strength to the “reinforced” knot, which cannot handle even the most complex hooks.
Where such a node is not used:
- for mounting sinkers with a transverse or longitudinal hole;
- for mounting tubes and factory rings.
Important! The size of the ear of the above accessories should not be more than 1.2 mm, since at diameters above the specified indicator the knot does not hold securely. Learning to knit an improved knot model
Learning to knit an improved knot model
Homer knot or homer knot
The knot tying pattern is shown in detail in this video.
Grinner knot or universal Uni knot This knot is also known as the Uni knot or ukni not. Uni means universal.
The double universal Uni knot is knitted like this
Figure Eight Knot This fishing knot is designed for attaching both hooks with and without an eye. It is also suitable for making mobile loops, tying feeders, sinkers, and leashes. In a word, it has wide application and can be used anywhere.
This knot can have several weaving options, for example, by folding the fishing line in two you will get a double figure eight.
To attach two fishing lines, many connections are used, some of them are universal.
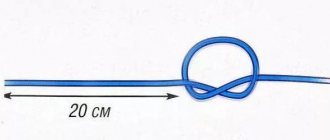
The water knot, known for a long time, guarantees a strong connection and is easy to knit. It has been known since 1425, which indicates its versatility and professional suitability. This knot is used when connecting fishing lines and to tie the leash to the main fishing line.
Improved clinch knot, through which the hook ring is connected to the leader, and the swivel is connected to the main line. Most of all, it is suitable for monofilament lines up to 0.4 mm. In terms of its strength, it works at 95% and is the most popular and versatile among those used by anglers. But it is better not to use it on large winding rings or thick wire.
How to properly tie a fishing line on a salmon hook?
This option is ideal for sturgeon fishing. The main advantage is that it has high tensile strength as well as versatility.
How to properly tie a fishing line on a salmon hook:
- This option can be used both on thin threads and thick, braided ones. Ideal for synthetic thread.
- In order to secure the thread to the hook, you must follow the diagram presented below.
- Mainly used on hooks where there is no eye, but only a blade.
- Using this option, you can catch even a fairly large individual, and it will not fall off.
Node diagrams
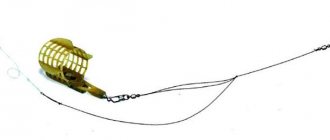
How to tie a fishing line on two hooks at once?
Experienced fishermen, in order to increase their chances of a decent catch, will come up with a variety of interesting methods that allow them to catch a huge amount of fish with a minimum set of gear and rods.
How to tie a fishing line on two hooks:
- To do this, they often use the option of using an additional leash, or tying another hook on the main fishing line. The first method involves knitting on the main thread; for this, an additional hook is initially made, and then the main hook is made from the remaining fishing line. It is necessary to initially measure the required length by which the hook should hang below the first option. Most often, loop knots are used for this, as well as bloody ones.
On one thread - The second option is often used with the use of an additional leash. In order to secure two hooks, they are knitted separately on each fishing line, one of which is additional, and the second is the main one. After that they simply communicate with each other. In order to connect them, a method called loop-to-loop is usually used. Below is a diagram with which you can tie two hooks together.
Leash with two hooks
Using the diagrams, it’s quite easy to figure out the nodes. The main thing is to choose the right fishing line and its thickness.
Crochet
It's amazing what you can't knit with an ordinary crochet - jackets, sweaters, scarves, tablecloths, dresses, toys and much more. The set of tools for work is minimal.
Firstly, regarding hooks: they are usually made of steel or wood, but there are also bone ones. Their sizes may vary. In addition to the color and texture of the threads, their thickness plays an important role; it must correspond to the thickness of the hook.
How to make a loop to start with? Step-by-step simple instructions will help you with this.