Equipment Features
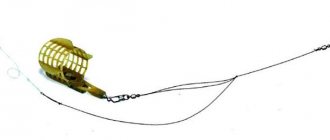
The classic symmetrical loop is a separate equipment, which is often prepared at home before going to the reservoir.
It is knitted on a length of nylon or flurika, and then attached to the main cord using a swivel with a clasp. Thanks to this option, the installation practically does not rotate and does not get tangled, unlike those performed on the main fishing line. So, the symmetrical loop is most widespread when fishing in closed reservoirs. It is also effective in slow currents. With its help, you can fish on rivers in return lines, reaches and other areas where the force of the stream is reduced. It is in places like these that this montage shows its best qualities.
Important! The symmetrical loop must be used on hard ground. Here it is much superior in sensitivity to the more popular paternoster. The symmetrical equipment is designed for hunting active fish
Its advantage over similar rigs is that it hooks the fish itself. As a result, the number of realized bites increases significantly, which naturally affects the catch
Symmetrical equipment is designed for hunting active fish. Its advantage over similar rigs is that it hooks the fish itself. As a result, the number of realized bites increases significantly, which naturally affects the catch.
The symmetrical loop design is not well suited for hunting trophy underwater creatures. Large specimens behave very suspiciously and become wary at the slightest doubt about the naturalness of the proposed bait. Therefore, to catch them, it is more advisable to use an asymmetrical installation. And the equipment in question is one of the best for small and medium-sized fish, which behave much more carelessly and take the hook with bait more quickly.
In some fishing circles, symmetry is considered to be a picker rig, due to its sensitivity and focus on small fish. This rig performs well with light feeders and weights. It has proven itself well when fishing for crucian carp, but on a muddy bottom it is better to abandon it due to its low efficiency.
Advantages and disadvantages
A symmetrical loop is a basic piece of equipment that every angler who decides to seriously engage in feeder fishing should learn to use. The advantages of this equipment are:
- high sensitivity;
- suitable for stagnant bodies of water;
- works well with light feeders;
- hooks fish on its own.
Since the rig is knitted on a separate piece of fishing line, it can be used repeatedly. Having made several symmetrical loops at home once, you can then use them on subsequent fishing trips until they all come off or become unusable.
The disadvantages of symmetrical equipment include:
- ineffective on a marshy bottom;
- poorly suitable for hunting trophy fish;
- It is inconvenient to knit directly on a pond.
Otherwise, the symmetrical loop does not cause any complaints, which is why it is used by fishermen.
Differences from asymmetrical loop
In fact, these two equipment have only one difference. When twisted, symmetry has two loops of equal length. An asymmetrical installation has a shoulder of approximately 2 cm, i.e. one segment is larger than another parallel segment.
This little detail makes the asymmetrical equipment more sensitive and less noticeable to the fish. Having taken the bait, she does not feel any resistance or hesitation that alarms her. But with active biting, a symmetrical loop is preferable due to better self-catchability.
Manufacturing a feeder with an asymmetric loop
There are many ways to assemble a feeder with an asymmetrical loop. One of the popular methods of making tackle is the so-called Gardner loop. This is a universal method, thanks to which crucian carp will be caught even in the complete absence of wind and in the current. The feeder is fixed here due to a special outlet unit. The leash and the main line are a single unit.
The manufacturing technology is as follows:
- You should make a loop with a diameter of about 2 cm , through which the leash will be secured;
- After 20 cm from this loop, make another one , but larger - its size should be 10 cm. It is used to attach the feeder;
- When all these fastening elements are made , install the leash and the feeder itself.
The Gardner loop allows you to get a catch even in strong currents, but it has one serious drawback - the line will regularly overlap.
Characteristic nuances of fasteners
Now some general recommendations for installing symmetrical feeder equipment. The fishing line I use is the most common one, with a diameter of 0.22 to 0.30 mm. If you take it thicker, then the tackle will be coarser and more noticeable to the inhabitants of the depths, and thinner ones will no longer have proper reliability. In principle, I also focus on the weight of the feeder and the nature of the upcoming fishing.
The fishing line should prevent the leads from twisting, be sufficiently rigid, but at the same time be sensitive. As for its color, you can use both transparent and dark colors for muddy water. As for the hooks for the feeder, you can use almost any of them: preferably not the largest, but always very sharp.
While we are making the feeder rig, we will need to twist the remaining ends of the fishing line. We secure the remaining end with a regular double knot. If I provide sufficient rigidity to the leash, I can cast the feeder without overlapping or other similar difficulties. When I attach the manufactured feeder equipment to the main working line, I first cut off the ends of the resulting twist, and then fix the swivel at a distance of approximately 15 centimeters from the knot.
The main criterion in creating feeder equipment, both symmetrical and asymmetrical, should be the unhindered sliding of the feeder within the main loop. By using swivels, we leave ourselves the opportunity to change feeders directly while fishing.
It is best to fix the leash using the “loop-to-loop” method to avoid overlapping when casting. In addition, you should strive to avoid unused ends of the fishing line in every possible way - you should simply get rid of them, as they can interfere with the operation of the structure. To tighten the knot tightly and get away from the protruding ends, I additionally hook pieces of cambric.
And finally, I remind you that if you fish in a body of water that is characterized by the presence of a strong current, then you risk losing the sensitivity of the manufactured equipment, which can be called the main factor in successful feeder fishing.
In conclusion, a video about catching carp in the spring on a feeder.
Using an asymmetrical loop
Often, when fishing with a feeder, the angler, without waiting for a bite signal, begins to check the bait and discovers that it is slightly tattered or that a moth or some small component of the bait is missing. If such cases are repeated repeatedly, this is a clear sign of fish passivity. The fish touches the bait, but the weight of the feeder and the lack of timely hooking, because the angler does not see or hear it, deprive the joy of catching trophies. This situation is the moment of using an asymmetrical loop.
Read a complete guide for beginners about catching bream on a feeder and preparing equipment, as well as choosing bait and bait.
The thinness of the equipment will allow you to respond in a timely manner to the lethargy of the fish and catch it. When the bite is active, feel free to switch to installations with the possibility of self-hooking, because with this installation, an asymmetrical loop, the fisherman will simply get tired of constant sharp bites and labor-intensive hooking of fish.
Some nuances of creating asymmetrical loops
There are several more useful tips regarding creating an asymmetrical loop on the feeder that cannot be ignored
- Use a fishing line of high rigidity to form an asymmetrical loop. To make sure that the selected equipment corresponds to this parameter, wind a piece of fishing line around your finger, making several turns. A hard thread will straighten out immediately, while a soft thread will retain its ornate shape.
- Choosing fluorocarbon will be a good option for creating asymmetry in a fishing feeder rig. This material has increased rigidity and abrasion resistance. Fluorocarbon is ideal for fishing in reservoirs where the bottom is covered with small pebbles, shell rock, and driftwood. It also retains all properties in areas with slopes and edges.
- The length of asymmetrical loops varies, and this parameter depends on how active the fish itself is. The higher the activity, the longer the feeder moves along the loop, and the longer the fish does not feel resistance. The long length of the asymmetrical loop is suitable for fishing in moments of sluggish bite. If bites occur actively, then it is better to reduce the size of the loop.
- An important function in asymmetrical loop equipment is performed by twisting. Its length must be chosen correctly. If it is too large, then overlaps will often occur, and the leash will become tangled. But such problems will not arise if the fishing line is stiff and thick.
- The leash is selected for the rig after the asymmetrical loop is knitted. When choosing this element, take into account fishing conditions and active fish. In most cases, a fishing line with a thickness of 0.12-0.16 mm is used. In cases where a fisherman plans to catch a large fish, it is necessary to select a fishing line with a diameter of 0.20 mm.
- The length of the leash for the feeder is selected taking into account the type of fish that lives in the selected reservoir. For example, the more passive the fish, the longer the leash should be for catching prey. And vice versa, with increased biting activity, it is advisable to equip the fishing line with a shorter leash.
- To prevent the leash from twisting and tangling, select the optimal twist length. Usually it varies between 10-20 cm, but if the thickness of the fishing line is 0.20-0.25 mm, then it is better to reduce the twist size to 6-8 cm.
- Separately, it is worth mentioning the length of the shoulder. The size of this part should be 2 cm. If this parameter is made larger, the equipment will become less sensitive, and the fisherman will not be able to see careful, weak bites. If the shoulder is less than 2 cm long, then overlaps and tangling of the feeder with the leash will occur.
If you are a beginner fisherman, be sure to try fishing with a feeder with an asymmetrical loop.
This gear has excellent sensitivity, so your fishing will be successful and effective.
Asymmetrical loop or paternoster?
Reviews claim that the paternoster is no different from the Gardner loop . However, it has one feature: it can slide along the loop, making the leash longer or shorter. The paternoster is an effective tackle even when compared with a standard asymmetrical loop. By using a paternoster you can achieve a serious catch, however, an asymmetrical loop also shows excellent results.
Below is a video by Alexey Fadeev about an asymmetrical loop:
Asymmetrical loop for feeder, features and method of knitting
Despite its popularity, not many people succeed in using an asymmetrical loop in business. Unlike Gardner, this equipment is more complex. If used ineptly, it can constantly get tangled, break off and shoot off, but if you get the hang of it, fishing will be a pleasure.
Properties of an asymmetrical loop
This type of loop is characterized by different arm lengths. The rig is knitted from a piece of rigid fishing line about 1-2 m long and 0.3 mm in diameter. You can use monofilament or fluorocarbon, the main thing is that the fishing line has maximum rigidity and is suitable for asymmetric installation.
An asymmetrical loop for a feeder consists of two parts: the loop itself and a twist with a small loop for attaching a leash with a hook. The equipment is thrown into the water, the line slack is removed to the desired tension, after which the feeder slides down along the loop. The fish takes the bait in its mouth and begins to move without feeling any resistance. The free movement continues until the feeder moves to the upper edge of the loop. As soon as this happens, the tip of the rod begins to tremble, making it clear that the bite has begun. The fisherman immediately needs to hook before the fish spits the bait out of its mouth.
Asymmetric feeder loop
The asymmetrical feeder loop can be used several times as long as it is not damaged. As practice shows, a well-tied loop can withstand 2-3 fishing trips, but it is better to have 3-4 equipment in stock.
Advantages and disadvantages
The main advantages of an asymmetrical loop include:
- high sensitivity. The rod tip responds instantly even to weak and cautious bites;
- the equipment does not twist due to the fact that the loop is attached to the main line through a swivel;
- not susceptible to negative external factors and bad weather;
- different lengths of the arms allow you to remove the slack of the fishing line and create tension;
- deeper ingestion of bait and bait by fish;
- the fish is reliably caught and held after a successful bite;
- effective even with light feeders and thin leashes;
- Suitable for passive fishing.
Despite many advantages, the asymmetrical feeder loop also has disadvantages:
- installation is difficult, knitting skills are required to obtain high-quality equipment;
- It is not a self-cutting type of hinge. With active biting this will cause difficulties;
- with inept use and long leashes, the fishing line may become tangled;
- long knitting process.
It is better to knit an asymmetrical loop for the feeder in advance in order to get high-quality equipment and not waste time on it while fishing.
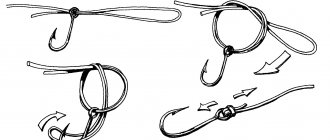
How to knit loops for an asymmetric type feeder
Installation of an asymmetrical loop is a painstaking and responsible task. Prepare the necessary equipment components in advance. This is a piece of fishing line, a feeder, a swivel and a leash. Knitting is carried out in several stages.
- A fishing line up to one meter long is folded in half.
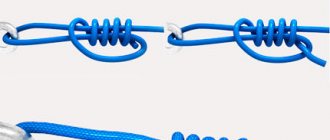
- A loop is made for attaching a leash with a hook. The knot for the loop can be anything, but the so-called “surgical” one will be stronger.
- A rigid twist about 10-13 cm long is made behind the loop, at the end of which a knot is also tied. Visually it will look like a loop, twist and two free ends of the fishing line.
- A swivel with a carabiner under the feeder is put on one of the free ends.
- We make the end with the carabiner 2 cm longer than the second. This way we get the tool arm. We measure the length of 10-12 cm and knit a locking knot.
- The remaining end is cut off, and a loop is made at the end of the second for attachment to the main fishing line.
- A feeder is hung on a carabiner.
- The leash is attached to the outlet using the loop-to-loop method.
The asymmetrical loop for the feeder is ready. Pack it in a bag before your fishing trip.
Where is asymmetrical equipment used?
Feeder equipment of an asymmetrical type can be used both on a clean bottom and in conditions of abundant vegetation, in standing reservoirs or in strong currents, but provided that the feeder has been correctly selected. Proper tying and loading of the tackle allows you to make long casts at a distance of up to 50 meters. In addition, the equipment can be used when catching passive individuals, small fish and in pressed-in reservoirs. Fish species such as bream, carp, tench, crucian carp, etc. are caught using an asymmetrical loop.
How to knit an asymmetrical loop
Don’t be too upset if your first practical knitting experience isn’t entirely successful. An asymmetrical loop for a feeder is indeed not the simplest element in feeder equipment, which is worth considering. There is no need to rush in this matter, since all the nuances of the work discussed below must be extremely consistent in size and elements.
A meter-long piece of fishing line is folded exactly in half and the first small loop is knitted at the place of the fold to install the leash. A variant of the loop knot is up to the angler to choose, the main thing is that the loop is blind. The next element will be the twist. Its size should not exceed ten centimeters. This size must be observed. Twisting to a lesser extent will not particularly affect the performance of the installation, but a longer element will periodically be the culprit for tangling the feeder loop. The finished twist in the same dimensions is tied with a knot. The easiest and fastest way is eight. Now let's move on to the main part of the work, which contains the main purpose of this design.
Important! We tie the two remaining tails of the fishing line so that one of them is only two centimeters longer than the second. This difference in size is asymmetry.
We finish the knitting again with a blind loop, which will serve as a connecting element to the main cord of the tackle. The installation is now complete. As can be seen from the description, with care and accuracy, the asymmetrical loop is not so scary, but quite effective, and this is what we will talk about next.
Manufacturing of feeder equipment “asymmetrical loop”
A method for finding catchable feeder places that is gaining momentum!
We will need:
- main line (monofilament)
- 2 swivels
- fluorocarbon line
- feeder weight
- hook
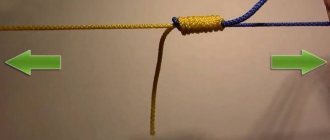
How to knit. The rig can be made right on the pond, but just in case, in order not to waste precious time while the fish is actively biting, make several of these and, possibly, alternative rigs in advance.
In the installation you should get two twists (the size varies differently for all anglers, try different options and understand which one suits you best, we will focus on options with 4-5 centimeter twists.
The length of the leash should be based on the fishing activity of the fish.
If the bite is weak and the fish are very wary, use a fluorocarbon leash of 1 meter; if the bite is active, 20-30 cm is enough
Using swivels will allow your line to twist less, maintain its strength and prevent the equipment from getting tangled.
Advantages and disadvantages
Despite all the difficulties, the asymmetrical loop has both advantages and disadvantages, and is one of the basic equipment, so any fisherman should be able to knit it and use it in suitable situations.
Advantages of an asymmetrical loop for a feeder:
But in addition to the advantages, there are also disadvantages that you should know when choosing equipment for specific conditions.
Disadvantages of an asymmetrical loop:
- Difficulty in knitting and installation.
- Should not be used in muddy or overgrown ponds.
- Beginner fishermen can get confused due to long leashes.
- Additional elements in the equipment are required.
- The fish does not hook itself, so you need to constantly monitor the bite in order to hook it in time.
To get the maximum result, you should always experiment, change the length of the leashes, the thickness of the fishing line and vary the weight of the feeder.
Making carp rigs with your own hands
We have already touched on the topic of carp rigs superficially. Now let's look at them in more detail.
Carp installation “Safe clip”
Safety clips are an element that attaches the sinker to the fishing line, facilitating the easy release of the fish from the sinker if the main line breaks.
This equipment has advantages over other equipment when fishing in snags, since the load is secured in a safe clip, which guarantees detachment under strong tension.
We will need:
- Leadcore (thickness 45 lb). This element has a braid and a lead core. It plays the role of weighting the equipment at the bottom so that the fishing line does not hang in the water column and does not scare the fish. The second role of leadcore is that it is a safer material for fish when playing. The carp will not be scratched during sharp maneuvers because the material is soft and thick.
- Mounting needle for leadcore.
- Quick release with swivel.
- Safety clip (Safety Clips, with a lock for blind equipment or sliding) - plastic or metal. The disadvantage of plastic is that it breaks during forceful casting. There are also metal options on sale, try it.
Instructions:
We fix the leadcore in the needle. To do this, take out a core about 3 cm long from it and bite it off with tongs. Return the braid to its original place and bend the leadcore where the core ended. At the bend, pierce the leadcore with a needle and bring it out after 2 cm towards the tip. We put the swivel on the tip of the leadcore, and then hook the hook of the needle on this very tip and begin to move the tip of the leadcore inward with slow rotational movements left and right - forming a loop. Cut off the extra piece of the tail, leaving a little more than 1 mm. We tighten it very tightly. The harder you pull, the more firmly the braids will be attached to each other and will not unwind. We drip a drop of Moment Pro glue in the place where the leadcore shell went inside for an additional guarantee of strength. The length of the leadcore will be 60 cm. We perform the same operation from stages 1 to 4 on the other side. And yes, the presence of leadcore greatly distinguishes carp rigs from classic feeder rigs. We insert the needle into the clip from the side where we will have the cone, fasten the leadcore into the needle and pull it through the clip to the very end. The clip is put on the swivel on the other side of the leadcore
It is important to secure the swivel in the clip using a small plastic quick release, this is part of the clip itself. Step No. 7 is also done with the cone for the clip. We put the sinker on the clip and fix it with a cone.
Carp equipment Inline (Inline)
There are many types of Inline installations described on the Internet, and most of them structurally replicate the Running Feeder Rig. But historically, Inline is a carp rig for carp fishing (waiting) fishing, not feeder fishing. In carp fishing, a feeder tip is not used as a bite alarm, but a bite is detected by an electronic alarm. When the line is released from the reel, the alarm makes a sound. Naturally, this is a sliding equipment, which means it is sporty.
Inline is suitable for fishing on rocky hard bottoms and shell rocks. Unsuitable for fishing in snags, since the sinker does not shoot off under strong tension. It's also bad on muddy bottoms.
Feeder installation Inline is very good at self-hooking carp and carp due to the drop-shaped shape of the sinker. The part of the sinker close to the leader has a thickening, which gives much more resistance to lifting from the bottom. Consequently, the hook with the sinker is sharper.
You will need:
- Inline cargo
- Leadcore (with or without core) length 60 cm
- The needle is thin for leadcore
- Large broaching needle
- Scissors and glue
- Swivel
Instructions:
- We form a loop at one of the ends of the leadcore (we use leadcore without a core). Apply glue to fix the loop.
- We fasten the swivel using the “loop-to-loop” method.
- We insert the mounting needle into the Inline sinker from the side of the connector tube (narrow part), and attach the free tip of the leadcore to the needle. We tighten the swivel inside the sinker by pulling on the free tip of the leadcore.
- The leash is attached to the swivel using the loop-to-loop method or another reliable knot.
Video instructions for making and fishing with a “symmetrical loop” feeder rig
A thirty-minute video about the “asymmetrical loop” rig from the world champion in feeder fishing Alexey Fadeev, and the “symmetrical loop” is knitted in exactly the same way, only both sides of the fishing line in the loop should be the same size.
After watching, you will be able to not only knit a symmetrical loop rig, but also correctly feed it to the fishing spot.
We will be glad to discuss this gear with you, dear friends.
There is probably not a single feeder fan who has not used an asymmetrical loop in practice. Many have not fully mastered all the subtleties of its knitting. Hence the frequent tangles, overlaps, breaks and, as a result, dissatisfaction with asymmetry.
The sensitivity of the asymmetrical loop is even superior to other installations. But in order for it to work correctly, show a good bite and give a minimum of tangles, you need to know several nuances and subtleties of its tying.
In this article we will take a closer look at the method of tying it and some of the features that make feeder fishing truly unique.
Like the Gardner loop, the asymmetrical loop came to us from Europe. It is believed that the first such installation was proposed by Dutch sports fishermen, who showed excellent results in catching bream. That is why such equipment has become widespread throughout the world.
Any rigs can be tied directly on the pond. But it is better to knit an asymmetrical loop in advance. It takes more time and the entire fishing may depend on the quality of the mating.
An asymmetrical loop requires a stiff line!
If possible, it is better to use fluorocarbon fishing line (fluorocarbon). Its composition makes the fishing line rigid and allows it to retain the necessary properties for a long time. In addition, fluorocarbon is much more resistant to bottom debris and accidental cuts, which is important when fishing on edges and shells.
Suitable line diameter is 0.28-0.32mm!
Some fishermen use a larger diameter, as they say, “a matter of taste,” but it is better to stick to these diameters.
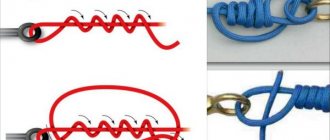
We knit the loop in several stages:
- We take 60-70cm of fishing line, fold it in half and make a small loop to connect to the leash. The loop knot can be made using a regular double knot or a figure eight knot.
- Next, we twist the two lines and secure it with a knot as well. Twist length 10-15cm.
- We get a twist and two pieces of fishing line. We pass a swivel with a carbine through one end of the fishing line. The carabiner should be used without protruding parts of the “antennae” to minimize snags.
- Now we make the end of the line with the snap hook 2 cm longer than the second end of the line, as shown in the diagram.
- We measure the length of the loop at 10-15cm. and tie a stop knot.
- At a distance of 2-3cm from the last knot we knit a loop for attaching to the main fishing line.
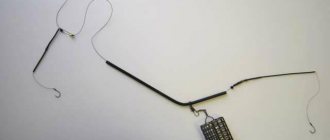
We get this installation:
Now about the geometry of the loop, the sizes of its elements and their proportions.
When the loop is ready, the outlet leash should be at least 2 centimeters below the feeder!
With this difference, there will be a minimum of tangles and overlaps between the leash and the feeder.
The difference in the loop arms (slack) should not be more than 2 centimeters!
If this difference is greater, then the sensitivity of the loop decreases and careful bites may simply not be noticed.
Video of asymmetrical loop. Part 1:
And the second part:
Fishing technique
We work with an asymmetrical feeder loop for fishing in the same way as with other installations. During fishing, you need to select the weight of the sinker so that it does not drift, as well as the length of the leash
For passive biting and cautious fish, we use longer and thinner leashes - up to 1.5 meters long and 0.1-0.16 in diameter. If the bite is normal, make the leashes shorter - 0.3-0.7 cm
Selection of equipment during fishing is a normal practice in the process of feeder fishing. The main thing is not to make a mistake during installation with the dimensions of the twist, the difference in the length of the arms, otherwise all the charms of the asymmetrical pattern are lost, which leads to a decrease in the effectiveness of hooking.
Where is an asymmetrical loop used?
An asymmetrical fishing loop is used for catching most types of non-aggressive fish:
- carp;
- bream;
- tench;
- roach;
- crucian carp, etc.
It can be used both for bottom fishing in conditions of a clean bottom and in thick thickets. Even with strong currents, asymmetrical mating is used, but it is important to correctly determine the feeder. With the correct execution of the knot and selection of gear, the fisherman can cast 50 m.
Storage of feeder equipment
To ensure that feeder rigs are always in working order and ready for fishing, after use or manufacture, they should be wound on a reel for float fishing and stored in fishing boxes.
They also use foam plastic, from which a reel of the desired shape and size is cut. In addition, you can insert a hook into the foam reel.
The rigs should be stored in a dark and dry place, because ultraviolet rays negatively affect the condition of the fishing line from which the rigs are knitted.
After use, you should thoroughly dry the assembly and then reel it on the reel, otherwise wet hooks will quickly rust.
If it is not possible to use a reel, take small ziplock bags, they are also convenient for these purposes.
Article on proper storage of feeder leashes
Feeder tackle is widely available, and learning how to tie it is not that difficult. By gradually improving your skills in feeder fishing, you can achieve outstanding results.
Not every angler has the opportunity to regularly go on long fishing sessions and spend several days on a reservoir.
Feeder rigs allow you to catch decent trophies even during short fishing trips, and this is their undoubted advantage over other gear.
Advantages and disadvantages of asymmetrically shaped loops for the feeder
Asymmetrical loops for feeder fishing are included in the basic equipment. Every novice angler must master the correct manufacture of this element of fishing gear in order to then successfully apply it in practice.
The use of equipment in the form of asymmetrical loops in fishing has the following advantages:
- a high level of sensitivity, allowing the fisherman to see the bite even when the fish takes the bait carefully and carefully;
- with a feeder equipped with asymmetry, you can effectively fish in reservoirs with standing water (equipping the fishing rod with leashes made of thin fishing line and small feeders);
- Suitable for successful fishing in compacted reservoirs, helps to catch passive fish.
When choosing equipment with an asymmetrical loop for specific fishing conditions, pay attention to its disadvantages.
These include:
- installation and tying of an asymmetrical loop causes some difficulties for an inexperienced person;
- when using an asymmetrical loop, the prey is not automatically hooked, and if the bites are too active, this becomes the cause of difficulties;
- additional elements appear in the equipment (for example, a clasp);
- If long leashes are attached to the fishing line, the feeder equipment can become very tangled (especially if the feeder is used by an inexperienced angler).
The choice of equipment for feeder fishing depends on the specific conditions in which the fishing takes place. Don’t be afraid to experiment, change the thickness of the fishing line, select the optimal length of the leashes, try different combinations of feeder equipment with a feeder. This approach will help achieve better and more effective results.
Symmetrical and asymmetrical loops
These types of loops belong to figured snap-ins. Lately, feeder fishing has been very popular due to the special structure of the feeder rod. As a rule, such rods are very sensitive and you can very easily detect a bite without special tools. At first glance, these loops are quite complex if you compare them with Gardner's paternoster. To dispel first impressions, you just need to take and knit a few loops to make sure of their simplicity.
How to knit symmetrical and asymmetrical loops? These types of rigs involve a double line with a loop along one of which the feeder floats. On the same line, behind the loop, there are leashes with hooks. The only difference between them is that the arms of the loops are not the same: for a symmetrical loop they are the same, but for an asymmetrical loop they are different. According to anglers, an asymmetrical loop is more sensitive to bites. Moreover, a feeder that slides over a larger shoulder is less alarming to the fish, which means that such equipment is more attractive to it.
The Gardner paternoster is knitted directly on the main line, and the symmetrical and asymmetrical loops are prepared separately. You can prepare several of them and store them on reels, and when fishing, attach them to the main fishing line. This can be attributed to the advantage of these types of equipment, since in case of snags and gusts they can be very easily replaced. For their production, monofilament fishing line with a diameter of 0.22-0.28 mm is used. It may seem that it is a bit thick, but, as experience shows, because of this fishing line the equipment does not lose sensitivity, and when casting it practically does not get tangled. The color of the fishing line does not play a special role. The main thing is that it holds the knot well and is not very stiff. Leashes, naturally, are made from thinner fishing line, somewhere in the range of 0.12-0.15mm. Any hooks can also be used, depending on the fishing conditions, as well as the type of bait used.
Symmetrical loop
This type of equipment can be used both for fishing without a feeder with a picker or sinker, and with a feeder. It works great in still water, but in the current it gives a lot of empty bites. To install such a loop, you need to take 100-150cm of monofilament and fold it in half. Using a “surgical loop”, tie a small loop at a short distance from the bend of the fishing line (5-10cm). After this, you get two free ends of the fishing line. After the loop, a twist is made from the two free ends of the fishing line. The length of this twist is about 8-10 cm and is intended for the rigidity of the equipment. This twist will minimize the possibility of overlapping when casting. The end of the twist must be secured with another “surgical” knot. Having measured about 30 cm from this knot, another knot is knitted. The result is a 30-centimeter loop with equal shoulders. After this knot, there are also two free ends of the fishing line about 15-20 cm long, one of which is cut closer to the loop, and a swivel with a carabiner is tied to the other. Using a carabiner, this equipment will be attached to the main fishing line, and the swivel will prevent it from twisting in the water. The other end also has a loop to which you can attach leashes with loop-to-loop hooks. Thus, the “symmetrical loop” type equipment is ready for use.
Asymmetrical loop
The manufacturing technology is the same as the previous one. The only difference is that when standardizing a 30-centimeter loop, one arm should be 10 cm longer than the other. The rest is the same: one knot, then a twist, then a loop and a knot. In this setup, the feeder is attached to a longer arm. For fastening, you can use a swivel with a clasp, having previously installed it when forming the loop. This mount will make it possible to change feeders depending on fishing conditions. The asymmetrical loop is effective both in still water and in high currents. In addition, it prevents tangling when casting. The fact is that the load always flies in front and due to the fact that the length of this part of the fishing line is greater, the load will be in front of the entire equipment. Due to this effect, it is more sensitive compared to a symmetrical loop. When cutting the fishing line, you need to make sure that there are no burrs left, that is, you need to cut as close to the loop as possible.
Types and types of installation
Common types of feeder installations:
- large symmetrical loop. It is used infrequently due to design flaws, but is recommended in places with active biting, as it cuts off fish;
- asymmetrical installation. It is sensitive and invisible to fish;
- Gardner rig. It is the simplest and most popular method, although it is not classified as a self-hooking type, but it provides a strong fish hook. The essence comes down to attaching the feeder to a twist of 10-15 cm fishing line;
- The inline installation method involves free movement of the feeder along the fishing line. Easy to install, but has less sensitivity compared to the Gardner loop. When casting over long distances, the line may overlap with the leash and feeder. The inline method is ideal for fishing in still waters with close casting;
- loop in a loop. A fairly simple method - the leash is loop to loop, loops are formed on the main line and the leash, one is threaded into the other, and then secured with a hook.
Read more
How to fish with a feeder on a river with current
Feeder rod is designed for bottom fishing
Factors affecting loop quality
For high-quality installation of feeder equipment, it is important to choose the right fishing line. It must be memoryless and have a high rigidity coefficient
The best option would be a fluorocarbon type with a diameter of 0.25-0.30 mm. It is not recommended to take thicker fishing line, because... in a clean reservoir or when fishing in winter, it will be noticeable in the water. Fluorocarbon lines have a high degree of transparency and are resistant to abrasion, which are important conditions for feeder fishing.
Fluorocarbon line ANTARES 1000 m, diameter 0.25 mm
Another important factor in the use of such fishing lines is the ability to maintain high strength in places where knots are tied. Ordinary fishing line cannot boast of such properties.
In addition to these factors, others are taken into account:
It is important to select the required twist length. When it is too big, the leash gets tangled and gets tangled.
The position is corrected by tightening the knot to 6-8 cm and using a rigid fishing line; for catching passive fish, it is better to increase the length of the leash, and for active biting, on the contrary, reduce it; According to the rules, the shoulder size should be 2 cm. If the overhang is larger, the equipment will become insensitive and careful bites will go unnoticed. If the shoulder overhang is less, then the leash with the feeder will get tangled and overlap; Before casting, always check whether the feeder moves freely or if something is blocking it. If there are problems, the equipment should be replaced; The swivel and carbine must not have protruding parts. They will get tangled in the fishing line or cause frequent snags.
Feeder loops are knitted from a strong, rigid and transparent piece of fishing line. This way the equipment will be durable, invisible in the water and have the least shock-absorbing properties.
Thin fishing lines are used for feeder leashes, but they may not hold up when biting a large trophy. To avoid breakage of the leash, a piece of special feeder rubber called feedergum is attached between the unit and the equipment. It absorbs strong jerks of the fish and prevents breakage, even with strong resistance.
You can try feeder fishing rigs on any type of soil and under different fishing conditions, and see for yourself their effectiveness. Moreover, making loops is absolutely easy.
Gear used
Rod
The main characteristics of a rod for feeder fishing include:
- length;
- maximum weight of cargo/feeder;
- rigidity;
- build.
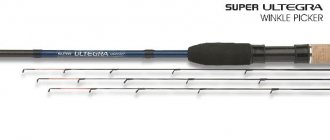
There is a division of all fishing rods into pickers and feeders. As a rule, fishing on feeders is done using feeders, and on pickers - using sinkers. In any case, the choice of weight depends both on the characteristics and class of the rod, as well as on the preferences of the fisherman and fishing goals.
Picker rods usually have a length of up to 3 meters, feeder rods - over 3 meters.
fishing line
To make an asymmetrical loop, take a rigid monofilament line 0.2-0.4 mm thick and one meter long. Thinner fishing line or braid is not used, as this can lead to tangling of the gear. A fishing line that is too stiff leads to loss of sensitivity. Fluorocarbon is often used to make equipment, which is more durable, practically does not wear off and is invisible in water.
Coil
The coil on the feeder must have a high gear ratio. Feeder fishing is characterized by frequent recasts even in the absence of a bite due to the need to replenish the fishing point with bait. The reel must have a large spool in diameter to ensure a good casting distance. It is desirable to have a shallow “match” spool, convenient for thin fishing line. It is desirable to have a fishing line tuck on the spool, which is convenient to use to fix the casting distance. Another main criterion for choosing a reel is the quality of the friction brake.
Bite alarm
There are a great variety of bite alarms for feeder fishing. There are mechanical and electronic alarms by type, and visual and audible ones by mode of action. There are also direct bite alarms, to use which you need to be within their hearing/visibility, and remote ones, which send a signal to one or another intermediate device (for example, a pager).
The choice of one or another bite alarm depends on the preferences of the fisherman,
Sinker
In feeder fishing, bottom sinkers are used if you need to cast without a feeder, which is usually weighted enough to hold the tackle at the desired depth.
Feeder
The purpose of the feeders is to deliver bait to the fishing point to attract and retain fish at one point in the pond. The choice of feeder depends on the fishing conditions and habits of the fish. It is important to have a supply of feeders with you and experiment with them - otherwise it will be difficult to attract and keep fish in one place. Functionally, feeder feeders are divided into several types:
- feeders for starter feeding;
- feeders for long-distance casting;
- supplementary feeders for standing water;
- supplementary feeders for currents;
- feeders for live food.
Also, feeders can be divided into types according to the method of attachment to the equipment and according to design features. The first ones can be sliding, remote on a separate leash and end. The second ones are open, semi-closed and closed. Feeders can also be light and loaded with lead. They vary in volume - from a tablespoon for light tackle to holding about half a kilogram of bait for super-heavy rods.
Leash
For leashes, high-quality monofilament or fluorocarbon fishing line with a diameter of 0.12 to 0.18 mm is usually used.
The diameter of the fishing line is selected depending on the size of the fish being hunted. The larger it is, the larger the diameter should be.
For leashes, you should select a soft line without memory with a good breaking load and the smallest possible diameter. On sale there are special leash lines from different companies wound in lengths of 20 - 25 meters. They are generally of better quality than regular large spool lines.
How to knit with your own hands?
As mentioned above, it is quite possible to knit symmetrical and asymmetrical loops for the feeder with your own hands. There is nothing overly complicated about this. Experienced fishermen do this extremely quickly, without encountering unnecessary difficulties. For a beginner, this process may seem difficult, but everything can be handled without any problems if you rely on a detailed step-by-step diagram.
Asymmetrical
There are many different modifications of asymmetry. All of them are aimed at minimizing possible overlaps. They also influence the increase in the elasticity of the retracting leash. However, most fishermen use an extremely simple and proven method of tying such loops. Let's look at the step-by-step instructions.
- First, you will definitely need to prepare a number of components. These include a piece of fishing line with a cross-section of 0.2-0.4 mm. It is recommended to give preference to tougher varieties. The best option is fluorocarbon. To check the level of rigidity of the fishing line, you can wind a couple of turns around your finger and then release it. If the material is suitable, it will unwind immediately.
- Now you should take a piece of suitable fishing line. It must be bent in half. It should be taken into account that one of the sides should be 10 cm shorter than the other.
- To properly make a strong and high-quality loop, it is advisable to use a triple or double knot. The result should be a small loop that can be used to secure the leash well.
- Next, you will need to twist the fishing line used (suitable length - from 10 to 15 cm), as well as a double knot at the end. This stage of work is considered the most important and responsible, so it must be taken extremely seriously. The condition and quality of the leash will depend on this moment. If everything is done correctly, it should turn out quite tough and dense. As you progress, you should get a high-quality asymmetrical knitting.
- Next, through the elongated section you will need to thread a swivel that has a built-in fastener for fastening the feeder.
- Then you will need to select the appropriate length of the loop (30-70 cm) and tie a double knot.
As you can see, the asymmetrical loop is not too difficult to prepare. The main thing is to act strictly step by step, take your time and treat each stage of work responsibly. Then you can achieve excellent results. Asymmetrical fishing loops are used to catch many species of peaceful fish. It could be bream, carp, crucian carp or roach.
Symmetrical
This loop is one of the most effective feeder equipment. Many fishermen use it because this way they manage to achieve rich catches. The use of symmetrical loops is due to the highest sensitivity levels, relative ease of manufacture, as well as high reliability. True, for novice fishermen, tying this option on their own often causes certain difficulties. If you have at least a little experience, then it doesn’t take much time to form a symmetrical loop.
If you have not previously dealt with the process of preparing a symmetrical loop yourself, then it is advisable to first use the step-by-step instructions for creating it.
Let's look at how to act correctly.
- First, a piece of fishing line will need to be folded in half. Next, a loop is made for the leash.
- The next step is to twist the lines, but only on one side.
- The result should be a twist that will need to be secured with a strong knot. After this, you will get a loop, which will be intended for fastening the leash with a hook.
- On one of the ends, which will be free, you will need to carefully put a swivel, complete with a clasp. This element will be designed to be attached to the feeder equipment.
- After this, you will need to fold the 2 free ends together. Then you will need to carefully measure approximately 15-20 cm and fix it with a knot.
- The next step is to perform a second twist. It will also need to be secured with a knot. At the end of the installation, it is permissible to leave a loop or put it on a swivel with a clasp to fasten it to the main cord.
At this stage, the symmetrical loop for the feeder can be considered completed. Installation of this type can be installed at home in the required quantities, and then changed at the reservoir, if necessary. The clasp located on the main loop will allow you to attach almost any feeder in terms of weight and design. The main thing is that the latter is suitable for the conditions in which the hunt for underwater inhabitants is carried out.
How to knit an asymmetrical loop step by step
It is only difficult to connect the installation the first few times. Later, when the process reaches automation, production will no longer seem complicated. Experienced fishermen can knit such designs without additional measurements.
Asymmetrical loop diagram:
- You will need a piece of rigid fishing line 60–70 cm. The fishing line must be folded in half and a small loop made to connect to the leash. The knot can be made double or tightened with a figure eight knot. It is important that the knot does not tighten or come undone.
- Next, measure out 10–15 cm and twist it. To prevent the twist from falling apart, it is necessary to secure it with the same knot that was used to make the loop. It turns out to be a twist with two ends. For a stronger connection, you can use a surgical knot.
- You need to thread one piece of fishing line into the swivel with a clasp. It is important to use knots, carabiners and fasteners in installation without snags or protruding corners. This will help avoid snagging and braking of the feeder.
- Place the swivel at the bottom of the installation. The outlet for the feeder begins approximately 3–5 cm above it. This position creates the desired asymmetry.
- Then measure out a 10–15 cm loop and secure it with a stop or double knot.
- At a distance of approximately 3–4 cm from the knot, a loop is formed for attachment to the main equipment.
- The feeder should move freely from the twist to the base.
- A leash with a hook is attached to the swivel.
- All ends of the line are trimmed to prevent tangling.
The leash in the finished installation should be located 2 cm below the feeder. The difference between the arms should not exceed 2 cm; if the distance is greater, the sensitivity of the equipment will decrease.
Unlike the symmetrical loop for the feeder and paternoster, it is better to make an asymmetrical loop at home. Experienced fishermen knit several loops for the feeder at once, so that during the fishing process they do not have to modify or tie the installation onto the main fishing line.