Beginner tourists mistakenly believe that there is nothing difficult about setting up a tent. Indeed, modern models have a simplified design that allows you to set up a place to stay overnight in just a few minutes.
But in order for your vacation to be truly comfortable, you need to know how to set up a tent correctly. Today's article is dedicated to this very issue. By following the tips and recommendations below, you can create a more comfortable resting place.
Step-by-step instructions on how to set up a tent
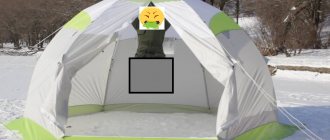
If you bought a modern camping tent, there should be no difficulties in assembling it. Most manufacturers include installation instructions inside so that even a novice tourist does not encounter difficulties when arranging a place to stay for the night (Figure 1).
In fact, the tent being installed does not require any special skills, and its assembly scheme is practically independent of the model:
- First you need to remove the awning from the cover and lay it out on the selected area with the dark, dense side down.
- Next you need to assemble the frame arcs. To do this, the tubes are simply inserted into one another, and the elastic band inside will firmly hold them together.
- Further actions depend on the tent model. In modern awning products, the arcs are overlapped crosswise, and the lower edges of the frame are inserted into special holes in the bottom. Then the bottom layer of the tent is attached to the poles, and an awning is thrown on top, which is attached to the poles with special plastic holders. To firmly secure the structure, all that remains is to pull the ropes and secure their edges with pegs.
Figure 1. Arranging a shelter may sometimes require the help of friends.
In general, it is worth familiarizing yourself with the structure of the tent and the technology for its installation even before the start of the hike. Then you will be prepared for any surprises and you will not have any difficulties in arranging a place to stay for the night.
How to set up a tent: rules
Modern tent models are so well thought out that setting them up on a camping trip takes a minimum of time and does not require much effort. But to make your vacation truly comfortable, you need to follow certain rules for arranging a shelter (Figure 3).
When setting up a tent, consider the following nuances:
- Try to arrange a place to spend the night at the edge of the forest, and not in its depths, since there are usually much fewer mosquitoes at the edge of the plantings. For the same reasons, you should not put up a tent next to a body of water.
- If you are afraid of rain, dig around the perimeter of the tent with shallow holes that will act as drainage holes.
- Since people sleep in a tent with their feet facing the exit, the entrance hole should be located directly opposite the resting place. This way you can easily find the entrance to your shelter at night.
- Before installation, be sure to clear the area of pine cones, branches and other plant debris. It will be felt through the bottom of the tent and will interfere with a quality night's sleep.
- The pegs that secure the tent must be stuck into the ground at an angle of 45 degrees. It makes no sense to completely bury them in the ground, since due to strong tension the peg may jump out and the structure will be damaged.
Some other material must be laid out at the bottom of the tent: mattresses, air mattresses or a simple layer of dense fabric. This way you will protect yourself from the cold coming from the ground. In addition, if you were unable to properly clean the area under the tent from debris, such an additional layer will ensure a comfortable rest.
Figure 3. Step-by-step installation diagram
But the most important thing in arranging a vacation spot is to choose the right place to place the tent. Since this plays a key role in a comfortable stay, let us dwell on this point in more detail.
Choosing the right place
As twilight approaches, it is necessary to take care of lodging for the night and choose the right place to stay. First, let's determine where this is not possible or undesirable:
- A prohibited area
classified as private property or under protection (natural park, wildlife sanctuary, nature reserve, etc.). - A clearing located in a ravine or hole.
Such a place is good for a tent from the position of protection from the wind, but in case of rain, all the water will flow exactly to the place where you will spend the night. - On the bank of a river or lake.
If you set up a tent near a pond, you need to be prepared for an “attack” of mosquitoes and other living creatures that are drawn to moisture. Also be aware of the risk of water overflowing its banks. Additional disadvantages are increased humidity and cold. - Near an anthill or animal trail.
Holidays in such a place are dangerous for all tourists, so it is better to choose another area. - Under big trees.
This place is not the best for a tent, because in strong winds branches may fall. In addition, tall trees can attract lightning, and as a result, people can also be harmed. - Near the fire.
Remember an important tip - never install an awning near a fire or against the wind, because this can cause sparks to hit the surface and a high risk of ignition.
Above we looked at where you can’t set up camp for the night. Now we will highlight a number of recommendations on how to properly arrange a place for maximum comfort and safety of travelers.
First of all, give preference to a flat area without tall vegetation. At the same time, do not place the product directly in the center (move to either side). Pay attention to the site for placement. It is important that it is smooth, without knots or rocky surfaces. Also, when camping in hilly areas, the best choice for a tent site is the western part. For your comfort in hot weather, you need to assemble the awning in the shady part, and in cool weather - in the sunny part. If nature threatens rain, prepare a gutter on all sides of the tent to drain water. If possible, set up camp on an elevated area. In this case, when it rains, you don’t have to worry about the appearance of a puddle inside your temporary home.
To make your vacation quality, carefully choose a place for installation. Nature provides enough opportunities for accommodation, and the tourist must take into account all the recommendations considered. Before installation, clear the selected area from sharp branches and cones for a more comfortable sleep. If the camp is organized for several days, make a bedding of pine needles, which provides comfort and eliminates dirt inside the tent.
Also keep in mind that the structure must be reliably protected, because during an overnight stay nature can present a “surprise” in the form of strong wind or rain. We will talk more about the installation features below.
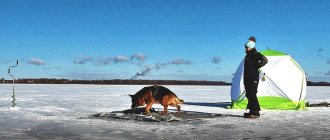
If you are planning a hiking trip in winter, take into account a number of features. Look around carefully and set up camp in an area where there is no risk of snow. Also look for a place where there is the least amount of snow “cushion”, because compacting the surface can take a lot of time. If necessary, dig a place to shelter from bad weather, but be careful not to block the entrance with snow. Additionally, use special anchors for installation. As an alternative, branches, ski poles, and crampons are suitable.
When hiking in winter, it is recommended to have a tourist nearby who has experience in such travel.
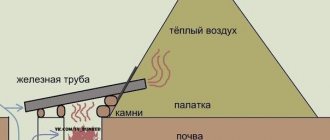
How to set up a tent in winter
Winter hikes are considered the most difficult, if only because subzero temperatures make it difficult to sleep comfortably. But, if you follow the tips on how to install a tourist or raincoat tent correctly, your night's rest will be quite comfortable even in winter (Figure 5).
The main purpose of installing an awning in winter is to avoid freezing while sleeping at night and not being covered with snow.
To arrange a comfortable winter parking, follow these recommendations:
- Carefully assess the area around you, preferably with binoculars. Choose an area where you are guaranteed not to be covered with snow or covered by an avalanche. For the same reasons, never set up a tent on the edge of a cliff.
- Instead, spend more time looking for a perfectly level and solid area. This is in any case faster than compacting it yourself.
- If a suitable flat area is not found, level the snow on another. You can even dig a place for future shelter. But in the process, make sure that the awning is positioned so that its entrance is not blocked by snow.
- To set up a winter tent, regular pegs may not be enough. They should be replaced with special anchors. If you don't have them at hand, use any other objects: crampons, ski poles or thick branches.
Figure 5. In winter, you need to look for a place to rest especially carefully.
When arranging a winter place to sleep, you should also adhere to the rule regarding the distance of the tent from the fire. To keep warm inside the tent, it is better to take a special camping stove with you.
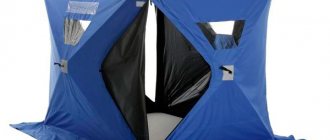
Advantages of cubic tents
Tents with a cube-shaped frame are designed for winter use and have the following advantages:
- capacity;
- quick installation;
- wind resistance;
- multilayer construction;
- moisture resistance;
- comfortable operation.
The dimensions of the cubic shelter allow several people to fish at the same time. The design is designed taking into account the required space for equipment, heaters, lighting devices, etc. The shape of the frame allows the fisherman to straighten up if necessary.
It takes a few minutes to assemble the frame and the work can be done by 1 person. When assembled, cube tents are compact and can be transported in the luggage compartment of a car. If necessary, the products are folded into a backpack bag and can be transported on public transport.
Cube-shaped tents have walls that curve outward to provide more volume and height. Inside the tent you can organize a place to rest at night.
The tents are made from waterproof materials; the inner awning uses fabric with padding polyester insulation. Protective elements hide the cracks, preventing warm air from blowing out. The design of the cube does not allow snow to accumulate on the roof. Ventilation valves ensure the circulation of oxygen indoors.
Installing a tent step by step
Installing a tent has its own characteristics depending on the type of structure and model. If there are no difficulties with the frame options, then putting up a raincoat tent or half-barrel will be more difficult. Since the second option is considered a more modern option, we will provide instructions for assembling just such a tent shelter.
To make the structure strong and stable, follow these recommendations:
- Remove the tent from the cover, straighten it and spread the bottom on the prepared area. Next, pin it to the ground with pegs.
- Assemble the arcs and connect them to the rest of the awning.
- Now you need to stretch the inner surface of the tent, stretch the awning and secure it on top.
You can act a little differently. First, straighten the upper awning, assemble the arcs, insert them into the grooves of the awning and secure with ties. After this, you need to stretch the awning, straighten the tent and attach it to the awning from the bottom side. At the final stage, the bottom is straightened and secured.
Regardless of the chosen method, a tent installed using one of these methods will meet all safety and comfort requirements.
Cube tent installation process
1. Select a flat surface free of foreign objects to install the structure.
2. Remove the tent and accessories from the carrying bag and carefully unfold it.
3. Inspect the folded tent. Make sure that the fabric does not get caught or wrapped around the frame. During installation, be careful not to use excessive force to open the tent, as this may damage the tent.
4. Pull the strap located in the center of one of the walls. Pull until the frame straightens. Thus, it is necessary to install all the walls of the tent.
5. Find the entrance to the tent. Unzip all existing layers. Enter the tent. Using your hands, straighten the roof by lifting it up until the frame is fixed.
6. Secure the tent with tie-down loops on the tent skirt using stakes. For maximum stability, stretch the tent using the lines on the sides. Make sure that the guy lines and tent material are not too tight and can absorb strong winds.
7. Sprinkle the skirt with sand, soil or snow for better protection from drafts.
Due to the specific shape of the roof of the Cuboid 3.60 and Cuboid 4.40 tents, a fastex banner was added to their design at the top of the walls. With its help, you can straighten a small deflection in the middle of the roof, which will prevent the accumulation of precipitation.
In order to install it, you need to fasten the parts of the fastex together and tighten the tape tightly enough so that, due to the tightened walls of the tent, the deflection in the center of the roof rises.
Setting up a children's tent
Installing a children's tent is even easier, because the design of such products is initially extremely simple and safe.
Typically, children's houses are packed in small round cases that are easy to transport or even carry in your hands.
To make a suitable house for children to play outdoors, you need to remove the awning from the cover and pull it up by the “ceiling”. The design of such houses is such that they unfold literally in seconds. All you have to do is secure the structure with pegs to prevent it from being blown away by the wind.