Every person in childhood wanted to have his own secluded corner, a place in which he could isolate himself from the world around him and create his own magical world that would exist only in his imagination. It is for this reason that each of us built various kinds of huts and tents in childhood from everything that we found at home. Literally everything was a material - bed linen, boxes, armchairs, fabrics, chairs, because nothing limited the imagination.
Your children would really like to have such a place, so give them a nice gift, make a play tent for them yourself . You can find a large number of different models on the Internet and in stores, all of them differ in both appearance and price. But sometimes the purchase doesn't make sense. Why, if you can make a children's tent with your own hands . If you don’t know how, in this article you will find a sufficient number of types of homemade children’s play tents, as well as photos, useful tips and instructions for creating them.
DIY children's play tent-house
As already mentioned, you can make absolutely any type of tent, it all depends on your desires, for example, this model of a children’s play tent is completely different from the others that I have already described, and it looks quite beautiful and original. Making such a children's play tent-house with your own hands is not difficult!
To do this you will need the following materials and tools:
- Thick beige cotton fabric 2×1.5 m;
- A piece of gray fabric 0.5 cm long for edging;
- Threads to match the color of the fabrics;
- Scissors: straight, curly and manicure (or you can use a stationery knife);
- Sewing measuring tape;
- 14 eyelets with a diameter of 1.2 cm;
- Hammer;
- Black acrylic paint for painting on fabric;
- Sponge;
- Brush;
- Stencil paper;
- Pencil;
- 5 screws;
- Tailor's pins;
Children's play tent diagram
First you need to take measurements from the table, this will be the frame of your tent. Next, according to the diagram (but with your own dimensions), cut out parts from the fabric with allowances: 1 cm on the sides and 3 cm on the lower edges (where the parts will be edged, allowances are not needed). These allowances are folded in one direction and secured. Sew all the parts into a single fabric that you will use to cover the table. It is advisable that the walls of the tent lie on the floor. For the window, cut a square hole on the side, and separately make a frame from gray edging. Install eyelets in the tent: 1 pc. on the upper edges of the walls and 4 more pcs. - in places where the table legs will be located. Screw the first screw onto the front crosspiece of the table itself (under the tabletop). Having hooked one upper edge of the tent onto it, wrap the table legs with cloth and fix the second edge of the product with the same screw. Screw other screws through the remaining eyelets. Sew the buttons to the tent and you can fasten the finished flap door with a pattern onto them. Photo source: https://kak-svoimi-rukami.com/2016/01/detskij-domik-palatka-svoimi-rukami-foto-shemy/
Types of structures
A camping tent can look different. The chum model looks very unusual. The large structure is made of waterproof fabric, and the frame is usually made of steel. The size of the tent even allows you to make a fire inside, since there is a special hole in the upper part through which smoke escapes. The chum has only one entrance, and installation is impossible without a pole.
A dome tent resembles an igloo in appearance, which makes it stand out from conventional structures. Its base is rectangular, and the frame is created from two arcs. The coating can be either single-layer or two-layer.
A tent for winter fishing can also be produced in various variations. Many of them, however, are also used for summer holidays. The “umbrella” model is considered one of the simplest due to its elementary assembly and installation of the structure. As a rule, strong but lightweight materials are used for the frame, and everything is covered either exclusively with synthetic fabric or its combination with tarpaulin fabric.
We suggest you familiarize yourself with how the ceiling in a bathhouse works
The “automatic” model, which is installed under the influence of a spring, is popular. This design is easy to carry and install, but folding it back can cause some difficulties, especially for inexperienced fishermen. In addition, the stability of the tent is very weak, and gusts of strong wind can simply topple it. The frame collapsible variation is assembled from several arcs that form the base and an awning covering it.
How to make a wigwam for children with your own hands
If you don’t know how to make a wigwam for children stronger with your own hands , then instead of ordinary wooden blocks, you can use bamboo rods. Now the tent, due to the fact that the poles are tied but not secured, can be easily folded and removed, if necessary, and then unfolded again.
In the same way, you can take it with you if you are traveling with children to relax in nature - it can easily fit in the trunk. This version of the tent will be much lighter than a regular wigwam made of bars, and due to the fact that the poles will be up to 2 cm in diameter, the model will look neater. The top edge can be trimmed with braid, leaving the ends for tying. If you know how, you can trim the top with the main fabric and hem the bottom of the canopy. Place the canopy on the frame and tie it at the top.
At the bottom of the canopy, in the places where the frame ends, at a height of 10 cm from the floor, sew rings to attach the frame to the canopy. If there are no rings, then you can sew on pieces of braid to tie the canopy. Photo sources: https://geoinzh.ru/indiyskaya-izba-vigvam-svoimi-rukami/
How to sew a waterproof tent with your own hands
Waterproofness is a very important criterion on which the comfort of staying in a tent will depend. You can immediately buy tent fabric that is initially impregnated with a water-repellent agent. But there are a number of measures that can make even ordinary fabric, such as tarpaulin, waterproof. Here are some examples:
- Place the fabric in a solution of 40-50% laundry soap until completely saturated. After this, transfer it to a solution of copper sulfate 20%. After a few minutes, the material must be removed and dried thoroughly;
- In 4 liters of warm water put 0.5 kg of soap, 450 g of rosin and 25 g of baking soda. The material is placed in the resulting mixture for about 2 hours. After time has passed, it is taken out and dried;
- Combine water and alum in a ratio of 10 to 4. Add 2 parts of fish glue to the mixture, as well as 1 part of laundry soap. Wring out the fabric soaked in the solution well and rinse using a solution of lead acetate at a concentration of 4%.
All of these methods require the use of protective gloves and care. But the simplest method can be considered the use of ordinary film, which, if necessary, can be used to cover the tent and secure it with clothespins.
A simple version of the tent can be made using the following pattern.
Pattern of a waterproof tent
The dimensions in the diagram are indicated in centimeters and are calculated for a base perimeter of 150*180 cm. If necessary, they can always be increased while maintaining the overall proportions.
For such a tent you will need at least one riser. You can use a regular ski for this. But if there is a pair available at once, then even better. In this case, it is better to make the riser in the shape of the letter Λ. This is very convenient, especially in poor visibility conditions. The back wall is fixed with braces, which are carried out from the highest point in the diagram. If the area is wooded and it is possible to install the structure between two large trees, then you don’t even need to use a riser.
The main steps for sewing a tent consist of the following procedures:
- Sewing a stretcher using a nylon rope between points A and FG;
- Sewing a stretch to points B and C;
- On the outside, loops are installed at the corners of the base, with which the tent will be attached to pegs. Nylon rope is also suitable for this purpose;
- If desired, you can sew a zipper between the sashes.
- Preparing the base of the structure. To do this, it is necessary to cut a piece of the required size from a durable waterproof, and preferably rubberized, material and sew it with a tarpaulin tent awning.
It is advisable to make holes in the structure for air circulation. The easiest way is to cut the sides of the tent a little and place a holding object between them, for example, an ordinary branch. The edges of the cuts must be trimmed with threads to prevent the fabric from unraveling. The seams can always be reinforced with additional tape. This measure will not only protect the tent from tearing the seams, but also from moisture getting through them.
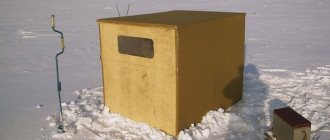
What should a winter tent be like?
Having decided to independently design a shelter, you need to familiarize yourself with the requirements that it must meet. First of all, the product must protect the fisherman from bad weather. In addition, you need so much space inside to be able to relax, have a snack, and warm up. Today, although you can buy a winter tent, many fishermen prefer to make it with their own hands, taking into account their needs.
A homemade design must meet the following criteria:
Types of designs
Among the variety of winter tents, there are two most common types of structures:
- Automatic.
- Arc.
Automatic tents
The positive qualities of this type include quick assembly of the structure (due to the presence of flexible metal strips, unfolding and installing the tent takes no more than 20 seconds), lightness, and mobility.
But there are also disadvantages , in particular poor resistance to wind, especially with strong gusts. Due to the characteristics of the frame, the stability of the tent cannot be improved by any means (braces, pegs, etc.). It has low rigidity and can bend and break if assembled incorrectly.
The automatic type of winter tents is ideal for one-day fishing. An automatic tent is also called a spring tent. Given the compact design, it is convenient for frequent movement on ice.
The category of automatic tents includes:
- Tent in the form of an umbrella. Its design is analogous to an ordinary rain umbrella, it is installed and dismantled very quickly, and is convenient to use.
The materials for such a frame are strong and rigid duralumin rods, and for the awning - tarpaulin or synthetics. Despite the low coefficient of vapor permeability, winter tents made of synthetics are in great demand among fishermen. - Tent in the form of a cube. The main advantage of such a tent is its significant internal volume, increased due to the outwardly convex walls of the frame (you can stand in it and not feel discomfort when moving). For the manufacture of the frame, fiberglass is used, which has an increased strength index. It holds its given shape well and does not accumulate condensation on the roof. Thanks to the use of heat-saving material for the production of cubic tents, you can safely use stoves in them. The windows have special valves for air ventilation. Disadvantage: low stability against a strong gust of wind, the tent can be blown away.
Arc tents
The peculiarity of this type of tent is that it is manually assembled: the awning is attached to the poles using hooks. As a rule, 2-3 arcs are used for the frame, which are located on the outside of the awning.
For the manufacture of arcs, either metal or fiberglass is chosen. Of course, if the poles are metal or aluminum, the cost of the tent will be several times higher. But fiberglass, despite its relative cheapness, has low resistance to external temperature changes (it often bursts in the cold).
Arc winter tents are considered the optimal solution for night fishing.
They are made of durable materials, withstand temperature changes well, resist gusts of wind better, retain heat, and are reliable in operation.
Our next section is about how to make a reliable winter tent with your own hands.