Transom for PVC boats - types and designs
Just as watercraft come in a variety of modifications, boat transoms differ in size, materials and design features. Therefore, before you buy a transom for a boat, you need to decide on exactly the right characteristics. Otherwise, the transom on the inflatable boat may not fit or, even worse, fly off the vessel while it is moving, which will lead to very sad consequences. Therefore, let’s take a closer look at the characteristics of a boat transom.
Transom size and design
Let's start with the dimensions, since for PVC boats they can be said to be almost standard. The width of a suspended transom for a PVC boat is usually 300-400 mm, and the mounting height depends on the height of the sides, but in any case does not exceed 380 mm. In general, the world standard classifies transoms by height into models S (381 mm), L (508 mm) and XL (635 mm), but for small vessels their PVC fabric can only be used in small sizes, i.e. "eSki". And “El” and “Ixel” are already the prerogative of large boats and yachts.
Also, two more parameters are important in dimensions: thickness and angle of inclination. The thickness of the transom depends on the maximum permissible engine power (indicated in the vehicle passport). General recommendations are as follows: for engines up to 15 hp. 2.5 cm thick is enough, but when using more powerful units it is necessary to buy transoms with a thickness of 3.5 cm or more. As for the angle of inclination, it should not go beyond the established limit of 4-6 degrees. This is a standard that improves the performance of the propeller, and therefore ensures high boat speed and economical fuel consumption.
By design, a transom for a rubber boat is a simple device that can consist of the following elements:
- Plywood plate with water-repellent coating;
- Metal frame;
- Mounting arches;
- Eye or Boss - staples with a flat base.
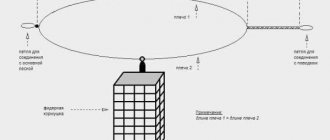
In this case, some models use two plywood sheets connected at right angles. This hinged transom for a boat is attached with a cord. However, the types of fastenings are worth mentioning separately.
Transom Mount
Depending on the design, the transom can be attached to a PVC boat or to a rubber boat using one of the methods presented below.
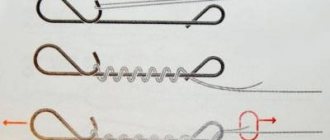
Lugs - two small lugs are glued to the boat hull, which later secure the hook and the large lug. The metal bracket is then connected to the plywood part of the transom using nuts and washers
It is important to note that the strength of the adhesive joint is ensured by the thermal effect of a hair dryer. Lacing - in this case, a special overlay with an adhesive base and rings is used through which the cord is passed. It is believed that lacing better secures the suspended transom to the PVC boat, because
The entire width of the transom is used. In this case, the load is distributed evenly and the engine receives a stable position. But we can’t keep silent about a noticeable drawback - lacing takes a lot of time.
It should also be mentioned that, based on the presented methods, craftsmen independently come up with ways to secure a hinged transom for a PVC boat. For example, adhesive plates are connected to a metal frame on which the motor itself is already installed. This method is reliable, but very labor-intensive and takes up a lot of cockpit space.
In addition, we note that transoms can be stationary or suspended. In the first case, the device is mounted once and for all, and in the second, the transoms can be removed and reinstalled if necessary.
Materials for production
As already noted, the factory transom for an inflatable boat is made of moisture-resistant plywood (transom board), plastic (bosses) and galvanized stainless steel (fastenings). Thus, the board and fastenings are reliably protected from the destructive effects of the aquatic environment, and the plastic bosses are provided with good adhesive adhesion to the PVC fabric.
But other materials are also used, especially if the shipowner assembled the transom on the PVC boat with his own hands. In this case, metal, plastic and simple wood treated with protective impregnation can be used for the board. The fastenings are made from metal profiles, rods and pipes, and they also take care of anti-corrosion protection.
Thus, when choosing a transom for a boat, you should pay attention to each of the listed parameters. And to get a more complete idea of what a good transom should be like, let’s look at the characteristics of the most popular models
Plastic hinged transom for PVC boat
Design
The transom consists of the following elements:
- Plate (square or rectangular plywood).
- Lugs, or eyelets.
- An arc, or bracket, with the help of which the structure is fastened.
During the installation of the structure, the bracket is fixed on the base of the plate, the ends of which are attached using bosses on the sides of the boat.
Materials for production
As a base, a material is used that complies with certain standards:
- Waterproof.
- It looks like thin and light plywood.
- Smooth surface that can protect from negative influences.
- The fastening arch is made of rolled material.
- The bosses are made using plastic.
Manufacturing
To make the transom you will need the following components:
- Drawing.
- The design of the motor mount should be as simple as possible.
- To begin with, you should use an engine whose power is minimal.
- The plate consists of plywood with a protective coating.
- The minimum thickness of plywood is 10 millimeters.
- Smooth plywood edge for boat film safety.
- Fixation of special loops that will connect the plate and the metal bracket.
- The main component of the fastening arch is rolled metal.
- The diameter of the fastening arc is 10-15 millimeters.
All necessary elements are fixed and installed on the vessel.
Transom height
The level of the element depends on the size of the base, which is determined by the volume of the vessel. The height of the transom should not interfere with fixing the motor.
Reinforcement of the hinged transom
The universal design consists of two brackets and four bosses. In order to strengthen the engine fixation, it is necessary to increase the number of fasteners and eyelets.
In this case, it is necessary to take into account the weight of the transom in order to avoid maximum load on the boat.
superkaras.ru
Transom
The aluminum, bakelite or plastic transom located at the stern is torn from the hull when the engine foot hits rocks or the bottom.
Repairs are made after the boat has been deflated and placed on a level surface.
How to repair:
- Clean the area connecting the bottom and transom from dirt.
- Degrease surfaces.
- Remove any remaining silicone from the drain valve.
- Apply liquid PVC to both surfaces in two stages at the interval specified in the instructions for the glue (~20 minutes).
- After another 20 minutes, attach the transom to the bottom, heat the gluing area with a hairdryer to 210ºC and roll it with a roller.
- Strengthen the section of the transom adjacent to the bottom and the cylinder with a Ø 16 cm reinforcement with a cut along the radius. Return the drain valve to its place.
- Cover the junction of the bottom with the transom with a strip of plastic.
The boat can be used within 24 hours.
Manufacturing options
We will describe the most common option for making a transom for a PVC boat with your own hands - using a structure on brackets.
To make and attach the transom to the boat cylinder you will need:
- bakelite plywood - one sheet approximately 30*30 cm wide, the second - 30*20 cm, each thickness 16 mm;
- metal rod with a cross section of 10 mm for making a frame;
- special glue for PVC boats, optimally from the repair kit;
- sandpaper;
- solvent;
- drill and tools for working with metal;
- welding machine;
- purchased or self-made eye rings.
As the latter, you can use boat rails.
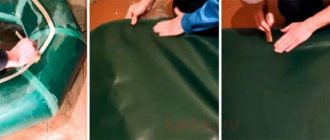
You need to cut two rectangles of the specified sizes from bakelite or other moisture-resistant plywood. Carefully file the edges. Fasten them together so that the total thickness is 32 mm (for mounting most outboard motors, the thickness of the support should be 30-35 mm). Fastening can be done using conventional bolted connections.
Drill 4 holes in the corners of the large slab to mount the frame.
After this, we begin assembling the frame on which our transom will be supported. In order to calculate the length of the frame brackets, you will have to fully inflate the boat and attach the support plate vertically to its stern. Use the help of another person - he should hold the plate while you use a tape measure to measure the length of the future frame elements, and also mark the points for gluing the handrails with a marker on the cylinder.
After installation, the transom must be kept strictly vertical!
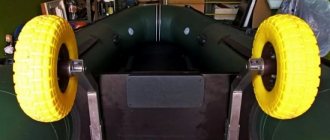
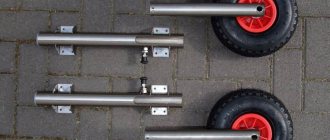
Prepare a sleigh in the summer, and a cart in the winter - this saying just fits my blog. This time I want to share my experience in the manufacture and operation of quick-release transom wheels. I wanted to write a blog in the “Drive2 on the Water” community, but my application for membership has been under consideration by the moderator for several days. Maybe they forgot about me :((((There are many options for transom wheels floating around on the Internet. But for myself, I looked and chose exactly these ones. I made them last winter, at that time there was practically no normal information on such wheels, I had to mock them up knots in both plastic and plasticine in order to test the optimal sizes. Looking ahead, I’ll say - it worked out, I was pleased, three sets were made, for PVC boats of different sizes 2.7m, 2.9m and 3.2m. If anyone is interested, read on. For the kit you will need: 1. A pair of wheels, they were with a camera (black in the photo), and monolithic polyurethane (yellow), with a diameter of 260 mm (I could be wrong - I forgot a little); 2. A square profile made of stainless steel 30X30 mm. , 1.5 mm thick; 3. Stainless steel sheet 2 mm thick; 4. Rod with a diameter of 9 mm (preferably 8 mm. stronger design) stainless steel. Just before I forget: stainless steel is a bit difficult to find, everything can be made from ordinary steel, primed , painted.
Briefly about installation: 1. Inflate the boat and turn it over, put something under it, maybe a box. 2
Try it on to the transom, making sure that the reinforcements in the places where the transom is glued in, gussets, etc. do not interfere. 3
Make sure that the plate on the inside of the transom does not rest against the sling. 4. In the working position, the distance between the top point of the wheel and the bottom was at least 40 mm - so that the adhering soil did not rub against the bottom. 5. Set the maximum possible wheel track width, but so that the wheels do not touch the boat’s cylinders.
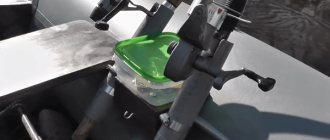
Operation: 1. Get the boat ready, inflate. 2. Connect the racks to the brackets with the wheels facing up. 3. Alternately raise the sides in the aft part and move the racks to the lower position. 4. Place the boat on its wheels and install the motor on the transom in the raised position.5. Lift the bow of the boat by the handle and guide the boat towards the water, stern first. 6.Sit in the boat, push off from the shore so that the wheels do not touch the bottom, move the racks to the upper position or remove them. 7. Lower the motor to working position. This is an approximate algorithm; during operation, adapt to yourself.
This is where I will end my series of articles on Fisherman’s homemade products for now; there is also exclusive material on making wobblers and swimbaits, but it will come later, I don’t even know when.
Happy New Year and Merry Christmas! Good luck, health, prosperity! NHNCH, NGNZH and smooth roads!
Manufacturing
As already mentioned, the board is made of plywood or plastic.
For this:
- a rectangle or rectangles of the required size are cut out;
- gluing is performed;
- after drying, the corners are processed - cleaned of chips and burrs, rubbed with sandpaper, and impregnated with water-repellent varnish;
- joints with arcs are marked, holes are drilled;
- additional processing of the internal surfaces of the holes is carried out - the holes are ground and impregnated with varnish;
- Final painting with varnish or paint is carried out and dried until completely dry.
The production of arcs is carried out as follows:
- cut to size of the workpiece;
- the arcs are welded together to obtain a rigid structure;
- plates with holes for fastening bolts or rivets are welded;
- ends are processed, welding seams are processed, metal is cleaned for painting;
- priming and final painting are carried out.
Read Catching roach with a jig and choosing bait
Advice: it is recommended to prime the metal frame with red lead and paint with hammer enamel.
Gluing of rails or eyelets is carried out at pre-marked places in accordance with the technology for repairing PVC boats:
- the attachment points on the boat are marked;
- the surfaces to be bonded are degreased;
- a small layer of glue is applied to both surfaces, and after a short drying time, the glued surfaces are pressed against each other;
- the resulting compound is placed under a press and kept until completely dry.
Do-it-yourself PVC boat mounted transom
The transom is where the outboard motor is mounted. It must be a reliable, firmly fixed structure. Therefore, the manufacturing process cannot be approached irresponsibly. This element must not be allowed to be unstable and not durable. Mistakes on the water can end in disaster. This is especially true when there are several people in the boat and their well-being depends on this structural element.
When carrying out work, you should strictly adhere to the basic recommendations, taking into account the technical characteristics of the PVC boat along with the motor that will be attached to this element.
Homemade transom for a rubber boat.
Watch this video on YouTube
Motor and transom
The transom for an inflatable boat is designed exclusively for a specific model of an inflatable boat, since boat designs come in a variety of sizes and vary in size. As a rule, those boat models that are sold without an engine and designed for oaring are not allowed to install an outboard motor more powerful than 3 horsepower. Such a motor will allow you to move in an inflatable boat through the water at speeds of up to 10 km/h. Such inflatable boats have limitations related to the weight of the motor. By and large, such boats are not designed to have outboard motors installed on them.
Before starting work, you should carefully study the technical data of the PVC boat and the motor in order to correctly calculate the suspended transom.
Since the boat is not large, the transom is an additional load, especially with a motor. At the same time, you need to take into account that the boat is made of thin PVC material.
And yet, such a transom is capable of supporting a boat motor with a power of up to 3 horses, which contributes to more comfortable fishing conditions. At the same time, you should carefully consider the entire structure, since it puts significant pressure on the stern of the boat. The more powerful the engine, the greater its mass and the greater the load it puts on the material of the boat.
Transom design
As a rule, a hinged transom for a boat is a very simple design consisting of:
- From a plate.
- From fastening arches.
- From the rings, which are also called bubyshki.
The plate is made from a plate and can have any shape. Mounting bows are brackets that are attached to both the plate and the boat using eyelets.
The eyelets have a unique design, consisting of special brackets that have a flat base.
Materials for production
Only waterproof plywood is suitable for making the plate. It is quite light and durable, and at the same time has a polished surface that can protect the structure from negative natural factors.
For the manufacture of staples, rolled steel is used, which is bent depending on the given shape. The best option is to use stainless steel or steel with a special coating (chrome, nickel, zinc).
The presence of steel elements allows you to create a durable structure that is resistant to deformation. If the elements have a protective coating, the structure is durable and protected from corrosion.
The eye is made of plastic, which is characterized by lightness and resistance to moisture, as well as other negatives. In addition, the plastic easily adheres to the PVC base from which the boat is made. For fastening, only moisture-resistant glue should be used.
Manufacturing
All work begins with a drawing. Moreover, a drawing of the simplest transom design will do.
For the plate, plywood with a thickness of 10 mm is used. The edges of the plate should be sanded to avoid damaging the boat. Loops are attached to the plate, which will serve as a fastener for metal brackets.
The fastening arcs are bent manually or on a machine.
Eyes are purchased separately; if all the parts are ready, then they should be installed on the boat.
BEST DIY Canopy Transom!
Watch this video on YouTube
Installing a transom on a rubber boat
The structure is fixed in stages:
- Inflate the boat.
- Attach the frames to the surface of the vessel.
- After the glue has dried, deflate the boat.
- The fastening arc and the plate are connected by a fishing line.
- Place the mounting bow in the eye area.
- Inflate the boat.
Transom and motor
When choosing an engine, the following points must be taken into account:
- Maximum engine power is 3.5 horsepower.
- The maximum speed of the boat is 10 km/h.
- Limited engine weight.
- Features of the technical characteristics of the motor.
- The force of the engine on the trans.
Manufacturing process
Making transom chassis at home is not difficult. Every self-respecting man probably has everything he might need in his garage.
There are a lot of well-known, simple ways to place transom wheels on a boat, both with fasteners and those that do not require traditional fastening.
One of the easiest ways and quite quick in time is to install transom structures on a small boat, on the rear on balloon handles.
To do this, you will need a plastic barrel, from which two main elements 20 cm wide will be cut.
Special ties are cut along the edges of the barrel, which will act as the basis for fasteners. And the chassis itself will be installed in the middle of each part on four stainless steel bolts. All holes must be filled with silicone as a sealant.
Of course, every fisherman has his own methods for improving the boat; for this, you may need various additional parts installed yourself, which will significantly save effort, time and money.
There is also an excellent option for installing transom chassis on special stainless steel brackets. It is the most practical and simple of all known and inexpensive.
So, to make transom wheels with your own hands you will need:
- square pipe 25*25*2 – 1.2 m;
- round pipe 20 mm, external Ǿ 17 mm and internal Ǿ – 0.5 m;
- round pipe 23 mm (outer dia.) 20.5 mm (inner dia.) – 0.05 m;
- rod Ǿ 16 – 18 cm;
- Washers Ǿ 20 – 4 pcs.;
- Washers for M10 bolt – 8 pcs.;
- Bolt with nut M10 – 4 pcs.;
- Cotter pins Ǿ 4 – 2 pcs.;
- Electrode 3.2 – 2 pcs. for the manufacture of knitting needles;
- Furniture plug 25*25 – 2 pcs.;
- Wheels 26*85 with needle bearings – 2 pcs.;
- Special primer for metal structures;
- Special enamel;
- Transparent silicone;
- Drill Ǿ 20;
- Drill Ǿ 4;
- Grinding wheel;
- cutting circle;
- brush.
So, having prepared everything you need in advance, you can safely move on to making transom wheels. Initially, you need to prepare the wheel itself, for example, from ordinary wheels from a children's bicycle or purchase ready-made ones.
From the prepared pipes, make the base of the bracket according to the drawing.
Some joints will need to be welded, since there will be a large load on the frame and the threaded connection may not withstand it. For welding work, it is better to invite a specialist who has specialized equipment in his arsenal.
It is best to order special rotating pins on which the wheels will be mounted from a turner, who will perform the work in accordance with GOST with tolerances and appropriate fits for the hole.
In the finished structure, drill holes for future fasteners and clean them with a file.
After the frame is ready, at the last moment it is necessary to install the fingers and put the wheels on them. This way the transom wheels will be ready for installation. This kind of work takes little time, but the savings are enormous!
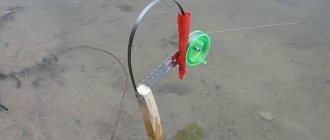
DIY water cannon
Let's look at how to make a water jet for a boat with your own hands. Cunning craftsmen came up with two options for homemade water cannons.
Based on a boat motor
Experience has shown that the most successful homemade water cannons are made from the Veterok-12 outboard motor. But you can use any other one. Usually the old models are used: “Moscow”, “SM-557-9L”, “Strela”, etc. The main advantage of Veterok is the prevalence and accessibility of the necessary parts.
The water duct can be placed both outside the boat and inside it. The second option is used more often, since with an external location the hydrodynamic resistance of the craft increases. Some elements of the water pipeline are made from pipes, others are welded from blanks cut from a stainless steel sheet.
Water cannon on "Veterok"
You can give the workpieces the desired shape using a mandrel (manually) or bending rollers. The impeller blades are cut from the same material. They are then profiled and welded to the hub.
At the design stage, a model of the water conduit can be made from papier-mâché. Then it will be enough to cut it to get a pattern for the development blank.
The transmission of rotation from the engine is carried out through a conventional standard gearbox. It is attached to the main deadwood of the engine using a special flange.
The displacement of this version of the homemade water cannon is 450 kg. Thanks to it, the vessel can reach speeds of up to 20 - 25 km/h and perform planing.
Based on a centrifugal pump
The pumping mechanism of this device is driven by an Intek engine with a power of 5 hp. manufactured by Briggs & Stratton.
The pump develops a head of 35 m and has 2-inch suction and discharge pipes. Its cost is about $300.
The pump is installed in the boat and then a 2-inch PVC pipe is attached to the pump on the suction side. Through a hole in the bow of the bottom of the boat, it must be brought into the water, equipped with a pipe with a mesh filter - this will be the water intake.
A high-pressure fitting with an outlet hole with a diameter of 24 mm is screwed onto the thread of the discharge pipe. One made of reinforced vinyl is suitable - these are sold today in any store for gardeners and gardeners. The role of the nozzle will also be assigned to a piece of PVC pipe having the same diameter as the fitting. A rubber hose should be used to connect the fitting to the nozzle.
Do not put the nozzle in water. Contrary to popular belief, this technique will not speed up, but will slow down the boat, as it will lead to cavitation.
The amount of jet thrust developed by such a water jet depends on the total length of the suction and discharge lines.
Since hydraulic resistance increases with a decrease in the diameter of the pipe and an increase in the speed of fluid movement in it, it is most advantageous to install the pump as close to the stern as possible so that the length of the nozzle is minimal.
Under such conditions, the pump at maximum engine speed developed a pressure of approximately 20 meters of water column (2 atm), thanks to which the boat picked up speed to 8 km/h.
A tester of such a water cannon may face trouble: the pressure fitting is quite easily unscrewed by a stream of water, and the force of its impact is so great that there is no way to keep the part from rotating manually.
Lubricating the pipe with glue before screwing on the fitting does not give the desired effect - the fitting still breaks off. It is recommended to develop an additional fastening for the threaded fitting or use a pump and fitting with flanges.
For practical advice on installing a shower tray, see this page.
What is a transom and what is it for?
Long sailing on an inflatable rowing boat requires physical effort. And some types of fishing (trolling) are practically inaccessible. Therefore, many owners of such watercraft equip them with outboard motors. On some boat models that are sold without an engine, the possibility of installing one is initially provided. To do this, you need to strengthen the transom board, which is mounted on the stern cylinder using a cord or fastening arcs. The transom for the boat allows you to transfer the traction forces of the engine to the hull.
Design features and varieties
In most cases, these devices have a similar design and differ only in the material of manufacture and method of fastening. The complete hinged transom is made of waterproof plywood. If the device is attached using tubular arcs, then most often it has the shape of a square with a side of 30-40 cm.
If the transom on an inflatable boat is fixed with a cord, then its design has a more complex shape. The device consists of 2 rectangular plates connected to each other at right angles: the horizontal one is attached to the stern cylinder of the boat, and the engine is suspended from the vertical one.
Requirements
This is a device for mounting an electric or gasoline engine, which must meet the following criteria:
- have sufficient strength;
- be made from waterproof materials;
- have a reliable fastening;
- The thickness of the plates must correspond to the engine power.
Manufacturers indicate on their products the maximum engine power for which they are designed. It must be remembered that an inflatable boat transom with a thickness of less than 18 mm is designed for engines of no more than 10 hp. In this case, the body can have a length of up to 3.3 m, and the diameter of the cylinder can be 0.44 m.
Do-it-yourself PVC boat mounted transom
The transom is a full-fledged PVC boat motor mount; of course, if you make it yourself, it can be unstable and flimsy, although it all depends on how the transom was made.
When making this device for mounting a motor, you should follow all the recommendations and take into account the technical characteristics of the PVC boat and the motor itself, which will be attached to it using a transom.
https://youtube.com/watch?v=eCnzhf0hemI
Transom and motor
It is important to take into account that such a device as a transom for an inflatable boat is not suitable for mounting a high-power engine. D
The engine installed on a PVC boat should not have more than three and a half horsepower, which allows the boat to reach a speed of about ten kilometers per hour. The fact is that the boat and the transom itself have a limit on the weight of the motor.
When purchasing a motor, PVC boat and transom, you must carefully study the technical specifications.
The fact is that the boat has a weight limit, and the transom, which has a reinforced structure, has a fairly large weight, which increases the load on the fastenings, and, accordingly, on the relatively thin polyvinyl chloride.
Such a transom is capable of supporting a powerful engine of up to three and a half horsepower, but it can only be used on a large inflatable boat.
In addition, the power of the motor puts pressure on the transom plate and the stern of the boat: the more power, the greater the pressure.
Design
The design of such a device as a hinged transom for a PVC boat is extremely simple and includes:
- plate;
- Mounting arc;
- Eyes, which are sometimes called bubyshki.
The plate can be square or rectangular and is made of plywood. The fastening arc is a bracket that is put on the plate, after which its ends are secured to the boat using eyelets.
Eyes or lugs are staples whose ends extend into a flat base.
Materials for production
Moisture-resistant plywood is used as the material for the plate.
This material is quite thin and light, and also has a smooth coating, which protects the plate from exposure to adverse environmental factors.
Staples in most cases are made of metal, in particular rolled metal, bent in a certain way.
It is best if it is stainless steel or steel with a protective coating.
Steel is a strong enough material so that the bracket does not deform under the influence of the load exerted when the boat engine is running.
And the resistance to aggressive environments that stainless steel or coating has protects the metal from corrosion.
For the manufacture of eyes, in most cases, plastic is used, since it is a lightweight material that is resistant to environmental influences, in particular moisture. In addition, plastic can be easily fixed to polyvinyl chloride film using glue.
Manufacturing
In order to make a transom for a PVC inflatable boat, you will need a drawing. You should not choose a device for securing the motor of the most complex design.
For self-production, it is best to take a transom of a simple design, especially if you plan to attach a relatively low-power motor using this device.
To make the plate, plywood with a protective plywood coating is suitable. The thickness of the plywood must be at least ten millimeters. After cutting off the required piece of material, you need to sand the edges of the plate, since the PVC film is easily damaged. Special loops are attached to the plate, with the help of which the plate will subsequently be connected to a metal bracket.
Fastening arches are made of rolled metal. You need to take a metal rod of small diameter, about ten to fifteen millimeters, and bend it in a certain way. You can bend the rod using a special machine or using a workbench and hammer.
Frames can be purchased separately.
The entire structure is assembled immediately before installation on the inflatable boat.
Requirements for transoms
Both a purchased and a homemade transom for an inflatable boat must meet the following mandatory requirements:
- Strength. This applies to both the choice of manufacturing materials and the method of fastening.
- Water resistance. Both wooden and metal parts should not be affected by moisture - the plywood should not swell and the frame should not rust.
- Correct choice of plate thickness. The more powerful and heavy the motor, the thicker the plate should be.
Important! The most durable transoms are installed to use a motor with a maximum power of 10 hp. They are designed for boats up to 3.5 m in length with a cylinder diameter of approximately 0.44 m
Multi-layer plywood and chrome-plated metal will provide adequate moisture resistance and guarantee durability.
Making a hinged transom for a PVC boat
Today, the transom has become an integral part of boats, motor and rowing inflatable boats, the carrying capacity of which exceeds 220-250 kg.
Depending on the type of boat, there are two main types of transom: stationary (fixed) and mounted (removable).
Many lovers of outdoor activities on the water, who have a rubber or PVC boat at their disposal, want to increase the speed of movement on the water by installing a motor - gasoline or electric. The stationary rigid element is tightly glued into the stern of the vessel by the manufacturer. As a rule, it is made of multi-layer waterproof bakelite plywood.
Many manufacturers include a hinged transom in the package. Each of them has its own fastening elements and is designed to install a low-power motor (up to 3 hp). In addition, a rigid element at the stern of a PVC vessel is often used for attaching additional equipment, for example, an echo sounder sensor.
But lovers of fishing and other types of water recreation, who have boats of sufficient carrying capacity and, for various reasons, are not equipped with a rigid element for mounting the motor, have to buy it or make it themselves.
Installation
One of the classifications of transoms involves their division depending on how they are attached to the vessel.
According to this principle they are divided into:
- Removable. Removable ones are installed on boats with outboard motors, and a popular way to mount a removable transom is to mount it on a bracket. In this case, it is mounted to parts located in pairs above and below.
- Pasted. Glued-in transoms are usually spaced at an angle of 8 degrees. To adjust the position and height of the transom, movable pads are often used.
Soft linings for boat cans
They can be either homemade from improvised means or industrially manufactured. They can be used both as independent devices and in conjunction with a waterproof bag. In this case, the bag is zipped onto the cover and placed under the can. The volume of such bags, depending on the boat model, is determined by the width of the cockpit and the width of the can used. A very useful device for storing small items, as well as those that can be damaged by moisture.
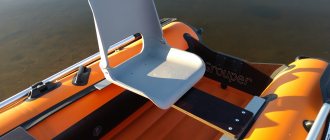
To obtain slightly greater comfort, inflatable seats are offered for use. These are inflatable ottomans of various shapes and sizes that can be designed to be placed in any part of the boat. They can be attached either to the spacer between the cylinders or using the same half-rings.
Even greater comfort in the boat can be achieved by installing inflatable backrests for ottomans.
The result is a luxurious inflatable chair, which, however, is more relaxing than allowing you to concentrate on fishing.
Required tools and materials
To make a transom with your own hands, you will need a minimum set of tools and a list of suitable materials.
Tools:
- devices for sawing metal: grinder (angle grinder) or hand saw for metal;
- electric drill or screwdriver;
- devices for sawing wood: hacksaw or electric jigsaw;
- welding inverter (depending on the model design);
- pipe bender (depending on the model or the presence/absence of a welding inverter);
- spanners.
Consumables:
- self-tapping screws;
- trimming discs for an angle grinder or blades for a metal saw;
- drills and bits;
- saw blades for electric jigsaw;
- electrodes (when using a welding machine);
- yacht varnish;
- paint brush;
- hammer paint;
- specialized glue for boats.
Read: Plastic boats for motors
Materials:
- iron pipe up to 20 mm in diameter (preferably round);
- plywood. 30-40 mm thick (can be used in 2 layers of 1.5 or 2 mm).
- nuts;
- factory adapters-mounts (glued to the hull of the boat), it is advisable to purchase them in a store, since making them yourself is difficult.