Strengthening plastic sleds for motorized towing vehicles
As the first tests of a homemade motorized towing vehicle on wooden slides showed, drag sleds largely affect the cross-country ability. Homemade skids made of steel profiles and galvanized steel did not perform the best in terms of cross-country ability. They should be used on a knurled surface for household purposes: to bring water, firewood and the like. And for moving through deep, loose snow, it is better to buy plastic drags. This became clear immediately after the first trip in a plastic drag sleigh, rented from a friend.
Structure
Before we get started, we need to understand how they work.
To do this, you need to find drawings of the structure of the sled on the Internet. After you have studied all the diagrams, you need to decide what size the sled will be and how you will use it. Read here - Stencils for wall decor - ideas and options for cutting out patterns for applying stencil images (125 photos)
It is known that to increase the stability of a sled, it is necessary to increase the distance between the runners. However, you should not forget about the roads on which you plan to travel.
Price issue
For my motorized towing vehicle with a 6.5 hp engine. and with the 380th caterpillar I didn’t see the need to buy large drags. Their purpose was to transport the driver and maybe a small load, nothing more. For more massive loads, homemade metal sleds will be used.
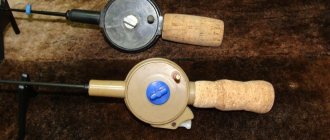
So, on the local market I found a suitable option costing only 1000 rubles. The dimensions of the drags are approximately one meter by half a meter. No reinforcement, just a plastic trough. The price of exactly the same trough, but with piping, was already about 3 thousand rubles. It takes a couple of hours to weld a harness from a steel profile, so I bought these plastic drags without reinforcement for, as it seems to me, an adequate price of 1000 rubles. In any case, I couldn't find it cheaper anywhere.
Tying plastic drags
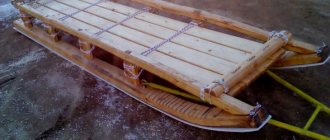
The drag sleds will experience a relatively small load, so I don’t see any point in strengthening them thoroughly. This will only make the structure heavier, which is undesirable. Therefore, it was decided to just run runners from a 20x20mm profile under the bottom and connect them to each other at the front and rear.
At the front, 2 eyes from the same profile were welded into which the towing device was passed. And at the back there was a ring welded for coupling with more drags.
Plywood was laid at the bottom of the skids, which was screwed to the runners with self-tapping screws. Those. the bottom of the plastic skids was sandwiched between the plywood and the runners. To prevent the plastic from cracking, holes were pre-drilled for the screws.
The front part of the runners was bent in a proven way: with a grinder, cuts are made in half the thickness of a square pipe, the profile is bent as required, after which the cuts are welded.
The design turned out to be quite rigid, the first tests were successful. The drags in deep snow showed themselves to be much better than the previous metal ones.
Conclusion
In principle, it is not necessary to make strapping and generally strengthen plastic drags in any way. I calmly rode the drags without any reinforcement. But, firstly, this is not very convenient, because... the bottom bends underfoot and there is no rigidity. Secondly, it’s slippery. Thirdly, it is difficult to attach another drag sled to the back and, finally, fourthly, their service life without reinforcement is noticeably shorter.
Source
FAQ. Sleigh drag for motorized towing vehicle
Which drag sleds are best to use for a motorized towing vehicle?
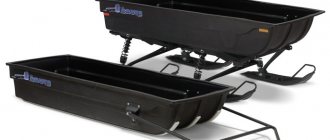
This question cannot be answered unambiguously, since drag dogs are very popular among owners of motorized dogs and the number of their designs is limited only by human imagination. If you don’t want to waste your own time, and saving money doesn’t particularly concern you, then buy a ready-made plastic sled for a motorized towing vehicle. They have proven themselves excellent in operation. If your soul asks for creativity, and your hands grow where they need to, and you don’t have an extra ruble in your pocket, then you can try to do everything yourself. Search the Internet, there are a lot of recommendations, there are photos and video information, reviews about the operation of a particular model. Similar materials were also posted on our website, so we will not consider in detail the designs of sleds for towing vehicles.
Let's give just a few small tips:
- The design and dimensions of homemade sleds must fully meet the requirements.
- If you plan to transport goods, then it would be good to take care of the sufficient height of the sides and the possibility of securing the transported items.
- If you plan to go fishing in the company of fellow passengers, then it would be a good idea to make the sled more comfortable for travel and provide additional seats.
- Drag bars for motorized towing vehicles and snowmobiles are somewhat different in design.
- Skis or covers made of metal are highly durable, but when driving through puddles or melt ponds in frosty weather, they quickly become covered with ice and lose their gliding properties.
What are the optimal sizes of sleds for a motorized towing vehicle?
We have already discussed a similar question above. And here it is unlikely that it will be possible to find the “golden ratio”; for each user of a motorized dog, the optimal size of the sled is different. The drags must fully meet the requirements of the owner and the operating conditions of the towing vehicle. In this case, it is necessary to take into account the capabilities of the vehicle that will be used as a tractor: a motorized towing vehicle or a snowmobile.
How to repair a crack in a plastic motorized dog sled?
Unfortunately, sleds for motorized towing vehicles manufactured by industrial enterprises are most often made of composite frost-resistant polyethylene. This is an excellent material, it has proven itself in operation. But if a crack forms on it, it is unlikely to be able to seal it. Those. It can be sealed using polyester or epoxy, but such a structure will not last long. There is only one way out - repair using a patch made of plastic or aluminum, secured with rivets.
How and with what to hem the sled-drag for a motorized towing vehicle?
The standard sleds sold for motorized towing are good for everyone, but with a little modification they can be even better. And they will last even longer. In particular, experienced owners of motorized dogs recommend that after purchasing plastic sleds, make a backing for them, which is an overlay on the runners or the bottom of the drag. This small modification will not take much of your time, but will significantly increase the service life of the sled. Most often, polypropylene pipes, HDPE pipes or sewer plastic pipes are used for this. Overlays are cut out of them, with the help of which the sled is hemmed. The linings are fastened either using rivets or self-tapping screws with countersunk heads.
How to strengthen the drag sled for a motorized towing vehicle?
One of the options for strengthening the sled is the hemming of the runners, which we talked about above. But you can go even further. Make a fender frame for the sled around the perimeter of the drag trough, which will to some extent protect your vehicle and extend its life. To make the frame, you can use a metal-plastic pipe or an aluminum profile. You can, of course, use a steel pipe, but it is somewhat heavy. Fastening of the fender frame with drags is carried out using rivets, bottom joints or self-tapping screws with countersunk heads.
Do-it-yourself sled-drags
With the right approach, homemade drags can be much stronger than factory ones. Despite the fact that the sled is made of durable frost-resistant plastic alloy, it is still not as wear-resistant as metal. Plastic drags can be rubbed or broken on stone, asphalt and other hard obstacles and surfaces. In addition, the metal hitch fastenings of purchased models are usually of low quality? Bolts often become loose and connections become loose, which can lead to the loss of the sled.
When developing your own homemade drags, you can take all these nuances into account. Recently, a sled made of lightweight metal profiled pipe and plywood has become a very popular model of homemade drag sleds. Their structure, as befits a skid, is very simple: a metal frame mounted on skids.
In order to make homemade drag sleds, start making a frame. To do this, you will need a welding machine, a grinder, drills and the necessary materials: a profiled pipe for the frame and drawbar, as well as plywood.
Take a lined square profiled pipe, say 20 by 20 mm in size and 2 mm thick (no less). You can make a frame with your own hands measuring 1900 x 300 x 900 mm. The front needs to be rounded for better cross-country ability of the sled. There you need to weld a steel sheet to give the entire structure more stability. After the skis and drawbar are ready, the body is sheathed with thick plywood. It is important that the distance between the crossbars of the body does not exceed 400 mm so that the plywood, bending, does not break.
To make a drawbar with your own hands? steel coupling between the towing vehicle and the drags? two lightweight steel pipes with a diameter of 20 mm and a total length of 1700 mm are used. To ensure a strong connection, you need to make two crossbars with a cross-section of 20 mm. To make a drawbar with your own hands, you use a rectangular pipe, but we used a round pipe. In order for the hitch to withstand additional loads and be protected from bending, it is necessary to weld a metal sheet into which a bushing with a diameter of 25–30 mm is cut. Skis for a homemade sled can be made from sheet metal or using long plastic pipes.
You can weld metal fasteners for the seat into a metal frame with your own hands, which is not available in purchased sled models. You can make sure that if necessary, for example, to tow a broken motorized dog, the seat can be easily removed. Depending on your needs, you can make the sides lower or higher, modify the hitch with the towing vehicle and provide fastenings for fishing gear, etc. Well, plus, a homemade sled? This is an opportunity to save some money.
So, as we have seen, there is nothing difficult about making a drag sled yourself. You just need to have the necessary materials, tools and desire at hand. In this way, defects and weaknesses of purchased models can be avoided. In addition, homemade drags are much stronger than purchased plastic ones.
Snowmobile sleds - types of structures and the principle of their operation
There are several main types of snowmobile sleds, and each has advantages and disadvantages . The sled is very versatile in its design. They easily attach to all types of snowmobiles. For example, for a Yamaha snowmobile, Russian Mechanics, Ermak, Viking 540, Dingo 150, BRP and Varyag 550.
Snowmobile sled
In order to choose the type that suits you, you need to consider several factors:
- the routes and trails you need to navigate, features of snow cover and terrain;
- type of cargo transported;
- driving style.
For more information about snowmobile sleds, watch the video:
Volokushi - description and dimensions of plastic snowmobile sleds
Sleigh drags are the easiest option.
They have several advantages:
- compactness and low weight;
- simplicity and speed of loading and unloading luggage;
- The drag body body does not freeze.
However, drags have a serious drawback - due to the design features, their front part is often damaged. This type of sled is inexpensive, and making it yourself is impractical.
Passenger
rarely seen . They usually consist of a housing made of plastic or plywood mounted on skids.
For greater passenger comfort, the design of the passenger sleigh can be sprung, and lighting and heating can be installed in the cabin.
They are not easy to find on sale, but such designs are sometimes made by winter fishermen and other outdoor recreation enthusiasts during the cold season.
A passenger sleigh can carry one or even several passengers, therefore, having only one snowmobile, the owner of this design can take a large company out into the snowy nature.
The main disadvantages are the large dimensions and weight of the structure. Because of this, passenger sleds can only be attached to powerful, high-powered snowmobiles.
Freight
Cargo sleds are the most versatile and practical option. They are designed more complexly than drags, but at the same time much simpler than passenger ones. These sleds have a large load capacity with small dimensions.
Due to the relatively small contact area with the surface, cargo sleds have a smoother ride than drag sleds - such structures easily slide on their runners, easily overcoming obstacles.
The luggage in them is protected much better. Below are photos of a homemade snowmobile sled.
Due to the fact that their skis are located at a great distance from each other, cargo sleds can also boast much greater stability than drag sleds.
A standard cargo sled consists of three main elements:
The frame is the basis of the entire structure. The runners are attached to the bottom of the frame using racks. There is a flooring on top, on which the loads will be placed.
For greater convenience and functionality, the frame of the cargo trolley must be equipped with railings and a covered structure placed on it.
In such a box, cargo will be reliably protected from snow and wind.
Types of homemade sleds for snowmobiles
In general terms, a sled is a universal vehicle. There are several types, but they all simply attach to any snowmobile. To decide on a suitable model, you need to take into account a number of factors:
- the complexity of the route along which you have to navigate;
- thickness and quality of snow cover;
- terrain features of the site;
- type of cargo transported;
- travel distance;
- driving style.
Initially, it is worth finding the answers to each item. After this, it will be easier to choose a sled for your snowmobile, and all models are divided into three types:
- Volokushi are considered the simplest type of sled. In the factory version, they are often made of plastic and resemble a rectangular trough in shape. The drags do not have skis. While driving, the bottom slips on the snow. The weak point of the drag is considered to be the front part. It is most often destroyed. However, such a product is inexpensive, it is easier to buy it than to make it yourself. The drags are shaped like a rectangular trough, and the bottom is not equipped with skis
- Passenger sleds are extremely rare for sale. This is due to low demand. The design is a covered booth mounted on skis or a skid. There is one or more seats for passengers inside. Advanced models have heating and lighting. In such a booth it is convenient to go fishing together or just relax. Most often, passenger sleds for snowmobiles are assembled with their own hands, which significantly reduces the cost of the design. Their main disadvantage is their heavy weight. You can only attach it to a powerful snowmobile. Passenger sleds are convenient for going fishing or relaxing in winter, but they can only be attached to a powerful snowmobile
- The cargo sled took all the best qualities from previous varieties. They are more resistant to drag due to the presence of skis. With small dimensions, they are lighter than passenger sleighs, although they can withstand several times more load. Due to the presence of skis, maneuverability and maneuverability on difficult terrain are improved. The main purpose of the sled is to transport goods. However, people can ride them with success. Devices in the form of springs are usually installed between the skis and the bottom of the cargo sled to increase the load capacity.
READ ALSO: Do-it-yourself installation of polypropylene pipes: polypropylene water supply
Of all the options, the most popular on the farm are cargo sleds. Volokushi and passenger models are used by amateurs for entertainment and recreation.
In the video, a homemade sled for a snowmobile with your own hands in running-in:
Necessary materials
What are skis for a snowmobile sled made of? Let's consider the construction of a simple version of a snowmobile sled from a metal pipe. In order to make such a design, you will need:
- profiled metal pipe 20×20, wall thickness - 2-3 mm;
- round plastic pipes for making skis;
- Metal sheet;
- plywood sheets 10-15 or more millimeters thick.
A sled with a metal frame is much more reliable and durable than structures made from plastic pipes.
Their disadvantage is their greater weight, but they will serve for a long time and without failure. The only thing that may be needed when operating such a design is periodic replacement of plastic skis, which will wear out over time or may be damaged when hitting rocks and roots.
Sleigh dragging with your own hands
Due to the simplicity of the design, the range of materials for the sled is enormous.
You can use everything that is lying around in the garage or at the dacha.
Recommendations
A motorized towing vehicle, as mentioned above, is an excellent vehicle for transporting goods and an indispensable vehicle for hunters and fishermen. And their huge advantage is that they can be repaired in the field without spending money or a lot of time.
Expert opinion
Smirnov Alexander Stanislavovich
Wilderness survival instructor. More than 15 years of teaching experience
Among the many advantages, one must take into account the fact that before operating this vehicle, preparation and maintenance are required.
- During long periods of parking, you need to warm up the engine so that it does not fail and serves for a long time.
- To prevent ice from forming, you need to treat the springs and rods with a special anti-icing agent.
- Before long stops and after the next trip, the units and tracks need to be cleared of snow, which becomes clogged and can turn into ice.
- The limiter cable must be treated with lubricant.
- Check threaded connections while tightening.
Before preparing for winter, you first need to get rid of any remaining gasoline in the fuel system, this also applies to engine oil. The frame structure itself and its base must be cleaned and checked for damage, and if there is any, fix everything using tools and welding. Then sand everything and paint.
This is interesting: Salt lick for roe deer
You can also make the frame yourself, using metal pipes to make a rectangular section.
A prerequisite is that the metal should not be thin, as it wears out quickly. A pipe thickness of 3 mm is sufficient.
Additionally, the tension chains need to be checked, adjusted and lubricated. Be sure to change the engine oil according to the season. When using a motorized towing vehicle at sub-zero temperatures, it is necessary to provide for the installation of frost-resistant electrical wiring.
Check and, if necessary, replace the parts of the motorized towing vehicle. It is also recommended to replace the spark plugs.
If transport will be used frequently in winter, then it is advisable to purchase additional accessories - for your comfort and to store the motorized towing vehicle. You will need a special case, a ski module and heated handles.
How to make a sled for a motorized towing vehicle with your own hands, see below.
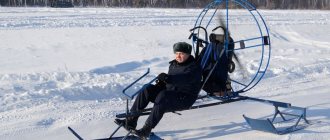
It’s hard to imagine a motorized towing vehicle without a drag sled. They carry the driver and other cargo.
Some motorized towing vehicles are even equipped with such a sled. How do drag sleds for a towing vehicle differ from the same drag sleds for a snowmobile? In addition, many are not satisfied with purchased models.
How to make a sled for a motorized dog with your own hands? What materials, tools and skills are needed for this?
Homemade snowmobile sled made from plastic pipes
Polypropylene or PVC pipes can serve as material for sleds. The design will be lightweight and suitable for any snowmobile. The connection of individual elements is carried out with a soldering iron. The load-carrying capacity of the structure will be small, since the plastic tubes will not withstand heavy loads.
Pipe blanks are cut to size according to the drawing
First you need a drawing. It's simple. The design consists of two curved runners that act as skis. Vertical posts extend from them, which support the main platform.
According to the dimensions of the snowmobile sled indicated on the drawing, blanks are cut from the pipe with your own hands. Prepare shaped elements for soldering. Heat up the soldering iron. From the shaped elements you will need tees and 90° angles. On skis you will need to bend the edges. This can be done by soldering 45° corners. However, the disadvantage of this method is that the soldered fitting has an edge with which the skis can cling to obstacles on the track. You can go another way. Avoid soldering the corners and bend the PVC tubes to the desired angle, after heating them with a hairdryer.
You can give the pipe the desired angle using a hair dryer, heating the area required for bending
After cutting the tubes, begin soldering. First, clean the edges of the workpieces. Nozzles are inserted into the soldering iron. Install the fitting and pipe section. When the plastic softens and begins to melt, the blanks are removed from the hot nozzle and joined together. All elements are collected in a similar way.
Advice! If you have no experience in soldering plastic pipes, it is best to practice on unnecessary scraps to avoid defects in the main structure.
The fittings are joined to the pipe using a soldering iron.
The skis are assembled first. They consist of three paired pipes. Tees are soldered at equal intervals along the runners. Racks made of pieces of pipe are attached to the central outlet of the fitting. Their upper end is connected with jumpers using tees and pipes. They form the platform of the future sleigh.
Stands with jumpers are soldered to the runners from pieces of pipes and tees, forming a sleigh platform.
A rectangle is cut out of plywood according to the size of the platform contour. To make the seat soft, the blank is upholstered with an old blanket or foam rubber, and covered with leatherette on top. The platform is secured to the jumpers with overhead clamps or bolts through pre-drilled holes in the tubes.
Important! The plastic structure cannot be used to transport heavy loads. Lightweight homemade sleds for snowmobiles will be a joy for children and can support one adult.
Sled for non-mobile with skis
This is a more complex option in terms of design. But it's worth it. Thanks to the use of skis, the sled becomes more stable and behaves more consistently at high speed. Also, when using skis, the body of the sled itself does not come into contact with the snow cover, which means it will last much longer.
Option 1 - steel frame and skis.
Durable and voluminous sleds for snowmobiles.
A square pipe with a diameter of 20mm x 20mm is used for the frame.
The pipe is cut with a grinder and connected by welding.
Front sheet of metal 2mm thick. Serves to protect against snow and small obstacles. It is welded to the frame.
The skis are made of sheet metal, with additional stiffening ribs along the edges (made using a sheet bender)
The rigid hitch (drawbar) is welded from a 20x20mm profile, as is the main frame of the sled.
The end uses a spring to provide shock absorption during acceleration and braking. Without a spring, you risk rapid wear and tear on the towbar and its attachment to the snowmobile.
Sleigh drawing:
This version of the sled has one flaw - there are not enough guides on the skis.
Guides are needed for normal controllability of the sled, because... on flat skis the sled skids a lot when turning.
In the factory version, the ski with a guide looks like this:
If you do it yourself, you can weld a small corner or a steel rod of small cross-section to a metal ski (about 10mm for a 20cm wide ski).
Snowmobile sled made of plastic pipes
An interesting and affordable option for a snowman sled made of PP pipes. These pipes are used for water supply and sewerage.
To make the frame, 25-30mm water pipes are suitable.
For cutting, you can use special scissors, or a knife and a hammer (if you don’t have a lot of special tools)
To connect the parts we use a soldering iron for PP pipes. By the way, you can also use homemade devices based on an iron or even simply by heating a tip from a piece of metal pipe on a gas stove. The main thing is not to overheat the tip, since the special soldering iron does not have a high temperature.
How to make skis for a sled
To make runners, it is convenient to use a sewer pipe with a diameter of 100 mm.
How to straighten a snowmobile ski tube:
Carefully cut lengthwise and heat with an industrial hair dryer or burner (you need to be very careful with an open fire so as not to melt the pipe).
We straighten it using two boards (pieces of plywood) placed on the floor and pressed down with a foot or a heavy object. You can also use a vice or a press machine.
It will not be possible to heat the entire length of the pipe at once, so we warm it up and bend it in small sections of 30-40 cm. This way you won't need much effort.
There is one simple trick to secure the pipe to the runners.
Drag bars for motorized towing vehicles
So, the proposed version of the sled is quite simple to manufacture and does not require significant financial investments.
The design is based on two elements - skis and a steel frame. This version of the drag is quite stable and stable when turning, and it overcomes snow obstacles perfectly. Another advantage is that the body of the sled does not come into contact with the surface of the terrain over which the motorized towing vehicle moves, therefore, the device has less wear.
The main material for the manufacture of the frame is a metal pipe with a square section of 20x20x2 mm. The required pipe sections are obtained by cutting using an angle grinder (grinder) and fastened together by welding. A steel sheet is used to cover the frame, which will serve as an obstacle to snow and dirt getting inside. For front protection it makes sense to use a sheet 2 mm thick. The protection is also secured to the steel frame by welding. Moisture-resistant plywood is ideal for cladding the side and back surfaces.
Steel sheets are also used to make skis. To increase rigidity, ribs are made along the edges using a sheet bending machine.
For the manufacture of the drawbar (coupling device), a profile pipe 20x20x2 mm is used, just as for the frame. A spring is placed on the rigid coupling, which serves as a shock absorber during braking or acceleration.
Do it yourself
Everyone decides for themselves whether to buy drags or make them with their own hands. If you have the opportunity to easily spend about 10-15 thousand rubles on a fairly good sled, there is no point in messing around with homemade products.
But if you think this cost is unreasonably high, you can make a variation of the drags with your own hands. A similar thing for a snowmobile will consist of:
- metal profile pipe (size about 20×20 mm with walls 2-3 mm thick);
- metal sheet;
- round plastic pipes;
- sheet of plywood (thickness not less than 10 mm);
- additional design elements;
- inserts for a comfortable fit (optional);
- sides (if needed), etc.
It is better to take good metal as a material for the frame. This is a guarantee of the reliability and durability of the structure. Although the drags will be heavier than those made on the basis of plastic pipes, there will be no problems with service life.
You just have to change your plastic skis occasionally. After all, over time they will wear out, break and collapse. The process is natural, nothing to worry about.
Assembly procedure
The procedure for making a simple version of drags looks something like this:
- Using 4 pieces of pipe, a metal frame is made for a rectangular base. Set the dimensions yourself;
- If the design will be used for cargo transportation, it is better to supplement the base frame with special cross members;
- Vertically located racks are mounted to the base;
- The number of racks used depends on the length of the drag itself;
- Basically, 2-4 racks are used on each side;
- Skis are made from pipes, this time plastic. I advise you to level them so that you get flat-shaped skis;
- The pipe, cut in half lengthwise, is straightened with a construction hairdryer;
- The heated plastic is pressed with something heavy to fix the new shape. Wait for the plastic to cool;
- Skids are mounted on the frame;
- It is desirable that the upper part of the ski runners be at the level of the frame and mounted to the edge of the base. Otherwise you will bury yourself in the snow;
- A drawbar and a lock for coupling with a snowmobile are mounted in the front part;
- A sheet of plywood is laid on top of the frame as a flooring.
Then equip and decorate this variation of drags at your discretion. You can look for ideas on the Internet, or just use your imagination. Nobody limits you here.
I think I managed to answer many questions. If I missed something, open up. Write, ask or just share your opinion.
And I have everything. Thank you all for your attention! Subscribe, tell your friends about us and stay with us!
Thanks for reading! Please,
DIY toboggan sled made from a plastic barrel
Maybe you're like me and have always dreamed of making a classic toboggan out of bentwood. But you, like me, understand that this requires a lot of time, as well as tools that you do not have. And so I thought. . .How can I quickly make a simple toboggan that slides just as FAST?
Ideas for creating an unconventional toboggan stirred in my little brain, a little time passed, and the result is already in our store!
This is an incredibly fast toboggan sled made from the following simple things:
• 208.2 L (55 gallon) plastic drum • small handful of screws • rope • wax!
Everything is done very simply with a few basic tools. Don't doubt it will benefit your health and... . .
Let's sweat!
Step 1: Materials
I found a used plastic barrel at a construction site. It originally contained some sort of detergent. Large car washes are a good source of detergent barrels like this one for DIY projects.
At first I planned to use maple boards for the sides (as in the pictures), but then they came in handy for another project. So I made do with 2x4s, which are just as good.
Step 2: Measuring and Marking the Barrel
The sled runner is made from the side of a plastic barrel, which needs to be cut off with a jigsaw.
I used a simple marking device made from leftover boards and a marker.
The width of the runner I made is 56 cm, and I marked the barrel at the top and bottom, respectively, so that the ribs protruding on its surface were symmetrically located on the part being cut out. For details on barrel markings, see the notes on the photos.
1. The marker is inserted into a hole drilled in the board. To make a mark, carefully guide the board around the barrel.
2. A small piece of wood is screwed to a longer piece of wood as a stop.
1. There is a vertical seam on the barrel, which I outlined with a marker to make it easier to see where to cut. The circumference of the barrel is very close to 182 cm.
Step 3: Cut the runner from the barrel
To cut the barrel, I recommend using only a jigsaw. This is the safest, easiest and fastest way.
First of all, drill a 6mm (or so) hole at the beginning and end of the vertical line. Then carefully make cuts at the top and bottom of the barrel.
Then cut the barrel along a vertical line.
Step 4: Straighten the runner
I had to think about how best to turn the middle part of the barrel into a sleigh runner.
In the end, I came to the conclusion that the inner, smoother side of the barrel should be in contact with the earth's surface. On the outside there are raised letters and other symbols that, in my opinion, should not be dragged through the snow.
In addition, by acting in this way, we gain the advantage of a slight vertical bend of the barrel from top to bottom. When the inside is turned down, the runner develops edges that bend down slightly and act as sharp guide edges (as on skis and snowboards)
. . . So, we need to straighten the curved middle part of the barrel as much as possible.
The simplest way is to gradually roll it tightly in the opposite direction in order to break the “memory” of the material and bend it until it takes on the flattest possible position. This will require a little muscle strength and elbow involvement, but it's not difficult.
It may also be helpful, after finishing the runner, to manually secure it with electrical tape in a tightly folded position while you do the rest of the parts. That's what I did.
1. Fold this part in reverse direction and work it by hand to break the memory of the material and straighten it.
2. Save it for other projects. Golf disc drive?
Step 5: Wooden Parts
Running along the length of the sled are two fastening elements made of 2x4 boards 150 cm long. Any boards that are long and wide enough to drill holes for threading ropes with knots at the ends will do (details in the description of the following steps).
There is also a front wooden “handlebar” piece (shown in photo 2), and another 2x4 piece that fits as a spacer between the pointed ends of the side boards (shown next).
1. Two pieces from a 2x4 board, each 150 cm long..
1. Width approximately 2-4 cm and length 55 cm.
Step 6: Sharpen the ends of the side boards
The front ends of the side boards must be cut along a curve.
For an explanation of the size and type of cut, see the notes on photo 1. Such cuts can be easily made with a band saw or jigsaw.
1. Make a mark 15cm from the front end and draw a curve from this mark to the front corner as shown below. I drew this curve by eye, but it turned out well.
Step 7: Mark the position of the holes for the rope handles
I made three handles on each side from rope threaded through holes drilled in the side boards and secured with knots. Each handle is made from a separate piece of rope.
If you would like to replicate my chosen handle arrangement, please see the notes on image 2 for hole sizes and placement tips.
1. To determine the ideal location using a visual example, I cut three 23cm boards.
2. Neckline 12.5 cm.
3. Neckline 12.5 cm.
4. 8 cm from the rear end.
5. A pencil line was drawn on the top and bottom of each board.
Step 8: Drill Holes for the Rope
I drilled holes on the bottom sides of the boards that were 2.2cm in diameter and approximately 2.5cm deep to attach the knots. (I used 1 cm thick rope.)
The position of the hole axes is transferred to the sides, and then to the top side using a square with cutouts. Then from the top side you need to drill up to the large holes drilled earlier with a 1.3 cm drill.
Not shown here, but important: Drill the same type of holes in the front of each side board at the 15cm mark. Ropes will be threaded through these holes to secure the front of the sled and also to tow it. .
Step 9: Finishing All Wood Pieces
If you want to use the sled for a long time, I recommend finishing all wooden parts with some kind of polyurethane impregnation according to the instructions on its packaging.
Lightly sand all surfaces with 220-grit sandpaper to ensure the impregnation is evenly distributed.
Step 10: Optional: stripes, like in Crazy Races!
Having completed the polyurethane impregnation treatment, I decided to add blue stripes to the sleigh, as in “Running Races”.
I taped over the areas where the stripes should be, and then sprayed clear varnish onto the finish. This sealed the edges of the tape so that if anything leaked underneath it, it would be clear varnish. As a result, the additional coating will have crisp and clear lines.
Then I applied some blue spray paint and removed the tape. Stripes, like in “Crazy Races”!
Step 11: Cut the rope for the handles and towing
A 60cm piece of rope was used for each handle. In this case, the quickest way to “insulate” the ends of the rope is to simply wrap the rope where you want to cut it with electrical tape. Then cut with a knife in the middle of the electrical tape and both ends are processed. Easier than that!
For the towing rope, I cut 2 pieces of 150 cm, processing the ends in the same way.
To prepare the ropes for fastening to the boards, I tied a knot at one end of each piece. For tips on this, see the notes on image 2.
1. Lightly pinch the rope with pliers. Grip the pliers firmly and pull the cord, tightening the knot. The knot will be very tight
2. Spray a little Moment glue onto the knot to prevent it from unraveling later. Not that there is such a danger, but a little superglue won't hurt.
Step 12: Handles and Tow Rope
Now we attach the handles and towing rope.
We thread each handle from below, and then into the adjacent hole from above. Tie a tight knot and, if desired, glue it, and pull the handle up harder so that the knot fits into the lower hole.
Do the same with the tow ropes in front.
Step 13: Attaching the Front Edge Board
A small board that runs along the front of the sled performs a connecting function. It acts like a rudder while driving, but at the same time provides rigidity and serves to secure the tow rope.
I attached it with clamps to one of the ends of the runner, on the smooth underside. I then attached it using some 1.6cm screws and pre-drilled and countersunk holes.
1. Conical, adjustable countersink. If you don't have one, get one. Select the appropriate size for the screw type and adjust according to the type of wood and depth required. This is a woodworker's best friend.
Step 14: Attaching the Side Boards to the Runner
The side boards are attached to the plastic runner with screws inserted from the underside.
It’s good if you have comfortable sawhorses on which you can place the almost finished toboggan while performing this stage.
I used 5cm screws that were taken out of some old pieces I had put aside a few years ago. I don’t even remember what it was, but beautiful large screw heads stood out on it. If you are making such a sled and are going to buy propellers, I recommend looking at something like the one shown in picture 3.
This step involves attaching the runner to the boards with clamps and pre-drilling and countersinking the holes.
I worked from the back edge to the front, first on one board and then on the other, and placed the clamp next to the screw being driven in, gradually moving it further. Be careful not to drive the screws too close to (or right above) the rope holes!
Step 15: Installing the Front Strut
A front brace, made from a piece of 2x4 board, was installed between the front ends of the side boards. It was screwed through the side boards, as well as from the front through the runner.
In fact, it was a late addition, but extremely necessary. The spacer prevents the side boards from moving apart and really strengthens that curved (and stress-bearing) part of the sled.
1. Installation of towing rope is described in the next step
1. Try to drill and countersink holes in advance. In fact, with 5cm screws going into relatively soft pine, I didn't do this... just a countersink hole for the screw heads. Should I include full instructions on how to use the screws, eh?
Step 16: Attaching the Tow Rope to the Front Board
Carefully drill a 1/2 inch hole at both ends of the front board of the sled.
Two pieces of towing rope are threaded into these holes, and the front edge of the sled is pulled up, bent as far as necessary, and fixed in this position thanks to knots tied at one end of these ropes. The loose ends need to be tied together.
You're almost done!
Step 17: Wax Coating
I didn't originally plan to wax the plastic runner, but I'm glad it was done. I simply did not expect such a result!
I took a cube of regular paraffin wax and rubbed it all over the bottom surface of the runner and screw heads. Then I quickly ran a propane torch along the waxed surface to melt the wax on the runner and screw heads.
It was an experiment of sorts, and I was sure that when we started riding, the wax would fall off as the runner flexed as it moved.
But the next day after skating, the wax remained in place. It absorbed well into the surface, like lubricant into skis!
So before you ride, wax your sled!
1. Wax not yet melted.
2. Melted wax.
3. To melt the wax on the screw heads, you need to hold the flame over them a little longer.
Step 18: Let's look for snow
If you live in an area where there is less snow than you need, you will have to look for it.
Luckily, I live a half-hour drive from one of the snowiest places on Earth. We went to the mountains and found a suitable place to ride our new sled. There was inspiration and the kids were passionate about riding them in the snow, so it all worked out!
Step 19: Improvements
If I were to do it again, I would change a few things. This is food for thought for those who would like to make such a sled.
Look at the first photo. I secured the runner as best I could, but its tail part hung down quite far and was noticeably bent, which slowed down our sled a little on the first ride. To straighten, I heated the plastic with a gas torch until it was soft and pliable, and clamped it to the board until it cooled. This basically straightened him out. But if I were to do it all over again, I would simply cut the back edges of the side boards from the bottom, as shown in the photo, so that the tail end of the runner rises a little.
Look at the second photo. There's a lot to see here. The wax that I deposited in this area fell off the screw heads, which did not surprise me at all (I was more surprised that the wax remained on the plastic). I've been considering using stainless steel screws here, so if you're concerned about screws rusting, you might want to consider that option, too. But they are quite expensive. In the end, I realized that even ordinary screws would most likely outlast the wooden side boards, despite their repeated treatment with polyurethane. If anyone really wants to do it "right", they should of course only use stainless screws and replace the wood pieces every year. But I don't think it's worth the time and money!
Look at the third photo. At first I was worried about some waviness of the runner, but after practical use I realized that this waviness does not affect anything if a bunch of people are sitting on the sled.
Another consideration: I was tempted to add extra bracing between the side boards or even install some wooden seats. In the end I abandoned this intention in order to achieve maximum ease. In my opinion, this is not exactly an improvement, but the last argument for those who “if you think the same, then I will invest a little in this matter.”
And that's it now.
The plastic seems to have an indefinite shelf life, so I'll soon need to replace boards, screws and ropes!
Step 20: Have fun!
I hope you now have your own toboggan!
Cargo homemade sleds for snowmobiles
A special feature of cargo sleds is their resistance to heavy loads. This is achieved by using durable materials, such as metal. Skis are made wide. Due to this, the runners do not fall into the snow. Improves maneuverability and stability when the snowmobile moves at high speed. Shock absorbers are sometimes provided between the runners and the platform frame. They smooth out impacts on bumps. The sled bounces less, which reduces the likelihood of damage or loss of cargo.
Shock absorbers smooth out impacts when riding a snowmobile on uneven terrain, thereby improving cargo safety
The snowmobile sleds shown in the photo are made from metal with your own hands. The platform is covered with plywood. The sides are welded from tubes. They won't interfere with cargo sleds. It is convenient to secure the transported cargo with straps over the sides.
How to make your own snowmobile sled from metal pipes
In general terms, the assembly of metal sleds follows the same principle as in the case of plastic pipes. The only difference is the technology for connecting the workpieces. If plastic was soldered, then in order to make sleds for a snowmobile from steel tubes with your own hands, you will have to weld them.
All elements of the metal sled are welded by electric welding
First, a rectangular frame is welded from the tubes. It consists of racks and a platform. Skis can be bent from a thick-walled plastic pipe or a stainless steel strip with a width of 20 cm or more can be used. The runners are attached to the frame posts. A plywood sheet is laid on the platform. A drawbar is welded to the front of the frame for hooking onto the snowmobile.
Advice from professionals
Experienced snowmobile owners say that there is no universal sled. In the snowy northern regions, this transport is used to perform various tasks. If you need to frequently transport cargo, want to go on vacation, give rides to guests, it’s best to get several sleds.
In the snowy northern regions, a snowmobile with a sleigh is a popular means of transportation.
The material for the sled is chosen taking into account the terrain on which it is intended to be ridden. Plastic is good for deep snow. To ride over bumps, you need a sled with wide metal skis. Passenger models are equipped with shock absorbers.
When transporting cargo, it is important to stow it correctly to achieve load balance. To protect luggage from getting wet, it is optimal for such transportation to have sleigh boxes.