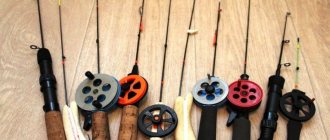
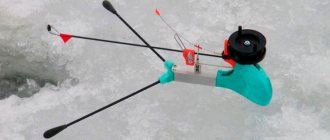
Onboard fishing rod
Before you start fishing, you need to securely secure the fishing rod in the boat. An important point: the side rod should not sink as if it fell out of the boat, you could lose it. In addition, if a bream steals a fishing rod that does not sink in the water, then it can be easily found in the pond.
An onboard fishing rod consists of a conventional inertial reel, a whip and a guard.
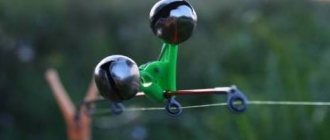
The guard is the main part of the onboard fishing rod. Its sensitivity affects the operation of the gear. An excellent guard will not scare the bream, which has lifted the bait from the bottom; in turn, it will help compensate for the weight lifted by the fish, which is 4–6 grams.
The gatehouse must be clearly visible. Even if you don’t look at it, its vibrations should be noticeable with peripheral vision. It is advisable to attach a foam ball with a hole for the line at the tip of the guard.
The ball should be painted in a bright color. Along the length of the guard you need to install a couple of rings to support the fishing line. It is best to take a whip of medium length and moderate flexibility.
How to catch bream on a side fishing rod
On an onboard fishing rod, the reel plays the role of a keeper of the fishing line supply. And it does not take part in casting and fishing, so you can use any type. The optimal cross-section of the fishing line is 0.2–0.3 mm.
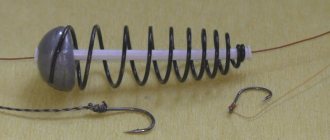
We equip the fishing line with a weight. We select its weight depending on the strength of the current. The weight should slide along the fishing line so that the bream does not feel it when biting. At the end of the fishing line we attach a spring-type feeder.
At both ends of the feeder we tie one eight-centimeter leash, on which hook No. 5–7 is attached.
How to find bream
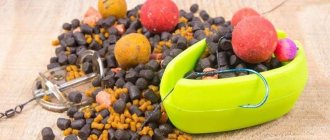
Bait
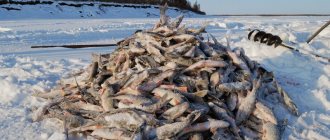
Bream are caught using bread, pellets, boilies, and grain baits. But the best results in the cold season are provided by dung worms, crawlers or underleaves. The bite is also excellent on a variety of shellfish and peeled shrimp.
In the cold season, bream prefers boilies with the addition of fishmeal.
Bream fishing tactics
The technique of fishing with a side rod is very simple. You must not let go of the fishing rod. If the nod straightens, you need to urgently cut it. Delay is inappropriate here, because as soon as the bream feels the heavy bait, it will immediately spit it out.
Source: https://34fish.ru/vid...rtovuyu-udochku
www.prf60.ru
Lever
The best handle for a fishing rod is a cork. Oddly enough, there is no shortage of elite material. Using my hand and a small reel, I decided to use two narrow wine corks and two mushroom-shaped corks for sparkling wine. You can create any configuration, play with color and shape.
Using a 6mm drill, I drilled the plugs along the axle and assembled the handle, pulling the parts through the narrow end of the whip. The end plug has been cut off. Then the plugs were removed and placed on glue one at a time.
Reel mount
I use small, inertia-free reels. These can be inexpensive Chinese models, since the throwing element of fishing is practically absent and cords are not used. The main thing for me is a normally functioning clutch. Winter soap dishes will work well here; spincast reels with a closed spool are excellent.
I use the old-fashioned method of attaching the coil, making 3-4 turns of electrical tape on each side of its foot. There is also a good cheap factory option - a reel seat designed to equip Bolognese rods.
Manufacturing of adjustable nods
How to make a self-hooking fishing rod with your own hands
The order is:
- We take a long clamp and put a piece (3-4 cm) of a durable rubber tube or insulator on it.
- We knock out the latch, as we have already described.
- We paint and wait for the varnish to dry. We hang a bell.
- We also attach the clamp together with the attached tube to the fishing rod.
- We melt the back of the guard a little with a lighter and bend it so that it does not fly forward.
- Let's check. The nod should not move freely back and forth.
A small kit for making a movable nod.
The signaling device with adjustable hardness is ready. Its cost will not even be 15 rubles, it looks beautiful and works well!
An example of a gatehouse made from a screed with adjustment.
A few words about the equipment of the onboard fishing rod
I use a fishing line with a diameter of about 0.2-0.25 mm, preferably with high elongation, in order to compensate for the jerks of possible trophies and sharp bites of river chub over a short distance. I don’t move it a lot, about 20-25 meters. I make the leashes from a slightly thinner fishing line (0.18 - in the current there is no need to make them too shallow, the fish takes it more boldly), with a length from 25 to 60 cm.
I prefer weights with a through-fastening “inline”, preferably with an anti-twist outlet. I select the weight in the range of 30-50 grams - depending on the strength of the current at the fishing site.
I place a silicone stopper above the sinker on the main line (it is used to prevent the load from hitting the nod during transportation). The stopper should be raised by 20-30 cm during fishing.
At the end of the main line I knit a swivel or a swivel with a clasp (to quickly change leashes twisted by the current). Carp anglers have special plastic fasteners for changing leads. I close the swivel assembly with a bead made of elastic rubber (also taken from carp fishing - such strays are called “anthers”). I pull it directly onto the knot and the swivel ring, so the leash never gets tangled through a piece of the knot’s line.
Equipment
There are 3 main types of mounts for onboard gear, from which you can choose the appropriate one depending on the conditions or your personal preferences.
Standard
The most versatile rig option for a side fishing rod is with a sliding sinker. This type of rig can be used in any conditions, but its disadvantage is that when fishing on a muddy bottom, it can fall into the silt.
The weight of the sinker is selected according to the fishing conditions: for fishing in the current, a weight of 25–50 g is suitable; in still water, lighter weights can be used. It is better if the sinker has an anti-twist.
To tie a standard onboard fishing rod rig, you need to:
- put a sinker on the main line;
- tie a swivel at the end of the main line;
- tie a leash with a hook to the swivel.
A swivel is required when fishing in a current that strongly twists the line. Also, it will not be superfluous for fishing in still water, although you can fish here without it. If silicone stoppers are placed below and above the fishing line, they will protect the nod and the knot with which the swivel is tied from impacts from the sinker.
Donnaya
Bottom rigs are the best option for fishing on muddy bottoms. When fishing with this rig, a hook with a nozzle will not fall into soft ground.
To assemble this equipment, you need:
- stepping back from the end of the main line about half a meter, tie a side leash with a hook to it;
- Attach a sinker to the end of the main line, which will be located at the bottom.
The length of the leash must be selected in such a way that the hook cannot fall on the ground and fall into it.
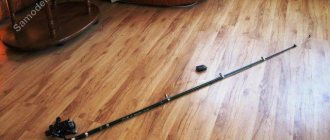
The hand-made onboard fishing rod is ready
This is how the side fishing rod came out, made by hand. By the way, it may be suitable for some types of winter fishing. The cost of the product without the coil was approximately 1.5 USD.
Turishchev Anton, Ukraine, Slavyansk - Specially for the Samodelki FISH website
- Feeder for fishing from a boat with a capacity of 2 liters
- Homemade bait for various fish. A large number of recipes
samodelkifish.ru
No one has ever considered fishing with side rods from a boat as a sport, but it is still one of the most productive, inexpensive and at the same time very exciting ways of summer fishing.
Typically, a side fishing rod is considered a rather crude “folk” tackle. However, you can achieve excellent results and get maximum pleasure at low cost with such a fishing rod.
Manufacturing, equipment and fishing.
There are many options for side rods these days. This article will describe step by step how to make a light and small fishing rod to catch white fish in the current from under the feed. Such tackle will be intended for technical fishing using a reel and rod (in some areas such reels may not be installed at all, and after hooking the fishing line is selected manually).
The photo below shows all the necessary tools and materials that you will need to make a side fishing rod.
Whip.
There are fishermen who like to control large forms, up to approximately two meters in length. And some people prefer to have short rods in the boat, so that their size does not exceed 60 cm. Following the main indicators (weight, strength, length and action), the fiberglass end from Chinese telescopic rods is well suited, which perfectly ties large fish at a short distance and is known for its endurance. These whips are sold as spare options. Their price is approximately 50 cents.
Lever.
The best handle for such a fishing rod is a cork. It may seem strange, but there is no shortage of this material. You can use narrow wine corks or mushroom-shaped corks for sparkling wines individually to suit your hand, create any configuration, and also play with shape and color.
Using a drill with a diameter of 6 mm, you need to drill the plugs along the axis and assemble a handle from them, pulling the parts of the plugs through the narrow end of the whip. The end cap should be cut off. Then the plugs need to be removed and carefully placed on the glue one at a time.
Reel mount.
Reels should be small and inertia-free. Inexpensive Chinese models work well. In such reels, the throwing element used for fishing is practically absent, and cords are not used at all. The most important thing is a well-functioning clutch. In this case, winter soap dishes will work well. Spincast reels equipped with a closed spool are also perfect.
In this article, the “old-fashioned” method of attaching the coil will be used. So, you should make 3-4 turns of electrical tape on the side of each paw. You can also use a good cheap factory method - a reel seat, which is designed to equip Bolognese fishing rods.
Rings.
The factory rings must be used. One of them should be the one that is used in telescopic fishing rods as a loose discharge (it is usually fixed approximately in the middle of the whip). In general, it can be glued. In this article it was simply tensioned and wedged.
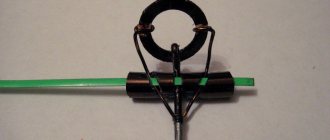
Quivertip (nod).
An excellent option is a winter nod in the shape of a spring with a ball. After installing such a nod, the fishing line passes inside the spring and through the ball itself. Such an element performs a certain number of functions - it registers a bite, compensates for the vibrations of the boat on the wave, and also plays the role of a tulip. During night fishing, chemical fireflies also attach well to it.
Onboard fishing rod rigging.
Line should be used with a diameter of approximately 0.2-0.25 mm. with a large measure of stretch, so that at close range it is possible to compensate for the jerks of all kinds of captured trophies, as well as sharp bites of river chub. You don’t need to wind the line much, about 20-25 meters. Leashes should be made from a slightly thinner fishing line and a length of 25 to 60 cm.
Loads must be secured with an “inline” fastening with an anti-twist outlet. The weight should be approximately 30-50 grams (depending on the strength of the current in the place where fishing occurs).
Above the sinker, which is located on the main line, you need to place a silicone stopper, which is used to ensure that the load itself does not hit the nod during transportation. When fishing, the stopper needs to be raised by about 20-30 cm.
At the end of the main line, you should tie a swivel with or without a clasp (in order to instantly change leashes twisted by the current). Carp anglers usually have special plastic fasteners that are used to change leads. The swivel assembly must be covered with a hard rubber bead. This method was taken from carp fishing. Such things are also called “anthers”. It needs to be pulled over the ring and the swivel knot, so the leash will not get tangled through a piece of fishing line tied in a knot.
Now the onboard fishing rod is completely ready.
Actually, this is an interesting version of a side fishing rod, made by yourself. By the way, such a fishing rod can be suitable for many types of winter fishing. The cost of such a product without a coil will cost approximately one and a half dollars.
usamodelkina.ru
Making a side fishing rod
To make a light but strong side tackle for catching white fish - roach, bream and so on - you will need:
- whip;
- cork;
- glue;
- insulating tape.
The tools you need are a knife or hacksaw and a drill (screwdriver) with a drill bit.
Fishing rod
A side rod can be made from almost anything. For example, some use iron rods for this. If you plan to catch fish by holding the line with your hands, without using a fishing rod, any whips will do. But it’s still better if the tackle is lighter - in this case, it will be much more pleasant to fish with it.
Fiberglass tips from inexpensive telescopic fishing rods are perfect for whips. They are quite flexible and tie fish well. Therefore, a tackle made on the basis of such a whip is perfect for catching trophies with a fishing rod, and not with your hands.
At the same time, the tips for fiberglass rods are very strong and durable; if used fairly carefully, fishing rods made from them are difficult to break and will last almost forever. Perhaps you have the last leg of a broken telescopic fishing rod at home. These whips are also sold separately in fishing stores and are inexpensive.
If desired, the purchased whip can be cut to the desired length. The optimal size of a side fishing rod for catching white fish is about 60 cm, but many people prefer longer gear. Longer tackle may be needed if holders are not used and after casting the rod is placed on the bottom of the boat and rests on the side.
Making the handle
The handle on the side rod is optional.
You can catch by holding the whip itself with your hands. But fishing with a handle is more comfortable. In addition, you can easily attach a reel to it. If there is no handle, you will have to use a reel instead of a reel. Cork is the best material for making the handle of a side rod for catching white fish. It fits nicely in the hand and does not slip. Cork is a “warm” material that does not cool your hands, even if the temperature drops below zero degrees.
Other options are foam and wood. A wooden one is best suited for making a fishing rod handle designed for hunting pike perch and other predators, as well as for catching large peaceful fish such as carp and carp. It will be tough and durable and will allow you to feel confident while fighting a serious trophy.
To make a good handle, just take 3-5 plugs, drill holes in them and place them on a whip with glue. A good configuration is 2 mushroom corks from champagne, between which there are 2 straight wine corks. Such a handle will have sides at the front and back and fit comfortably in the hand.
Fastening the pass rings
In addition to the handle on the fishing rod, you need to place guide rings. If you plan to use a nod with a line mount, a tulip is not needed, and one guide ring located in the middle of the fishing rod is sufficient. If you glue it securely, it will last for many years. Another option is to simply tighten the pass ring so that it fits snugly and does not wobble.
If there is no fastening for the fishing line on the nod, there should be a tulip at the end of the fishing rod, which must be glued if it is not there.
Reel mount
The coil can be wound with electrical tape. Another option is to use a reel seat for Bolognese rods. It must be glued and then also covered with electrical tape. The advantage of this method is that the coil can always be easily removed or replaced with another one.
Fishing rod with reel
You can do without a coil. In this case, you need to place a reel on the handle, on which the fishing line will be wound.
To make such a fishing rod you will need:
- whip;
- a round bead, a wooden handle from an old mop or another suitable piece of wood for making a handle;
- paper clips;
- insulating tape;
- thread, varnish, heat shrink tube and hot glue.
Manufacturing process:
- drill a through hole in the bead and remove the sawdust;
- glue the handle onto the whip;
- wrap it with electrical tape;
- make 2 pass rings and 2 hook blanks for the reel from wire or paper clips;
- make bends at the ends of the workpieces and hammer them into the handle to securely fix them;
- secure the reel hook blanks with electrical tape and bend them;
- wrap the guide rings onto the whip with thread and cover it with varnish;
- Place a heat-shrink tube onto the tulip mount for a more secure fit.
At this point the fishing rod is ready.
Making a nod
The nod requirements for a side rod are small. It should be consistent in stiffness with the weights you are using, but still be soft enough to show good bites. To equip an onboard fishing rod, a spring nod for a winter fishing rod is well suited.
You can also make this important element of the onboard fishing rod yourself.
To make such a nod you will need:
- coil spring;
- Styrofoam;
- a piece of thick hard rubber.
The spring should be soft enough to show bites clearly, but not sag too much under the weight of the sinkers you plan to use. Before making a nod out of it, it is worth checking it by hanging a weight. If the spring is too stiff, release it by holding it over the fire. If it is too soft, you need to look for another one.
Cut a ball or cube out of foam plastic, make a hole in it and glue it to one end of the spring. Make a rectangular nod mount from rubber. Make two holes in it. Insert a fishing rod into one of them, and a spring into the other. At this point the nod is ready. Such a guard must be attached to the fishing rod before the tulip is glued. Another option is to insert the spring into the tulip and tape it to the whip with electrical tape.
The glue must first be checked to make sure that it does not corrode the foam. If desired, the foam ball or cube itself can be painted red or any other color so that the homemade nod is better visible against the background of water.
Fishing rod equipment
High-quality equipment, selected with knowledge, will allow you to get a lot of pleasure from fishing.
When choosing fishing accessories, it is very important to pay attention to the following characteristics described below:
- The rod is as light as possible, which will allow you to avoid spending physical effort on holding it for a long period of time. When fishing a reservoir from the shoreline, you can stop at a length of about 6 meters, but for a boat it is recommended to purchase short analogues not exceeding 4 meters.
- The reel is the most suitable inertial plastic type of product in this case.
- Fishing line - we give preference to monofilament thread 0.19 mm thick in brown or marsh tones. The leashes are made from thin 0.15 mm fishing line.
Having selected the tackle, we proceed to the configuration of the equipment:
- The blind option is ideal for rods without guides and a reel. The main role in this case is played by the reel, from which the required length of monofilament should be unwinded. The reel is fixed to the top of the tackle. The resulting equipment allows you to go hunting for small crucian carp and roach.
- When using gear with a reel, it is advisable to use a sliding type of equipment. Adjusting the position of the fishing rod directly depends on the depth indicator at the selected fishing point.
General questions regarding the use of side fishing rods
One important detail should be noted right away: the main requirement for onboard fishing rods for catching bream is their lightness and ability to float. This is necessary so that if the fishing rod falls from the boat into the water (which often happens, especially when catching strong bream) due to poor fastening, both the fishing rod and the fish can be easily found.
Traditionally, when fishing for bream in the summer, two types of side rods are used:
- fishing rod with a nod;
- fishing rod with float.
Making a nod
A side nod can be purchased at any specialized store or made by yourself.
Option 1
In this variation, you will need to prepare spring material. The most affordable in this case will be a plastic clamp, the length and thickness of which will allow you to easily adjust the sensitivity of the nod.
Before production you should prepare:
- copper wire – cross-section 1 mm;
- electrical tape;
- plastic clamp;
- rings;
- Super glue;
- heat shrink.
Step by step process:
- We construct a tulip with a small middle ring from wire .
- The rings are fixed to the clamp (to the smooth side without a notch) using several turns of insulating tape.
- If the given conditions are observed, the summer jig will spring well. If desired, you can use a couple of drops of superglue for better fixation.
- Next, the heat shrink is put on.
- Using copper wire, we construct a corner that will serve as an attachment to the tip of the tackle.
- The smaller side of the angle is fixed to the clamp in a similar way to fastening the ring.
- If desired, you can decorate the product. Insulating tapes of various tones, heat shrinks in bright colors, and varnishes for nail plates are suitable for this.
- Using insulating tape or a price tag, we make a flag on the top of the nod. This accessory will provide an opportunity to monitor bites without stress when fishing in the reeds.
Option 2
No less popular is the method of making a nod based on a plastic bottle.
When manufacturing a product, you cannot do without the following materials:
- plastic bottle 1.5 l;
- sharp scissors;
- flat file;
- paper clips;
- threads
Step by step process:
- Having prepared the body of the bottle using scissors, you should cut out the body of the summer jig, focusing on the recommended dimensional characteristics: length - 25 cm; width (base) – 0.7 cm; width (top part) – 0.4 cm.
- We process each cut line with a file. Be sure to remove all burrs and smooth out ribbing.
- Having straightened the paperclip, we form a ring with a diameter of 0.4 cm with two outlet legs.
- The legs are pressed against the body of the summer jig (at the top). We fix them by tightly wrapping the thread.
- The wrapping area is treated with waterproof glue.
Experienced fishermen recommend making 2-33 nods with varying lengths and base widths. This will be the key to success in fishing. Hard nods are usually used in conjunction with a heavy jig, and the soft version of the product is equipped with a light nozzle.
Option 3
If desired, you can make a side type of summer jig using broken tackle. In this case, the product will be universal, meeting all requirements.
Step by step guide:
- We cut out the body of the nod according to the recommended dimensions (listed above) from the broken knee of the tackle.
- All extreme lines are processed with a file, giving the maximum degree of smoothness and roundness.
- You can make a nod ring from a paper clip or use one that is on a broken tackle.
- The ring is fixed with a thread at the top of the nod.
- Be sure to cover the thread with an adhesive base (waterproof).
- We paint the body of the accessory in black and white.
How to make a nod for a fishing rod with your own hands?
Anyone can make a nod with their own hands. All you need is material, time and desire. There are practically no differences in the designs of winter and summer nods. The only thing is the larger size of the summer guard and its perpendicular location relative to the rod.
Let's consider options for making nods.
Winter nod
In order to make a reliable guard for a winter fishing rod with your own hands, you will need a thin knitting needle or a piece of wire and fishing line 0.3-0.4 mm thick.
- We wind the fishing line tightly over the entire length of the knitting needle so that the turns are pressed tightly against each other.
- Then, carefully, holding the fishing line by both ends and not allowing it to unwind, we bring it on a knitting needle to the gas stove and warm it up for 15-20 seconds. Here it is important not to overexpose the fishing line near the fire and not let it melt - you need to achieve simple heating of the material; the more it warms up, the tighter the turns will be pressed together.
- After this, immediately lower the knitting needle with fishing line into a deep container of cold water or hold it under the tap. In this way we achieve hardening of the fishing line, giving it strength and rigidity.
- Then we remove the resulting spring from the fishing line and cut out a nod of the required length (2-3 cm) from it.
- All that remains is to select the fastening knot, connect the spring to the rod and pass the fishing line through it.
This is one of many options for making a winter nod. Many fishermen use thin wire instead of fishing line, but such homemade gear is less convenient in working conditions.
Summer nod
Making a side nod to a summer fishing rod is quite easy. One of the simplest manufacturing options is a nod made from a nylon clamp. Such clamps are very cheap and serve perfectly as a side nod for a summer fishing rod.
- wrap the tip of the rod in front of the ring with electrical tape to make it easier to secure the clamp;
- at the end of the clamp we burn a thin hole for the fishing line with a hot needle;
- We put the clamp on the thickening of the electrical tape and tighten it as tightly as possible;
- along the length of the clamp sticking out to the side, we put on two rubber cambrics so that the nod holds its shape;
- pass the fishing line through the hole. The side nod for a summer fishing rod is ready!
Guard for onboard fishing rod
In addition to the above options, the guard can also be installed on an onboard fishing rod. In order to make a nod for a side fishing rod, you will need a piece of foam plastic, a piece of thick rubber and a thin long spring.
The spring should be soft enough to better respond to fish signals. If you only find a very stiff spring, you can heat it and release it so that it softens.
- cut out a small ball from polystyrene foam and make a blind hole in it for the spring;
- Carefully fill the hole with glue and insert the spring into it. Let the glue set;
- We make a small mount for the nod from rubber. To do this, cut off a piece of rubber approximately the size of the upper phalanx of the little finger and make two holes - for the spring and the rod;
- insert the spring into the mount and put it on the rod. The nod is ready;
- if it is not possible to make a rubber mount, then we pass the spring into the upper ring of the side rod and screw its end to the rod with electrical tape.
Some anglers may also require a bottom rod guard. You can either buy it in a store or make it yourself. Usually people don’t bother and make a guard for a bottom fishing rod in the same way as for a side fishing rod.
Nod attachment
The most accessible nod clamp to the tip of the tackle will be the option based on a small piece of rubber. There should be a hole in it (observing one axis) into which the upper part of the blank elbow can pass. The cut is made transversely. It is into this that the jig will be inserted with the base.
You can build a universal type mount. To do this you should prepare:
- nail – 10 cm;
- insulating tape;
- threads;
- adhesive waterproof base.
Step by step process:
- head of the nail is carefully bitten off.
- The body bends, maintaining an angle of 90 degrees (in the central part).
- We wrap with threads.
- Cover the thread with waterproof glue and leave for 30 minutes to dry completely.
- The resulting structure is applied with one of the segments to the tip of the tackle.
- We wrap the product tightly using electrical tape.
- to the opposite section of the nail .
- We wrap it with electrical tape again .
Bait used
For hook attachment the following can be used:
- bloodworm;
- maggot;
- small worm.
Some lucky fishermen successfully fish with:
- beads of various tones;
- devil;
- thread winding (colored).
However, this is rather an exception to the rule and most fishing enthusiasts are unlikely to become the owner of a significant catch if they play with a devil without bait.
Nod fishing technique
When preparing for fishing, you should loosen the tackle. The fishing line is wrapped around the circumference of the form. The free tip is passed through the nod ring. We equip it with a jig. If you are fishing for perch or pike, you should hang a vertical spoon as a bait.
Using a side nod, you can use the following fishing technique:
- We perform the fall and rise. The jig should fall freely to the bottom surface. When lifting, we use light, smooth movements and tighten the fishing line by 10-12 cm, observing a short pause.
- If desired, you can use the game near the bottom surface. To do this, the jig must fall freely to the bottom surface. The lift is made 15 cm above the bottom and slight vibrations are given with a nod. Such a game lasts no more than 2 minutes, after which the jig reaches the bottom again. Repetition follows the same pattern.
- Playing with your finger is no less effective. To do this, they accurately copy the game of the previous method by adding small oscillatory movements of the jig. For this purpose, the index finger periodically taps the tip of the tackle.
- Tension - intended for fishing in areas of a reservoir with a fast current. Slowly lowering the jig to the surface of the bottom, hold the line in tension and pull the bait to the surface of the water.
- Jerks - a jig lowered to the surface of the bottom jerks up 35 cm and reaches the bottom again. The jerk is repeated again.
- Calm state. The bait is lowered to the selected depth and held in one position until the bite occurs.
In various conditions and on different bodies of water, the game should be individual, so when going to a new place you should experiment.
Fishing with a rod with a side nod
This type of fishing refers to simple active types of fishing. You can fish from the shore, boat or wade. The best option for fishing with a nod in the summer is to wade, since a fisherman moving along the shore can scare the fish more than one moving slowly in the water.
Tactics
Wiring the jig is carried out with the flow and in different ways:
- free fall and stepwise rise: the jig falls freely to the bottom, after which it is raised 10–15 cm in short jerks until it is returned to the surface of the reservoir;
- bottom game: the bait is lowered 10-15 cm from the bottom and the game begins for 1-2 minutes, then the jig is lowered to the bottom;
- tapping with a finger: the jig is lowered to the bottom, raised ten centimeters and the tempo of the game is set by tapping the rod with a finger;
- during the current - tension: the nozzle is lowered to the bottom, then the tension of the fishing line is raised a certain distance to the surface of the reservoir;
- playing in jerks: the jig is stopped at the bottom and with a sharp jerk is raised to a height of 35-40 cm;
- movement along the bottom using a nod;
- dragging the bait along the bottom using a fishing rod;
- stopping before the bite: the jig is lowered to the desired depth and left in a calm state.
Nozzles
The side nod on a summer fishing rod can be with or without bait. Bloodworms, maggots, and worms are attached to the hook. You can attach a bunch of colored threads; the color of the bait does not affect the success of fishing. Fishermen also use multi-colored beads and beads, cambrics.
Advantages
The gear is used for fishing in reeds and reed thickets. Vertical wiring protects the hook and jig from snagging. A do-it-yourself nod is made from readily available materials. The tackle allows you to deliver the bait to a precisely chosen place. The lightness and mobility of the fishing rod is used by anglers to catch fish in different places and conditions. It expands the possibilities of searching for fishing spots.
Flaws
The gear has few disadvantages. Blind and running rigs are used in different fishing conditions, so you need to have both types of fishing rods with a side guard. A long side nod for a summer fishing rod does not resist gusts of wind well and exhibits its own vibrations more strongly. The length of the device is determined based on the fishing results.
Blitz tips
- When fishing with a side nod, there is no need for extra costs. It can be assembled easily at home with ordinary household items available. The device will turn out to be so convenient that it will be inappropriate to spend money on buying a store-bought analogue.
- It is very convenient that when using a summer jig in a variety of weather conditions, a high level of sensitivity is not lost. It is extremely difficult to miss the time of cutting in this case.
- The most catchy area will be the area of the reservoir near the long reeds. This is worth considering when choosing a location.
lakeking.ru
What is a nod?
The nod is a small device made of elastic material and serves as a bite alarm, and in winter fishing it can be used to control the movement of the jig. The device transmits the slightest movement of the fisherman’s hand to the bait, which thanks to this is in constant motion and becomes more noticeable to the fish. It is thanks to the characteristic style of winter fishing that the nod received this unique name.
As already mentioned, there are two types of lodges: for winter and summer fishing.
But regardless of the fishing period, all nods can be divided into several categories:
- Lavsan. Factory-produced summer and winter mylar nods are in good demand among amateur fishermen. And the reasons are quite clear - they are made of durable material, which is enough for more than one season, and at the same time retain the elasticity of the metal nod. Difficulties arise only when making such a nod at home. The only available material is the tape that is used to tie large boxes in furniture stores. But such homemade nods, as a rule, are only enough for one season, and due to the properties of the material, they will have to be constantly bent.
- When fishing at great depths or in strong currents, it is best to use a metal nod, which has excellent rigidity, and in winter fishing gives the jig a unique and lively game. Such a nod is quite simple to manufacture: the material can be a piece of wire, a spring from a mechanical watch, or any thin metal plate.
- Polycarbonate nods (made of plastic) are among the easiest to make. Everyone has an abundance of consumables - plastic bottles. The only disadvantage of such nods is their low strength.
- The spring guard is perfect for winter fishing for large fish using a balance beam.
- The cheapest store-bought option is a silicone nod. However, the material wears out quickly, cracks and is not very convenient to use.
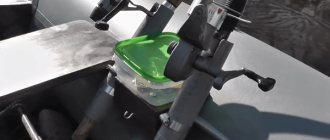
Onboard bottom fishing rod equipment
Examples of the rigging of onboard bottom fishing rods, which we once used to fish from motor boats “Progress” and “Kazanka” on the Volga, which was not yet polluted by dams, are presented in the photograph under the title of the article.
Pay attention to the arrays of homemade lead bottom sinkers in the rigging of the side bottoms, with the help of which the bottom was felt in a powerful, stable current near the fairway of the great Russian river.
This was the time when, for fishing with a rig with a ring, you lost your entire catch of fish, but you gained the pleasure of paying, by those standards, a considerable fine + a showdown in the work team of the poacher and the fisherman.
It is clear that each fisherman, to equip onboard bottom fishing rods of different lengths, selects an individual configuration in accordance with the characteristics of his watercraft and the fish he intends to catch.
For this reason, there is such a wide variety of side dock equipment with adjustable nod springs. In addition, fish are caught from the side of the boat not only from the bottom. Therefore, it is not necessary that all equipment be bottom-based.
Eg. You can put a live bait float rig on one of the onboard fishing rods with thick fishing line to catch predatory fish above the bottom of the reservoir and release the float along the current from the side of the boat.
Using another short fishing rod with a nod on a stand, we fish from the bottom along the river, setting up the gear for catching representatives of the carp family. Then the float equipment attached to the rail of the side of the boat can also be called side, but it is not bottom. See the picture. And if only you knew how many pikes were caught using such simple equipment!
Linking fishing rod equipment to boat characteristics
The equipment of an onboard bottom fishing rod is, first of all, tied to the characteristics of the boat. In other words, to the possibilities and convenience of fishing from a floating craft on the river.
Let’s say that on the powerful currents of the Kama or Vetluga, much above the confluence of the rivers into the stagnant Volga, you will feel quite uncomfortable in a small boat equipped with bottom fishing rods, shown above in the picture.
For summer fishing on serious rivers with powerful currents, you need fast and more stable vessels, not oared small vessels. And the equipment of onboard bottom fishing rods should be more powerful, and the length of the gear should be longer.
Therefore, you have to stand on your rubber boat (Omega-1) in a section of the river with a slower current, linking light equipment to comfortable or more gentle fishing conditions.
In addition to the technical characteristics of the boat, the equipment of the onboard bottom depends on the area chosen for fishing. First of all, it depends on the pressure of the river flow and the depth of fishing.
For different fishing depths and the strength of the river current, you will need different fishing line thicknesses, sinker weights and side nod spring settings.