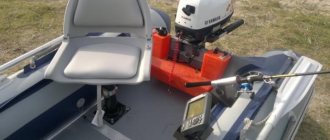
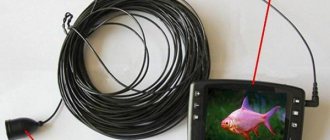
An onboard fishing rod mount will be very useful when fishing from a boat. You can attach the tackle to it and calmly wait for bites. The onboard rod holder securely holds your rods so they are always at hand.
But store-bought models are quite expensive. And even at a high price, they can be inconvenient to use. Making a good holder for the side fishing rods of a PVC boat, metal boat or wooden “kaika” with your own hands is as easy as shelling pears.
First you need to choose the type of fastening. Then decide on the design option for the holder. His choice depends on the gear - you use short side rods or long ones, which are usually used for fishing from the shore.
Mounting options
Both when choosing a holder in a store, and when making it yourself, first of all you need to decide on the type of fastening.
There are 4 standard methods:
- bolted - suitable for wooden and metal boats, this mount is very reliable, but the disadvantage is that it turns out to be stationary, so first you need to think carefully about where to place it;
- on screws - for wood, this method of fastening has the same advantages and disadvantages as the previous one;
- on glue - this is a good way to attach holders to PVC boats; if done correctly, this fastening is also very reliable, since rubber has excellent adhesion, but after fastening the structure cannot not only be moved, but even removed;
- on clamps - a universal method, suitable for any boat that has a suitable surface for fastening; on the one hand, the fastening method is reliable; on the other hand, the holder can always be easily moved to another part of the boat or simply removed.
There are also more original ways - installing an onboard mount for a fishing rod on a lyctros-likpaz and on oars, which will be discussed below.
Types of stands
Wooden pegs were used by our distant ancestors. Anyone can make pegs. They can be cut right on the shore of a pond.
Butt holders can also be made from scrap materials (rebar, plastic). Butt holders hold the rod firmly. They need to be inserted into the ground. Therefore, they cannot be installed everywhere.
You can make the racks yourself or buy them in a store. Most often they are made from metal alloys. The stands can be adjusted in height.
Design options
By design, all holders can be divided into two groups:
- Solid. In such models, the onboard fishing rod holder itself is a single unit with a mount to the boat (base). They take up the most space during transportation. But they do not need to be assembled and disassembled in order to put them on the boat.
- Separate. The onboard fishing rod holder is mounted to the boat mount before installation. Such models take up minimal space during transportation when disassembled. The downside is that they take a little longer to install. Also, if the connection between the holder and the base is performed poorly, a breakdown may occur at this point.
Do-it-yourself stand for donks and fishing rods
The great and wise Arkady Raikin said: Fishing is a cool thing, stick, string, hook, worm. You came, left, sat down and slept.
But how exciting fishing is! Many people have probably encountered this problem. You arrive at the water and suddenly discover that the shore is rocky or bridges have been built. Everything seems to be fine with the bridges, but there is nowhere to stick a stand under the rod.
I encountered this not so long ago; there was no way to install the stand. I had to look for plastic bottles, fill them with water and save the situation. If you can just put a float and that’s it, then what to do with the bottom tackle under the feeders?
Holder for onboard fishing rods based on UKB
This option is suitable for both short side fishing rods and conventional long float, bottom and spinning tackle. It can be used for trolling.
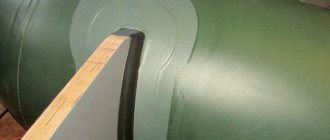
It is mounted on adjustable mounts for cans (lyktros-likpaz system) of the inflatable boat, which run along the sides from the inside. If there are none, you can glue them. These mounts are convenient because you can move the cans as you please, adjusting the location of the crew and things in the boat. The holder can also be moved forward and backward along the length of the cable cable.
The basis of the structure is a short wooden (or plastic, PVC, metal) block, one of the sides of which (adjacent to the board) is beveled. A pipe is attached to it, into which the fishing rod is inserted.
There are three ways to get such a holder:
- buy a completely finished structure (UCB) in a store;
- buy a base in the store - a block - and independently attach a pipe to it in which the fishing rod will be placed;
- make the holder completely with your own hands.
Making a holder for an onboard fishing rod with your own hands
The base can be made from a wooden block of suitable size.
To do this you need:
- saw off one of its sides so that it lies flat on the side of the boat;
- drill a longitudinal hole in it;
- cut a groove so that it fits onto the rail;
- coat the block with several layers of varnish so that it lasts a long time (the best option is yacht varnish, the protective coating made from it is the most durable).
For fixing fishing rods, a PVC plumbing pipe is best suited.
A good option is to place two pieces of it on different sides of the base of the holder. Make cutouts in them for the spinning rod leg if you are going to fish with this type of reel. Thanks to these cutouts, the rods will be clearly fixed in the holder without twisting. It is much more convenient to use this design.
An important advantage of plastic plumbing pipes is that they will not damage the fishing rod. Ready-made holders for onboard fishing rods, which you can buy in a store, often have metal pipes. When the boat constantly rocks on the waves and - especially - when crossing a pond with oars or under a motor, fishing rods in such metal glasses are easily injured.
Plastic pipes are attached to the block using a pipe clamp. They can be placed at different angles.
You can attach a plastic food container to the bar. The result is a convenient storage for baits, in which they will always be at hand.
How to make a simple stand for several fishing rods
Almost every fisherman has old single rod stands in stock. From two such racks you can make a stand for feeders or donks.
If it is resistant, then you can take thin-walled metal tubes with a diameter of 6-8 mm and a length approximately the same as store-bought copies.
It is very important to make cuts at one end to get the following cross-section:
The narrower the oval, the sharper the end of the tube will be. This is a very important point. When you have to fish on a hard bank, it is very difficult to insert a horn. If it has a sharp end, then this can be done without excessive effort. Entrust the operation of cutting and sharpening the tubes to turners. The machine should produce neat products. Let them make 6-8 such blanks. From these you will receive 3-4 coasters.
Having received such blanks, we proceed to the final stage of production. We need a thick insulated wire. Its diameter can be 4-5 mm, and its length is 1 meter. We will make a snake out of it and insert it into the ends of the tubes.
If the wire is thick enough, it will hold well in the tube. The length of the end that will go into the tube is 5-6 cm. When fishing, you simply install the tubes at a distance equal to the length of the wire and place the ends into the tubes. Such a simple stand takes up little space, is quickly assembled and disassembled and costs very little. You can make several pieces of wire of different lengths. For example, for two fishing rods you can use a short wire, and for three, a longer one.
Three fishing rods can easily be placed in the special compartments. Thick wire can withstand the weight of heavy feeders and carp fish. Every angler can adopt this budget option, eliminating the need to buy expensive rod stands in a fishing store.
You can also make a single slingshot from wire, like the one that children make (they used to do it). You insert such a slingshot into the tube and get a flyer for one fishing rod. By making several pieces of wire, you will get a compact set that can be used for different occasions.
In order for the holders along with the coils to not be placed on the ground, it is better to install them on small tubes with flyers stuck into the ground. Make 3-4 tubes 50 cm long with flyers and you will protect the reels from sand and water getting into the body when fishing.
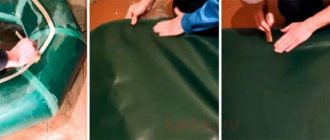
Installation of lyktros-lykpaz
If you don't know how to attach side rods to your PVC boat and you don't have adjustable can mounts on your boat, you may want to consider gluing them on yourself. They are very comfortable. In addition to cans and holders for onboard fishing rods, they can accommodate holders for an echo sounder, smartphone, and so on.
First of all, inflate the boat and make markings on it. A ballpoint pen is suitable for this. It is enough to draw one horizontal line on each side, along which the lower edge of the glued fasteners will run. Another option is to use masking tape.
The height of the lines should be such that the distance from one glued lyctros-likpaz to another corresponds to the width of the can. Correct marking is very important; if you make a mistake with it, all the work will have to be redone from the beginning, either sawing off the cans so that they become narrower, or changing them to wider ones. It’s better to glue together; it’s difficult to do all the work alone.
Apply glue to the side of the boat and the fastening and glue it in place.
It is more convenient to first apply the adhesive to the bottom half and stick it, and then do the same with the top.
To make the surface of the already glued lykpaza smoother, heat it with a hairdryer and smooth it with a suitable object; a brush handle is suitable for this.
To install cans on the lyktros-likpaz, screw special fasteners to them.
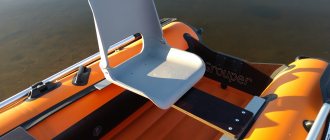
Holder with clamp
This design can be used with both short side rods and regular long rods. The holder with a clamp can be attached to any suitable part of the boat. A jar (seat) is perfect for this.
To make such a holder, you will need:
- clamp (sold in hardware stores); PVC sewer pipe;
- 2 bolts, washers and nuts each;
- metal corner with perforation;
- 2 lock washers;
pipe clamp.
The manufacturing process of a holder with a clamp is as follows:
1. Cut the metal corner at the bend. Sand all its edges so that they are smooth and free of burrs.
2. Drill 2 holes in the clamp and attach it with bolts and nuts to half of the corner.
3. Remove the rubber seals from the pipe clamp and cut off its screw, leaving a small part so that it can be attached to the half of the angle that already has a clamp.
4. Cut off a piece of plumbing pipe. Make a hole in its upper part for the spinning rod leg if you are going to fish with this type of reel.
5. Place the clamp on the pipe, tighten the knob - and the spinning rod holder is ready.
Holder with clamp from a meat grinder
A holder with a clamp can also be made on the basis of an old unnecessary meat grinder.
For this:
- saw off its upper part, the one where the meat is placed, leaving only the clamp;
- drill 2 holes in the clamp;
- take a metal plate and screw it with two bolts to the clamp (you can take a plate with holes, a piece of metal corner, as in the example above, or any metal plate in which you need to drill holes yourself);
- screw it to it through the third hole in the metal plate
- pipe clamp;
- secure the plumbing plastic pipe in the clamp, with or without a cutout for the coil.
DIY rod stands
At home, the easiest way to make single stands is based on a hollow tube and rigid metal wire. The entire manufacturing process can take several stages:
- Stage No. 1 - the wire is bent to form a stag.
- Stage No. 2 - the free ends of the wire are inserted into the tube.
- Stage No. 3 – the ends of the wire are fixed in the tube. Alternatively, you can flatten the top of the tube.
- Stage No. 4 - flatten the lower part of the tube in the same way.
Source
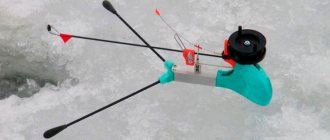
Magnetic holder
This onboard fishing rod stand for a rubber boat is suitable for use with compact onboard fishing rods.
They must have handles of a special shape, in the lower parts of which there are metal plates.
The holder itself is a board with magnets that is attached to the oar.
To make it you will need:
- a piece of plywood with a thickness of 6 to 12 mm;
- a pair of plumbing fasteners;
- flat magnets, one for each fishing rod.
Plumbing fasteners should be chosen more powerfully. The cheapest and weakest ones can break during operation.
Expert opinion
Vladimir Poltoranin
Fisherman - expert
The oars on all boats lie differently, this point must be taken into account. You need to inflate the craft and stow the oar, and then mark the points where you need to place the fasteners so that the holder runs parallel to the side of the boat.
The suitable length of a piece of plywood, which will be the basis of the structure, is from 1 to 1.5 m, the optimal width is 15–20 cm. Cover it with varnish so that it does not begin to rot from moisture.
The design of this holder is very simple, but at the same time extremely functional. It can be safely called the best option for fishing with onboard fishing rods.
The most important advantage of such a holder is that the tackle does not need to be moved forward in order to be picked up and hooked. You can hook it right away by sharply tearing the rod off the magnet. In this case, the fish will not have a chance to throw the rig out of its mouth before the hook gets into its lip.
Another advantage is that this holder can be used as a shelf or table - for example, put a cup on it to drink tea.
This holder is easy to remove and install.
He will serve forever. If a wooden base is varnished, it will not rot. By choosing powerful plumbing fasteners, you can be sure that it will withstand all tests. Even if you somehow manage to break it, it will be easy to replace.
The only drawback of this holder is that to fish with it you will need to make special onboard fishing rods. But they are not difficult to make.
Feeder fishing tactics and techniques
Preparing good tackle and “tasty” bait will not always guarantee a good catch, since there are other important factors that influence the catch; we will now dwell on each of these reasons separately.
On still water
If the fish will be caught on a feeder in a stagnant body of water, then this factor must be taken into account when preparing complementary foods.
So, in water without movement, ordinary complementary foods will only create a food table, which will not attract the attention of aquatic inhabitants. In such conditions, the fisherman’s goal is to use such bait that will disperse throughout the water, creating a certain turbidity
This intriguing fish effect can be achieved by adding oatmeal to complementary foods.
In such conditions, the fisherman’s goal is to use such bait that will disperse throughout the water, creating a certain turbidity. This intriguing fish effect can be achieved by adding oatmeal to complementary foods.
On a strong current
If the place of future fishing is a fast river, then the complementary food needs to be thickened so that it does not spread with the current, but attracts fish.
This effect can be achieved by adding porridge made from large grains, such as peas or corn.
For long casts
If fishing is planned on a large body of water and it is known in advance that the fish lives very far from the shore, then a feeder for this purpose must be selected with a four-meter length.
If the fisherman thinks through this point in advance and chooses the appropriate gear, then not a single aquatic inhabitant, even one that lives very far from land, will be able to escape the hook.
Despite the maximum simplicity of the designs, there are different types of devices under consideration. So, taking into account the installation features, two types of devices can be distinguished.
Combined or solid. Such models of stands are an integral part of the boat mount, which greatly simplifies installation and maximizes mobility. The disadvantages include the rather large size of the structure and difficulties with its transportation.
Depending on the design features, devices are also divided into categories.
Another type of classification is also used. This refers to the number of seats based on which the holders are divided. They are:
Particular attention should be paid to the latter variety. These more complex devices consist of a frame on which glasses are installed to securely fix the rods
Most often, such designs become an attribute of boats for trolling fans.
Targas for several places are installed between the sides of the craft, with fixation at one point. If we are talking about a larger number of stands (glasses), then fastening is carried out on both sides of the boat. That is, the maximum potential load is taken into account.